All Lada Granta Liftback models by default have pre-installed casing made of polyvinyl chloride polymer material.
Often the door card becomes the object of increased attention from the driver due to the occurrence of creaks and knocks inside the door. Eliminating defects, sealing joints and joints is quite acceptable on your own. The procedure is not complicated; it is not necessary to contact a service center.
Common reasons for removing door trim from Lada Granta Liftback
- creaking, grinding in the cavity of the doorway;
- mechanical damage, impact, resulting in deformation;
- manufacturing defects;
- deformation of the door card due to systematic exposure to direct rays of the sun;
- natural wear and tear of plastic latches and clips.
Location of fasteners
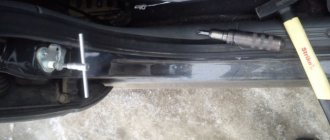
The front and rear door trim of the Lada Granta Liftback is attached to the body with bolts and plastic pistons.
- 3 “10” bolts along the lower perimeter;
- 8 pistons around the entire perimeter of the door card.
During installation and dismantling, be extremely careful, as polymers are very fragile. Excessive pressure and distortion of the structure contribute to deformation and breakage of the piston. Replacing the polymer is not difficult, but it takes time to restore it to good condition.
Tools and materials for removing door trim
- a flat-head, Phillips-head screwdriver;
- rags, rubber gloves;
- spare pistons, a new door card in case the old ones are damaged.
How to remove the rear door trim on a Lada Granta
The procedure is slightly different from removing the front passenger door trim, but the removal process is even easier.
The work must be performed in the following sequence:
- The door lock button is unscrewed.
- The handle of a mechanical window lifter is removed in the manner described above - first the hook is removed, and then the handle (for electric windows, the steps are also described above).
- Use a flat tool to pry up and remove the handle cover.
- Unscrew the two screws located under the removed cover.
- The rear door trim does not have the two lower bolts that were previously seen, as these doors do not have pockets. Therefore, all that remains is to remove the trim from the clips.
Video with step-by-step instructions:
On the rear doors you will not have to deal with the power window control unit, since this element is not provided at the rear. The wires may be present if there are speakers connected. There are also no rearview mirrors, eliminating one plug. When reassembling the doors, you should make sure that there are no gaps, which over time can cause breakdowns due to the presence of condensation, moisture and dust. These include mechanical and electronic problems, including corrosion.
Sequence of actions when removing the front door trim of the Lada Granta Liftback
- We place the machine on a flat platform or platform with mandatory free access around the perimeter.
- We take priority safety measures: squeeze the handbrake, install wheel chocks.
- We twist the latch flag.
- We unscrew the three fastening bolts that secure the lower perimeter of the card.
- We pry up the plastic casing and remove the clips from the seat.
- Disconnect the block with wires from the music speaker.
- We replace the card with a new one and install it in the reverse order.
Removing the rear door trim of Lada Granta
1. Unscrew the door lock button by hand.
2. Using a screwdriver, press out the window handle socket, pull out the lock and remove it. After removing it, remove the handle.
3. Using a thin screwdriver, pry up the outer door handle trim and remove it.
4. Using a Phillips screwdriver, unscrew the two screws securing the handle and remove it.
5. By inserting a screwdriver between the upholstery and the inner door panel, press the lower front corner of the upholstery away from the door, overcoming the resistance of the pistons. Continue to press the upholstery away from the door, moving from the corner in both directions, overcoming the resistance of ten pistons.
6. Pull the lock lock rod out of the trim hole and remove it from the door.
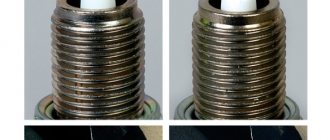
Note:
When removing the upholstery, the pistons could break. Therefore, check all caps for damage and replace if necessary. The location of the pistons' seats is shown below.
7. Install the rear door trim in the reverse order.
Removing the rear door trim
The process of removing the trim from the rear door of the Lada Granta is somewhat complicated. Additional handle fastenings are installed to close the door. It is attached to the car body using two “10” bolts.
- Carefully pry off the plastic cover of the door handle. It is better to do this with a polymer material, a plastic card. It is strictly forbidden to use metal objects, as the edge will be damaged.
- Using a Phillips screwdriver, unscrew the two bolts securing the handle and remove it.
- We twist the latch flag.
- Unfasten the plastic clips around the perimeter of the card.
- In the cavity of the opening, we disconnect the blocks with wires that go to the speaker.
- We replace the door card, carry out preventative maintenance, and connect the electrical wiring. We install new auxiliary equipment as necessary.
- The assembly of the structure is carried out in the reverse order.
By analogy, we remove the trim from the rear door on the opposite side.
Step-by-step removal of the front door card
To replace the casing, you will need a set of screwdrivers, but it is worth stocking up on spare clips, which are necessary for fastening the casing.
First, for safety reasons, you need to remove the negative terminal from the battery.
Your actions:
- Unscrew the door lock button until you can remove it completely.
- Use a screwdriver to pry up the screw cap that secures the trim to the door.
- Using a cross-shaped tool, unscrew the screw itself.
- Do the same procedure with the screw located in the armrest recess, as well as its two screws at the bottom of the card.
- Pry the top of the handle with a flat tool to remove it.
- Unscrew the two screws inside the handle that are found under the top trim.
- Once the trim is no longer attached to the door, you need to start removing it from the lower front edge. To gain access to it, just use a flat tool to pry the edge that fits tightly to the metal of the door.
- As you remove the upholstery material, you must disconnect the pins holding it. At such moments you should be extremely careful not to damage them. In total, there are 8-9 pistons (clips) on the Lada Granta door, and they are located along the perimeter of the upholstery fabric, but closer to the edges.
- From the corner, move in both directions at once while removing the card.
- Remove the lock lock rod from the hole.
- Disconnect the exposed block with the power window wires by squeezing the locking element. In cars that do not have power windows, remove the lever seal from the handle hinge.
- Only then can you completely remove the door trim.
Reviews
| № | Positive |
| 1. | Vitaly: I don’t know about others, but I didn’t have any problems with the upholstery. The plastic fits tightly to the metal, does not creak or rattle. After purchasing the car, I immediately removed the noise from the showroom. |
| 2. | Mikhail: I’ve already removed the card myself several times, laid out the wiring, no complaints. The fit is tight, the first time I broke one pin, I installed a new one. No complaints. |
| 3. | Ignat: I recommend changing the upholstery on the Lada Granta Liftback yourself. There is nothing complicated, just ten minutes of time and you're done. |
| 4. | Sergey: I heard that owners complain about the card knocking on the Lada Granta, I can’t confirm it. Since noise reduction is not provided from the factory, I installed it myself. |
| 5. | Semyon: despite the budget class of the car, the workmanship and assembly quality is good. There is no personal garage, the car is parked in the cold all year round, the panel is not deformed in the sun. |
| 6. | Vasily: two months ago I was in an accident and was hit in the side. I did some minor cosmetic work, didn’t change the trim, the stock one fits snugly, doesn’t play or squeak. |
| 7. | Gennady: I’m happy with the upholstery, no comments. I wish the manufacturer to make the clips stronger, since they are flimsy and practically disposable. |
| Negative | |
| 1. | Maxim: I can’t evaluate the quality positively, because after two months of using the machine, the cards began to knock. I visited a car service center and had the seals glued. I don’t know for how long, but is this quality? |
| 2. | Ivan: the car isn’t even six months old, but I’ve already removed the cards twice and sealed the joints. You can hear knocking and vibrations on the paving stones. Additionally, I pasted over the noise reduction. I can't recommend the quality. |
| 3. | Victor: the upholstery started knocking after a year. Possible deformation from cold, direct sunlight or manufacturing defects. |
Conclusion Despite isolated negative reviews regarding the upholstery of the Lada Granta Liftback, the design of the door card is generally of high quality. The joints fit tightly to the metal body. Most likely, third-party sounds are caused by a violation of the operating conditions of the technical device. For example, direct rays of the sun, negative temperatures.
Removing the front door trim
As with the rear counterparts, the job is quite simple to do. You will need the same tools. The sequence will be like this:
- In the LADA Largus doors contain a built-in speaker; it is removed first of all using a spatula.
- Using the T20 nozzle, remove 4 screws and then disconnect the wiring.
- Using the T30 nozzle, dismantle the door handle, lining and unscrew 2 fastening screws (one is located under the plug, the second is on the side of the trim).
Carefully remove the casing located on the pistons.
As a result, door painlessly loses its trim without damaging the structure. No special skills required. However, if difficulties arise, it is better to contact a car service.
Rear door trim
Here the upholstery is pressed to the door by 10 plastic clips and 2 screws securing the handle. The disassembly technology is as follows:
- The first step is to remove the mechanical window lifter handle. Use an awl to pry up the plastic half-ring that secures the lever to the axle. Pull it out and remove the handle.
- Pull out the 2 plastic plugs on the door handle and remove the fastening screws. After this, the element will be easily removed.
- Using a flat-head screwdriver, pull out the lower far corner of the decorative panel and snap out the first piston.
- Grab the door card with your hand and remove it, releasing the remaining clips along the contour. The casing has been successfully dismantled.
Scheme for dismantling the decorative panel Note
Please note that the opening handle lever on Kalina 1 will have to be unscrewed and removed, but on Kalina 2 there is no need to remove it, since it is screwed directly to the door and is in no way connected to the decorative panel
To remove the window lifter handle, you need to pull out the half ring
Otherwise, the upholstery on the doors LADA Kalina car is removed in the same way, there are no differences.