Probably no car enthusiast would dare to drive without a rearview mirror. But this simple device also fails. The fastening of the interior mirror sometimes suddenly becomes loose. And someone can hit the outside mirror and accidentally break it. In addition, the angle adjustment drive in the mirror periodically breaks down. Is it possible to solve all these problems on your own? Of course: most car enthusiasts can disassemble, remove or glue the mirror on their own. It's not as difficult as it seems.
Removing the outer and inner rear view mirrors
Rear view mirrors are an integral part of the car. Even those drivers who have equipped their “swallow” with a monitor or camera cannot do without mirrors. Therefore, keeping them in good condition is the primary task of every car owner. Before moving on to the procedure for dismantling the mirrors, we will list the tools that we will need for the job.
Tools required for dismantling
- Phillips screwdriver;
- flat blade screwdriver.
How to disassemble an external mirror
It is advisable to dismantle the exterior mirrors in a certain sequence.
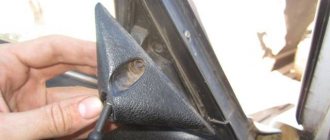
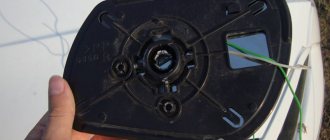
- Using a screwdriver, remove the locking bracket to which the mirror angle adjuster is attached.
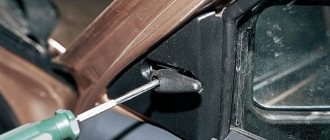
The side mirror retaining bracket is removed using a Phillips screwdriver. - Use the same screwdriver to remove the fastening screws. There are only three of them. Be sure to hold the mirror while removing these screws.
The screws holding the side mirror are unscrewed with a Phillips screwdriver - After removing the screws, the mirror is removed. To do this, you need to slightly pull it towards you.
After removing the screws, the mirror is removed manually
How to properly remove the interior mirror
Changing the rear view mirror in the cabin is a little more difficult. Work must be carried out in the following sequence:
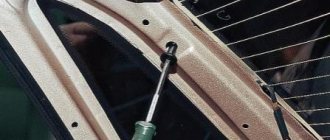
- The plastic plugs above the interior mirror mounting screws are carefully pryed off with a flat screwdriver and removed.
- The mounting screws are unscrewed with a Phillips screwdriver.
The mounting screws for the interior mirror are unscrewed with a Phillips screwdriver. - The mirror is carefully removed.
How to remove a mirror from a windshield
Dismantling a glued mirror does not require any special skills. Proceed as follows:
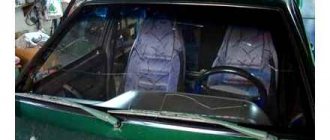
- In some modern cars, the bracket with the interior rear view mirror is glued directly to the windshield. To remove it, you must remove all plastic plugs from the bracket (if any).
- After this, the mirror is turned counterclockwise with both hands and removed from the socket.
The glued mirror rotates 90 degrees and is removed manually
Why might you need to remove the rear view mirror?
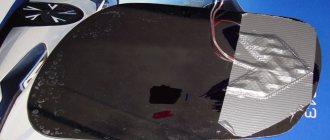
If we are talking about side mirrors, then their dismantling may be associated with replacing the glass with a better quality and darkened one or with repairing the mirror angle adjustment drive. Remember that side mirrors are part of your car's body. If you damage the paintwork on them or do not secure them properly, the appearance of the car will be significantly altered for the worse.
This mirror is removed differently for each model, but there should be no problems during dismantling. And yet, it is better to contact specialists and get qualified assistance in dismantling the side mirrors so as not to damage the electronics.
Many more drivers are wondering how to remove the rear view mirror from the windshield ? There can be a variety of reasons for such an action:
- repairing the mirror itself or electronics suitable for it (self-dimming, for example);
- eliminating unpleasant sounds and rattling noises coming from the mirror;
- windshield tinting;
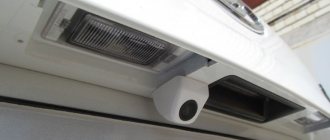
- installation of a rear parking sensor camera in the mirror;
- installation of certain sensors that are not included in the vehicle package.
At first glance, the procedure for removing a mirror on the windshield does not present any difficulties, but in fact this procedure takes many by surprise. If you do not understand the dismantling technique, you can easily damage the ceiling in the cabin, the windshield or the mirror itself, so you should follow certain recommendations in this regard.
Disassembling rear view mirrors
The procedure below applies to both exterior and interior mirrors.
- The mirror is removed from its regular place.
- Use your hand to gently press the top edge of the mirror glass until it unrolls.
Side mirror mirror element rotates manually - A piece of rag or napkin is placed in the gap that appears between the mirror body and the glass.
- Then a flat-head screwdriver, pre-wrapped with electrical tape, is inserted into this gap.
The latches holding the mirror element are bent with a flat screwdriver - The latches holding the mirror are pryed with a screwdriver and removed from the protrusions.
- The mirror glass is carefully removed.
This is interesting: About chip tuning of a car engine
The left mirror is dismantled in the same way as the right one.
How to glue a car mirror to the windshield
First we need to decide on the glue that we are going to use.
What glue should I use?
The main rule: the glue holding the interior mirror to the windshield must be two-component. Yes, there are many varieties of all-purpose glue. But in this case, universal glue will not work. The fact is that two-component glue perfectly withstands sudden temperature changes, high humidity, and most importantly, vibration. Conclusion: the mirror element should not be glued with universal glue.
There is a second option: use light-curing glue. This is a substance that quickly “sets” when exposed to sunlight. This glue can be purchased at specialized auto stores. But it has a serious drawback: to work with it, a powerful ultraviolet lamp is required, without which reliable bonding cannot be achieved. Some car enthusiasts claim that you can do without it, just sticking the mirror on a sunny summer day is enough. But such gluing cannot be called reliable.
The conclusion is simple: the best and least troublesome option for gluing a mirror is two-component glue. For example, Loctite 37438, which has become incredibly popular recently. By the way, it is sometimes used to glue DVRs that have a loose fastening device.
How to attach a mirror element
To keep the mirror securely on the windshield, you must follow the following algorithm:
- Select the location for installing the mirror. It should be glued in the center of the glass, at the same distance from both the passenger and the driver.
- The windshield is cleaned of dirt. First, this is done with a rag, then the surface of the glass is wiped with alcohol.
- The mirror is disassembled as indicated above (after all, in fact, only the bracket on which the mirror will be installed needs to be glued to the glass).
- A thin layer of glue is applied to the bracket and to the windshield. After this, you must wait at least 15 seconds.
Glue is applied to the interior mirror bracket - Then the bracket is installed on the windshield and lightly pressed down manually (and if you decide to install the mirror entirely, without disassembling, then after installation it must be additionally secured with tape, which will support the mirror until the glue sets).
The interior mirror is glued to the windshield - The glue must dry properly, so you cannot drive the car for 24 hours.
Video: gluing a mirror to the glass inside the cabin
Mounting the Device on a Bolt-On Bracket
Not all modern cars have interior mirrors glued to the windshield. In some cases, the mirror bracket is attached the old fashioned way: with bolts to the ceiling. In this case, you need to act like this:
- The mirror together with the mounting bracket is installed in the ceiling niche and held by hand.
The interior mirror is installed in a niche and held by hand - Self-tapping screws are inserted into the holes and tightened using a Phillips screwdriver.
- Sockets with installed self-tapping screws are closed with plastic plugs (provided that such are provided in the design of the bracket).
This is interesting: How to drive through puddles correctly
How to remove a mirror from the windshield in foreign cars
Is everything so simple with foreign cars? Let's try to figure it out. In fact, when removing a mirror from the windshield in foreign-made cars, a number of problems can actually arise, the biggest of which is the risk of damaging the windshield itself. The fact is that in foreign cars, in order to dismantle the mirror in the cabin, you need to put in a lot of effort, at the same time, the windshield is not designed for excessive pressure, and if you overdo it, it can simply crack.
We recommend
“Types of windshields: what to look for when purchasing” More details
We list the procedure for removing the rear view mirror from the windshield of a foreign car without the help of professionals:
- since the fastenings here are equipped with plugs, they must first be removed, most often this is easy to do without the use of any tools;
- further, the mirror needs to be pulled up, moving along the windshield towards the ceiling of the cabin, while it is important not to overdo it;
- When dismantling, you need to be careful with the fastening so as not to break it.
If you need to remove the mirror from the windshield of a foreign car in order to tint the windshield, we advise you to abandon this idea or immediately splurge on a new windshield. The fact is that you won’t be able to tear the bracket away from the glass, and even if you manage to do this, a mark from the bracket will still remain.
If the dismantling procedure is carried out successfully, then the mirror should be in your hands, while the bracket itself should remain in place. It is necessary to control the efforts when removing the mirror, since you can sharply pull it up by inertia when it has already come out of the fastening runners, then damage to the ceiling with sharp edges is ensured.
Foreign-made cars also often have a special rear-view mirror lock in the interior. This is either a latch or a pedal that must be pressed so that the mirror can be easily removed from the bracket. Safety precautions for carrying out the procedure are also important here, since you can accidentally cut your fingers.
How to install and secure heated side mirrors
To assemble and connect the side mirrors yourself, you will need minimal electrical knowledge and dexterity. You must act in the following sequence:
- A set of mirrors equipped with an internal heating system is purchased.
Heated mirrors for Lada Granta - The standard side mirrors are removed from the car in the manner described above.
- After installation, the top cover on the side mirror housing opens. This gives access to the wiring socket (it is supplied with the mirrors).
The side mirror housing is opened and the electrical wiring is connected. - The wires are connected to the socket and inserted into the door through the mirror housing.
- Use a Phillips screwdriver to remove the plastic trim from the door.
Plastic trim removed from car door - The wiring runs through the door and dashboard to the fuse box, next to which there is a relay with a plug for turning on the heated mirrors.
Mirror wiring is connected to the heating relay - The wiring plug is connected to the socket shown in the photo, after which the car door trim is reassembled.
Installing a mirror on glass: how to glue it
To attach the mirror to the windshield, you need to properly prepare the surfaces and select the adhesive. The installation site should be degreased (alcohol will do). The patch on the bracket is also cleaned and degreased.
Regarding the adhesive base, there are different types of glue:
- chemically or light-curing adhesive base;
- adhesive compositions based on epoxy resins.
At the same time, not all types of glue can be used to mount the interior mirror mounting bracket on the glass.
Please note that you cannot use instant glue, superglue, double-sided tape, etc. The fact is that these types of glue and tape are not designed for high temperatures
After the windshield warms up in the sun, the rear view mirror will simply disappear.
The fact is that these types of glue and tape are not designed for high temperatures. After the windshield warms up in the sun, the rear view mirror will simply disappear.
How to glue a mirror in the salon
To attach the interior mirror, it is optimal to use glue that hardens under the influence of chemicals. This adhesive base can be two-phase (the adhesive must be treated with an activator after application) or active single-phase.
Epoxy glue also holds well, but takes a long time to dry and requires strong pressure on the surfaces being glued. In the case of a salon mirror, this option will not work.
In turn, glue that hardens when exposed to light will also not be effective without a special lamp. The reason is that it hardens in ultraviolet light, while sunlight or artificial lighting does not affect the gluing process.
Installing a rear view mirror on glass
After selecting the glue, you can proceed to installing the bracket. All work must be carried out at a temperature of about +20 degrees Celsius.
- The mirror holder is cleaned of old glue, the gluing area must also be roughened using fine sandpaper and degreased;
- The place where the holder is attached to the glass is processed in a similar way;
- Apply a small layer of glue to the mount;
- An activator is applied to the windshield at the gluing site;
- During gluing, you need to accurately hit the mounting pad on the holder at the place where the activator is applied;
- Apply slight pressure on the gluing point for the time specified in the instructions for the adhesive;
- After gluing, it is necessary to remove any remaining adhesive or activator from the glass and holder using a degreasing agent.
- It is better to install the mirror on the holder one day after gluing the bracket.
We also add that it is not advisable to park the car in the open sun or leave it in the cold for 2-3 days so that the glue dries normally and does not suffer from severe temperature changes.
You should also avoid for several days the stress that the mirror on the windshield is usually subjected to (after gluing, do not touch it with your hands, do not adjust the mirror with great force, etc.).
Common device problems
Let's look at a few troubles that every car enthusiast may encounter.
Peeling off the mirror surface
Sometimes this kind of trouble happens even on new cars. The reasons can be very different.
- the manufacturer decided to save money and used a low-quality adhesive;
- during the work, the master did not allow the glue to set properly;
- the mirror came unstuck due to too sudden temperature changes (and this is the most common reason, especially in frosty winter).
In all these cases, the car owner will have to use two-component glue, as shown above.
Glass replacement procedure
The mirror element of both the exterior and interior mirrors may be damaged. Below is the sequence for replacing it:
- The glass is removed from the mirror body.
- The new mirror element has several plastic hooks (in our example there are 4). These hooks are inserted into the mounting holes in the mirror body, after which you need to press very carefully on the mirror element.
The new mirror element is installed into the mirror housing manually - A characteristic click will be heard, indicating that the plastic hooks have engaged and the glass has “settled” into place.
The procedure for replacing mirror elements in interior mirrors is similar to that given above (the only difference is that there are usually 2 plastic latches in the interior mirror, not 4).
How to try to remove the mirror mount from the windshield yourself
Using brute male force to remove the rear view mirror mounts in the cabin, you can inadvertently break the windshield.
It is best to carry out the dismantling procedure not alone, but also to use a hair dryer, pliers and a clean, dry cloth.
Ask someone to help you; you don’t need to have any special qualifications in this matter. It’s just that someone needs to warm the windshield in the area of the patch with circular movements, and in the meantime, you carefully use pliers to try to move the mount from its place, pulling it from side to side. It is a construction hair dryer that should be used for these purposes because the heating temperature should be 300-350 degrees Celsius; an ordinary household hair dryer cannot provide this. When you feel that the snout is about to come off, have a cloth ready to catch it, as the hairdryer will also heat it up. After dismantling, be sure to wipe the fastening area with alcohol, prime it if necessary, and, using special glue, glue the penny back.
And yet, let us remind you that if you doubt whether you will be able to carry out all the above manipulations yourself, contact a service center, where a specialist will take on the risks associated with car repairs. After all, it often happens that repairs in your garage will ultimately cost even more, and the consequences of such repairs will be difficult to correct.
At a minimum, first read the instructions from the manufacturer of your machine. It would be a good idea to consult a professional or a specialized forum.