Comments: no Published: 03/20/2016
Rating:
Tags:VAZ 2108/2109/21099LED backlight
Almost every car owner wants to make his car unique. And it doesn’t matter whether we are talking about a Maybach or a VAZ 2109, 21099. With the help of tuning a VAZ 2109, you can make almost any car exclusive. Next, we’ll look at the elements of headlight tuning specifically for VAZ 2109 and 21099, and how you can do it yourself.
It should be noted that tuning both front and rear headlights is not as complicated a process as it might seem at first glance. The main thing you need is your imagination and the necessary materials.
Tuning rear lights VAZ 2109
Alternative optics
Besides the fact that alternative optics on a VAZ 2109 or 21099 are beautiful, such headlights are much more reliable than standard lighting fixtures.
Why do the headlights fog up from the inside and thereby spoil the appearance of the car? The fact is that glass allows moisture to pass through, as a result of which the contacts oxidize, and the lamp may simply burn out. Even if this does not happen, the glass will fog up, resulting in poor visibility on the road. Replacing the glass won't do anything. The result, if there is one, will only last for a short time.
Based on this, we can say that tuning the rear lights on a VAZ 2114 or 2109 and 21099, or the front lights, is more of a necessity than just an external change.
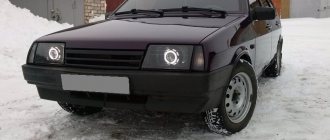
Alternative optics for VAZ 2109
Popular faults
If we talk about the dashboard of VAZ 2109 cars, then they are characterized by certain problems. We will tell you about them, and also tell you how to act correctly in a given situation.
We recommend: How to properly store tires without rims
| Fault type | Your actions |
| Gasoline level and temperature indicator does not work | In most percent of cases, this situation occurs due to breakdown of devices, sensors of these devices, or an open circuit of the power supply. Therefore, first check the circuit for continuity, make sure that the fuses have not blown. If this is not the case, check whether the gas level and temperature sensors are working. Only if none of the actions allowed you to get rid of the breakdown, you can begin to replace the devices themselves. No options, the problem lies in them |
| When the fuel tank is full, the arrow points to zero | If you have worked on the fuel level sensor, the fault most likely lies with you. When manipulating this device, the float limiter is often knocked down. Either the limiter is installed incorrectly or adjusted, causing the resistor winding to end. To resolve the problem, remove the sensor and then adjust the limiter again |
| The fuel gauge needle regularly jumps and ends up at zero | Here, most likely, the resistor has weak contact with the current collector. Another possible option is that there is a break in the resistor. To resolve this situation, we recommend replacing the hot level sensor with a new measuring device |
| The fuel level lamp is constantly on | If this lamp is constantly on, there is probably a short circuit in the fuel level sensor supply wiring to ground. Another option is that the sensor’s flexible bus is shorted to the fuel intake pipe. You will have to disassemble the device to align the bus and get rid of the resulting short circuit |
| Indicator lamps do not work on the dashboard | There is a high probability that the light bulbs have simply burned out, or they are poorly held in their seats due to loose contact. Replace the bulbs, but first try tightening the contacts. Traces of oxidation may be detected. When cleaned, the light bulbs can work normally again. Also, do not exclude the possibility of wiring breakage or oxidation of the tips of the supply wiring. Try going over the wires with a tester, cleaning the contacts if necessary. |
| The speedometer does not work, the flexible shaft is noisy | In such a situation, you will have to change the speedometer drive cable or replace the entire speedometer assembly. But before you bother so much, check that the fastening nuts of the tips are tightened correctly and properly. The flexible shaft may make noise during operation due to deformation or violation of the permissible bending of the shell of less than 10 centimeters during installation |
Last resort - complete dismantling
The instrument panel of the VAZ 2109 is not so complicated that you cannot figure it out on your own. But in the absence of experience, it is better to entrust the repair to specialists, or to enlist the support of a partner who understands this matter.
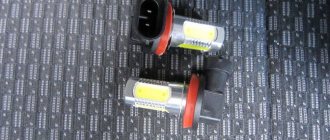
Types of lamps
For rear and front lights, two types of lamps can be used:
- LED;
- xenon
As practice shows, LED lamps are most often chosen for rear lights. This is due to the fact that such lighting devices are much cheaper, but at the same time durable and economical.
In addition, we can highlight the following advantages of LED lights specifically for VAZ 2109, 21099:
- service life - at least 10 years;
- ergonomics;
- energy saving;
- response is 3 times faster than xenon.
Against the backdrop of all this, such headlights provide the optimal amount of light for the car. If you don’t want to change the rear or front headlights, you can tune the ones you already have. It should be noted that, unlike the front lights, the rear lights on the VAZ 2109 or 21099 can even be painted from the inside. It’s quite easy to make this a reality with your own hands.
Rear LED headlights
Features of headlight adjustment
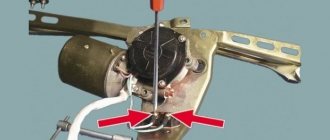
In order not to dazzle oncoming drivers, after replacing or repairing headlights, it is necessary to adjust the headlights. For this purpose, the car is installed on a flat horizontal surface five meters from a white wall or stand. A weight of about 75 kg should be placed on the driver's seat to replace the driver's weight. Markings are applied to the wall.
Markings on the wall for adjustment
The hydraulic corrector handle should be set to the “driver and front passenger” position. At the same time, the low beam turns on.
Each headlight needs to be adjusted. An unused headlight must be covered with a dense material that does not transmit light.
The headlights are adjusted using screws. Light spots need to be adjusted to the markings on the wall. The adjusted light must meet the following requirements: the upper boundary of the light spots must be on straight line N, lines A and B, located in the vertical plane, must pass at the intersection points of light spots C1 and C2 (video author - Vladimir Sharkhun).
Necessary materials
First of all, it should be noted that regular spray paint will not work. This is due to the fact that the space inside heats up, and the paint simply slides off. To tune the rear headlights on a VAZ 21099 or 2109, you only need to use special paint.
A special substance for tuning headlights must withstand high temperatures. The cost of one such bottle does not exceed 500 rubles.
Car headlight tinting paint
All types of tuning of front and rear headlights on VAZ 2109
Every car enthusiast wants his equipment to become noticeable and original. You can upgrade any car, regardless of year and model. “Nine” is a popular car of the last century, produced by the Russian automobile industry. One of the reconstruction options is tuning the headlights on the VAZ 2109. The headlights on the VAZ 21099 and the headlights on the VAZ 2108 are the same.
Car repairers believe that tuned headlights are more reliable than those installed at factories. Rework options:
- replacing standard optics with xenon,
- use of LEDs,
- covering lighting structures with tinted products.
Replacing lamps
Factory bulbs installed in a car do not last long. LED lamps have the following advantages over a conventional incandescent lamp:
- service life of at least 5 years,
- ergonomics,
- low power consumption,
- fast response.
At night, it is very important to have a good view of the road. Changing the optics often improves the light performance of devices. Xenon lamps are more powerful than diodes, but LED lamps are easy to maintain and have a low cost. Do not forget that unregulated xenon lamps emit a very powerful luminous flux. This can lead to a traffic accident, as the oncoming driver may be temporarily blinded by the bright light.
Painting
A common method of auto tuning is darkening the optics with a special varnish or painting. To complete the work you will need a can of black paint. Only materials with high temperature ratings are allowed. Regular paint will come off as a result of heating, and no tinting effect will remain.
The work is carried out in stages:
- The headlight is removed from the car.
- The optics are completely disassembled.
- Using a curved screwdriver, unscrew the screws that hold the headlight mask.
- The turn signal reflector is removed.
- The chrome paint is being cleaned off.
- Apply primer for plastic in three layers.
- After the primer has completely dried, paint is applied (auto mechanics recommend applying paint in 5 layers.)
- The structure is being assembled.
- The headlight glass is cleaned of old compounds.
- The glass is washed, wiped dry and treated with a degreaser.
- Black sealant is applied along the edges.
- The device is assembled and installed on the car.
- The connection is made to the circuit through the fuse block.
If there is incomplete contact between the glass and the optics box, air may get inside, causing the headlights to fog up.
Film tinting
An inexpensive way to change the optics of a VAZ 2109 is to use a tint film. The result depends on the quality of the materials used. Good tint films have high light transmittance. This is an important indicator on which the lives of all road users depend. It is allowed to apply the film to the inner and outer surfaces of the headlight.
Preparatory stage before painting
In order for the paint on the headlights to last for a long time, a preparatory stage should be carried out. The algorithm of actions is as follows:
- headlights are dismantled and disassembled;
- the additional turn signal reflector is removed;
- Using fine sandpaper or a special substance, chrome is removed from the surface of the lantern;
- primer is applied.
Please note that the primer must dry for at least one hour. The substance should be applied to the headlight of a VAZ 2109 or 21099 in 2-3 layers. Otherwise, the paint will simply peel off during use.
Preparing headlights for painting
Painting process
The paint must be applied in at least 4-5 layers. It takes at least one hour to dry completely. After this, you can assemble the entire rear light.
At the final stage, you need to be especially careful when applying the sealant. The old one is completely removed. After this, the surface of the rear light is degreased and a new sealant of the appropriate color is applied.
If this protective substance is applied incorrectly, the taillight of the VAZ 2109 (21099) will fog up, which will lead to more serious consequences. In general, doing this yourself is very simple.
Film tinting
If painting does not suit you, you can use tuning using film.
Here it is necessary to note the main rule: the better the quality of the film, the better the result. Therefore, in this case, savings are inappropriate.
Film can be applied to lanterns both outside and inside. But if you plan to cover the front of the headlight, you should understand that the film deteriorates much faster.
Film tinting of headlights
The process of pasting headlights
The algorithm is as follows:
- the headlights are carefully dismantled and disassembled;
- The reflector is removed using an abrasive material or a special liquid.
It is recommended to cover the glass with masking tape to avoid scratching it during work. To make it easier to level the film around the edges, you can use a spatula that is not too sharp. It's a little more difficult to apply film to the taillights. The gluing process itself is the same. Only the preparatory stage is somewhat different:
- the battery is turned off;
- the wires that lead to the lighting fixture are disconnected;
- The flashlight itself is disassembled.
Only after this can the procedure described above be carried out.
Pasting car headlights
In general, tuning a VAZ 2109 (21099) with your own hands is a simple process that almost anyone can do. But it also has several negative sides:
- significant deterioration of lighting;
- tinting is prohibited by law and is punishable by administrative penalties;
- possible problems during technical inspection.
Therefore, when doing such tuning with your own hands, you should understand and take into account these nuances. With the correct selection of materials and compliance with technical requirements, tuning, which was done by yourself, will not only add beauty to your car, but will also provide it with greater practicality.
Author: Baranov Vitaly Petrovich
Education: secondary specialized. Specialty: car mechanic. Professional diagnostics, repair, maintenance of passenger cars of foreign production 2000-2015. Extensive experience working with Japanese and German cars.
Main reasons
Almost all problems related to automotive electrical systems can be solved in approximately the same way. You need to look for a potential or probable cause of malfunctions in the problematic object itself, or understand the system responsible for supplying power.
The situation is exactly the same with devices called brake lights. If they stop working, then you should look for the reason in one of the following points:
- There were problems with the fuse. It has oxidized or completely failed;
- There are faults in the lamps themselves or in one lamp, depending on how many stops are not working;
- The reason lies in the mechanism responsible for turning on the warning signal when the brake is applied;
- In the socket where the stop light is installed, the contacts have oxidized;
- More serious problems appeared related to damage to the wiring.
We recommend: 10 ways to mount your phone in a car
Based on the stated reasons why the feet may stop working, we can draw a completely objective conclusion. A truly serious malfunction concerns only wear or damage to the electrical wiring. Solving such a problem with your own hands is not always correct.
When the rear brake lights (left and right) or the additional central brake light repeater fail, do not rush to look for an auto electrician and offer him money to fix the problem.
There is a high probability that you will be able to do everything on your own. You will only need a standard set of tools for a motorist, as well as an understanding of how the lighting equipment in general works in your vehicle. Start with the most likely and fairly simple to solve possible malfunctions. Only if it turns out that the problem is bad or damaged electrical wiring, then it makes sense to visit a good car service center. It is better to entrust such tasks to experienced craftsmen. The main components for restoring the operation of brake lights on your own, you will need a spare working lamp, a control unit or a multimeter, as well as suitable tools.
It would be a good idea to study the owner's manual and understand how to get to the stops on your car.
Fuse
The first place to start is by searching for the mounting block in which the fuse responsible for the brake light is located.
Moreover, each machine has its own electrical circuit and specific location of fuses.
These can vary significantly depending on the vehicle, such as:
Homemade trailer from the back of a car
Category: Light trailers
- VAZ 2110;
- VAZ 2107;
- Toyota Rav 4;
- Ford Fusion;
- VAZ 2114;
- VAZ 2115;
- Ford Focus;
- Chevrolet Lacetti;
- Lada Granta;
- Hyundai Accent;
- Renault Logan;
- Hyundai Solaris, etc.
A blown fuse quite often causes the failure of a number of equipment, including lighting devices. Check fuses visually and using a multimeter.
But there is a simple and effective way to check that takes a minimum of time. To do this, start the engine and hold down the horn button. This is not suitable for all car models, but on many vehicles the same fuse is often responsible for the sound signal and brake lights.
If this is not the case, we continue our search further.
Brake lamps and their sockets
Next, you should switch to the brake lights themselves. In most cars, to gain access to the feet, the luggage compartment is opened, the rear light bulb is removed, after which you can get to the feet themselves.
But the dismantling process may differ on different brands and models. Here, start from your car specifically; if necessary, look for hints in the operating manual. There are examples of cars where you can get to the brake light without removing the rear optics at all. You still have one main task ahead of you. It consists of gaining physical access to the faulty device, the lamp and the socket in which it is located. Not everyone can try to determine the problem by eye. Here it is better to take a different route.
We recommend: What to do if the engine overheats?
The optimal solution would be to use new, similar lamps instead of potentially faulty ones. Therefore, you will have to buy a light bulb in advance and screw it in. If you can't find a lamp of a similar size, use a marker or turn signal repeater. Make sure these conditional controls work first.
When everything worked after installing the new lamps, you found the reason. You can confidently buy new matching stop lamps, replace old ones and reassemble the unit in reverse order.
It is extremely important to take into account one feature. Some modern cars have such a principle of operation of brake lights, in which when one car brake light fails for one reason or another, the second one automatically stops functioning. That is, sometimes checking one lamp does not give a result, since in fact the chances are 50/50 of replacing the burnt lamp, and not the one that simply turned off in tandem.
How does fuel consumption change when using a trailer?
Category: Light trailers
If replacing the light bulbs did not give anything, check the sockets themselves. It happens that they oxidize, this breaks contact, and the device does not turn on, although power is supplied to it. Also make sure that the socket is connected to the vehicle wiring. If necessary, the contacts are disconnected, cleaned with fine-grained sandpaper, and then returned to their place. Even during this procedure, it is recommended to apply a special lubricant to the contacts after cleaning.
One more thing. When checking the sockets, it is also worth taking new light bulbs. It happens that due to oxidation of the cartridge, the lighting device itself fails. That is, in fact, 2 malfunctions occur simultaneously.
Problems with the switch
The brake light on a car lights up the moment the driver presses the brake pedal with his foot while sitting behind the wheel. When pressed in this way, the force is transferred to a special mechanism. It is popularly called a frog. It is also a limit switch and it is also a classic brake light switch.
There are 3 main reasons why a frog or limit switch may not work:
- contacts have oxidized;
- carbon deposits appeared;
- corrosion has formed.
Despite the slightly different processes, the essence of the problem is the same. It can be eliminated by stripping the frog, or by replacing the stop switch.
If none of the options are suitable, there is a high probability that the problem lies in damage to the vehicle's electrical wiring. Here it’s up to you to decide whether to try to resolve the issue on your own, or seek help from qualified specialists.
Considering the complexity of the electrical circuits of modern cars, a better solution would be to visit a trusted auto electrician. But the final choice is yours.