Removing mirrors
- Pry off the cap of the mirror control knob and unscrew the fastening screw with a Phillips screwdriver.
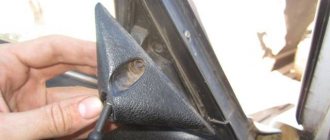
- Remove the triangular-shaped plug by prying it up with a flat-head screwdriver and unlatching the latches.
- Unscrew the three mirror mounting screws using a Phillips screwdriver.
- Remove the mirror from the car.
Disassembling side mirrors
Removing the mirror
First we dismantle.
Naturally, it will be more convenient to disassemble the mirror removed from the car, so it should be removed. What is needed for this?
Removing a power mirror. First, you need to remove the mirror adjuster locking bracket, unscrew the three screws that secure the mirror to the door frame, and then remove the mirror itself.
Removing the electric mirror. The first thing to do is disconnect the negative terminal from the battery. Next, you need to disconnect the block from the electric drive wires, unscrew the three screws securing the mirror to the door and remove it.
Replacing the mirror element.
Lifehack What is this for? SE Priora mirrors have arrived for the VAZ. Dismantling the entire mirror element of the VAZ Lada 21 Nov 0 Comments.
Installation of mirrors from Priora on VAZ. Which side mirrors would I choose for VAZ? lada 18 Dec 0 Comments.
VIDEO: replacing the mirror element on a VAZ 2111 2112 2110
More on the topic. How much does it cost to repair thresholds on a VAZ? Before repairing the removable thresholds of a car, you need to remove them. How to add oil to a VAZ engine. As you can see, the replacement process is very simple and does not require special equipment. How to carefully remove the trim on a VAZ. These nozzles are ball-shaped, and their driver can adjust The corrector on a VAZ does not work In order for the hydrocorrector of VAZ headlights to work again, the device must be repaired VAZ replacing wiper blades Replacing frameless wiper blades is a procedure that needs to be performed How to check the armored ducts of a VAZ 16 valves Now you know how to check the armored ducts without a tester.
But there is How to check the integrity of the cylinder head gasket of a VAZ If you are sure that part of the antifreeze goes into the engine through Repair of the internal combustion engine of Lada Kalina 16 valves Motorists cite facts when, in addition to the valves, pistons were damaged, connecting rods were bent, How to replace the windshield wiper motor on a VAZ Remove the windshield wiper mechanism on car VAZ and VAZ gasoline pump replacement Video material will tell you how to replace the gasoline pump, as well as VAZ repair instructions. You can familiarize yourself with the design of its systems, components and electrical equipment. Replacing the engine of the VAZ fuel pump injector Like most injection cars, the VAZ has a gasoline pump How to change the door limiter on a VAZ Door limiters are special devices that allow you to open and close doors silently, the speed of the VAZ does not drop. The fact is that when much more air enters the carburetor than gasoline, the mixture How to correctly pick up the tachometer of a VAZ Here you can Read more about the principle of operation of the tachometer.
How to run wires for the speakers of a VAZ Only this speaker is capable of providing natural transmission of low-frequency sounds, because the other components of the acoustic system do not turn on the starter relay on a VAZ. You need to remember how the wiring diagram for the starter on a VAZ works. There are only two on a VR. How to lubricate the steering wheel of a VAZ so that the steering wheel turns well and with little effort, for this purpose the steering column is constantly lubricated New articles Replacing rubber springs on gas Replacing rings on a gazelle engine.
How to open the hood of a gas radio Lifan Solano, what kind of flash drives. Replacement of Toyota Camry fuel pump mesh. Where is the Lifan Solano cigarette lighter fuse?
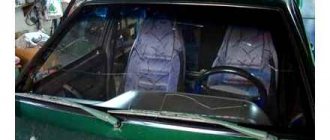
Removing and installing the internal rear view mirror on the VAZ 2110, 2111, 2112
An article with photos and videos for everyone who wants to replace the interior rear view mirror on VAZ 2110, 2111, 2112 cars.
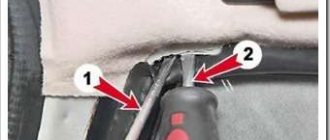
1.Remove the decorative cover using a Screwdriver...
2. ... to remove the fastening pistons from the holes in the bracket.
3. Now all that remains is to unscrew the two screws securing the mirror to the bracket and remove it. Reinstall the mirror in reverse order
When to change the timing belt
First, it’s worth considering the signs that can be felt or visually determined:
- extraneous noises are coming from the engine compartment;
- the exhaust turned black;
- difficulty starting the engine;
- When the motor is running, noticeable vibrations appear.
These signs do not always indicate a malfunction or damage to the timing belt, but if they occur, you first need to pay attention to this element. To check the element, you need to dismantle it: disconnect the negative wire from the battery, remove the plug, then remove the generator belt and six bolts securing the protective cover
After this, you can evaluate the condition of the item.
Replacing the VAZ 2110 or 2112 timing belt is required if you find the following damage:
- rubber delamination;
- there are oil stains;
- the presence of abrasions, cracks and folds;
- bulges, cuts;
- presence of broken threads.
Price issue
First of all, we will orient you a little on the price tags that are presented on the market today.
The cost may vary depending on the manufacturer, technical features of the product and the region of its sales. Therefore, prices are average.
Mirror type
approximate cost
Outdoor heated
Obviously, the characteristics of the panoramic interior mirror provide a better view, and the presence of heated exterior mirrors provides comfort and does not require constant wiping. It is better to pay more, but buy new functional products.
How to remove a side rear view mirror with your own hands
This accessory is not as simple as it seems. Most often, various devices are built into it. For example: turn signals, LEDs, heating parts. For this reason, before removing the mirror, it is necessary to remove the negative charge from the battery. This is necessary in order to minimize the likelihood of a short circuit occurring during work.
replacing the side rear view mirror
The tools needed for this repair can be found in every garage. These include: a set of screwdrivers of different sizes, a household hair dryer, a plastic spatula, electrical tape, a small piece of soft cloth, and a wrench. In addition, attention to detail, caution and a desire to do everything right will come in handy.
Removal process. After the negative charge has been removed from the car battery. You can start dismantling. To do this, you need to open the car door and remove the handle for changing the mirror angle.
The process for removing the angle knob varies on individual vehicle models. For example, on some it is enough to pull the handle towards you for it to come out of the grooves. On other models, you will have to unscrew it counterclockwise or, before removing it, you will need to unscrew the bolts that hold it in place.
In order to remove the mirror, you need to find the bolts that hold it in place. As a rule, they are located under a decorative lining and are located so that they are not visible. The decorative hiding element must be removed. Often the rubber gasket is removed together with it. It is important not to lose it due to the fact that these items are not sold separately in stores, with some exceptions. When the cover plate is removed, the bolts are clearly visible. They need to be unscrewed; in addition, to avoid confusion during assembly, it is best to photograph the location of the multi-colored wires.
Dismantling
You have decided to carry out dismantling work with your own hands and then reinstall it. The only question now is how to remove and disassemble the element, so that later everything can be returned to its place without any risks. In the meantime, glass replacement or another procedure will be carried out, depending on the specific situation.
To carry out dismantling work, you need to take:
- curved screwdriver;
- flat screwdriver;
- wrench to match the size of the fasteners;
- hair dryer;
- degreaser;
- rags;
- high-quality glue;
- some free time;
- clean garage;
- good mood.
Add to this set of tools a couple of skillful hands, and everything will go great.
As you understand, rear and interior mirrors are removed differently.
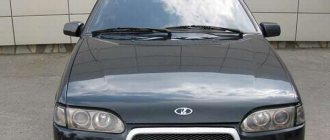
How to remove the side mirror of a Lada Granta
Side rear view mirrors are an integral element of the design of any vehicle. They allow better control of the road situation, promote traffic safety, and optimize the aerodynamics of the body.
Some mirrors are additionally equipped with direction indicators (read the instructions for how to replace them), this statement also applies to the popular domestic car Lada Granta. The need to remove mirrors may be due to the following factors:
- Mechanical impact that caused the destruction of the housing.
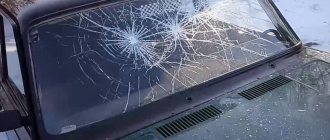
- A crack or other defect on the mirror element. (Instructions for replacing the mirror element)
- Burnt spiral of heated mirrors or other damage to the electrical part.
In general, the operation of removing a mirror does not present any particular difficulties; it can be done on your own with minimal waste of time, so there is no need to turn to professionals.
Mirror with electric turn signal and heating luxury Priora
- Manufacturer: Autocomponent
- 0 reviews
- Description
- Characteristics
- Video
- Reviews 0 ? '(' + product.reviewsCount +')' : »>>
Dear customers, in order to avoid mistakes when sending a side rear view mirror of the VAZ 2170 Lux (SE) with a turn signal, in the “Comment” line indicate which side is needed (driver or passenger), your car model, year of manufacture.
Check the integrity of the package immediately upon receipt (at the post office or delivery office of the transport company) in the presence of a department employee. You can read more at this link: Guarantee of safety of goods during shipment
The mirrors on the VAZ 2170 can be considered a gift from AvtoVAZ, because they are heated on all trim levels. Many car enthusiasts have a desire to replace them with Lada Priora Second Edition (SE) mirrors. Most often, difficulties arise only during connection. The mirrors on the Priora SE and the old model are distinguished by the presence of turn signals on the mirrors. SE has them, old ones don't.
The side rear view mirror of the VAZ 2170 with a turn signal (external side) is designed to provide the driver with a clear view of the view behind and to the side of the car. To ensure injury safety, the design of the side exterior rear view mirrors of the VAZ 2170 provides for the folding of the mirror in the event of an impact or break of the mirror from a headwind.
The right and left sides always look IN the direction of the car (moving forward) and in no other way, the driver’s side is on the left, and the passenger’s is on the right.
The price is per piece.
Article number of the right mirror: 2110-8201050-75;
Article number of the left mirror: 2110-8201051-75;
Mirror set item number: 2110-8201004-75;
Side mirrors are standardly installed on VAZ 2170, 2171, 2172 Lada Priora Lux (Lada Priora SE) cars and their modifications with a neutral-tone anti-dazzle reflector, a mirror element heating system, a turn signal repeater and an electric drive for adjusting viewing angles from inside the car.
Installation of SE mirrors on a Priora with old-style mirrors, VAZ 2110-2112:
We dismantle the old-style mirrors and install the SE mirrors in the reverse order.
Connecting rear view mirrors Priora (SE):
Old style mirrors have 2 connectors with wires:
— Block 1 (mirror control):
| Mirror block | car block |
| Red | Red-blue |
| Blue | Blue-black |
| Green | Green-black |
Block 2 (heated mirrors):
| Mirror block | car block |
| Gray (+) | Blue-red (left mirror), Black-red (right mirror) |
| Black (-) | Black (for heating) |
Lada Priora luxury mirrors (Lada Priora SE) have 1 block with wires (an additional plus (6th wire) is for the direction indicator).
Connecting new mirrors is carried out in the same way, all colors are the same, except for one - 12V mirror heating, brown is used instead of Gray.
The main thing is not to confuse the red-blue and blue-red wires. They are almost the same, so before connecting it is better to check them with a tester (a multimeter or a 12V light bulb, connecting the minus of the tester to the body, and to the wire. If the lamp.
The mirror has an original black protective and decorative overlay, prepared for self-painting.
Other article numbers of the product and its analogues in catalogues: 21100820105075; 21100820105175.
VAZ 2110-2111, VAZ 2112, VAZ 2170, VAZ 2171, VAZ 2172 .
Any breakdown is not the end of the world, but a completely solvable problem!
How to independently replace the side rear view mirror of a VAZ 2170 with a turn signal on a Lada Priora, VAZ 2110-2112.
With the online store Discounter AvtoAzbuka, repair costs will be minimal.
Just COMPARE and BE SURE.
Don't forget to share the information you find with your friends and acquaintances, because they may also need it - just click one of the social networking buttons located above.
How to change a mirror on a VAZ 2110
The mirror element is an integral part of the rear view mirror on the VAZ 2110 vehicle. Naturally, there are many modernized mirror designs, but regardless of innovation, a specialized mirror element plays a key role. It is this that provides high-quality display from a certain angle, which allows the driver to see all the necessary obstacles while driving. The creators repeatedly produce these components in the form of a separate spare part, which, if necessary, can be removed and replaced or repaired.
Types of mirror elements and their structure
It is important to note that competent service center professionals claim that it is quite difficult to carry out the procedure associated with replacing mirror parts on the rear view mirror of a VAZ-2110. This is due to the fact that the part has a rather fragile structure and can be damaged. Situations often occur when, during the process of replacing the mirror housing, the element itself is damaged.
This leads to various negative consequences. Before you independently replace such a mirror part, you need to understand exactly that the unit consists of four main components:
- Mirror element;
- Frame;
- Mechanism for setting the deflection angle;
- Bracket.
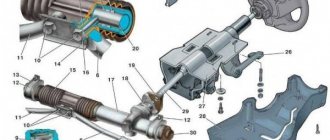
Diagram of the gas distribution mechanism
The timing belt consists of the following elements:
- a pulley having a gear structure;
- the timing belt itself;
- a pulley that ensures the operation of the water pump;
- a pulley that ensures the operation of the exhaust camshaft;
- special tension roller;
- rear belt protection cover;
- phase sensor synchronizer;
- bracket;
- springs;
- support roller.
In addition, the timing belt always contains timing marks:
- on the oil pump cover;
- on the back cover of the belt;
- on pulleys.
The pulleys themselves are not alike. In particular, a synchronization disk or ring is fixed to the camshaft pulley, ensuring normal operation of the phase sensor. The drive itself is closed with a plastic cover on both sides. As for the marks, they are designed to correctly set the valve timing, and they must match in pairs.
We remove the rear view mirrors on a Chevrolet Niva ourselves
Removing the mirror from either the left or right side is quite simple . To do this, you need a set of screwdrivers, pliers and half an hour of time.
The mirror could be removed faster, but due to the special location of the contact blocks for the adjustment and heating drive, you will have to disassemble almost the entire door trim.
Let's be patient and get started.
- We unscrew all the screws that secure the door card (door trim).
Disconnect the connectors of the two exterior mirror wiring harnesses.
After this, if necessary, you can replace the mirror element, the adjustment drive, or repair the broken bracket.
Disassembling the side mirror elements
The mirror is disassembled by dismantling the mirror element . To do this, use a thin screwdriver to unclip all 12 latches that hold the mirror element to the servo drive. They can be accessed through a hole in the plastic case, but you should never rush, since overdoing it can break the mirror surface.
vote
Article rating