Repair of the Rear Wing of a VAZ 2112
VAZ 2110: back to the right
its wings
repair and replacement
VAZ 2110 back to the right
wing
If the car has a 2110 VAZ back right fender is damaged, it will need to be replaced or repaired. The second option is, of course, cheaper, but it is more difficult to implement. Still, VAZ 2110 back to the right
The fender can be repaired without much hassle if you know the specific secrets that will be discussed in this article.
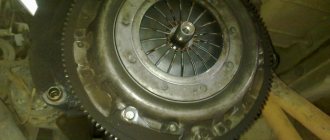
Repair process
VAZ 2110 Wing back right
- Turn off the car.
- Squeeze the wing.
- Level the surface with a heavy tool (this could be a hammer). Take the tip with the sharp flat end and attach it to the other side of the dent. Then hit the flat surface of the bit with a hammer. A slight leveling will be noticeable.
- The flat object should be straight outwards.
Note: It is better to straighten the steel tool because alloy is not suitable. All actions must be taken quickly. But you can't hit hard. This may cause the metal to stretch as the wing may be a little older.
- You need to very carefully punch the edges, in one strip.
Complete replacement of wings
Right rear fender from VAZ 2110
In some cases, the rear fender needs to be completely replaced. For example, if it is so badly damaged that there is no point in even trying to repair it
. This usually changes if:
- Significantly deformed upon impact.
- It has some small gaps.
- No corrosion observed.
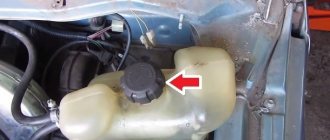
VAZ 2110 Wing back right
replacement wings . This is a very time-consuming process, but it can be done at home by following the instructions:
- It is necessary to completely empty the trunk, remove the bumper, headlights (see Replacing headlights on a VAZ 2110: do it yourself), fuel tank, and also the trunk mat.
- Remove the rear fender.
Note. You can use a thin chisel for this. Use light movements to squeeze the rear fender slightly, but try not to damage the car body.
- You need to drill the points at the junction of the wings and the rear window frame. You can now remove the rear fender.
- Carefully remove any metal strips that remain on the fender. Nippers and chisels will help with this. The edges must be smooth and polished.
Wing back right
VAZ 2110
- If there is dirt under the wing, it must be removed. This surface must be thoroughly degreased.
- Attach the new welding wing.
Repair of rear fenders on a vase 2112
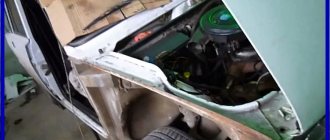
They brought us a VAZ 2112
in very poor condition, the hole on the arch body is completely rotten, a lot.
body repair Moscow vases 2112. Save option (3 pcs.)
How the tenth family of VAZs
.
Replacement of rear
arches and
repair
of spar.
If the arch began to rot the rear wings
Fender back to the right for VAZ 2110
Iron corrodes very quickly, which can damage the entire car as it grows. It is recommended to start repairs when the rust has not yet seeped into the salt, as the consequences will be much worse. Most often the front arch or rear
fenders . To resolve this issue, you must do the following:
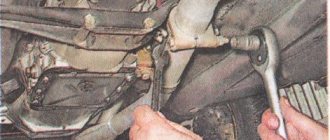
- Turn off the ground so you can easily carry out any welding work.
- The damaged part must be cut off and the remaining parts properly cleaned.
- To seal the resulting hole, you need to attach the patch on the “wrong” side. This must be done by welding.
Note. Before this, it is necessary to treat the damaged area with acid to get rid of corrosion. And to make it easier to process this part in the future, you need to drill a small hole in it (preferably using a)
- The patch should be cut from stainless steel to prevent rust.
Note. To make it easier to cut the patch, you need to take a piece of cardboard, attach it to the damaged part and press it so that its size is transferred to the cardboard. The result will be "print". You need to cut the patch a little larger than it. Transfer it to metal and cut it.
- Now you need to weld the edges of the patch to the fender so it fits nicely.
Wing back right
for VAZ 2110
- Of course, it won't look very nice, so you will need to clean it.
- Now you need to remove everything inside the seams. Use a special tool for this.
- Sprinkle with zinc.
- You need to take sandpaper and smooth the entire surface. After this it is necessary to degrease well. Remove remaining zinc.
Note: It can be cleaned with a solution of baking soda and water.
- You will need to wait a bit for the degreaser to evaporate.
- Cover with bauxite primer and let dry.
- Then smooth the surface again with sandpaper.
- Now you need to make sure that the seams are not visible. Putty will help with this. First you need to apply it to the seams so that they are filled. Do not level immediately as air bubbles may appear. You can then apply the caulk to the entire site.
- All that remains is to paint.
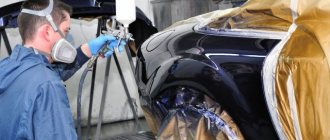
Painting the back of Vas wings
Picture of the rear wing
If the car breaks down for some reason, it needs repairs . However, if it is scratched, it should be painted. After the repair, the wing will still have to be painted.
- First, you need to highlight the damaged parts with a marker so that you can give them the most attention during the painting process;
- Next comes a primer. It is necessary for the paint to adhere better to the car;
- The next step is to prime the base paint.
Note: The paint should be sprayed in a thin layer, so the sprayer should be about 20 cm away from the wings .
- Let it dry for 5-7 minutes.
- Next comes the second coat of paint.
- Let it dry a little again.
- Apply a third coat.
Note: Wait about 20 minutes before applying polish. And if dust has settled a little on the surface of the wings , it should be removed with a sticky cloth.
- Now you can start applying the polish. Apply primer.
Note. You should not try to create a glossy surface with the first coat. This may result in the formation of varnish residues.
- Let the varnish dry for 7-10 minutes.
Note. You can then test for tack (if it's slightly tacky but not wearing off, another coat can be applied).
- Second coat of varnish. Let it dry thoroughly.
- Wipe with a damp cloth.
- Polishing vases.
Photos and videos found on the Internet will help you replace, repair
, picture
rear DIY wings. Any instructions will help you do everything quickly and accurately, although you will have to work hard. But the price of “home” repairs is much lower than in a car service.
Repair process
VAZ 2110 rear right fender
- Raise the car on a jack.
- Press out the wing.
- You need to level the surface using a heavy tool (this could be a hammer). Take a nozzle with a sharp flat end and apply it to the other side of the dent. After this, hit the flat surface of the nozzle with a hammer. A slight leveling will be noticeable.
- The outside needs to be straightened with a flat object.
Note: it is better to straighten using an iron tool, since aluminum will not work. All actions must be performed quickly. However, you should not hit too hard. This can cause the metal to stretch, causing the wing to expand slightly.
- The edges need to be knocked out very carefully, along one line.
Complete rear fender replacement
VAZ 2110 right rear fender
In some cases, it is necessary to completely replace the rear fender. For example, if it is damaged to such an extent that there is no point in even trying to repair it. Usually it is changed if:
- It was significantly deformed upon impact.
- It has small tears.
- Penetrating corrosion is observed.
Functions of fender liners, installation recommendations
To prevent the occurrence of corrosion processes and to increase the service life of wheel arches, fender liners are installed today. Their second technical name is lockers. Of course, it is very expensive to repair a niche today, so it is better to install the fender liners yourself if they were not installed at the factory. In addition, lockers improve the appearance of the car. Different materials are used to make fender liners:
- polyethylene;
- fiberglass;
- polyvinyl chloride;
- copolymers.
The following types of materials have excellent properties:
- high strength;
- elasticity;
- environmental Safety.
It must be said that they are distinguished by low thermal conductivity. Therefore, snow adhesion and ice formation are not observed on the surface of the lockers. Auto parts stores provide every car owner with a wide range of wheel arch liners. Corresponding elements are produced for almost every car model.
The best quality installation of lockers can be done at a service station. But you can install fender liners on a VAZ yourself if you have certain skills and some specific knowledge. The service life of the VAZ wing depends on the tightness of the fender liners. A tight connection is much easier to make with special equipment. Before installing the wheel arch liner, you must:
- wash;
- dry;
- coat with an anti-corrosion compound.
To carry out such technological operations, a special stand is used. The installation of the fender liners itself does not cause any particular difficulties. They are secured with self-tapping screws, which must be screwed into the “pistons” included in the kit. The wheel arches have special technological holes that coincide with the mounting holes for the fender liners.
Therefore, there is no need to do additional drilling. As a result, the paint coating that was applied to the surface of the wheel arch is not damaged. To install the front fender liner, you need to perform several operations:
- a fender liner is inserted into the wheel arch;
- the mudguard is fixed;
- tighten three screws securing the locker to the front bumper;
- all pistons are installed in the technological holes;
- A self-tapping screw is screwed into each piston;
- the upper fastening of the fender liner is performed;
- Removing the fender liner is carried out in the same sequence, but in reverse.
To install the rear fender liners, follow these steps:
- the rear fender liner is inserted into the wheel arch of the VAZ wing;
- the mudguard is screwed on;
- the top screws are tightened;
- the lower screw screws the fender liner to the rear bumper;
- Remove the rear fender liner in the reverse order.
Step-by-step instructions for removing and installing bumpers on the Daewoo Nexia
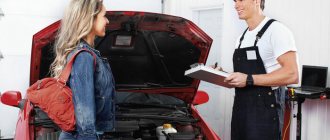
Daewoo Nexia belongs to the category of popular middle class vehicles. Now this brand of car is in demand among Russian car owners due to its low price, excellent driving characteristics and good build quality.
During road accidents, the front and rear parts of the car are often damaged, so before removing the rear bumper of the Daewoo Nexia, you need to familiarize yourself with the procedure for dismantling and installing this element.
+7 Tver, st. Bobkova, 21, bldg. 1
Trade in auto parts for foreign cars
Everything for Motors
+7, Gorki Leninskie, Technopark M4, Zapadnaya street 28A
We are the official exporter and manufacturer of auto parts for engine restoration and are ready to offer high-quality auto parts that will extend the life of the internal combustion engine. We have it in stock.
+7(903) 960-16-21 Moscow, Leningradskoe highway, 196
We work 24 hours a day from Monday to Friday. Saturday and Sunday from 9-00 to 21-00. We offer: Batteries, MAZ spare parts, KAMAZ spare parts, ZIL spare parts, GAZ spare parts, GAZelle. brake
- Mudguard left front
- Right rear mudguard
- Mudguard right front
- Rear left fender
- Rear right fender
- Front right fender
- Lockers
- Front left fender liner
- Front right fender liner
Removing and installing the front left wing of the Daewoo Nexia. First you need to lift the hood, then install the stop. Remove the outer casing of the front bumper, and also remove the caps from the windshield wiper arms. Unscrew the nuts securing these levers. Remove the levers, unscrew the screws that secure the ventilation grille panel. Disconnect the tubes supplying fluid to the windshield washer nozzles. Next, remove the ventilation grille. Also remove the front turn signal lights, and then remove the parking lights. Unscrew the bolts securing the wing. Remove the wing from Daewoo Nexia. Installing a new or old front left fender occurs in the reverse order.
Wing painting
After you had to replace the rear wing on a VAZ 2110, paint it to match the body. To do this you need:
- Mark the damaged areas with a marker so that you can focus on them when painting.
- Cover the elements with a primer - it will give the paint greater adhesion to the metal.
- Apply a base coat of paint and leave for 6-7 minutes to dry.
- Apply a second coat, let dry, then a third.
- Allow the paint composition to dry completely.
The sprayer should be held 20 cm from the area to be painted - this way the paint will lie evenly and in a thin layer.
Next, proceed to varnishing. To do this you need:
- Apply the first coat of varnish to the painted areas.
- Leave to dry for 6-7 minutes. Do not achieve a glossy surface; a thick layer will leave unsightly streaks. If your fingers stick slightly to the varnish, you can safely apply a second coat.
- Wipe gently with a damp cloth.
- Polish.
Do not use the car for 2-3 hours to allow the paint and varnish to dry completely.
Repair process
VAZ 2110 rear right fender
- Raise the car on a jack.
- Press out the wing.
- You need to level the surface using a heavy tool (this could be a hammer). Take a nozzle with a sharp flat end and apply it to the other side of the dent. After this, hit the flat surface of the nozzle with a hammer. A slight leveling will be noticeable.
- The outside needs to be straightened with a flat object.
Note: it is better to straighten using an iron tool, since aluminum will not work. All actions must be performed quickly. However, you should not hit too hard. This can cause the metal to stretch, causing the wing to expand slightly.
- The edges need to be knocked out very carefully, along one line.
Complete rear fender replacement
VAZ 2110 right rear fender
In some cases, it is necessary to completely replace the rear fender. For example, if it is damaged to such an extent that there is no point in even trying to repair it. Usually it is changed if:
- It was significantly deformed upon impact.
- It has small tears.
- Penetrating corrosion is observed.
VAZ 2110 rear right wing
Replacing a wing is a rather labor-intensive process, but it can be done at home by following the instructions:
- You need to completely empty the trunk, remove the bumper, headlights (see Replacing headlights on a VAZ 2110: we do it ourselves), the fuel tank, and also the trunk mat.
- Remove the rear fender.
Note: You can use a thin chisel for this. Using careful movements, you need to slightly squeeze out the rear wing, but try not to damage the car body.
- It is necessary to drill points at the junction of the wing with the transverse rear window frame. Now you can remove the rear wing.
- Carefully remove any strips of metal that remain on the wing. Nippers and a chisel will help with this. The edges need to be straightened and sanded.
Rear right wing of VAZ 2110
- If there is dirt under the wing, it needs to be removed. This surface must be thoroughly degreased.
- Attach the new wing by welding.
How the tenth VAZ
.
Replacement of rear
arches and
repair
of spar.
Rear right wing for VAZ 2110
Additional Information
An alternative to completely replacing the rear arches is to weld on patches. A similar repair is demonstrated in the video clip.
If you don’t want to get involved with welding work, you can resort to using special inserts based on carbon fiber (fiberglass). Carbon fiber strips are simply glued onto pre-cut and cleaned holes to prevent corrosion. Body putty is applied over the fiberglass. Of course, such repairs will not last long. The body is puttied with the expectation of six months of intensive use of the car.
Regarding the implementation of painting operations, the topic of painting the rear arches deserves a separate review. Body parts are painted in at least 3 layers. First, the metal is primed. Then the color is applied to match the body color. The top protective layer is created by varnishing. After applying the varnish, the surface of the arches is thoroughly polished.
All molar operations must be carried out in a dry, warm room. The spray booth must have sterility comparable to that of a laboratory. There should be no dust or aerosol impurities in the atmosphere of the painting chamber. Ideal conditions for painting the body allow you to create a desiccant and a fine air filter that effectively retains oil impurities.
Source
How to Remove the Front Fender on a VAZ 2110
It's no secret that on the VAZ 2110 the right front fender serves not only an aesthetic function, but also serves as protection. Often this part of the body is subjected to mechanical or other impacts that have a negative effect on the surface or the wing as a result. In this version, the front right fender of the VAZ 2110 is replaced by another repair, which you will like better, quietly carried out at home.
Front right wing of VAZ 2110
First of all, let's find out how to remove the wing from a VAZ 2110 car. Let's get started:
- First, you will need to remove the side turn signal, but before doing this, disconnect the battery;
Note. Removing the bumper involves removing a special fastening on the right side of the VAZ 2110 car.
- We take out the side turn signal, moving it to the front of the car and removing it from the special hole;
Note. The turn signal housing should also be removed and the lamp socket with the lamp should be moved towards the front.
- We find a bolt at the bottom that strengthens the buffer on the right side;
- We loosen the nuts that secure the crankcase protection with the bumper of the VAZ 2110 (there are 5 of them);
- Remove the radiator trim;
- Loosen the front buffer bolts.
Note. The front buffer bolts (there are two of them) are loosened if your goal is simply to move the buffer in the appropriate direction, thereby gaining access to the nut that secures the front wing mount.
- Unscrew this bolt;
- Then remove the headlight from this side of the car;
- Then grab the wheel arch liner and remove it;
- Now you need to unscrew the screws that secure the wing to the body (we are talking about the upper fastenings, which are turned out with a 10mm wrench);
- We do the same with the screws that secure the wing to the body.
How to remove and install the front bumper of VAZ 2110,11,12. And all possible adjustments.
Note. During the work, it is necessary to use not only one key, but also a screwdriver with a wide blade, and also a second key with the same number.
- The wing is simply removed when there is nothing to hold it.
Right front wing of VAZ 2110
As for installing a new or repaired wing, the process is similar to removal. Our client is left with the stages of work to be done in reverse order.
Note. During installation, the wing should be carefully adjusted to other parts of the body. This is important and requires special vigilance.
When installing a new wing, it is also important to observe the following points:
- Install, as stated, in the reverse order of removal;
- Clean surfaces on the car body;
- Install new insulating gaskets between the body and the upper part of the fender, as well as between the front pillar and the rear part of the fender.
Note. If such gaskets are missing and finding them is a problem, it is recommended to use mastic, which fits perfectly on the body and seals the cracks.
- The wing must be aligned through the use of enlarged holes, doing this in accordance with the gaps and protrusions of other body panels of the VAZ 2110;
- Be sure to coat the wing with an anti-corrosion compound after installation.
A complete step-by-step change of the right wing on a VAZ 2110 involves the following actions:
- We arm ourselves with the necessary keys (10, 13);
- The front facing linings are dismantled;
- The front fender liners are also removed;
- It will now be necessary to disconnect the side fastenings of the buffer trim;
- The side turn signal on the right side is dismantled;
- Now you need to get to the bolt that secures the headlight trim and unscrew it;
- We also remove the turn signal apron;
- We find the bolts securing the right fender to the body;
- We turn them inside out.
Front fender. Correct dismantling. VAZ 2110, 2112
Note. There are four bolts that secure the wing to the body. This is a front bolt, a bolt that secures the fender to the sill and two bolts that secure the fender to the strut.
- Now you need to unscrew a bolt that is not familiar in the engine compartment (it strengthens the wing to the cooling radiator frame);
- Then we unscrew the three bolts that secure the wing to the mudguard;
- The time has come to free the wing from the factory mastic.
Note. The front fender should be removed from the factory mastic very carefully so as not to deform the narrow sheet.
Front fender installation
Installation proceeds in the reverse order of removal. In order to ensure that the process of changing the right front wing of the VAZ 2110 passed without errors, it is recommended to watch a high-quality video or, in other words, photo materials. It will also be useful to use other step-by-step annotations when working, listen to the advice of experts, etc. When working in artisanal conditions, it is important to keep in mind that the main thing is desire and patience, and the rest will follow. Independent replacement and repair will help the owner of a modern vehicle save a lot of money, because the cost of work at 100 is not low and there is no confidence that only masters work there.
Removing the mudguards of the engine compartment of Daewoo Nexia N150
Tools:
- Screw jack
- Wheel key
- Open-end wrench 7 mm
- Open-end wrench 10 mm
- Straight box spanner 10 mm
- Straight box spanner 17 mm
- Ratchet wrench
- Extension
- Head 4 mm
- Head 10 mm
- Hammer medium
- Beard
- Medium flat screwdriver
Parts and consumables:
- Left and right mudguards (if necessary)
- Wheel chock
Note:
Remove mudguards for replacement or when you need access to parts and mechanisms of the engine compartment that the shields cover.
Carry out the work on an inspection hole or overpass.
Below is an image of the placement of the mudguards on the underside of the vehicle.
Before removing the shields, remove the engine crankcase protection, if installed on the vehicle.
Removing the left mudguard
1. Place the car on the inspection hole, activate the parking brake and place a wheel chock (shoe) under the rear wheel.
2. Raise the left front part of the car and remove the wheel. To do this, you need to unscrew the wheel bolts with a wheel wrench and remove them.
3. From the bottom of the car, using a 10 mm wrench, unscrew the two nuts of the front and the bolt of the rear fastening of the mudguard of the engine compartment.
4. From the wheel arch side, using a wrench of the same size, unscrew the rear bolt and the front bolt of the mudguard.
5. Remove the left engine compartment mudguard.
6. Install the left engine splash guard in reverse order.
Removing the right mudguard
1. Remove the right front wheel (see steps 1-2 above).
2. From the bottom of the car, using a 10 mm socket, unscrew the two nuts of the front and the bolt of the rear fastening of the right mudguard of the engine compartment.
3. From the side of the right wheel arch, using a head of the same size, unscrew the two bolts of the side fastening of the mudguard.
4. Remove the intake tract resonator as described here.
5. Using a 4 mm socket, unscrew the stud securing the resonator.
6. Using a 10 mm wrench, unscrew the bolt of the front fastening of the mud guard of the engine compartment and remove the shield.
7. Install the right mudguard of the Nexia engine in the reverse order.
Replacing the wing of Lada 2111 (VAZ 2111)
The car body is highly susceptible to corrosion and varying degrees of damage. Constant driving around the city causes dents to appear on the body. The front fenders are especially susceptible to damage. If the dents are not severe, the impact area can be repaired with your own hands in a garage.
To repair the front wing of VAZ 2110, 2111 and 2112 you will need a straightening hammer and pliers. You can straighten without removing the wing. After straightening work is completed, the damaged area must be painted so that the appearance of the car does not deteriorate. To do this, the paint surface is degreased and sanded with 120-grit sandpaper to a metallic shine. Next, putty with fiberglass is applied, it is sanded, and the last layer of putty is applied. Three layers of liquid primer are applied on top, and it must be allowed to dry for two hours. After this, painting is carried out using a special sprayer.
If the front wing is severely deformed, it would be more advisable to remove it and install a new wing. This is done in the following sequence:
1. Remove the side turn signal;
2. The bumper and headlight are removed;
3. Next, the wheel arch liner is removed;
4. Using a “ten” key, unscrew the upper self-tapping screws securing the wing to the body, as well as the lower self-tapping screw securing the wing to the bracket;
5. Unscrew the lower self-tapping screw and the self-tapping screws attaching to the front pillar;
6. The wing is removed.
After the damaged wing is removed, the new part is put on in the reverse order. It is also necessary to remember that before finally tightening the screws, the wing must be adjusted to fit the gaps with other body elements. This completes the replacement of the front fender.
If you are interested in how to repair and replace the rear wings of a VAZ 2110, 2111, 2112, then this review is for you. After watching the video, you will do everything yourself and save a significant amount. All work is carried out without the use of very expensive tools; almost everyone has standard tools in their garage box. Repair of rear wings of VAZ 2110
Detailed video guide: Repair and replacement of rear wings of VAZ 2110, 2111, 2112:
Brief description of the work: How to repair the rear wings of a VAZ 2110, 2111, 2112? In order to restore the wings to their former appearance, they need to be straightened. Then putty and sand. Only after this can you start painting the body parts. For clarity, watch the video on repairing, replacing and painting the rear wings of the VAZ 2110, 2111, 2112.
We are glad to welcome all car enthusiasts, auto mechanics, mechanics and those simply interested on our website. The AvtoSlesar24.ru website was made for you and we will try to help repair your car.
On this page we will demonstrate the replacement and straightening of the front wing in a VAZ 2110/2111/2112. If you want to try replacing it, our video tip might be able to help. What subtleties can be encountered during repairs?
Price article
For example, the price for the original right wing of a Chevrolet Cruze, which has been produced since 2009 to the present, starts at 11,700 rubles. There are several articles by which you can find this spare part: 95963448, 95963446, 96930969, 96930968, 96930969, 95963448, 95963446, 96930968, CV10130AR, CV2810160-0R00, H-017 448, CV2810160-0R00CV1602AR, CVCRZ09-270-R, CV2810160-0R00, PCV10130AR, CV2810160-0R00, CV10130AR, CV2810160-0R00, CV1602AR, GD99D72R, GD99D72R;
The original left wing of the Chevrolet Cruze has been produced from 2009 to the present, and can be purchased for 14,500 rubles. Part number:
95963443, 94560507, 94560507, 95963443, GD99D72AL;
Non-original wings; both right and left can be easily purchased in many stores and outlets that sell auto parts. Or bring it to order. The cost is an order of magnitude cheaper than the originals. The left one will cost one and a half thousand, and the right one can be found for 1300.
The rear right fender for a Chevrolet Cruze sedan will cost 10,000 rubles. Not original 8900. Article 54937.
The rear left one costs 9900, not the original 8900 rubles. With article number 95318141.
The front fenders of the hatchback are exactly the same as those of the sedan, but the rear fenders are different. Prices for rear wings: for example, the original right one costs 16,000 rubles, the original pony can be found for 10,000 Article number 95479663.
The original left one will cost an amount equal to 18,000 rubles; a non-original one can be obtained for eleven and a half. Article number 95915270.
You can also purchase fenders for a Chevrolet Cruze of any model (sedan, hatchback) for much less at car dealerships. Alternatively, you can also match it to the color of your car.
Replacing the wing of Lada 2111 (VAZ 2111)
The car body is highly susceptible to corrosion and varying degrees of damage. Constant driving around the city causes dents to appear on the body. The front fenders are especially susceptible to damage. If the dents are not severe, the impact area can be repaired with your own hands in a garage.
To repair the front wing of VAZ 2110, 2111 and 2112 you will need a straightening hammer and pliers. You can straighten without removing the wing. After straightening work is completed, the damaged area must be painted so that the appearance of the car does not deteriorate. To do this, the paint surface is degreased and sanded with 120-grit sandpaper to a metallic shine. Next, putty with fiberglass is applied, it is sanded, and the last layer of putty is applied. Three layers of liquid primer are applied on top, and it must be allowed to dry for two hours. After this, painting is carried out using a special sprayer.
If the front wing is severely deformed, it would be more advisable to remove it and install a new wing. This is done in the following sequence:
1. Remove the side turn signal;
2. The bumper and headlight are removed;
3. Next, the wheel arch liner is removed;
4. Using a “ten” key, unscrew the upper self-tapping screws securing the wing to the body, as well as the lower self-tapping screw securing the wing to the bracket;
5. Unscrew the lower self-tapping screw and the self-tapping screws attaching to the front pillar;
6. The wing is removed.
After the damaged wing is removed, the new part is put on in the reverse order. It is also necessary to remember that before finally tightening the screws, the wing must be adjusted to fit the gaps with other body elements. This completes the replacement of the front fender.
If you are interested in how to repair and replace the rear wings of a VAZ 2110, 2111, 2112, then this review is for you. After watching the video, you will do everything yourself and save a significant amount. All work is carried out without the use of very expensive tools; almost everyone has standard tools in their garage box. Repair of rear wings of VAZ 2110
Detailed video guide: Repair and replacement of rear wings of VAZ 2110, 2111, 2112:
Brief description of the work: How to repair the rear wings of a VAZ 2110, 2111, 2112? In order to restore the wings to their former appearance, they need to be straightened. Then putty and sand. Only after this can you start painting the body parts. For clarity, watch the video on repairing, replacing and painting the rear wings of the VAZ 2110, 2111, 2112.
We are glad to welcome all car enthusiasts, auto mechanics, mechanics and those simply interested on our website. The AvtoSlesar24.ru website was made for you and we will try to help repair your car.
On this page we will demonstrate the replacement and straightening of the front wing in a VAZ 2110/2111/2112. If you want to try replacing it, our video tip might be able to help. What subtleties can be encountered during repairs?
OUR REAL WORKS! "NOT DOLLS"!
The cost of the work was:
Front bumper (removal/installation) — RUB 1,500. Front bumper (repair) — RUB 2,000. Front bumper (painting) — RUB 6,500. Front right wing (repair) - 2,500 rubles. Front right fender (painting) - 6,500 rubles. Right windshield pillar (painted) — RUB 3,500. Car wash - 500 rub.
The price is indicated on a turnkey basis (labor + materials).
The cost of the work was:
Front bumper (replacement) — RUB 1,500. Front bumper (painting) — RUB 6,500. Front right fender (replacement) - 1,000 rubles. Front right fender (painting) - 6,000 rubles. Right wing mounting bracket (repair) - RUB 2,000. Right wing mounting bracket (painted) — RUB 1,250. Front panel (repair) - RUB 2,000. Front panel (painting) — RUB 1,250. Front fog lights (installation) — RUB 1,500. Car wash - 500 rub.
Source