Chips, cracks and serious damage to the windshield are an annoying problem for motorists. Sometimes there is simply not enough time for urgent repairs and taking the car to specialists, so the situation requires timely solutions. Fortunately, even a beginner can handle the process of replacing glass at home.
There are common fears in the minds of drivers regarding this windshield installation procedure. Of course, experience is extremely necessary, but how can you get it without practical action? By following a certain point and adhering to the basic rules, you can easily remove the damaged part of the car and replace it with a new one.
To dispel unpleasant thoughts and the beginnings of fear, it is important to mention the cost of car repairs at a service station. It often costs a hefty amount, especially when replacing a heated windshield that cannot be repaired. Therefore, DIY home procedures have huge advantages.
Reasons for replacing glass
There are only 2 reasons for carrying out repair work on the windshield:
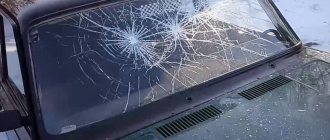
Malfunction or defect - chips, holes, cracks, scratches. Most drivers face this problem, which grows over time and turns into a disaster. A whole “web” of cracks blocks the entire view of the motorist, risking people’s lives and health.
The time required to replace a windshield depends on the type of car, but on a passenger car it will not take more than 2-3 hours. Do not risk yourself, your loved ones and other motorists on the road.
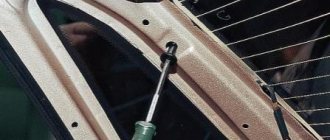
Penetration of liquids through the seals indicates poor-quality glass installation. Most often, a leak can be eliminated using sealant, but sometimes the material needs to be completely re-glued. If the leak is small, the windshield seal may need to be replaced. It is removed using a thin screwdriver and replaced with a new one.
Replacing a windshield at home will not happen without the necessary tools and a dry room. Make sure the garage is draft-proof and clear of sharp or bulky objects.
Why do you need to replace your windshield?
There are two main reasons that lead to the need to replace your windshield.
- Penetration of moisture from under the seal. Leakage between the glass and the body occurs due to the presence of an untaped area. If there is no warranty, you will have to carry out the repairs yourself. Sometimes it is possible to eliminate a leak when a hole is detected by filling the gap with sealant. If you cannot get rid of the leak, you will have to completely re-glue the glass.
- Damage to the windshield. Many motorists have encountered problems such as cracks and chips. They gradually grow, forming a whole “web” on the windshield. In this case, you will not be able to pass the state technical inspection, and the operation of the vehicle will be unsafe. If there is minor damage, chips and cracks can be repaired, otherwise the glass must be replaced.
Below we will tell you what tools and materials you will need for replacement, how to remove the old windshield and install a new one in its place. And at the end of this article, watch detailed video instructions on how to replace a windshield with your own hands according to all the rules.
Materials and tools
Before starting work on the windshield, you need to wash the car and keep it indoors for exactly one day (to dry).
For high-quality and safe glass replacement, ask a second person for help. It is much easier to cope with heavy work together - one holds the suction cups, the other works with the string, and so on:
- Metal string with holders.
- Sharp wire line or awl.
- Sacral and thin screwdrivers.
- Glass holder in the form of suction cups.
- Nut wrenches.
- Flat gravel.
- Painting adhesive tape.
- Sealant.
- Device for applying glue.
- Protective primer.
- Solvent for old glue.
- Absorbent swabs and cloth gloves.
The entire list of materials can be found in a specialized automotive store or online. It is important to note that the salon cost of replacing a windshield is 3 times higher than the cost of all tools.
Windshield replacement procedure
We will analyze the correct technology for replacing glass on a car, as is done in workshops, and then it’s up to you to decide whether to change it yourself or leave it in the hands of a specialist.
Glass dismantling
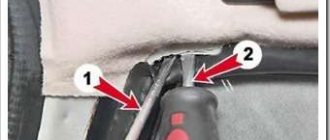
- The first step is to gain access to cut out the old glass (remove the wipers, moldings and rubber seal).
- If possible, cover areas of the interior trim with masking tape or dismantle individual trim elements in order to protect them from damage and contamination by glue. Also disconnect the wires if any (for example, rain sensor or heated parking wipers).
- Thread a string for cutting glass and, together with an assistant, carefully cut the glass.
- To remove old glass, it is recommended to use special suction cups, which can be used to easily dismantle it.
Basic steps when replacing glass on a car. Installation and dismantling of glass; removing old glue from the opening on the car body; preparing glass and applying glue.
Preparation and installation of a new stele on a car
- After cutting the glass, to completely remove the old glue, you need to go through it with a knife. remove any remaining sealant as carefully as possible so as not to damage the paintwork or damage the plastic upholstery.
- We degrease the glass installation area around the perimeter.
- We apply the activator to the surface of the new glass along the perimeter at the place where the glue is applied (apply with a clean, lint-free cloth in one motion, without rubbing). Then, after a minute, remove the remaining activator with a dry cloth using the same method.
- The next step in preparing glass for gluing is to apply a primer in the place where the glass adhesive-sealant will be applied, as well as on the edges of the glass. This is done to protect the glue from UV rays, since standard silk-screen printing may not cope with such protection well enough. The soil should dry for 15 minutes at a temperature of +23 degrees.
- Turn the glass over to install the suction cups so that after applying the sealant it is convenient to install it on the car.
- To improve adhesion and to avoid corrosion on the edges of the body where the glass is installed, experts also recommend treating it with a primer.
- If the installation of glass also involves the presence of a rubber molding that is still in good condition, then before applying glue to the glass, clean it from dirt and dust, and after degreasing, install it in place and secure it with tape so that the glue does not squeeze the seal out during installation.
- Having turned the glass back over, we install the glue can into a special gun and apply glue-sealant to the prepared surface of the glass without breaks and with a uniform ridge height (some craftsmen apply glue not to the glass, but to the body at the installation site).
- Holding the suction cup handles, we install the glass into the opening . The insertion is carried out as carefully as possible; the process must occur without shocks or displacements while simultaneously controlling the placement of the rubber molding.
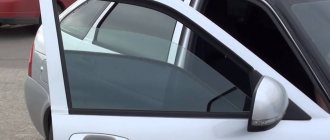
- Using light pressure, press the glass along the entire perimeter of the car opening. Then secure it with safety tape. If the sealant has come out in some places, do not rush to remove it, you need to wait for polymerization. Before installing the glass, it is recommended to lower the side windows to avoid air impact when closing the door. Now all that remains is to wait 7-10 hours until the glue dries . During this period, it is prohibited to slam the door or touch the glass. Create all the conditions for proper drying of the sealant specified in the instructions for it. At this point, replacing the glass on the car is considered complete; all that remains is to remove the tape and check the quality of the work done by spilling plenty of water.
All work must be done with nitrile gloves.
When a chip or crack in the glass cannot be repaired, it is then that the glass on your car needs to be replaced. And although the whole process does not look very difficult, failure to follow all the rules and technologies when gluing in new glass can result in, at a minimum, falling out on the first bump or behind a hot interior after rain, not to mention the situation in the event of an accident.
Author: Ivan Matieshin
Removal process
Using a thin screwdriver, remove the seal along the entire front surface of the car. Next, we carefully disassemble all the unnecessary parts on the glass: wipers, moldings and protective plastic coating.
Changing the engine oil with your own hands - step-by-step instructions on how to correctly, quickly and easily change the oil in the engine and transmission (125 photos and videos)Do-it-yourself speed controller - how to make a simple adjustment device or smooth descent (120 photos)
- Can a non-owner apply for compulsory motor liability insurance?
In the cabin, it is necessary to protect the dashboard from further action.
We remove the seal from the inside of the cabin, and also remove the front pillar cards through the latches. Using a screwdriver, remove the screws and visors in the interior.
We eliminate all unnecessary wires that interfere with further work.
We pierce the old glue with a sharp awl. We insert strings into the holes and begin cutting off the sealant from different sides. It's better to work together.
After completing the action, carefully remove the glass using suction cup holders. Use a solvent to remove the old sealant. Place damaged glass on cardboard or a blanket to avoid splinters on the floor.
Do-it-yourself engine repair - major restoration and maintenance of an internal combustion engineDIY bumper: how to make a unique polymer bumper for a car at home (125 photos)
Do-it-yourself car painting - preparation for coating and the main stages of high-quality car painting (100 photos)
Even a beginner with 1 person can handle a car. But, if you get around to replacing the windshield on trucks, you need to involve 2-4 people in the dismantling. Heavyweight glass differs greatly not only in distance from the ground, but also in weight categories.
What you will need to get the job done
The question of how to replace a windshield requires careful preparation. And this applies not only to the choice of what is necessary, but also to the selection of important tools and auxiliary materials.
First of all, you will need:
- A thin wire with handles at both ends. This unique tool will become indispensable when removing an old copy, because it is tightly glued with a special hermetic glue;
- Awl. Using an awl, you can make thin holes without damaging the car body, and thereby create a passage hole for the wire;
- Big suckers. They will be needed to hold the old glass in a stationary state. They can be simple, or have a special lever for suction;
- Screwdrivers and wrenches. The versatility of these tools does not need to be explained; they are useful in many ways;
- Chisels. It is better to take thinner ones, because they will be useful for carefully removing glass from the sealant;
- Glue. The most ideal option would be to purchase a special glue - sealant for automotive parts. The fact is that it bears most of the load from the wind, as well as protection from bad weather, which is why it is not worth saving on its installation;
- Solvent. This solution is best to deal with the problem of old glue residues.
- General things. This should include various rags, construction gloves, tampons, and other small items at your request.
New glass installation process
We treat the boundaries of the body and glass with a primer that improves tenacity.
We install a new seal. Apply sealant to the contours of the body.
Using suction cups, install the glass into the opening and fix it. It's better to use tape. We return moldings, protective film and wipers.
It is important to protect the glass from moving, so we leave the car alone for 24 hours.
Polishing a car with your own hands - a step-by-step master class on how and how to polish a car’s paintwork (70 photos)Polishing headlights with your own hands - how and how to properly polish headlights at home (100 photos)
Replacing thresholds with your own hands - advice from professionals on repairing the bottom and thresholds (120 photos)
After removing the protective layer of masking tape, you need to wash the car and check the tightness of the seams. If leaks are detected, we perform the procedure of additional application of glue-sealant.
Installing new car glass
You will need suction cup handles, which are used to grip the windshield. Otherwise, you can easily damage the edges of the triplex and ruin an expensive product. To glue the glass with your own hands, it is better to use the services of an assistant. One person takes the product from inside the car, and the second carefully inserts it into its seat. For large auto glass, it will be more convenient for three people to work - two people will hold the product, and the third will take it into the cabin.
The gluing procedure is quite complicated:
- using a convenient gun, sealant is applied to the seat or to the edge of the glass in a continuous thin strip;
- excess material is immediately removed; the adhesive mixture must not be allowed to stick out from the seat;
- the next stage is quick and very careful installation of the glass, this must be done within 2-5 minutes after applying the glue;
- then masking tape is applied on top of the glass and body for additional fixation of the product in different places;
- It is forbidden to close the doors of the car while the adhesive mixture is drying, otherwise the interior will be filled with toxic compounds;
- You can drive the car only after the glue has completely dried; the period depends on the instructions of the sealant manufacturer.
Performers' mistakes often begin already at the preparation stage. It is important to buy auto glass that matches your car and offers optimal geometry. Another big mistake is applying too thick or an uneven layer of adhesive material. This will cause the glue to bulge, and it will be difficult to do anything about this problem.