There are frequent cases when the oxygen sensor on a VAZ 2110 begins to malfunction. As a rule, this happens after a solid mileage. Let us immediately note that malfunctions of the lambda probe, as this sensor is often called, cannot be repaired; only replacement will help.
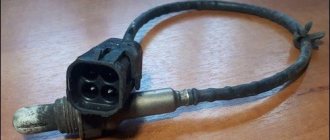
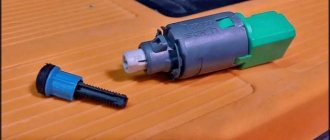
Old and new oxygen sensors
Old and new oxygen sensors
Purpose
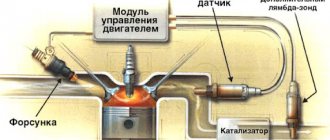
A lambda probe (oxygen sensor) is necessary for the normal functioning of ignition systems and the preparation of a combustible mixture. Measuring the oxygen content in the exhaust gases passing through the exhaust tract, it transmits the received data to the ECU. Pre-installed software processes the received information and optimizes the composition of the combustible mixture, as well as the ignition timing, which allows:
- Develop maximum engine power in all operating modes.
- Reduce fuel consumption.
- Reduce the content of harmful substances in exhaust gases.
This becomes possible when a stoichiometric combustible mixture containing fuel and oxygen necessary for its combustion in certain proportions enters the cylinders. Measured in kilograms, the optimal ratio of air to gasoline is 14.7:1, and in calculations is denoted by the letter λ (lambda), borrowed from the Greek alphabet. Hence the name - lambda probe.
Lambda probe life and reasons for its failure
On average, a VAZ lambda probe can work conscientiously for 5-7 years or 120-150 thousand kilometers. But this is subject to normal operation of the car, excluding constant overloads, low-quality fuel and off-road driving.
The main malfunctions of the “tens” oxygen sensor are critical overheating that occurs when using poor fuel, the ingress of various process fluids into the device, carbon deposits on working elements, as well as natural wear and tear, from which no device is insured.
Device
Structurally, the VAZ-2110 oxygen sensor is designed in the same way as similar devices installed on other cars. It consists of:
- Housings with a protective tip in which slots are made.
- Two electrodes, one of which (internal) is made of zirconium, and the other (external) is made of platinum.
- Wires with a connector with which the lambda probe is connected to the vehicle's on-board electrical wiring.
The principle of operation of the sensor is based on the potential difference between electrodes heated to 300 - 400 °C. The higher the difference, the less oxygen is contained in the exhaust gases.
Restoring the performance of the lambda probe by cleaning
In some cases, the oxygen sensor stops working only because the holes in the protective screen and the ceramic tip itself are covered with soot. To restore the working capacity of the part, it is necessary to clean the lubricating zone from soot, but when performing such work, you must follow certain rules. It is important not to use for cleaning:
- metal brushes;
- sandpaper;
- files;
- other objects that can damage the ceramic element.
The best method to get rid of contaminants is to soak the ceramics of the lambda probe in a solution of orthophosphoric acid, but to do this, you must first carefully saw off the protective cap. If acid cannot be found, you can use a rust converter, which is sold in stores selling auto chemicals. Of course, to clean the part from soot deposits, the sensor must be removed.
To soak a ceramic tip, it must be placed in liquid for 15-20 minutes; the soot should disappear from the surface on its own. If the deposits are not completely removed, they can be cleaned with a soft toothbrush. After the procedure, you need to secure the protective screen using camp welding. When it is not possible to restore the lambda's functionality, there is only one option left - to buy a new oxygen sensor.
Related articles:
- Friction discs in an automatic transmission: replacement, cost Like any parts in a car, friction discs wear out over time, and they can fail for other reasons. This article will look at the symptoms of a malfunction [...]
- What were the very first cars in the world? In our time, it is very difficult to imagine existence without a car, how firmly it has become a part of human life. If half a century ago a personal car was considered almost a [...]
- Fuel consumption of a Chevrolet Niva with different engines The Chevrolet Niva has been produced in Tolyatti since 2002, the model is very popular in Russia. The compact SUV has excellent cross-country ability and is 90% domestic […]
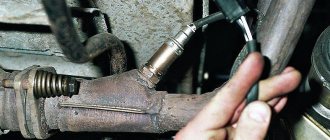
Location
During production, changes were repeatedly made to the design of the VAZ-2110. Therefore, depending on the specific modification of the car, the lambda probe may be located in different places:
- In the upper part of the exhaust pipe, near the resonator (on models of early years of production).
- On the exhaust manifold, in front of the catalytic converter (on new 1.6 liter engines).
The latest models of cars, equipped with sixteen-valve engines, were equipped with two oxygen sensors, one of which is located in front of the catalytic converter, and the other behind it.
Causes of failure
Old and new samples
Before starting the test, it is necessary to determine the reasons why the sensor stopped working correctly.
- Coolant has leaked inside the device.
- Unsuitable cleaning agents were used to clean the body of the device.
- The gasoline you fill your car with contains large amounts of lead. A popular breakdown typical for cars of those owners who prefer cheap gas stations.
- A banal overheating of the heat-resistant sensor, which again occurs due to low-quality fuel.
Article on the topic: VAZ 2110 rear wheel bearing: when to change and the complete replacement process
Symptoms of a problem
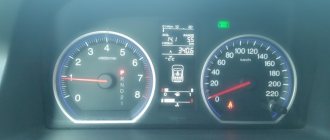
The main culprit for the failure of the lambda probe is low-quality fuel, due to which carbon deposits form on the electrodes, causing overheating of the contacts. Wire breaks occur less frequently. Most often, the driver finds out about a breakdown when the CHECK ENGINE lamp lights up, and computer diagnostics issues a fault code P0131. But it also happens that the ECU, for some reason, does not see the problem. In this case, the driver may suspect something is wrong, based on the following characteristic signs:
- Increased fuel consumption.
- Deterioration of the traction characteristics of the internal combustion engine.
- Unstable operation of the motor (vibrations, dips, floating speed).
If suspicion arises, it is necessary to first carry out a visual inspection. If there are no mechanical damages, control measurements should be taken.
Instrument testing
For such work, you can use a tester, oscilloscope or digital voltmeter. Considering the features of these devices, a voltmeter would be the optimal solution.
Examination
The check sequence will be as follows:
- Start the engine and let the car warm up.
- Next, we find the element we are interested in. If there are soot deposits or other external signs of a malfunction, there is no point in carrying out further testing with instruments. And so it is clear that it is out of order and needs to be replaced.
- Also check the condition of the wiring, the presence or absence of mechanical damage on the device.
- If everything looks fine, unplug the connector and connect a voltmeter.
- Now you can start the engine.
- Press the gas pedal in neutral to reach the 2500 rpm mark. After this, release the pedal.
- Remove the vacuum tube from the fuel pressure regulator.
- We check the oxygen sensor for functionality. To do this, look at what the voltmeter shows. If the reading is 0.8 volts or less, the probe is not working.
- It would be a good idea to check the device for a lean mixture. To do this, you need to turn on the air intake using a vacuum tube.
- If the voltmeter reads 0.2 W or less, the oxygen sensor is working normally. Deviation from these indicators indicates a breakdown of the device. Therefore, it needs to be replaced.
Article on the topic: Engine power on the VAZ 2114 and other technical characteristics
Examination
To detect faults, it is best to visit a service center and seek help from diagnostic mechanics who have special equipment at their disposal. If this is not possible, you can arm yourself with a multimeter and perform a series of control checks. To do this you will have to:
- Attach thin needles to the tips of the multimeter. They are necessary in order to take measurements without disconnecting the sensor from the electrical wiring.
- Warm up the engine to operating temperature. Only in this case will the lambda probe begin to function, and the results obtained will be correct.
- With the ignition on, measure the voltage between the signal (black) wire and ground (gray wire). On the connector these are terminals 1 and 2. It is normal if you get a reading of 0.45 - 0.50 volts.
- Measure the resistance between the white wires (terminals 3 and 4). It should be in the range from 2 to 10 ohms.
- Start the engine and measure the voltage between the signal wire and ground again. It should change cyclically, every 1.5 - 2 seconds, within 0.1 - 0.9 volts.
If at least one of the indicators is outside the specified limits, the lambda probe is faulty and should be replaced. Measurements taken with the connector disconnected from the electrical wiring may be incorrect.
Is repair possible?
In some cases, you can try to restore a failed sensor. But this option is applicable only in cases where the cause of its breakdown is carbon deposits on the working elements of the device. Combustion products disrupt the normal operation of the lambda probe, distorting the output signal. In order to independently get rid of carbon deposits on the working surfaces of the sensor, we will need:
- hacksaw for metal;
- vice;
- gas burner (you can use a burner from a household gas stove);
- clean glass container;
- orthophosphoric acid;
- soldering iron, flux and solder.
First of all, disconnect the sensor connector and unscrew it from its seat. Now it needs to be sawed, because the probe cannot be disassembled. Carefully clamp it in a vice and saw off both protective caps to get to the ceramic rod. When this is done, heat the sensor over the burner. This is necessary to burn off carbon deposits. Under no circumstances should you attempt to remove combustion products mechanically. This will only damage the device.
After heating procedures, you can continue to restore the working elements of the sensor by placing it in phosphoric acid. It dissolves carbon deposits perfectly. But don't overdo it. It is not recommended to keep the probe in acid for more than 30 minutes.
Upon completion of work, the sensor must be assembled. To do this, you will need to solder the sawed-off caps to the body using a soldering iron, flux and solder.
Price
Even on a VAZ-2110 of the same year, there are oxygen sensors not only with different catalog numbers, but also from different manufacturers. Most often this is Lada 2112-3850010-20. Prices for this part in stores range from 2200 – 3200 rubles. But you can also choose a replacement from a reputable brand. Among the possible options:
- Bosch 0 258 006 537 (2300 – 2700 r).
- NGK 1628 (2500 – 2800 r).
- Era 570023 (1700 – 2000 rubles).
All these components will normally fulfill their purpose.
Replacing the oxygen sensor
If any damage occurs, the sensor must be replaced. You can try to do this yourself. Let's consider the situation of replacing a lambda probe on a VAZ 2114:
- We put the car on an overpass or drive it into a pit and remove the motor protection (to replace the sensor with the neutralizer).
- We are looking for the wires from the oxygen sensor, and follow them to the sensors themselves, they are located on the catalyst (the first before the converter, the second after).
- We cut the clamps and disconnect the connectors.
- Let the system cool down.
- We take a wrench for “22” or special. head and unscrew the sensor.
- We take a new sensor and install it in place of the old one. We tighten the nuts.
- We connect the wires to the connectors.
- Use new clamps to secure the wires to the cooling system (do not allow contact with the exhaust pipe).
- Install the protection in reverse order.
On other car models, replacing the sensor will be identical.
https://youtube.com/watch?v=68L_IkIfRu4
Replacement problems
When replacing, the old sensor may stick to the pipe. In this case, proceed like this:
Generously pour wd-40 and try to unscrew it. Turn on the engine, heat the exhaust system and unscrew the sensor. Try to heat (being careful) the sensor itself and unscrew it. Tap it lightly with a hammer and try to unscrew it again. If this does not help, try “thermal shock”. Pour cold water onto the well-heated sensor
Try unscrewing it again.
Oxygen sensor price
The price of an oxygen sensor will vary by region and model. It ranges from 1000 to 3000 rubles. Buy a lambda probe in specialized stores and only with a guarantee.
Causes of oxygen sensor failure
- Coolant or brake fluid has come into contact with the sensor housing.
- The fuel used has a high lead content
- Severe overheating of the sensor caused by unclean fuel (clogged cleaning filters)
- The sensor has simply expired
- Mechanical damage to the sensor while the vehicle is moving.
A failed sensor will affect the operation of the vehicle as a whole and lead to additional problems. But using them you can immediately determine a possible breakdown of the sensor and replace it in a timely manner.
Related problems when the oxygen sensor fails
- The car began to consume more fuel than usual
- The car began to move jerkily
- The engine became unstable
- The normal operation of the catalyst is disrupted
- When testing for exhaust gas toxicity, the result gives inflated values.
In conclusion, I would like to give advice: in order to avoid the problems described above in the future, monitor the performance of the lambda probe. Check its condition every five to ten thousand kilometers.
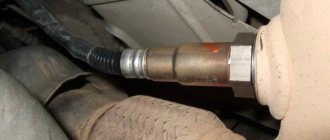
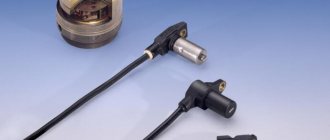
So, many people know that a Lambda probe from tens (VAZ2110) is suitable for the C20NE engine, in terms of parameters it is completely identical, the only difference is that in our native Lambda Probe there are three wires (2 white and black) and on the tens there are four wires (2 white, black and gray). two white ones need to be connected to two white ones (this is the lambda heating), black to black (this is the signal wire), and for the gray one we run an additional wire and screw it to ground.
there are two types of Lambda with tens, on the left with slots (from the 1.5 engine) on the right with holes (1.6 engine)
with the holes it died quickly... it lasted a year and that’s it, before that it was standing with the holes, lasted 3 years (75,000 km)
so I recommend taking it with slots, it is more similar to our native one
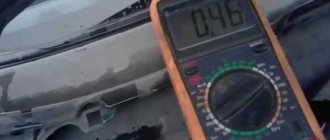
Checking the performance of the lambda is as easy as shelling pears; for this you need a multitester.
with the car running, insert the positive wire of the tester into the lambda connector into the black wire, minus the tester to ground
We set the multitester to 2000 millivolt mode
In fact, the oxygen sensor on the VAZ 2110 plays one of the most important roles in the functioning of the engine and exhaust system.
At the same time, not all car owners know what kind of device this is, what tasks it performs, or how to check the functionality of the oxygen sensor. Today we will talk about this and more.
Replacement
To remove/install the lambda probe, you must first warm up the engine to operating temperature and then turn it off. It is very difficult to unscrew the part when it is cold. After reaching the desired temperature, be careful not to get burned:
- Disconnect the connector.
- Armed with an open-end or socket wrench, first move the sensor from its place, and then unscrew it and carefully remove it from the socket.
- Make sure the socket is not damaged. Sometimes scale mounds form in it, which can damage the new part during installation. If there are any, they will have to be removed with a file.
- Install the new sensor and tighten it properly.
- Connect the connector to the electrical wiring.
If you do everything correctly, no problems should arise.
How to repair a lambda probe
Repairing a lambda probe with your own hands is quite simple; to do this, you need to determine in which particular unit the failure occurred.
If the problem is related to the circuit contacts, then first of all you need to find the break point and check whether the contacts have oxidized. The signal may simply not come from the control unit. Therefore, check the lambda power supply. If the element contacts have oxidized, they must be treated with WD40.
If a lot of carbon deposits have formed on the probe body, it may be necessary to clean all parts of the system. And here a natural question arises: how to rinse the lambda probe. The fact is that it is strictly prohibited to process platinum electrodes and ceramic rods with sandpaper. Therefore, it is necessary to use specialized products designed to dissolve rust.
To clean the sensor, follow these steps:
- Remove the lambda probe after heating its housing to 50 degrees.
- Remove the protective cap.
- Soak the sensor in phosphoric acid for 30 minutes (it will cope with even the most difficult deposits).
- Rinse the lambda in water, dry it and install the element back. Don't forget to lubricate the sensor threads with a special agent to create a complete seal (but don't use silicone sealant).
Since the cost of sensors ranges from 1000 - 3000 rubles per element, it is quite reasonable to try to repair the lambda probe yourself (see video below), and only then proceed to install a new element.