The steering rack is an integral and very important thing in a car, over time it wears out and an unpleasant knock appears, which is especially audible when turning and when driving on uneven roads. This knock is not exactly annoying, but it clearly makes it clear that something is wrong with the car so, and in general there is no need to joke with the steering mechanism and you will still have to throw away some money if you don’t remove this knock (in principle, you can even remove it for free by simply tightening the rack for this, we will write how to do this in another article to which we will give you a link a little later) then the rack may one day simply jam, in connection with this the steering wheel will freeze in one position and you will only have to press the brake, because there will be no other way out, so be careful with the rack.
If you want to repair your rack, then stock up on tools in advance, namely: You will need a special octagon wrench for 17 (In the car shop, tell them that you need a special wrench to loosen the rack stop nut and if the seller turns out to be knowledgeable, he will sell you exactly that what you need), as well as a chisel with a hammer, a vice (without them, work will not be convenient), all kinds of wrenches (socket wrenches, wrenches, if you have socket heads, stock up on them) and screwdrivers with pliers you will need!
Steering rack VAZ 2115 - device
One of the important components of a car is the steering mechanism. The steering rack in a car is the most important part of the unit.
Through it, the force applied by the driver to the steering wheel with the help of tips and rods is transmitted to the turning levers, which are connected to the steered wheels through axles. It follows from this how important the serviceability of the steering rack is for the safe movement of the car.
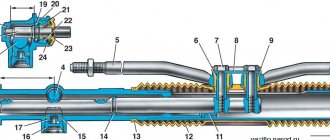
The photo shows the elements that make up the steering control design.
Steering rack assembly components:
- Position 20 – staff.
- Position 21 – rack support sleeve.
- Position 22 – damping ring.
- Position 23 - rubber-metal hinge.
- Positions 10, 11, 14 – parts for attaching the rack to the steering rods.
- Position 12 – brackets for attaching the steering device to the shield in front of the body, 13 – rubber supports for the steering mechanism, 15 – protective cover for the device. The rack of position 20 engages a drive gear mounted on bearings in the housing of position 17 of the steering rack assembly. A cermet stop, sealed with a rubber ring in the crankcase, presses the rack against the gear with a spring, which rests against the nut.
The locking ring prevents the nut from unscrewing. There are marks on the steering gear housing and boot to facilitate correct assembly of the unit.
Replacement
If you decide to replace the rail yourself, invite someone you know to help you. You will definitely need an assistant in this process. Also prepare the following tools and supplies:
- set of wrenches;
- hex key 17;
- jack;
- wheel wrench;
- bricks or logs to install the raised front part of the car without wheels;
- steering rod puller (if equipped);
- rust preventative (WD-40);
- Litol lubricant or equivalent;
- rag.
Work order:
- Place the car on a level surface.
- Secure it with the parking brake.
- Use a jack, wheel wrench and logs (bricks) to lift the front of the car and remove the front wheels.
- Disconnect the negative terminal from the battery.
- In the passenger compartment, on the driver's side, in the area of the pedal block, unscrew the locking bolt of the steering shaft cardan.
- Remove the adsorber from the engine compartment and move it to the side.
- Unscrew the steering end nuts, first pulling out the cotter pins.
- Using a rod puller, remove the ends from the posts. If there is no puller, tap the tips from below with light blows, being careful not to damage the threads on them.
- Spray the steering rack clamp nuts with rust remover and let it soak in.
- Unscrew the clamp nuts with a wrench (4 pcs).
- Remove the steering rack by pushing it to the right (passenger) side.
- Remove the tips from the rack and determine the approximate number of turns by which the nuts were tightened, so that you can then tighten them more or less accurately, and go to the nearest service station to adjust the wheel alignment.
- Remove the plugs on the sides of the new rail and fill the body with Litol as much as possible.
- Screw the ends to the rods (do not mix them up - they are different).
- Install the new rail into place by attaching the nuts to the studs of the clamps.
- Call an assistant and ask him to help you guide the steering shaft drive gear into the seat on the rack housing. Check the precise alignment of the splines.
- Tighten the locking bolt on the steering cardan.
- Carry out the rest of the installation work in reverse order. Don’t forget to lubricate all threaded connections with Lithol - it will be easier to disassemble next time.
Steering rack VAZ 2115 - how to eliminate play
While the car is moving, there are times when the driver feels a slight kickback when the car hits a pothole or a small obstacle on the road, in the steering wheel, and a knock appears in the mechanism. Then there is a need to fix the problem.
In this case, VAZ does not require repair of the steering rack, but only adjusts the gap formed between the rack and gear. Why are there special instructions?
To perform the work, it is better to install the car on an inspection hole, a special lift or overpass.
Work order _
- If there is protection on the crankcase, it can be removed.
- Using a special 17 mm wrench, turning clockwise, the adjusting nut is tightened until the play in the rack gearbox is eliminated.
Eliminating play in the steering rack
Before tightening the nut, it must be thoroughly cleaned of dirt.
If such an operation does not eliminate the knocking, you need to disassemble the steering mechanism, check the condition of all its parts, and replace worn elements with new ones. The cost of such repairs will be higher.
- Then, after assembling the steering gear assembly, the rack stop, which has an O-ring, is installed until the stop makes contact with the rack.
- After this, the retaining ring and thrust spring are installed and the nut is lightly screwed on.
- The nut is tightened with a torque equal to 1.12 - 1.37 kgf.m, the two divisions marked on the nut or on the 24 wrench are released, which provides the required gap of 0.12 millimeters, from the nut to the stop of the rack.
- The ease with which the rack moves is checked, the absence of knocks or jamming.
- The steering rods are mounted to the steering mechanism in such a way that their axes should be parallel to the steering mechanism housing.
The play is eliminated, but the knocking does not stop, then one of the options is chosen: buy a new steering rack or repair the steering rack on the VAZ 2115, which is much cheaper.
Signs of faulty tie rod ends
The steering tips need to be replaced if, when driving over uneven surfaces, or when accelerating, you feel the steering wheel beating and vibration reverberating through the gas pedal.
It is possible to visually determine the condition of the steering rack tips only when checking the anthers. These parts have a direct impact on wheel alignment, which means they should be replaced on time, since the rubber will begin to wear unevenly. Replacing steering rack tips is also carried out when the car is on a lift or in a pit. By the way, this procedure is best left to the masters, since the work requires precision and strength in the hands. In total, the entire process of replacing tips takes no more than one hour, so you don’t have to part with your favorite car for a long time.
Remember that if you replace the tips in a timely manner, your car's steering rack will last much longer, and the ride quality will noticeably improve.
Repair of steering rack on VAZ 2115
To save money and sometimes nerves, you can repair the mechanism yourself.
Repair materials
You will need:
- Grease for bearings. It is better to use Mobil Grease XHP 222.
- In aerosol packaging Movil.
- White Spirit.
- A can of WD-40.
- Plastic clamps 200 mm x 4 mm – 3 pieces.
- Rags.
Spare parts
- Steering rack repair kit.
- Silent blocks.
- Ends with nuts.
- Steering cover.
Tool for the job
- Set of socket heads with ratchet.
- Hammer.
- Cardan with extension.
- Tip puller.
- Key with internal octagon.
- The key is 22.
- Chisel, up to seven millimeters wide.
Also check out
- Algorithm for replacing the front brake pads of Lada Kalina at home
- Algorithm for replacing the tie rod end of a VAZ 2114
- How to change the power steering oil on a Lada Priora without going to a service station
- If you don’t have a tie rod puller with you, you can use a hammer and a powerful pry bar.
You can read about removing and replacing the tie rod end in this article
Self-replacement of the VAZ 2115 steering rack - step-by-step instructions
- Unscrew the nuts that secure the steering rack.
- Remove the rack on the right.
Do-it-yourself replacement of the VAZ 2115 steering rack - step-by-step instructions Do-it-yourself replacement of the VAZ 2115 steering rack - step-by-step instructions Do-it-yourself replacement of the VAZ 2115 steering rack - step-by-step instructions
- Remove the rack from the splines. Usually this does not cause difficulties.
- After removing the rail with lugs, unscrew the lugs and count the number of screws. Thanks to this, after replacement it will be more comfortable to get to the service station.
- Open the side plugs on the new rail. Fill the holes with lithol.
Do-it-yourself replacement of the VAZ 2115 steering rack - step-by-step instructions Do-it-yourself replacement of the VAZ 2115 steering rack - step-by-step instructions Do-it-yourself replacement of the VAZ 2115 steering rack - step-by-step instructions
- When screwing the tips, it is important not to confuse the sides, because the left one is different from the right one.
- To install a new rail you will need someone's help. Return the rack back and attach the fasteners to the right. A partner must provide assistance if the steering cardan gets into the splines. To loosen the clamp, drive a chisel into it. After this, the slots will fit in easier.
Worth checking out:
- Installation of new front struts on Lada Priora cars
- There is a special groove on the rack in which a locking bolt must be installed.
Reassemble in reverse order. After the VAZ 2115 steering rack has been replaced , make the wheel alignment adjustment.
How to tighten or replace the steering rack of a VAZ-2115
Drivers who have at least a little understanding of the structure of a car understand perfectly well that force is transmitted to the wheels using helical and spur gears. They, in turn, interact with the rack. Thanks to the use of pressure springs, play is established in the rack. If you hear a knocking sound while driving over uneven surfaces, this indicates that it is time to adjust the rack.
Many drivers believe that the VAZ-2115 steering rack cannot be repaired. This is the main mistake. The fact is that the steering rack can always be tightened. This action ensures safe driving and elimination of all play. Nevertheless, such adjustments must be carried out efficiently, since otherwise they can lead to loss of vehicle controllability. Often the cause of this is overtightening of the adjusting screw.
Steering rack adjustment
The steering rack can be adjusted either directly on the vehicle or by removing a spare part. The first method is usually used after car repair. But the second one is used to slightly adjust the rack. For this work you should have the following tools:
- adjustable wrench;
- universal octagon 17 mm.
Any work related to the steering rack must be carried out while the car is either on the inspection pit or on a lift.
Car steering
One of the important components of a car is the steering mechanism. The steering rack in a car is the most important part of the unit. Through it, the force applied by the driver to the steering wheel with the help of tips and rods is transmitted to the turning levers, which are connected to the steered wheels through axles. It follows from this how important the serviceability of the steering rack is for the safe movement of the car.
Steering design
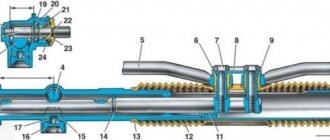
The photo shows the elements that make up the steering control design.
Steering rack device
Steering rack assembly components:
- Position 20 – staff.
- Position 21 – rack support sleeve.
- Position 22 – damping ring.
- Position 23 - rubber-metal hinge.
- Positions 10, 11, 14 – parts for attaching the rack to the steering rods.
- Position 12 – brackets for attaching the steering device to the shield in front of the body, 13 – rubber supports for the steering mechanism, 15 – protective cover for the device. The rack of position 20 engages a drive gear mounted on bearings in the housing of position 17 of the steering rack assembly. A cermet stop, sealed with a rubber ring in the crankcase, presses the rack against the gear with a spring, which rests against the nut.
The locking ring prevents the nut from unscrewing. There are marks on the steering gear housing and boot to facilitate correct assembly of the unit.
