The design of the clutch assembly in the Lada Kalina model requires adjustment of the cable drive over time. This need is dictated by the fact of natural abrasion of the linings on the driven disk and the very design features of the mechanism we are considering. During operation, the cable stretches, which also implies the need for adjustment. And many car owners are wondering: how to adjust the clutch?
The adjustment procedure itself is not a complicated action, therefore it is accessible to most Lada Kalina owners. In this article we will tell you how to adjust the clutch.
Clutch adjustment on Kalina description and Video
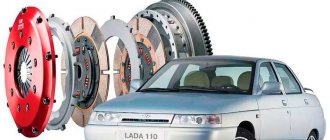
The clutch is the most important transmission mechanism of a car.
Useful properties of the clutch are the continuous transmission of crankshaft torque to the gearbox and mobility when connecting or disconnecting from the gearbox. Periodic clutch malfunctions are one of the weak points on the Lada Kalina car. Despite improvements in this area - the presence of automatic cable adjustment - independent clutch adjustment on Kalina is necessary from time to time.
The clutch is the most important transmission mechanism of a car. Useful properties of the clutch are the continuous transmission of crankshaft torque to the gearbox and mobility when connecting or disconnecting from the gearbox.
Periodic clutch malfunctions are one of the weak points on the Lada Kalina car. Despite improvements in this area - the presence of automatic cable adjustment - independent clutch adjustment on Kalina is necessary from time to time.
How does automatic cable tightening work?
Intensive use, naturally, contributes to abrasion of the friction linings of the clutch disc. As wear occurs, the built-in ratchet mechanism allows the cable to be slightly tightened to ensure proper disc performance. The release fork rotates, thereby compressing the bushing spring. A tense spring holds the tip clamps, as a result of which it is released and tensions the cable.
Malfunctions of the clutch transmission unit: how to determine
The machine itself can tell you that the clutch needs to be adjusted and the automatic cable locking no longer helps. These signs include:
1. The car does not pull forward well. The clutch does not provide proper connection between the flywheel and the disc, which is why a significant portion of the torque force and, accordingly, speed is lost.
2. When driving, the pedal is not raised all the way and dangles. In principle, this problem follows from the first one.
3. The clutch does not disengage well: the pedal is not pressed all the way, which makes it more difficult to change gear.
However, in order to be sure whether clutch adjustment is needed on Kalina, you need to carry out a number of small checks.
How to check the clutch
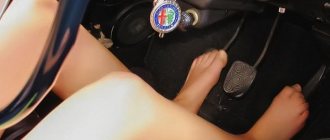
1. Depress the pedal and release it, as is done in reality when driving. Creaks and clicks when the pedal moves can already hint at a malfunction.
2. Check the pedal for sticking. An obstacle to movement more accurately means a problem in the adjustment area.
3. The travel of the clutch pedal should be “from end to end”. If it does not fully rise and certainly not fully fall to the floor, then clutch adjustment is definitely necessary.
But, before making a final decision whether it is necessary to adjust the clutch cable manually, it is worth trying to adjust the stroke. It is best to measure the stroke using a ruler. The pedal goes to the floor and then returns to its original state. If the distance is greater than 14.6 cm, only the pedal stroke needs to be adjusted. If everything is fine, then we proceed to further actions.
Clutch adjustment on Kalina is required when, when the clutch cable lead deviates from the release fork lever by 2.7 cm or more, the beating of the friction linings is pronounced, and the distance between them and the rivets is less than 0.2 mm.
Important: when checking the clutch, the engine must not be running and the car must be cold.
The procedure for adjusting the clutch on Lada Kalina
1. Open the hood and remove the air filter.
2. Pull the cable to maximum. This is done by stretching its tip.
3. Check the gaps between the lower cable guide and the release fork. As mentioned above, this distance should not exceed 2.7 cm with a normally adjusted clutch. If the gap is larger, you just need to turn the driver along the thread of the tip. It is better to take measurements not with a ruler, but with a caliper.
4. Squeeze and release the clutch pedal several times. Then repeat the measurements of the gaps between the fork lever and the driver again. When increasing, tighten the leash again and pump with the pedal.
The mechanism should also be adjusted when the car has cooled down and the engine is off!
As you can see, adjusting the clutch on Kalina is not difficult, and every car enthusiast can do it. However, if the cable keeps slipping and the clearance cannot be adjusted, then you may have to replace the clutch completely. You can also replace it yourself, but it’s better to contact a professional.
Diagnosis of clutch faults
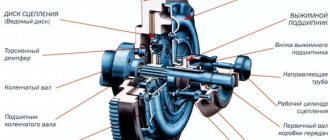
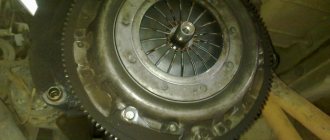
Lada Kalina is equipped with a “dry” clutch with one disc and a central pressure spring. The disc is connected to the clutch pedal (CP) using a cable. The interaction is carried out using a cable, which is the weak point in the node. Adjustment is carried out using a ratchet mechanism, which is a rod with a thread and a control nut.
Over time, the linings on the disc wear out and become thinner. Wear largely depends on the driver's driving style. For those who like to tear it apart, the unit will not last long and will need to be repaired. Using a ratchet mechanism, insufficient thickness of the lining is eliminated by tightening the cable. This happens by turning the release fork, it forces the spring located in the bushing to compress. The spring acts on the tip clamps, releases it and, thus, tensions the cable.
Replacing and adjusting the clutch cable on a viburnum
Welcome!
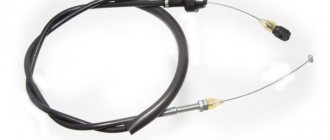
Clutch cable - thanks to it, you can control the clutch fork, and at that moment it can disconnect the clutch from the flywheel, thanks to the release bearing, a cable is used on all front-wheel drive cars, because their gearbox is located deep in the front, on classics Together with the cable, the main and slave cylinders of the clutch are used (there is no clutch cable), these cylinders work differently, unlike the cable (the cable simply pulls), but the result is the same (the clutch is disconnected from the flywheel due to the release bearing) and the effect occurs due to one and the same unit, namely thanks to the clutch pedal.
Note!
To carry out the replacement work, you will need to use: Be sure to use wrenches, as well as in addition to them, any other wrenches that can be used to unscrew bolts and nuts can also be used, in addition to this, you will also need a caliper or instead a ruler and stock up on pliers!
Where is the clutch cable located?
We won’t be able to show you in detail where it is, because it is located at the bottom and the angle that was taken in the photo below simply won’t allow you to look into that place, but we’ll still try to describe where it is, first, find the box, it’s for For clarity, the red arrow is indicated in the photo, this gearbox is connected to a cable that comes from the passenger compartment, so you can already make an approximate conclusion about where the cable goes, in addition to all this, pay attention to the blue arrow, which also shows approximately the location of the clutch cable in under the hood of the car.
When should you change the clutch cable?
Any cable, including the cable that goes to the handbrake, which goes to the gas (the throttle cable is correctly called) must be replaced if it breaks (If it breaks, you will not be able to use the system to which the cable goes, for example, the gas cable breaks, the car no longer will go, the clutch cable has broken, the clutch system will no longer work in the same way), with strong stretching, which by the way will greatly disrupt the operation of the clutch system (the clutch may not be completely disconnected from the flywheel, thereby changing gears will be harder and with a crunch), as well as it changes when souring, and souring of the cable is possible only if the car has not been used for a long time or is used in extreme winter conditions; when souring, the clutch pedal will be very difficult to press and will not be willing to return back, which can soon lead to an emergency situation on the road and therefore this the cable needs immediate replacement.
How to replace and adjust the clutch cable on a VAZ 1117-VAZ 1119?
Removal:
1) First, while inside the car, get to the clutch pedal and remove the stop of the cable sheath from the pedal bracket, this is done very simply, namely, take a wrench and use it to unscrew the nut securing the stop (see photo 1), as soon as the nut is is turned out, the stop is removed from the bracket stud (see photo 2), after which you have access to the clutch pin from which you will need to remove the stopper with pliers or a screwdriver (see photo 3), after the stopper is removed, remove it from the same finger housing of the mechanism for compensating wear of the driven disk linings (see photo 4).
2) Now remove the plastic bushing from the clutch pedal finger by hand (see photo 1), check its condition, it should not be deformed or heavily worn, otherwise replace it with a new bushing (Before installing the new bushing, lubricate it with Litol lubricant -24 or LSC-15), then remove the rubber seal of the cable sheath from the hole that it covers (see photo 2), then get out of the car and move into the engine compartment of the car to the box, having reached it, pull the tip of the clutch cable forward and then disengage it from the fork (see photo 3) and then unscrew the leash and remove it from the cable tip as shown in the fourth photo.
3) And finally, remove the cable from the bracket on the box, let’s immediately note the fact that the bracket on Lada Kalinas is solid and not split as shown in the photo below (The photo below just shows another car and it’s not the bracket, but the clutch fork that is shown there), so from this hole the cable will need to be taken out (the cable is indicated by a blue arrow) towards the car interior (in the direction indicated by a green arrow) and therefore you will bring the entire cable out into the car interior from the engine compartment and thereby completely remove it from car (When removing the cable, remove the guide sleeve of the clutch cable sheath).
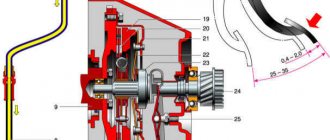
Installation:
The installation of a new cable begins from the interior; to be more precise, at the beginning you will need to insert the cable from the interior into the engine compartment and then, while in the cabin, the housing of the wear compensation mechanism for the clutch disc linings will have to be placed on the clutch pin and secured with a locking bracket, after fastening The cable sheath stop will need to be installed in its place and the rubber seal of the cable sheath will need to be tucked into the hole while inside the car, and after that you can move into the engine compartment, where you will need to insert the cable through the bracket (see photo 1) and install the cable sheath guide sleeve , when the bushing is installed, a leash is twisted onto the lower tip of the clutch cable, and it must be twisted in such a way that the tip of the cable protrudes relative to the end of the leash by 0-1 mm, having achieved this protrusion, overcoming the force of the cable spring, pull it forward all the way, and when the cable is fully extended, take a caliper and, holding the tip of the cable in an extended position, measure the distance indicated by the letter “L” in photo 2, this distance should be “27 mm”, if the distance does not match, then rotate the leash on the tip of the cable until it was exactly like this, as soon as everything works out for you, install the tip of the cable in the groove of the clutch fork and release it, also make sure that under the action of the spring, the tip guide is installed on the clutch fork without a gap and finally press the clutch pedal two or three times re-measure the distance “L” and, if necessary, re-adjust the clutch cable on the car.
Note!
This distance, which is indicated by the letter “L”, is the adjustment distance that should be exactly like this if the cable is adjusted correctly, but also take into account the fact that the cables are different and if you come across a defect that can be either longer than the standard original cable, or shorter , then there won’t even be a distance of “27 mm” on it, so buy good parts from proven places and if you see that with such an adjustment the release bearing is already starting to work (That is, you are not pressing the clutch pedal, but the noise is from the release bearing already exists), then in this case you can neglect it and adjust the cable not according to the information that the factory writes, but precisely by your own selection!
Additional video:
Using the example of a VAZ 2110 car, you can see how the clutch cable is replaced in the video below, but just keep in mind the fact that on Lada Kalinas the cable is replaced a little differently, but after studying this article and watching the video, most likely you There will be no difficulties when replacing the cable.
Hello Georgy!
This happens on many cars, on Priors there is practically no such thing, although the clutch cable on them is absolutely identical except for one part, on the Priors cable there is a spring at one end, if you transfer it to your cable on which you do not have one, then there is a very high probability that the pedal will stop clicking and we also recommend lubricating the plastic bushing on the clutch pedal with lithol, it rubs with the bracket, you should immediately notice it if you look at the place where the clutch pedal is attached!
Leave a comment Cancel reply
How to adjust the clutch on Kalina yourself
During the operation of the car, the driver encounters a number of problems that indicate that it is necessary to adjust the clutch on Kalina. Due to the peculiarities of the mechanism installed on these VAZs, even when the driven disk linings are worn, the clutch release cable automatically lengthens. This allows the car owner to adjust the pedal travel only occasionally, if a malfunction occurs. But even in these cases, it is possible to do it on your own, without resorting to the services of a car service.
Peculiarities
On Lada Priora, Kalina and Granta cars, the clutch cable is the same as on the VAZ of previous years. On new cars, the only difference is the presence of an auto-adjustment mechanism at the end of the cable. This mechanism is designed to automatically adjust when clutch parts wear out and when the cable is pulled out. That is, so that the owner does not adjust the clutch while operating the car.
Design and operation of the Kalina clutch
The unit is a dry-type mechanism, single-disc, with a central pressure spring. Switching off when pressing the pedal is carried out by a cable equipped with a ratchet. This part allows the cable to automatically change length depending on the wear of the disc linings and ensures a constant backlash-free fit of the clutch with the release bearing to the basket.
The pressure plate together with a diaphragm-type spring are enclosed in a casing. All together is usually called the clutch basket. Between this mechanism and the flywheel there is a driven disk. Its hub is connected to the gearbox input shaft.
When you press on the pedal, the cable tightens, turning the fork. Its lower bushing is pressed into the clutch housing, the upper bushing is removable. The force when turning the fork is transmitted through the clutch and clutch release bearing to the pressure spring and pressure plate, turning off the mechanism.
When the pedal is released, the clutch must fully transfer the engine torque to the transmission. Pressing the pedal normally completely disconnects it from the engine. Signs of the need to adjust the clutch on Kalina include:
- exceeding the full pedal travel (normally 146 mm from the lowered position to the stop on the floor) - adjustment of the clutch cable is necessary;
- when the pedal is pressed, the gear shift occurs with a grinding or crackling sound - the clutch does not disengage completely;
- when starting the engine, you can hear a howling sound in the crankcase - wear of the release bearing;
- jerking when starting to move indicates insufficient smoothness of clutch engagement;
- When driving in 3-4 gears, when you press the gas, engine speed quickly increases, and acceleration slows down - disc slipping, possibly due to wear on the linings or insufficient cable length.
As a rule, it is necessary to adjust the operation of the clutch after it has been repaired to bring the automatic adjustment mechanism into working condition.
This operation may also be required if Kalina has not been used for a long time or worked in winter.
In such cases, the wear compensator may lose some of its functions and cannot cope with adjusting the length of the cable.
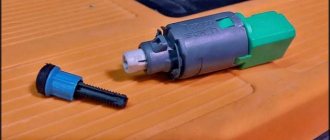
What if the sensor is faulty?
This component can only be installed with an electronic version of the accelerator pedal. The main function of the sensor is to control the operating modes of the Lada Kalina engine when switching gears in the transmission or starting movement.
If the sensor is faulty, the owner of the Lada Kalina 2 will be informed by the ECU about this fact by highlighting the “Check” symbol. The error code in this case is “0830”. The presence of a sensor failure is physically felt by the following signs:
- jerking of the Lada Kalina 2 car at the moment of switching gearbox stages;
- a sudden increase in speed (the engine is idling) when you press the clutch pedal assembly.
The designated element cannot be adjusted, so if functionality is lost, it must be replaced. The sensor is located above the pedal, or more precisely, under the steering shaft column. To replace, you should select an analogue with the code “1118-3720015” (also suitable for Priora and Granta).
The replacement procedure is characterized by inconvenience due to inaccessibility to the two screws by which the component is fixed to the pedal bracket.
- Dismantling involves removing the cable holder holder and the corresponding hole present on the pedal bracket.
- We also disconnect the block from the wiring harness under the instrument panel.
- You will need a screwdriver to remove the spring hook from the holder.
- Now unscrew the previously mentioned hard-to-reach screws.
- We remove the sensor with its holder and then install a new element.
We carry out the assembly process using the reverse algorithm.
Where is the fuel pump relay Kalina
Where is the speed sensor on Kalina
On-board computer for Kalina
Correcting the mechanism
If various extraneous sounds appear when the clutch is disengaged during vehicle operation, you need to check the gap on the drive fork and, if necessary, adjust it. Clutch cable adjustment is performed in the following order:
- Remove the air filter and pull out the cable by the tip to its maximum length.
- Using a caliper, measure the distance between the tip and the fork. Normally, this distance should not deviate from 2.7 mm.
- If discrepancies are found, turn the driver on the thread until the desired value is established. Release the end of the cable: it should press tightly against the fork.
- Press the clutch pedal 3-4 times to activate automatic cable length correction, measure again.
When re-measuring, a deviation from the value of 2.7 mm may again be detected. In this case, you need to repeat the described steps to adjust the cable length.
The clutch on Kalina may make squeaks and noises even after adjustment. They can be caused by the tip driver rubbing against the fork. The noise in this case comes from the engine side and is eliminated by applying lubricant to the contact point between the cable tip nut and the fork. Other possible causes - pedal creaking, cable grinding when rubbing against the casing - can be eliminated by applying lubricant. In some cases, the source of the noise may be the clutch pedal sensor.
When adjustment is required
Clutch adjustment is only performed when the engine is switched off. It is required if there is a deviation from the following values:
- full pedal travel does not exceed 146 mm;
- movement of the cable lead relative to the release fork lever - within 270 mm;
- runout of the dependent disc linings does not exceed 0.5 mm;
- the distance between the pads and the rivets that hold them is 0.2 mm or less.
There are several ways to check if your car needs a clutch adjustment.
- You should press the pedal several times in a row and listen for any extraneous noise. If the clutch pedal sticks or squeaks, it is advisable to make an adjustment. In some cases, car owners are unable to visually assess whether the pedal returns to its place freely. In such situations, it is recommended to do the following:
- press the clutch with your hand until it stops;
stop applying force, but leave your hand on the pedal in order to feel if there is movement.
If the clutch pedal sticks and clicks, or it returns to its original position with characteristic jerking, you need to adjust the clutch.
Return to contents