P0134 oxygen sensor circuit error, the one before the converter - no signal activity. Essentially, the first lambda probe does not work, since the 02 B1S1 sensor circuit is passive. When diagnosing with a car scanner, the computer displays the error: “P0134 Oxygen O2 Sensor Circuit No Activity Detected (Bank 1 Sensor 1).”
Unlike error p0135, when the oxygen sensor heater fails and this can affect the behavior of the car, error code p0134 can only be considered by the computer, since it does not particularly affect the driving performance of the car, the dynamics are the same, there is no problem, fuel consumption is unchanged, except that it may become dull when accelerating.
What does P0134 mean?
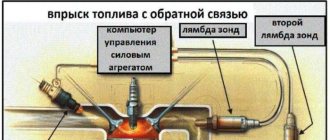
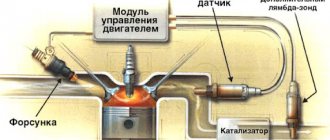
The oxygen sensor monitors the oxygen content in the vehicle's exhaust gases. It sends a signal to the transmission control module (PCM), which in turn uses the information received to regulate the ratio of fuel and air mixture supplied to the engine cylinders.
When there is insufficient oxygen in the exhaust gases, the vehicle's PCM reduces the amount of fuel used by the engine. This is important because if there is not enough oxygen in the exhaust gases, fuel consumption increases, as well as the amount of harmful substances emitted from the vehicle's exhaust gases.
When there is insufficient fuel, the vehicle's PCM increases the amount of fuel used by the engine. This is also quite important because if there is not enough fuel, hydrocarbons and nitrogen oxides will be released into the atmosphere.
Why is a lambda probe needed in a car, location
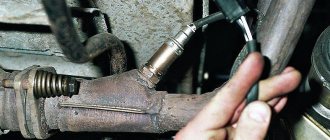
A lambda probe is necessary to measure the oxygen content coefficient in a combustible mixture. It is always installed in the area of the exhaust pipe before the catalyst and measures the volume of unburned oxygen in the combustion products. This information will allow the ECU to prepare the optimal mixture.
A mixture containing 14.7 parts air and one part fuel burns most efficiently. These are optimal indicators; if oxygen is present in large quantities, then the mixture is lean; if there is less air, then it is rich.
Combustion of a rich mixture is less efficient - a decrease in power and increased fuel consumption can be observed.
Since the engines in cars operate in completely different modes, the optimal ratio of air and fuel may not be observed. Oxygen sensors are used to control the quality of the mixture in power systems.
Based on the signals from the lambda, the ECU can assess the quality of the mixture. If indicators are found that do not meet the standards, the mixture is adjusted.
Operating principle of the oxygen sensor
The principle of operation of the oxygen sensor is quite simple. The lambda probe must compare the readings with some ideal results in order to understand how the percentage of oxygen in the mixture changes, so measurements are taken in two places - atmospheric air and combustion products .
This approach allows the sensor to feel the difference if the fuel mixture ratio changes.
The ECU must receive an electrical impulse from the lambda probe. To do this, the sensor must be able to convert measurements into electrical signals. For measurements, special electrodes are used that can react with oxygen.
Lambda uses the principle of galvanic cells - changing the conditions of chemical reactions leads to a change in the voltage between the two electrodes. When the mixture is rich and the oxygen content is below the lower threshold, then the voltage rises. If the mixture is lean, the voltage will drop.
Next, the impulse that occurs at the stage of chemical reactions is sent to the ECU, where the parameters are compared with the fuel maps stored in the memory. As a result, the operation of the power system is adjusted.
The oxygen sensor operates on chemical reactions, but its design is relatively simple. The main element is a special tip made of ceramic materials. Zirconium dioxide and, less commonly, titanium dioxide are used as raw materials.
The tip is coated with platinum - it is this layer that reacts with oxygen. One side of this tip is in contact with the exhaust gases, the other side with the air in the atmosphere.
This is interesting: Nissan Qashqai steering column cable: replacement and repair
The lambda probe electrodes have one feature. So that the reaction is more efficient and the indicators are accurate, measurements of the oxygen content in the exhaust are carried out under certain temperatures.
In order for the tip to reach the performance characteristics and the required electrical conductivity, the temperature of the environment should be 300-400 degrees.
To ensure the required temperature regime, the lambda probe was initially installed in close proximity to the exhaust manifold. This ensured the desired temperature after warming up the internal combustion engine. The sensor did not start working immediately. Before the lambda warmed up enough and began to produce accurate parameters, the ECU used signals from other sensors. The optimal mixture was not prepared during the heating process.
Some oxygen sensor models are equipped with electric heaters. Thanks to them, the lambda can quickly reach operating temperature conditions. Heating uses energy from the vehicle's on-board network.
What does the error indicate?
The error with this code is quite common and is not considered particularly complex. Such a notification tells the driver that the information coming from the first oxygen sensor is incorrect or is issued with violations. You can diagnose the supply of incorrect information from the sensor to the ECU as follows:
- When the signal from the oxygen sensor is low, the information is transferred to the ECU memory and recorded;
- The data is sent to the ECU and recorded if there are no changes in the information from the oxygen sensor;
- The vehicle's check light comes on when the violation is permanent.
What are the symptoms of code P0134?
In some cases, there may be no symptoms other than a stored DTC and CHECK ENGINE light. On the other hand, some consequences may be so severe in other cases that the vehicle becomes undriveable.
Also keep in mind that the severity of one or more symptoms may vary from vehicle to vehicle.
- Serious problems while driving: severe loss of power, unstable acceleration, the car may even stall unexpectedly.
- Increased fuel consumption, which can range from slight and barely noticeable to significant.
- Black smoke from the muffler.
- Difficult start.
- Reduced spark plug life.
- In extreme cases, reduced engine longevity is caused by an excessively rich fuel mixture, which washes away the protective lubricant film from the cylinder walls.
Causes of error P0134
When the oxygen sensor is working properly, it will give a reading (in millivolts) that fluctuates up and down. If the PCM detects that the sensor readings are not changing, it will store a code P0134. The most common causes of this error are:
- Oxygen sensor heater circuit malfunction
- Loose or damaged electrical wires related to the oxygen sensor
- Corroded oxygen sensor connector
- Worn or damaged vacuum hoses
- Malfunction of the automatic transmission control module (PCM)
How to troubleshoot P0134?
Before attempting to electrically diagnose the P0134 code, ensure that the engine is running and that there are no air leaks or serious exhaust leaks that could affect the operation of the oxygen sensors.
Also, make sure there are no rich or lean conditions and that the engine oil is not contaminated with antifreeze. If any other codes are present along with P0134, troubleshoot those issues first before attempting to diagnose P0134.
In a properly functioning oxygen sensor, any change in throttle will result in an almost immediate change in signal voltage. However, the speed at which changes occur (depending on the efficiency of the sensor) is best assessed using an oscilloscope.
Keep in mind that while an oscilloscope can identify emerging problems, interpreting the resulting waveforms requires expert knowledge and verified reference data for each vehicle being tested.
Therefore, in order to identify a faulty DC (if there is no oscilloscope), it should be enough that there are no changes in the signal voltage during a discernible period.
Step 1
Take a diagnostic scanner or adapter and read the information from the car. Record all stored trouble codes and available freeze frame data. This data can be useful if an intermittent error is later diagnosed.
Step 2
Visually inspect all wiring associated with the damaged sensor. Look for burnt, shorted, or otherwise damaged wires and connectors. Restore them if required.
Step 3
If there is no visible damage to the wires, check resistance, input (reference) voltage, ground, and continuity in all circuits associated with the damaged sensor.
Before checking the wiring integrity, be sure to disconnect the sensor from the ECU to prevent damage to the controller.
Since the P0134 code indicates a problem in the signal voltage circuit, as opposed to the heater control circuit, pay special attention to the resistance and continuity values in the signal circuit between the ECU connector and the sensor. These values must correspond exactly to those specified in the repair manual.
Try to avoid signal circuit repairs - it is best to always replace the associated harness to avoid problems with poor connections and high resistance that can arise from poorly executed repairs.
Make sure that the sensor is receiving full voltage from the battery. Keep in mind that in some cases the heater circuit voltage comes from the ECU, in which case the circuit is not protected by a fuse. Look in the repair manual to see how voltage is supplied to the DC heater.
Since the sensor has a heated element, it is possible that low battery voltage, poor grounding, or other resistance issues could affect the time it takes for the element to heat up, which is one reason why the code may set. P0134.
It goes without saying that the voltage/condition of the battery should also be checked. However, in cases of low battery voltage, codes related to low input voltages to the heater control circuit may be present along with P0134.
Step 4
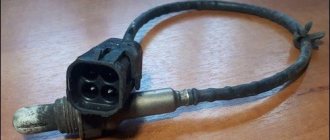
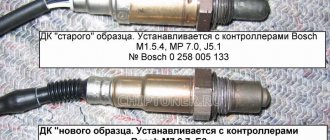
If all data obtained is within the manufacturer's specifications, unscrew the oxygen sensor from the exhaust pipe and inspect it for discoloration or the presence of any type of deposits that may reduce the effectiveness of the sensor. In general, the correct color of the oxygen sensor should be the same color as a healthy, properly functioning spark plug.
Compare the sensor to the pictures at the top of this article, but keep in mind that the DC cannot be cleaned of deposits. The only reliable remedy is to replace the sensor rather than use any additives.
If the DC does not show discoloration or deposits, measure the sensor resistance and replace it if its resistance is outside the manufacturer's specifications.
Replacing the sensor does not make sense if it shows signs of “poisoning” with oil or antifreeze. In these cases, the underlying problem must be resolved to prevent the P0134 code and its associated symptoms from recurring.
How does a mechanic diagnose a P0134 code?
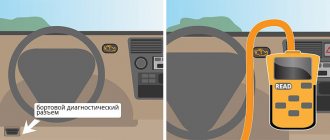
First, the mechanic will connect the OBD-II scanner to the vehicle's diagnostic port and read all stored data and error codes to determine when and under what circumstances the P0134 code occurred. He will then clear the error codes from the computer's memory and test drive the car.
To determine if the P0134 code appears again, the vehicle must reach normal operating temperature. If the error code appears again, a mechanic will check the electrical wires and oxygen sensor connector for corrosion or damage. The mechanic will also monitor the oxygen sensor readings in real time using a scanner. This will help determine if the sensor is working properly.
If necessary, a mechanic will replace the faulty oxygen sensor. It should be noted that in rare cases, the problem may be a faulty transmission control module (PCM).
Consequences of sensor failure
- The car began to consume more fuel than usual
- The car began to move jerkily
- The engine became unstable
- The normal operation of the catalyst is disrupted
- When testing for exhaust gas toxicity, the result gives inflated values.
In conclusion, I would like to give advice: in order to avoid the problems described above in the future, monitor the performance of the lambda probe. Check its condition every five to ten thousand kilometers.
What repairs can fix the P0134 code?
To resolve this error you may need to:
- Check for the error code using a scan tool, clear the code from your computer's memory, and test drive the vehicle to see if the P0134 error code appears again and the Check Engine light comes on.
- Repair or replacement of electrical wires or oxygen sensor connector
- Replacing a faulty oxygen sensor
- Check and, if necessary, repair or replace the exhaust pipe or oxygen sensor heater fuse
Replacing the lambda probe
In most cases, a part such as a lambda probe cannot be repaired, as evidenced by statements about the impossibility of repair from many automobile manufacturers. However, the inflated cost of such a unit from official dealers discourages anyone from purchasing it. The optimal way out of this situation could be a universal sensor, which costs much less than its native analogue and is suitable for almost all car brands. Also, as an alternative, you can purchase a used sensor, but with a warranty period, or a completely exhaust manifold with a lambda probe installed in it.
However, there are cases when the lambda probe operates with a certain error due to severe contamination as a result of combustion products deposited on it. In order to make sure that this is really the case, the sensor must be checked by specialists. After the lambda probe has been checked and its full functionality has been confirmed, it must be removed, cleaned and reinstalled.
This is interesting: Replacing the cabin filter in a Chevrolet Aveo: where it is, step-by-step instructions
In order to dismantle the oxygen level sensor, it is necessary to warm its surface to 50 degrees. After removal, the protective cap is removed from it and only after that you can start cleaning. It is recommended to use phosphoric acid as a highly effective cleaning agent, which can easily cope with even the most stubborn flammable deposits. At the end of the soaking procedure, the lambda probe is rinsed in clean water, thoroughly dried and installed in place. At the same time, do not forget about lubricating the threads with a special sealant, which will ensure complete tightness.
The structure of a car is very complex, so it needs constant maintenance and timely preventative maintenance. Therefore, if there is a suspicion that the lambda probe is faulty, it is necessary to immediately diagnose its performance and, if the fact of failure is confirmed, replace the lambda probe. Thus, all the most important functions of the vehicle will be maintained at the same level, which will guarantee the absence of further problems with the engine and other important elements of the car.
Replacement problems
When replacing, the old sensor may stick to the pipe. In this case, proceed like this:
- Apply wd-40 generously and try to unscrew
- Turn on the engine, heat the exhaust system and unscrew the sensor
- We try to heat (being careful) the sensor itself and unscrew it
- Tap lightly with a hammer and try to unscrew it again
- If that doesn't help, try thermal shock. Pour cold water onto the well-heated sensor. Try unscrewing it again.
Oxygen sensor price
The price of an oxygen sensor will vary by region and model. It ranges from 1000 to 3000 rubles . Buy a lambda probe in specialized stores and only with a guarantee.
Additional comments for troubleshooting P0134
Although the most common cause of the P0134 code is a faulty oxygen sensor, before replacing the sensor, you must perform a thorough diagnosis and consider all possible causes of the error. First of all, you need to check the electrical wires and the oxygen sensor connector.
Each time after repair work is performed, it is necessary to clear the error codes from the computer's memory and test drive the vehicle to find out if the P0134 error appears again. This will help determine if the problem is resolved.
If during the diagnosis it turns out that everything is in order with the oxygen sensor, as well as the corresponding electrical wires and connector, it is necessary to check the exhaust pipe and the sensor heater fuse.
It should be noted that in rare cases, the problem may be a faulty transmission control module (PCM).
Common causes of violation
Error P0134 does not occur very often. There are few probable reasons for the occurrence of such a violation, and they all indicate an incorrect signal from a specific sensor. Based on this, you can determine the most popular options for the occurrence of error P0134:
- Presence of a short circuit;
- Oxygen sensor malfunction;
- Broken wires and oxidation of contacts.
During diagnostics using special equipment, the causes of the malfunction are identified quite quickly and accurately. In most cases, this violation is provoked by a breakdown of the oxygen sensor and in 5% of them the malfunction is directly related to a short circuit, an open circuit and the presence of oxidation processes in the contacts.
In situations where, along with the error in question, the presence of errors with code P0171 is also displayed, we can conclude that there is a possibility of a break or short circuit. The second error in most cases appears when the air-fuel mixture entering the engine is too lean. It is often accompanied by error code P0134, since in the exhaust circuit the first oxygen sensor is directly responsible for the supply. When the information supply stops, the ECU spontaneously reduces the fuel consumption. Thus, the air-fuel mixture becomes lean.
This is interesting: Diagnostics of Passat b3 (Passat b3): how to find faults for a beginner?
Reasons for the error
A slow response of a car oxygen sensor occurs for various reasons, the most common of which are:
- contamination, failure of the oxygen sensor or disruption of its circuits;
- the occurrence of malfunctions in the operation of the fuel pump, injectors, fuel vapor traps, as well as other elements of the fuel system;
- problems with sealing the intake or exhaust manifold;
- incorrect transmission of information from the lambda probe to the electronic control unit due to damaged wiring or oxidation of contacts;
- incorrect fuel pressure;
- contamination of the mass air flow sensor;
- clogging of the oxygen sensor holes with soot or carbon deposits.
Reasons for error P0171
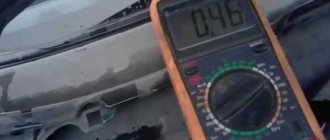
In reality, this will lead to flooding of candles. If the engine openly overuses fuel, misfires, shoots into the exhaust, but the ECU “complains” about the lean mixture, the death of the oxygen sensor is inevitable. The simplest tester connected to the signal terminal of the oxygen sensor will show a voltage within 0.25V.
Video: P0171 - lean mixture. One possible reason.
1. DMRV malfunctions
Failures of the mass flow sensor rarely lead to this error. The operating principle of the mass air flow sensor gives an overestimation of readings (contaminants on the sensitive element act as a heat insulator, which is interpreted by the injection system as an increase in air flow speed - that is, an increase in its quantity). More likely, it is not an “imaginary”, but a very real source of excess air at the intake.
2. Intake manifold leaking
Air leaks through cracks, which is not uncommon in plastic manifolds (in Renault Duster 2.0, for example, in 2013-2014 they were massively replaced under warranty). Through seals (if we remember Renault again, this is an eternal disease on a 1.6-liter engine K4M), through the vacuum booster pipe, and so on. In this case, the suction is maximum at idle and at low loads, when the vacuum in the manifold is greater. With significant suction, which can cause error P0171 to appear, it can even be heard by a characteristic hissing sound. Spraying a suspicious area with carburetor cleaner will immediately indicate a leak and change engine performance.
3. Cracks in the crankcase ventilation pipes, vacuum booster and others communicating with the throttle body.
4. Problems with the air temperature sensor
Cars that use an absolute pressure sensor (MAP or MAP sensor) to calculate cylinder filling may have problems with the air temperature sensor. Since calculating the theoretical filling requires a temperature correction, since air density strongly depends on its temperature, incorrect data on it also causes errors in calculating the injection time - accordingly, the injection time correction may go beyond the limits. To be precise, there is also a temperature sensor on cars with a mass flow sensor, but there it is interlocked with the mass air flow sensor, so we did not dwell on it separately. The sensor assembly will have to be replaced in any case, regardless of what exactly it “counted” incorrectly - the speed of the air flow or its temperature.
In addition to the traditional “knee-jerk” method of diagnosing a temperature sensor (that is, turning it off to switch the injection ECU to a bypass algorithm), you can also use a tester. All you need to do is find calibration data for your sensor on the Internet and measure its actual resistance.
The most reliable measurement is at three points - by lowering the sensor into melting snow or ice from the refrigerator (0 degrees), boiling water (100 degrees) and at room temperature, if you have a thermometer. Deviations of more than 10% from the calibration values are a clear indicator for replacing the air temperature sensor.
5. Mechanical malfunctions of the fuel supply system
A common cause of over-lean mixture. A leaky fuel pressure regulator or a “tired” fuel pump, even before error P0171 occurs, reveals itself as difficult to start, especially when cold, and failures during acceleration.
6. Fuel system clogged
The fuel filter has not been changed for a long time, clogged injectors. The composition of the air-fuel mixture is especially affected by the condition of the injectors, since the flow area of their nozzles is tiny, and the slightest dirt can reduce it.
Often cars today do not have an easily replaceable fuel filter as a class - a fine filter is installed in the fuel pump module. Therefore, simply eliminating a possible malfunction by replacing an inexpensive fuel filter will not work. The injectors will have to be given for cleaning - a special stand will help to evaluate the shape of the spray pattern, from which it is easy to see a dirty injector, and measure the real performance of the injectors. For example, in the illustration below it is obvious that the second injector is clogged.
Something else useful for you:
- Why does the engine start to stall?
- Random misfires. Error P0300
- How to check the generator with and without removing it from the car
What to do if P0171 occurs
It was stated above that there are many reasons why error P0171 occurs. Accordingly, the first thing you need to do is make sure that error P0171 is the only one on the diagnostic scanner; otherwise, it is better to start eliminating it from another specified error. For example, error P0171 is often accompanied by error P0134 (no oxygen sensor signal). Eliminating error P0134 in such a situation allows, most often, to solve the problem with error P0171.
If error P0171 is the only one detected by diagnostic equipment, it is recommended to proceed as follows to get rid of it:
- Check, replace or clean the mass air flow sensor.
The most common cause of error P0171 is contamination of the air flow sensor. Due to the presence of sediment on the sensitive elements of the sensor, it incorrectly determines the amount of air flow. Often problems with the air flow sensor are also accompanied by errors P0100 and P0102. To solve the problem with the air flow sensor, you can replace it with a new one, or try to clean the sensor from accumulated dirt. Quite often, a paraffin layer accumulates on the sensor wire due to contamination with fuel vapors. To clean the sensor from accumulated dirt, use carburetor cleaner or special products for cleaning electrical appliances.
- Check for vacuum leaks.
If the mass air flow sensor is not to blame for the P0171 error, you should proceed to checking for vacuum leaks. It can occur in various places: in the inlet pipe, at the outlet of the throttle body, in the throttle body gasket, in the manifold gaskets, at the connection points between the vacuum hose and the intake manifold. It is also necessary to check the hoses of the crankcase ventilation system, components of the fuel vapor recovery system and plugs on the intake manifold. The exhaust system, after and before the installation of the oxygen sensor, must be sealed, otherwise this may lead to incorrect readings from the sensor. You can find vacuum leaks using a car scanner by checking the fuel balancing values.
- Checking the differential pressure sensor in the exhaust gas recirculation system. It is worth noting that this sensor is not installed on all cars. But if it is present on the car, and the engine mileage is already more than 80 thousand kilometers, you definitely need to check it. Often, after 80 thousand kilometers, corrosion elements appear on the sensor, which lead to its failure or the transmission of incorrect information. Usually the sensor is replaced rather than cleaned, since it is not possible to restore its full functionality as a result of cleaning. The cost of such a sensor is about 2000-4000 rubles.
- Checking the fuel system. If it is not possible to detect problems with excess air entering the system, all that remains is to move on to diagnosing the likelihood of fuel entering in less quantity than required. It is recommended to start checking the fuel system by diagnosing the injectors. The mechanical properties of injectors can only be checked by removing them and diagnosing them on a special stand. After making sure that the injectors are working properly, it is worth checking the fuel filter for clogging, and then using a car scanner to test the fuel pressure, voltage at the fuel pump, and fuel balancing values. Based on the data obtained, it is possible to draw conclusions about which elements of the fuel system are faulty, and then fix the problem or replace them.
Please note: There are situations when the P0171 error appears from time to time, and does not “hang” constantly. This indicates a connection problem between the sensor harness and the controller, which may be caused by a damaged harness or a poor controller ground.
How to resolve error P0134
Troubleshooting error P0134 involves finding the location of a specific open circuit, short circuit, or poor contact in the electrical wiring to the oxygen sensor.
You should start by checking the DC connector. First, disconnect the connector and check the quality of the contact areas. They can be tightened using a thin awl or a thick needle. Next, the contacts should be treated using special compounds or silicone grease in the form of a spray.
Next, check the entry point of the wiring harness directly into the DC housing. Since the sensor is rigidly attached to the exhaust system of the car, which is movable relative to the car body, breakage of the conductors may occur in this place during movement. It can be detected tactilely. If the conductor breaks off at the point where it enters the sensor housing, most likely the lambda probe cannot be repaired; it should be replaced.
The oxygen sensor must be replaced with a new one. Used lambda probes cannot be used. They have a limited resource. Even if a used recreation center was stored in a warehouse after dismantling, its working surface can be destroyed as a result of the action of water vapor in the air. Moreover, it is unknown what life the sensor had before it was removed from the working engine.
The serviceability of the electrical wiring from the DC connector to the engine control unit is checked by testing using a multimeter. To do this, you need a diagram of the car's electrical equipment.
It is better to detect a possible short circuit in the oxygen sensor circuits by monitoring the contacts of the DC connector. In this case, you should disconnect the connector of the engine control unit so that the current of the multimeter probes does not lead to failure of the engine control unit. The multimeter probes are connected in series in pairs to the connector contacts. The multimeter mode switch is set to the resistance measurement position at a limit of 200 Ohms. In this case, only the contacts of the lambda sensor heater should ring. The heater resistance is several ohms. The short circuit is eliminated by careful insulation.
In the event that previous actions did not bring results, you can “throw in” a known good oxygen sensor. It is possible that the original sensor has internal damage. It may be associated with an emergency when a working element breaks and the DC fails instantly.
When this operation is not successful, there remains only one, and very unpleasant, reason, namely, a failure in the input circuits or firmware in the engine control unit. This malfunction occurs during emulation when the catalyst is removed or the vehicle's electrical equipment is short-circuited. In some situations, such a failure leads to the need to replace the engine control unit with all the attendant problems.
Errors in oxygen sensors must be corrected. Along with increased fuel consumption and deterioration of environmental performance, they lead to premature engine wear.
May be of interest:
Scanner for self-diagnosis of a car
Compare the cost of MTPL for your car
Choose a DVR: an indispensable gadget for the driver
Some drivers prefer a DVR in the form of a mirror
Conclusion
- Intake air leaks are often the cause of P0171. And it needs to be checked first. The easiest way to check is to use a smoke generator. But there are also alternative methods.
- Low fuel pressure also often causes a P0171 code and should be checked with a manual fuel pressure gauge.
- A faulty PCV/EVAP is common on VAG vehicles such as Audi, VW (Volkswagen), Skoda and Seat. It should be checked if you have one of the machines listed.
- Faulty EGR valves are common on Opel engines. If you have such a car, first check the exhaust gas recirculation valve.
- Multimeters can be bought: here and here. Car chargers - here and here.
Previous entry Error P0174 - what it means, symptoms, causes, diagnosis, elimination Next entry How to find air leaks at home