Changing the cabin filter on a VAZ-2110 with your own hands
A cabin filter is found in almost every modern car. The VAZ-2110 is no exception. Another name for this filter element is a stove or heater filter. Some car enthusiasts not only do not change cabin filters, but do not even know where it is located. This is a fundamentally wrong approach, since air enters the cabin through this device.
Replacing the cabin filter on an old-style VAZ 2110
- If your car has an old-style VAZ 2110 cabin filter, then to replace it you will need to remove the frill.
- Five screws and two nuts were used for fastening. It is not difficult to unscrew the fastening elements, after which you need to remove the frill from the clamps and move it to the side.
- To pry the fasteners, just use a regular flat-head screwdriver. Having done this work, you can get to the filter and remove it.
To remove the filter, just turn it towards you, after which it can be easily pulled out. There is no need to rush to install a new filter; you should first vacuum the compartment. The entire replacement of the old-style VAZ 2110 cabin filter can take no more than five minutes. To quickly replace a part, you can cut a suitable hole in the casing, which can be covered with a lid and secured with two self-tapping screws.
Location of the cabin filter on the VAZ-2110
On a car, the cabin filter is located under the windshield on the passenger side.
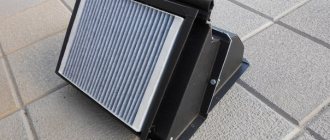
The cabin filter is hidden under this decorative grille.
On models produced since 2003, this element is located horizontally, but before 2003 it was located vertically. At the same time, these consumables are not interchangeable, so when purchasing, be sure to specify which filter is needed.
In order to find this element on the car, you should carry out the following manipulations:
- Open the hood.
- Find the protective grille on the passenger side.
- This is where this filter element is located.
How to replace the cabin filter on a VAZ 2110
It is recommended to replace the cabin filter element in accordance with the manufacturer's instructions. Most often, this parameter varies between 10 -15 thousand kilometers. However, cleaning the old element is also allowed. To do this, a stream of compressed air is directed into the filter part until the filter is completely cleaned. Despite all the savings, this method does not guarantee complete cleaning of the filter and only extends the life of the part for a short period of time.
The filter element can be replaced in a number of other cases: the appearance of unpleasant odors in the car interior, poor performance of ventilation and heating of the interior, in particular, poor airflow or fogging of the car windows (manifests itself when the filter element is completely dirty).
Before replacing the filter, you need to prepare a standard set of tools and thoroughly wash the car. To do this, it is recommended to use water pressure devices for car washing. Particular attention should be paid to the engine compartment on the interior side. To do this, the battery is removed, and the engine and the partition between the passenger compartment and the hood are washed. Try not to direct a direct stream of water at electrical devices, especially the injector and generator. After washing, remove water particles with compressed air.
After washing, you can proceed directly to replacing the filter element. On the windshield wiper, remove the protective cap and unscrew the fastening nut. Remove the lever, remembering to mark its position using, for example, chalk. If the lever cannot be removed, then there is no need to make sudden movements. Screw the nut in half and gradually use pliers to lift the lever up to the nut. After this, the nut is turned out a little, and the procedure is repeated until the lever is completely removed.
Now, unscrew all the screws intended for fastening the facing part. To remove it, it is not necessary to dismantle the windshield washer jets. All you need to do is turn them the other way and remove the lining by prying it up with a screwdriver. Immediately after you remove the trim, the cabin filter will be visible inside the heater. To remove it, reach inside and grab the filter. Turn it clockwise until it comes out of the compartment smoothly.
How to determine if the filter needs replacing
Dust flying out of the air ducts indicates the terrible condition of the cabin filter.
The cabin filter needs to be changed periodically. If, when purchasing a car, it is not known when the previous owner changed the filter, it is better to replace it immediately, since it is inexpensive. If you don’t want to spend even a little money, you can make a list when replacement is necessary:
- If the air inside the car has acquired a damp smell.
- Along with the air, a large amount of dust begins to fly out of the ventilation holes.
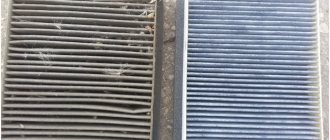
- The filter membrane has become dirty, which is immediately noticeable by its grayness.
Car manufacturers recommend replacing this element based on the total mileage. For the city, this figure is equal to 10–15 thousand mileage, for rural areas – up to 25 thousand.
Types of filters
Carbon filter.
Cabin filters come in simple and carbon types. Currently, it is not recommended to install simple filters that do not contain carbon, as it absorbs unpleasant odors. As for the choice, it is quite wide. The main thing is not to forget to mention in the store what kind of filter is needed. Cars before 2003 need one filter, and cars after 2003 need another.
Articles
The most popular elements are those with the following article number:
- 21110-8122021-83. This modification is suitable for VAZ-2110 after 2003 release.
- NF-6001c "Nevsky Filter". This filter can be installed on cars up to 2003.
Replacing the cabin filter of the VAZ 2110 old and new models
Purpose, types of cabin filters
To ensure that there is clean air in the car while driving, and the stove heats the interior well, a cabin filter is installed in VAZ 2110 cars. Over time, this element becomes clogged, and as a result, it stops performing its functions, it becomes difficult to breathe in the cabin, and the radiator does not produce the required amount of heat. Replacing the cabin filter of a VAZ 2110 can be done with your own hands, so there is no point in going to a service station; the procedure lasts about 30-40 minutes. On some cars, the VAZ 2110 cabin filter may not be detected at all. Despite the fact that the product is missing, there is a place for it under the hood, so you can install the filter according to the instructions.
Depending on the year of manufacture of the VAZ 2110, these products can be installed in different ways:
- Vertical. This arrangement is typical for filters on machines manufactured before September 1, 2003. These are old-style products. It is recommended to look for replacement products using catalog numbers: 2112-8122020-00 and 2110-8122012.
- Horizontally. These filters, accordingly, are installed on the VAZ 2110, which came out after 09/01/2013. You can find the new type of “consumables” using the following numbers: 211-8122012 or 2111-8122020-00.
Location, necessary tools for replacement
The exact service life of the cabin filter of a VAZ 2110 car can be found in the operation and maintenance manual. Experts recommend this “consumable” to me after 20-25 thousand kilometers. The cabin filter is located on the left side of the engine and can be reached after removing the protective cladding. It will be quite simple to determine that it is time to change the elements - it will be black.
For work you will need the following tools and materials:
- Replacement part. It is not necessary to buy a standard part; now there are carbon options that have a longer service life, as well as improved filtration.
- Socket wrench "10".
- Rags.
- Phillips screwdriver and star.
Instructions for replacing the old model
If the car was manufactured before September 1, 2003, then the replacement process is as follows:
- The first step is to remove the windshield trim. To do this, you need to remove 5 screws and 2 nuts - the work is done using a Phillips screwdriver and a “10” socket. Taking a flat-head screwdriver, you should pry off the fasteners in the back; We pry up the fastening and remove the cover
- The jets do not need to be dismantled; simply retract them;
- The filter element is located vertically inside the motor. You need to stick your hand into the radiator and turn the product to the left - after that it can be removed; We take out the cabin filter and install a new one
- The new element is installed in the hole and scrolled clockwise until its foam edges are secured.
Instructions for replacing a new product
Dismantling the “consumables” of the new sample is carried out according to the following scheme:
- Having removed the screws and nuts, you need to partially disconnect the frill and move it to the side, but there is no need to disconnect the washer hoses; We need to unscrew the nuts and screws of the fastenings using a 10mm socket and a Phillips screwdriver
- The product is located behind the motor. To remove it, you will need to unscrew the four screws with a Phillips screwdriver and remove its cover. The element can now be removed;
- Installation must be carried out according to the instructions on the labels. Here you need to set the direction you need. The rest of the work follows the same pattern.
Advice! In order not to remove the frill every time, you can modify it or simply install a product from Priora. The non-standard part is installed quite simply, and it is easy to move it to the side if necessary.
note
Removing the cabin filter on a VAZ-2110
To replace the filter, do the following:
- First you need to remove the windshield wipers. To do this, you need to unscrew a nut on each device. After this, you need to pull the wipers up and remove first one, then the second.
We turn off the wipers with a key of 10.
- The next step is to remove the decorative caps that cover the screws of the wind decorative grille.
Remove the plugs and unscrew the 4 Phillips screws.
- First you need to unscrew all the screws of the grille, then unscrew the two nuts securing the grille at the bottom.
We unscrew the screws securing the heat and sound insulation.
- After all the manipulations associated with unscrewing, you need to remove the wind grill.
Having removed the trim, we see the cabin filter under the grille.
After this procedure, you will see a filter, but this will only happen if your car was manufactured after 2003. If the filter is visible, you need to unscrew all the screws holding the cover and remove it. After this, all that remains is to install the new part.
Here he is, all dirty and covered in dust.
Description of replacing the cabin filter on a VAZ 2110
To replace the cabin filter on a VAZ 2110, you need a flat-head and Phillips screwdriver, a vacuum cleaner, and a knife. Pliers and a set of wrenches will not interfere with the work. You can see the installation of a new consumable in the step-by-step instructions below.
- Unscrew the windshield wiper fasteners and remove them by pulling upwards towards you.
- Remove decorative plugs.
- Unscrew the screws located under the plugs.
- Unscrew the fastenings of the heat and sound insulation.
- Remove the frill.
- Unscrew the wind grill fasteners. After that, remove it.
- Remove the cabin filter.
- Clean the seat.
- Install a new filter element.
- Reassemble everything in reverse order.
Features of the “vertical arrangement”
If after removing the wind grille you do not see the filter, do not be upset. This means that it is vertical and can only be found by touch.
In older models, the filter is located deeper in the housing, but can be easily reached by hand.
Before installing a new filter element, you need to make sure that there is no dirt at its location. Any debris found there should be removed immediately. If you have an old vacuum cleaner, it is ideal for this procedure.
If you do not clean the location of the element, then dirt will immediately fall on the new part, which will make the entire procedure practically useless.
Installing a new part
Before installing a new filter, wipe the housing from dust!
The new part is simply placed in place of the old one.
In this case, you need to make sure that there is no moisture at the installation site. Installation of the wind grill occurs in the reverse order.
We insert a perfectly clean new filter into place.