The control devices stopped working or they began to “confuse” the readings, the control lamps and lights do not light up - in this case the panel will have to be removed.
Preparing for work
Before starting work, you need to buy replacement light bulbs. You can choose standard ones with or without sockets, as well as LED ones. If it is necessary to replace the incandescent lighting elements responsible for the backlight, then you will need light bulbs of the AMN 12-3-1 (T3W) type. These are ordinary filament bulbs that are installed in the dashboard of VAZs from the factory. If it is necessary to replace indicator lights, then type A 12-1.2 elements are used. Are you choosing LED?
You don't need a lot of tools:
- flat screwdriver;
- Phillips screwdriver;
- pliers.
If you are going to disassemble the panel and repair it, you will additionally need:
- multimeter or probe;
- soldering iron from 40 Watt;
- solder and rosin;
- side cutters;
- small screwdrivers.
Removing the panel from the car
Using a slotted screwdriver, remove the plastic plug on which the heating sign is depicted. This plug is on the right, and under it there is a Phillips screw that needs to be unscrewed. (There are 2 screws under the plug, but only one needs to be unscrewed - the top one, which secures the right side of the dashboard).
Next to the hazard warning button, there is an odometer reset button, which is secured with a plastic nut. The nut must be unscrewed and removed with the washer located behind it. The button is recessed inside the panel.
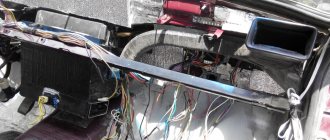
The right side of the tidy is weakened at this stage, and it remains to perform several additional manipulations in order to completely dismantle the device. To do this, pull out the right side of the device, thereby freeing access to its rear part. Here you need to disconnect all the chips and wires to perform dismantling.
Initially, the power chips for the stove button are disconnected. Be sure to remember the location of the wires. It is recommended to take photos so as not to be confused when assembly is carried out. Next you need to disconnect the speedometer cable. It is secured with a special nut, which can be unscrewed by hand.
All chips connected to the dashboard are disconnected. It is almost impossible to confuse their locations, since they have different fastenings and differ in size.
The supply hose is removed from the economizer fitting. This cable is located on the left side of the device. After all the chips, cables and wires are disconnected from the device, you can dismantle it.
Determining what doesn't work
If the backlight of the VAZ 2107 dashboard does not light up, this may be due to the following factors:
Faulty incandescent lamps
This rarely happens, however, due to the fact that from the factory the lighting of the panel is realized through the use of incandescent lamps, their burnout periodically occurs. The problem can be fixed by replacing the lighting elements, or better yet, installing LEDs. To make a replacement, you will need to dismantle the instrument panel. This is not difficult to do, but it will take a lot of time to disassemble the shield. The panel contains lighting elements, which must be replaced in order to restore the functionality of the VAZ 2107 instrument panel lighting. Before replacing, you should first check the serviceability of each lamp. The design of the shield uses 4 main lighting elements, which are responsible for lighting, as well as additional ones that act as an indication. If you had to disassemble the panel, it is recommended to immediately change them to LED ones.
Brightness control
The malfunction may be hidden in the part that is responsible for adjusting the backlight intensity. Although this part fails extremely rarely, its malfunction cannot be ruled out, especially if it has been established that the incandescent lamps are in good working order and do not need to be replaced. The light brightness control is located directly on the right side of the steering wheel near the headlight range control. If diagnostics have shown that this particular part is the reason that the backlight does not light, then it should be replaced.
Circuit breakers
The search for the reason why there is no instrument lighting on the seven should begin directly with the fuses. These elements protect the circuit from voltage surges, and as soon as a large current flows in the circuit or a short circuit occurs, the fuse link blows. If such a malfunction occurs, replace the fuse and check the power circuit.
Absence or poor contact at the point where the chip connects to the power wire
The reason for the lack of contact may be that the chip is not tightly pressed to the terminal block of the instrument panel. Poor contact occurs when contacts become oxidized. You can fix such breakdowns yourself by cleaning the contacts from oxides.
In addition to the main faults, there are additional ones, for example, damage to the power cable. If you have a multimeter in your arsenal, then identifying such a malfunction will not be difficult. Even if you don’t have a multimeter, it’s not at all necessary to contact a car service to fix the problem; you can use a probe with a light bulb.
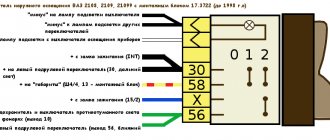
Tidy wiring diagram
Dashboard repair video
Dashboard lighting for VAZ 2107: what lamps are needed and how to replace them
In order to replace the lamps in the lighting fixtures of your car, it is not at all necessary to go to a service station and pay a highly qualified specialist. All operations can be done independently with minimal effort and money. Today we will talk about replacing light bulbs in the dashboard (DP) of a VAZ 2107 car.
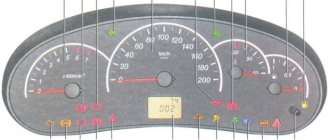
Location of lamps on the instrument panel of the VAZ 2107
Before we start replacing the light bulbs, let’s see where they are located on the PCB board and what the VAZ 2107 is responsible for illuminating or indicating.
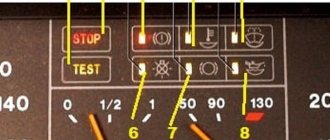
Layout of dashboard lamps on a VAZ 2107, where:
- Fuel level.
- Instrument lighting.
- The direction indicators are on.
- Engine control controller malfunction.
- Exterior lighting is on.
- Emergency oil pressure.
- The parking (hand) brake is on.
- High beam headlights are on.
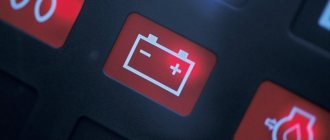
- Battery charge indicator lamp.
Removing the instrument panel and preparing for replacement
To change the lamps in the instrument panel, the latter will have to be removed. It cannot be said that the PP can be removed with one movement of the hand: the designers of the VAZ 2107 made dismantling a little more difficult than on other cars of the VAZ family. Nevertheless, dismantling the PP is quite feasible in a garage or even a parking lot. In this case, the operation does not require any special knowledge. The tools we will need are:
- small flat screwdriver or knife;
- crosshead screwdriver.
Removal
1. We prepare the car for operations (see “Preparing the car for maintenance and repair”).
2. Disconnect the wire from the negative terminal of the battery (see “Battery - removal and installation”).
3. Using a slotted screwdriver, remove the handles from the heater control levers.
4. Unscrew the nut securing the trip odometer reset handle. Remove the nut and washer and push the handle into the space behind the panel.
5. Remove the windshield wiper and washer switch for the rear door of the luggage compartment (see “Key switches - replacement”).
6. Using a thin slotted screwdriver, pry up and remove the screw plug for fastening the shield, located on the right edge of the block of control levers for the interior ventilation and heating system.
7. Use a Phillips screwdriver to unscrew the self-tapping screw.
8. Remove the shield from the panel.
9. Unscrew the knurled nut of the speedometer drive cable and disconnect the cable.
10. Remove the vacuum supply hose from the econometer fitting.
11. Disconnect the three colored wire connector blocks from the instrument cluster.
12. Remove the instrument panel.
Tips for motorists
When the instruments and warning lights on the instrument panel stop working, the driver of any car, including the VAZ-2107, becomes uncomfortable in the cabin of his car, since he will not have enough information that the instrument panel provides, as when starting the engine , and while driving.
The first thing drivers usually do is check fuse F10 (10A) , located in the mounting block and the condition of its terminals. If the fuse has not blown, then the cause of the failure of the instrument panel will have to be looked for in it itself. Therefore, we remove the instrument panel and in the left corner we look for two double black wires that are attached to the car body. This is “ground”, we check whether there is good contact and whether the fastening nut is tightened.
At the same time, immediately see if the pads are completely recessed, and you can also disconnect them and check the condition of the contacts. It happens that during installation they were bent, but due to vibrations they move away from each other and the instrument panel stops working.
But the most common reason for instrument panel failure is that the pins are attached to the instrument panel circuit board using rivets, and this connection is not reliable. As a result, the contact is lost, and the instrument panel stops working completely or works periodically, then turns on and off. This is especially evident in winter, until the interior of the car warms up, the shield does not work, and when a certain positive temperature is reached, due to the expansion of the metal of the rivets, contact is restored.
To eliminate this reason, you will have to drill out the aluminum rivets that hold the switching board and get to the connectors of the pads. Considering that the connector blades are riveted with copper rivets and not soldered, this is why contact is lost, which can be restored using an ordinary soldering iron. Then this disease of the instrument panel of the VAZ-2107 car will disappear forever. When assembling, you can use self-tapping screws instead of drilled aluminum rivets.
Making your own beard
A beard is a complex structure; it is made of flat parts. To make them you need to make patterns; it is best to make them from cardboard. It is necessary to achieve high precision of the console parts; rigid cardboard is quite suitable for this. If you are not confident in your skills, first make a mock-up of the console from cardboard. This will allow you to make sure that the drawings are made correctly and to estimate how the new beard will fit into the installation site.
After making the pattern, mark the details of the beard and cut them out of plywood with a jigsaw. All parts are connected using glue and screws. The latter will allow you to fix the console elements until the glue sets. This is the most reliable and easiest way to connect beard parts.
After the beard frame is ready, it is covered with carbon fiber, leatherette or fabric. For their fastening, finishing materials, furniture stapler and glue.
After the glue has dried, all that remains is to install the new console in place of the standard one. Attach switches and devices and secure.
Dimensions and instrument lights do not light up
#1 Kyivfan
Guys, tell me where to look for the problem.
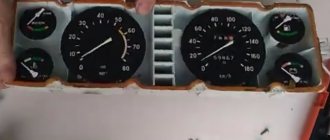
The situation is this: a VAZ 2103 car, the dashboard from 2107 installed mirrors with dimensions and turn signals. connected the whole thing. worked without problems. but today an opportunity happened:
I went to work in the morning, turned on the headlights and low beams, everything was fine for 25-30 minutes, and then suddenly the instrument lighting went off. scales and sensors work, there is no backlight, and the low beam light does not light up. The lights on the mirrors and the front lower right hand light also stopped lighting up. At the same time, the remaining dimensions are on and the low beam is on. When you turn on the high beam, it lights up and the light on the panel also lights up.
I suspect there is a short to ground somewhere. tell me where and what to look for.
There is also a problem with the heated rear window. connected according to the circuit through a relay, power is supplied to the glass heating, checked with a tester. but - in 20-25 minutes of driving, only thin strips thaw from fogging (the thickness of the heating threads themselves is slightly thicker).
thanks for the help
#2 vitaliy_kiev
- Top
- Complaint
#3 Kyivfan
Thank you. figured it out - it's a fuse))
there is still a problem with the heated glass
- Top
- Complaint
#4 vitaliy_kiev
- Top
- Complaint
#5 Kyivfan
I believed .. the contact - both negative and positive - are the same in cross-section.
and as for the dimensions - there are a hundred LEDs... I don’t think they take on much)
- Top
- Complaint
#6 vitaliy_kiev
- Top
- Complaint
#7 Kyivfan
Message modified: Kyivfan, September 21, 2013 - 21:31.
- Top
- Complaint
#8 vitaliy_kiev
- Top
- Complaint
#9 Yurec77
- From: Kyiv
- Auto: 21043/lanos.
Price list
- Special offers
- KAMAZ spare parts
- Spare parts KAMAZ-5490
- Spare parts MAZ, YaMZ
- ZIL spare parts
- Spare parts ZMZ, for GAZ vehicles
- Spare parts for Volzhanki cars
- Spare parts for Gazelists
- Spare parts for trucks Lawns
- Spare parts for GAZ-71 caterpillar
- Spare parts UAZ, UMZ
- Spare parts KrAZ, BelAZ
- Spare parts URAL
- Spare parts BUSES
- AMAZ spare parts
- IKARUS spare parts
- KAVZ spare parts
- LAZ spare parts
- LIAZ spare parts
- NEFAZ spare parts
- PAZ spare parts
- Other buses
- Tractors, computer equipment, attachments
- Tractors and walk-behind tractors
- Municipal vehicles
- Attachments and trailed equipment
- Spare parts for TRACTORS and SPECIAL EQUIPMENT
- JCB - spare parts for special equipment
- Truck crane (KS-3577, KS-4517, etc.)
- AMZ (A-01, A-41, D-440, D-442, D-447, D-461, D-467)
- Amkodor (TO-18, TO-28, TO-30, etc.)
- ATZ (T-4A, TT-4M)
- VgTZ (DT-75)
- VMTZ (D-120, D-144, D-130, D-145T)
- VTZ (T-25, T30A-80, VTZ-2048)
- LTZ (T-40, LTZ-55, LTZ-60)
- MKSM, UNC, DETVAN
- MTZ - spare parts for tractors
- OTZ (TDT-55)
- PTZ (K-700/701/702/703/704)
- KhTZ (T-150, MT-LB)
- ChTZ (T-130, T-170, B-10, B-12, B-170, T-10M, DET-250)
- YuMZ - spare parts for tractors
- Other special equipment and tractors
- RVD - high pressure hoses and sleeves
- MMZ spare parts and engines
- Spare parts for MMZ engines
- MMZ engines: D-242, D-243, D-245, D-246, D-260
- VAZ spare parts
- Spare parts OKA VAZ 1111
- Spare parts VAZ classic 2101 - 2107
- Spare parts VAZ front wheel drive
- Spare parts VAZ Granta and Largus
- NIVA spare parts and all-wheel drive
- Spare parts Moskvich, IZH
- Spare parts for Korean trucks
- Spare parts for Starex, H-1
- Spare parts for Porter, H-100
- Spare parts for HD65,72,78, County
- Spare parts for HD120, AeroTown
- Spare parts for HD160,170, . ,700,1000
- Spare parts for HYUNDAI, KIA buses
- Spare parts for Korean passenger cars
- Spare parts DAEWOO, CHEVROLET
- FOREIGN CAR spare parts more
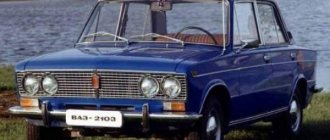
General tuning aspects
By tuning the dashboard of a VAZ 2107, you can change not only the appearance, but also improve its performance (video author - Auto overhaul).
For night time, the electronic instrument panel on the VAZ 2107 can be equipped with good backlighting. You can get creative and use overlays on the instrument panel to improve the appearance of the dashboard. You can make new scales for VAZ 2107 instruments yourself or order them printed.
If you have finances for a VAZ 2107, it is better to entrust tuning to professionals who will do everything efficiently and quickly. You can do it yourself, just be patient and if something doesn’t work, you need to look for the reasons and fix it.
General tuning aspects
By completing the VAZ 2107 panels, you can change not only the appearance, but also improve its performance (video author - Auto overhaul).
For night time, the VAZ 2107 can be equipped with good lighting. You can get creative and use overlays on the instrument panel to improve the appearance of the dashboard. You can make new scales for VAZ 2107 instruments yourself or order them printed.
If you have finances for a VAZ 2107, it is better to entrust tuning to professionals who will do everything efficiently and quickly. You can do it yourself, just be patient and if something doesn’t work, you need to look for the reasons and fix it.
Advertisements on NN.RU - Auto
A wide selection of hydraulic pumps and hydraulic motors of all series: spline hydraulic pump of right rotation. It is used in road construction and... Price: 1,000 rub.
In a short time and at a high technical level, you can: 1. Lengthen the frame (chassis) to the required wheelbase of the tow truck. 2.
Manufacturing of a broken-type platform with retractable ramps on the GAZ-33023 Gazelle-farmer chassis. Technical characteristics of the tow truck.
Conversion of a cargo-passenger gazelle, an all-metal gazelle, an autoline into a cargo gasel 3302 gas 33023 gazelle-farmer includes c.
A street film festival will be held in Nizhny Novgorod for the second time. Short films by young Russian directors will be available for free.
An accident occurred in the Moskovsky district of Nizhny Novgorod: a girl was swinging her friend, but the swing suddenly fell. As a result.
We are forced to buy unnecessary things because they come with what we need. Moreover, according to the sellers, they are inseparable, like Jack and Rose.
Today, Nizhny Novgorod fast food lovers have a real holiday: a new worldwide outlet has opened on the renovated Nizhne-Volzhskaya embankment.
Instrument panel lighting
- We disassemble and remove the instrument panel to get to the board with the lighting and alarm lamps. You can change them without completely removing it, but you need to act carefully so as not to break the wiring
- Turn the light bulb socket that needs to be changed a quarter turn and remove it.
- The lamp is pulled out in the same way as the socket - by turning it 90 degrees.
Video instructions for replacing instrument panel light bulbs on a “classic”:
In some modifications of the VAZ 2107, baseless lamps can be used. Therefore, it is better to check which ones you have installed, buy them, and only then disassemble the dashboard. Such a light bulb is simply pulled out of the socket without rotation.
You can buy it on the market together with cartridges for installation in a panel. In this case, it is enough to remove it from the “tidy” board and install a new light bulb assembly with a socket - simple and reliable, but they are more expensive.
Replacing the cigarette lighter socket lamp
We replace the cigarette lighter socket lamp with the instrument panel removed.
1. Squeezing the walls of the lamp housing, disconnect it together with the lamp from the cigarette lighter housing.
2. Remove the lamp socket from the housing.
3. By pressing and turning counterclockwise, replace the lamp.
Popular faults
If we talk about the dashboard of VAZ 2109 cars, then they are characterized by certain problems. We will tell you about them, and also tell you how to act correctly in a given situation.
| Fault type | Your actions |
| Gasoline level and temperature indicator does not work | In most percent of cases, this situation occurs due to breakdown of devices, sensors of these devices, or an open circuit of the power supply. Therefore, first check the circuit for continuity, make sure that the fuses have not blown. If this is not the case, check whether the gas level and temperature sensors are working. Only if none of the actions allowed you to get rid of the breakdown, you can begin to replace the devices themselves. No options, the problem lies in them |
| When the fuel tank is full, the arrow points to zero | If you have worked on the fuel level sensor, the fault most likely lies with you. When manipulating this device, the float limiter is often knocked down. Either the limiter is installed incorrectly or adjusted, causing the resistor winding to end. To resolve the problem, remove the sensor and then adjust the limiter again |
| The fuel gauge needle regularly jumps and ends up at zero | Here, most likely, the resistor has weak contact with the current collector. Another possible option is that there is a break in the resistor. To resolve this situation, we recommend replacing the hot level sensor with a new measuring device |
| The fuel level lamp is constantly on | If this lamp is constantly on, there is probably a short circuit in the fuel level sensor supply wiring to ground. Another option is that the sensor’s flexible bus is shorted to the fuel intake pipe. You will have to disassemble the device to align the bus and get rid of the resulting short circuit |
| Indicator lamps do not work on the dashboard | There is a high probability that the light bulbs have simply burned out, or they are poorly held in their seats due to loose contact. Replace the bulbs, but first try tightening the contacts. Traces of oxidation may be detected. When cleaned, the light bulbs can work normally again. Also, do not exclude the possibility of wiring breakage or oxidation of the tips of the supply wiring. Try going over the wires with a tester, cleaning the contacts if necessary. |
| The speedometer does not work, the flexible shaft is noisy | In such a situation, you will have to change the speedometer drive cable or replace the entire speedometer assembly. But before you bother so much, check that the fastening nuts of the tips are tightened correctly and properly. The flexible shaft may make noise during operation due to deformation or violation of the permissible bending of the shell of less than 10 centimeters during installation |
The instrument panel of the VAZ 2109 is not so complicated that you cannot figure it out on your own. But in the absence of experience, it is better to entrust the repair to specialists, or to enlist the support of a partner who understands this matter.
If you find an error, please select a piece of text and press Ctrl+Enter.
Auto catalog
- VAZ
- UAZ
- GAS
- AZLK
- IZH
- ZAZ
- ZIL
- LuAZ
- RAF
- BYD
- Chevrolet
- Daewoo
- Geely
- Great Wall
- Hyundai
- Lifan
- Tata