Using the Scanner
Using a scan tool is the easiest way to reset your check engine light. Here are 5 simple steps:
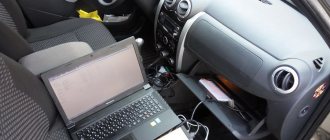
- Connect the scan tool to the OBD connector under the steering column. A laptop or tablet with the appropriate software is installed in the holder;
- Then turn on the car’s ignition and turn on all the gadgets accordingly;
- On your mobile device, in the appropriate section, press the “READ” button to view engine error codes. We write down the codes with a pen in the order in which they were received. This will be necessary for subsequent repairs.
- We delete the error code. Press the “ERASE” button on the scanner. The Check Engine light will turn off when all error codes are cleared. Some scanning tools have many options, such as freeze frame, which captures the sensor readings. When deleting codes, these readings will also be deleted. Note: in some scanners, the option to clear codes may be automatic and the “CLEAR” or “YES” button instead of the “ERASE” button.
- Be sure to turn the ignition on before clearing codes.
What is a check engine?
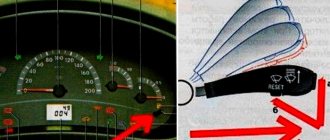
“Check Engine” is translated from English as “Check the engine.” On different cars, on the dashboard there is either such an inscription, or simply “Check”, or an engine icon. On the Priora, it is the yellow icon that lights up, resembling an engine in shape. “Check” lights up in two cases:
- Checking the functionality of the sensors. When you turn on the ignition, all the icons on the dashboard light up, indicating that there is a signal from the ECU and the system is ready to operate. After 2-3 seconds of turning on the ignition, the icon will go out.
- Malfunction of the engine operating system. There are several important aspects. Firstly, the ECU does not receive data about all breakdowns: it cannot technically record any mechanical damage. Secondly, the appearance of this icon may be erroneous. But you shouldn’t trust the opinion “it’s all for nothing” - a problem with the engine can grow like a snowball and cost a pretty penny if you ignore it. Regardless of whether the “check” on the Priora is on or flashing, the problem needs to be solved.
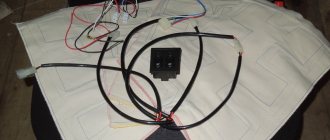
Battery disconnect method
Disconnecting the battery is an old way to reset the check engine light. Here are three steps to clear the check using this method: Step 1: Disconnect the cables from the battery. At this point, you should use a wrench to unscrew the positive and negative cables.
Step 2: Discharge the remaining electricity. The next thing you should do is press and hold the car horn for about 30 seconds. This action will help drain the car battery.
Step 3: Wait and reconnect the battery. After disconnecting the battery cables and draining the remaining electricity, all you have to do is wait about 15 minutes and then plug the battery back in. Error codes will be cleared. (Note: This method may not work on some vehicles.) If after this procedure the “check” lights up again, this may mean that the problem is still much more serious.
Error 1602
If error 1602 appears on the on-board computer of the Lada Priora 16 valves, this means that the on-board voltage in the controller has dropped. As the experience of VAZ 2170 owners shows, error 1602 does not affect the operation of the car; if you remove the terminal from the battery, then 1602 will disappear, but after a while it will appear again. There may be several reasons for 1602:
- Problems with the generator. Measure its voltage; in good condition it produces 13.7-14 V.
- A large voltage drop during engine starting also leads to the appearance of 1602. The ECU records the voltage drop and automatically adjusts the time. First of all, you need to check the ground on the electronic control unit.
- Codes 1602 appear when the security system blocks one of the electrical circuits.
Allow the check engine light to go off on its own.
Wait until the “check” goes out on its own. The simplest method because you don't have to do anything. The computer system in most vehicles will automatically recheck for problems that may activate the error light. If it is a minor problem, it will automatically correct itself and the check will go off. However, if the check light is still on after three days, you need to apply the methods mentioned above to reset it.
If this continues to happen despite the following reset procedures, you should take your vehicle to your nearest auto repair shop and have it diagnosed by a professional mechanic. Professional diagnostics use more sophisticated tools and can identify precise problems.
REMEMBER: You can always contact our car service center, where your car will be happy to receive professional technical assistance. You can also make an appointment with us for a scheduled technical inspection! Please familiarize yourself with our car repair and diagnostic services.
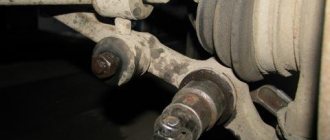
Failures in the idle speed system (IAC) and ESC
- P0500 - speed sensor is broken.
- P0506 - very low engine speed at idle.
- P0507 - too high speed at idle.
- P0511 - the XX regulator network is faulty.
- P0560 - BS voltage is below the minimum threshold.
- P0562 - very low voltage in the BS.
- P0563 - very high voltage in the BS.
- P0601 - ROM checksum error.
- P0615 - the wires of the additional starter relay are broken.
- P0616 - the same wires are shorted to ground.
- P0617 - they shorted at the BS.
- P0627 - the fuel pump relay wires are broken.
- P0628 - the same wires are shorted to ground.
- P0629 - they shorted it to the BS.
- P0645 - break in the wiring of the air conditioning compressor clutch relay.
- P0646 - the same wiring has shorted to ground.
- P0647 - she shorted to BS.
- P0650 - Malfunction indicator light circuit does not operate.
- P0654 - Tachometer control circuit is faulty.
- P0685 - the main relay electrical wire is broken.
- P0686 - the same electrical wire has shorted to ground.
- P0687 - he shorted it to the BS.
- P0691 - the electrical wiring of the fan control relay is shorted to ground.
- P0692 - the same wiring has shorted to the BS.
Note: in cases where the computer displays error codes that indicate a break in the electrical wiring of a device, before troubleshooting the problem and purchasing spare parts, you must first see if the electrical wiring plug has come out of the connector of the corresponding device. Such incidents happened. Testers and computers are, of course, good, but nothing can replace the eyes of a car enthusiast. Good luck with the repair.
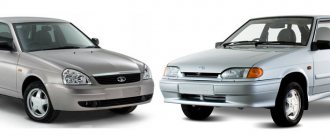
How to reset a check on a Priora yourself
Probably every VAZ owner has encountered such a problem when, out of the blue, the “chek” error comes on. Here many people immediately panic. Don't worry, there's nothing wrong with it. Firstly, this error appears when any sensor fails (here you will have to suffer and determine which one), but all this is determined by changes in the behavior of the car: dynamics, consumption, etc. Secondly, this error appears when the wrong mixture enters the combustion chamber. This can happen in two cases: some sensor is not working correctly, or low-quality gasoline. Try using higher quality fuel the next time you fill up.
However, even if you correct the problem, the “check” will continue to light up. Many people go to computer diagnostics to clear an error, where they pay about 150-200 rubles per minute. Although it’s not a lot of money, why? If you can reset the error yourself, spending the same minute on it, and you don’t have to go anywhere. Don’t know how to reset the check error yourself? Very simple, read below.
We reset the error.
- To do this, turn on the ignition without starting the car.
- Open the hood and remove the positive terminal of the battery.
- We wait from 10 seconds to a minute and seat the terminal back.
- Close the hood.
- Turn off the ignition.
- Turn on the ignition and start.
And then a miracle, the error light stopped lighting.
Even if you cannot decide why your check light came on, do not immediately run to diagnostics. Try to reset this error using the method described above. There are simply cases of accidental operation (there was an impurity in gasoline and the like). And then after the reset the error simply will not appear again. And if, nevertheless, there is some kind of problem, then the “check” will pop up again, after 50 kilometers.
Check Engine Light comes on when your vehicle's computer detects a problem with the powertrain. This may indicate a serious or minor complication, but ignoring it will definitely make the problem worse, leading to significant damage and costly repairs. You can avoid all troubles if you know the reasons for the signal. However, it sometimes does not turn off despite solving the problem. In this case, it won’t hurt you to find out how to reset the “check”.
Most drivers get annoyed if the check light still does not go off, even if the car problem has been corrected. In this case, your car's computer is faulty and a little intervention is required to resolve the issue.
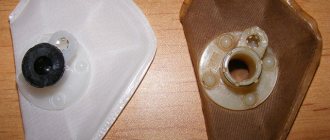
Error 0422
The efficiency of the Priora 16 neutralizer has fallen below the normal level - this is what error p0422 reports to the owner of the Lada Priora 16 valves. As practice shows, codes 0422 pop up quite rarely. If code 0422 appears on the on-board computer screen, then you need to perform the following steps:
- We examine the catalytic collector. Its body and filling must be in good condition;
- If damage is found, the catalytic collector should be replaced with a serviceable one;
- If the catalytic converter is not the cause of the message, then the remaining actions to eliminate p0422 must be entrusted to specialists from the service center.
To get rid of 0422 you will need to reflash the cathode collector. If you have the equipment to set the settings, you can do the work yourself.
Using the Scanner
Using a scan tool is the easiest way to reset your check engine light. Here are 5 simple steps:
Checking using a connected computer or tester
Driver Information Panel
Checking system malfunctions using connected devices gives more accurate results, but at the same time requires deciphering special codes. For example, the monitor displays code p0441 or p0130 or error p0422. Oh, these car manufacturers, in human language they could write “replace the oxygen sensor” instead of P0130 or “check the canister valve” instead of P0441. But nothing can be done, the Lada Priora is also intended for export, so it is easier to write p0441 in the program than to give explanations in Russian, Kazakh, Arabic, Armenian and 10 other languages. And then attach special tables that indicate the meaning of certain codes. Just look at them and everything will become clear. But these tables are not included with the operating instructions. Either way, you can check them out below.
All fault codes for Lada Priora car systems consist of 5 characters. Here is a breakdown of Prior's errors.
The Latin letter comes first:
- P - error in the electronic systems of the motor;
- C - error in the electronic systems of the chassis;
- B - error in interior electronics;
- U is an error in the joint operation of different systems.
Next comes the number:
- 0 - OBD-2 code;
- 1 - enterprise code;
- 2 - enterprise code;
- 3 - reserve code.
The system indicates an error
The next digit indicates the system in which the malfunction was found:
- 0 — exhaust;
- 1, 2 — fuel and air supply system;
- 3 - ignition;
- 4 - additional control;
- 5 — idle system;
- 6 - ESC;
- 7, 8 - transmission.
The last 2 digits indicate the serial number of the fault.
Battery disconnect method
Disconnecting the battery is an old way to reset the check engine light. Here are three steps to clear the check using this method: Step 1: Disconnect the cables from the battery. At this point, you should use a wrench to unscrew the positive and negative cables.
Step 2: Discharge the remaining electricity. The next thing you should do is press and hold the car horn for about 30 seconds. This action will help drain the car battery.
Step 3: Wait and reconnect the battery. After disconnecting the battery cables and draining the remaining electricity, all you have to do is wait about 15 minutes and then plug the battery back in. Error codes will be cleared. (Note: This method may not work on some vehicles.) If after this procedure the “check” lights up again, this may mean that the problem is still much more serious.
What is a check engine?
“Check Engine” is translated from English as “Check the engine.” On different cars, on the dashboard there is either such an inscription, or simply “Check”, or an engine icon. On the Priora, it is the yellow icon that lights up, resembling an engine in shape. “Check” lights up in two cases:
- Checking the functionality of the sensors. When you turn on the ignition, all the icons on the dashboard light up, indicating that there is a signal from the ECU and the system is ready to operate. After 2-3 seconds of turning on the ignition, the icon will go out.
- Malfunction of the engine operating system. There are several important aspects. Firstly, the ECU does not receive data about all breakdowns: it cannot technically record any mechanical damage. Secondly, the appearance of this icon may be erroneous. But you shouldn’t trust the opinion “it’s all for nothing” - a problem with the engine can grow like a snowball and cost a pretty penny if you ignore it. Regardless of whether the “check” on the Priora is on or flashing, the problem needs to be solved.
Diagnostic methods
There are two proven methods for finding problems on this modification of the car. Each has its own advantages and disadvantages.
Self-diagnosis using on-board computer
This method does not require the user to have additional equipment. All the necessary systems are already installed inside the machine. The processing sequence looks like this:
- Find the odometer reset key on the daily mileage;
- While holding the button, turn the ignition key.
If everything is done correctly, all the lamps on the dashboard will light up, the arrow indicators will make a full revolution and drop to the “0” position. In this way, the functionality of all vehicle systems is checked. If there is no response from any indicator, you need to check the circuit following the indicator. To more accurately determine the source of the problem, you can, in the same mode, press the mode scroll key to the “error codes” position, which in 90% of cases provokes the appearance of one of these indicators:
- 2 – short circuit or high voltage flow on the BS;
- 3 – the fuel level sensor in the gas tank is covered;
- 4 – antifreeze temperature sensor has burned out;
- 5 – error of the sea thermometer;
- 6 – severe overheating of the internal combustion engine;
- 7 – you need to check the oil level – the pressure has dropped;
- 8 – failure or jamming of the calipers, the pressure inside the line has dropped;
- 9 – battery “died”;
- E – failure or violation of the integrity of the EEPROM data packet.
To exit the menu, you must leave the on-board computer alone for 30 seconds. The main disadvantage of the method is its mediocre accuracy. The light only shows a broad problem in the design of the entrusted part of the machine. Thus, to more specifically identify the problem, you will need to resort to the following technology.
Checking via connected unit
Modern computers connect to the car's network via a diagnostic connector. The block is located inside the cabin, under the dashboard on the front passenger side. To work you will need a laptop or PC with the necessary software. After establishing a stable connection, an error code will appear on the unit’s display, explaining why the machine is acting up.
Standard codings were developed due to the sale of cars for export. It is inconvenient for the manufacturer to program each ECU for a different language. The standard cipher consists of 5 characters, each of which is responsible for a narrow range of information. One of these elements always comes first:
- P – malfunction of the power plant electronics;
- C – chassis electronics failure;
- B – problem inside the cabin;
- U – synchronization of two or more circuits is disrupted.
Next comes the first digit:
- 0 – OBD 2;
- 1/2 – enterprise code;
- 3- reserve
The data indicates a malfunction. The following indicates the serial number of the circuit containing the breakdown:
- 0 – exhaust gas system;
- 1/2 – fuel/air supply;
- 3 – ignition distribution system;
- 4 – additional control;
- 5 – violation of idle speed;
- 7/8 – gearboxes, differentials and drive axles.
The last two indices indicate the serial number of the breakdown.