Niva 21213 carburetor. How to clean?
For Niva lovers! This section of the auto forum is intended to discuss a variety of models that are produced under the Niva brand (Niva 2121, Niva 2129, Niva 2131, Chevrolet Niva). Here you will find detailed reviews about these models.
Everyone knows that the quality of our gasoline leaves much to be desired! Somehow the traction on my car has disappeared(((I’m sinning with the carburetor! There is an idea to clean it completely! Who has already done such a procedure - tell me how best to do this, where to start and how to finish? Merzkij Messages: 5 Registered: February 17, 2013 , 14:35 Reputation: 0
To clean it well, it will take a lot of time, you need to completely remove it, disassemble it in detail and wash it in gasoline, all the parts need to be washed well, then you need to blow out all the jets and all the holes with a compressor, wait until it dries well and you can put it on the car, that’s how everything...=)
PrizracniyGonshik Posts: 15 Registered: 05 Mar 2013, 13:06 Reputation: 0
Cleaning it is not a problem, as with any carburetor car... The most important thing is to rinse everything thoroughly, then use a compressor to thoroughly blow out all the jets and holes, everything that is unnecessary will fly out =)) Wash only with gasoline, and nothing else...
Shurik Messages: 21 Registered: Mar 10, 2013, 07:37 pm Reputation: 0
Yes, I agree, gasoline and only gasoline will help you) it’s called what we fill it with and clean it))) So I think you won’t have any difficulty disassembling it - blowing and rinsing is also not such an abstruse job. Once done, we put it back and fill it with normal gasoline.
hiler Messages: 9 Registered: May 20, 2013, 12:29 Reputation: 0
Return to Club - Niva forum
- 5 9841
- 0 1411
- 4 5769
- 2 1642
- 3 1585
Who is currently at the conference
Currently viewing this forum: no registered users and guests: 4
autonew.biz
Care products
A couple of decades ago, domestic car owners did not have the opportunity to use liquids to clean the fuel system. They had to make do with more affordable means, such as diesel fuel, kerosene, solvent and acetone. These materials were highly accessible, allowing every motorist to put a carburetor into working condition at minimal cost.
Any modern carburetor cleaning spray is an order of magnitude more effective than the compounds that were available before. And first of all, this is manifested in their higher quality.
Types of cleaning compositions
Car owners do not have any particular problems with how to flush the carburetor at home. There are two types of cleaning products available to them today:
Adjusting the carburetor on a VAZ Niva car
Created several decades ago, Niva is still popular among domestic and even foreign motorists. This SUV is in demand due to its unpretentiousness, maintainability and good cross-country ability, which can be the envy of many modern cars of the same class. But proper and uninterrupted operation of even such a durable vehicle can only be ensured with proper and timely maintenance and repair. Therefore, if you are not going to spend money on the services of service station specialists, it is advisable to at least superficially understand the design features of your car. For example, self-adjustment of the carburetor on a VAZ Niva car will allow you to optimize engine performance and reduce consumption at minimal cost.
The VAZ-2121 has become popular due to its cross-country ability, technical reliability and ease of operation and maintenance.
This article will focus on setting up the carburetor on the VAZ-2121 and VAZ-21213 models, as the most prominent representatives of domestic classic SUVs. Niva 21213 replaced its predecessor in 1994, having undergone a number of design changes. First of all, the model acquired a new engine, on which the manufacturer installed a different carburetor. The Niva 2121 used an Ozone carburetor, and owners of the next generation of the SUV were offered a more modern unit called Solex. However, many farmers did not appreciate the innovation due to its increased requirements for the quality of gasoline and often resorted to installing the unit from the previous model themselves. You will learn further about how to set up the carburetor on Niva 21213.
How to adjust the carburetor on a VAZ Niva car
How does the Ozone carburetor work on the Niva 21213 and 2121, as well as other classic cars of the VAZ family? From the fuel tank, gasoline enters the float chamber in the appropriate quantity. Next, passing through the nozzle, the atomizer in the diffuser, the fuel is mixed with air. After this, depending on the degree of opening of the throttle valve, a certain amount of the air-fuel mixture is supplied through the intake manifold to the engine cylinder.
Adjustment of the Niva 21213 carburetor is resorted to in cases where it has been repaired, disassembled/cleaned, and when starting the engine is difficult or its operation is unstable. Some types of adjustments can be made without removing the unit from the machine, but in some cases, for example, when you need to adjust the starting device, dismantling is indispensable.
Throttle Actuator Settings
The main goal of adjusting the VAZ-21213 carburetor by adjusting its drive is to ensure the optimal throttle position for the extreme positions of the gas pedal. So, when the pedal is pressed all the way, the throttle should open completely and, conversely, as soon as you release the gas, it should close. This is achieved by setting the required rod length. To perform the adjustment correctly, follow the steps below:
- Disconnect the drive rod from the bracket located on the cylinder head valve cover.
- Using a key set to “8”, loosen the lock nut and, by tightening/unscrewing the rod end, set the optimal throttle position.
- Now all that remains is to tighten the locknut and install the rod in its place.
Upon completion of the adjustment operations, it is necessary to make sure that the position of the damper actually corresponds to the position of the accelerator pedal. If the desired result is not achieved, repeat the described operations.
Carburetor adjustment begins with adjusting the throttle position
Setting the optimal fuel level in the float chamber
If during maintenance and repair the float or needle valve was replaced, the VAZ-21213 carburetor must be adjusted without fail. Read the step-by-step guide and you can make the necessary settings yourself:
- To adjust, remove the carburetor cover and place it in a horizontal position so that the floats are on top.
- You will need a caliper to measure the distance between the cap gasket and the highest point of each float. The manufacturer's documentation indicates that the optimal distance is 34–35 millimeters. If deviations are found after measurements, set the optimal position. To do this, bend or bend the tongue.
- If, after carrying out control measurements, the obtained values correspond to the norm, you can replace the carburetor cover. But during the process, be careful not to allow the floats to come into contact with the walls of the chamber. If necessary, bend the levers without disrupting the level adjustment height.
This is how the fuel level in the float chamber should be adjusted.
Self-adjustment of the starting device
After disassembly and repairs have been carried out with the replacement of the dampers, it is necessary to adjust the VAZ-2121 carburetor, which involves adjusting the starting device. And also this type of adjustment may be necessary if the engine does not start. To do this, the unit will have to be removed from the intake manifold. Prepare a standard set of tools and follow the procedure described below:
- After dismantling the carburetor, you should immediately check how the dampers work. Turn the choke lever counterclockwise until it stops - in this position the damper should close completely.
- At the same time, the throttle valve must be slightly open. In this case, the gap formed between it and the chamber wall should be 1.1 mm. This is the starting gap - it is this that is adjusted when setting up the starting device. You can measure the gap using a wire of the appropriate diameter.
- Use an "8" wrench to turn the adjusting screw located on the throttle lever. This way you will set the required starting gap.
- In addition, with the choke completely closed, press the trigger rod all the way. This will lead to an increase in the starting gap to 3 mm.
- If there are deviations from the norm, additional adjustments will have to be made. To do this, loosen the locknut of the adjusting screw located on the starter housing. Turn this screw until the desired clearance is achieved. After completing the adjustment, be sure to tighten the locknut.
In order to correctly configure the starter, be careful and strictly follow the sequence of actions described in the manual.
How to adjust idle speed on a Niva with your own hands
Upon completion of cleaning, repair, or in order to adjust the idle speed, it is necessary to adjust the Niva 2121 carburetor, during which you will need a gas analyzer - it is used to monitor the content of carbon monoxide (CO) in the exhaust gases. After you have prepared everything you need, including a standard set of tools, read the instructions and start setting up:
- First of all, before carrying out adjustment operations, warm up the engine and turn on current consumers (for example, headlights).
- If the engine is warm, you need to turn it off, then connect the gas analyzer to the exhaust pipe. Restart the engine.
- Take a screwdriver and, turning the mixture amount screw, set the crankshaft speed to 800–850 rpm. Speed control is carried out using a tachometer.
- Next, using the same screwdriver, you need to turn the mixture quality screw. Based on the gas analyzer data, set the CO content in the exhaust gases within 2.5–3%. Often, after the final adjustment, the engine speed deviates from the norm. You need to make adjustments using the quantity screw.
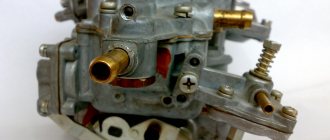
The blue arrow is the quantity screw, the red arrow is the quality screw.
After properly adjusting the carburetor, your car’s engine will develop the necessary power and operate steadily at idle speed. This will ensure optimal fuel consumption. If, after completing the adjustment, dips are observed at any speed, and starting the engine itself is difficult, then most likely there is a malfunction in the carburetor systems. In this regard, diagnostics and appropriate repairs may be required.
CarExtra.ru
Installation in reverse order
Installing a carburetor mechanism on a Niva takes much longer than removing it. This is because the reverse process is more complex in terms of connecting hoses and fuel lines.
The procedure for installing Ozone on a VAZ 2121 is as follows:
- The device is threaded onto four studs to the intake manifold.
- The corresponding nuts are screwed onto these studs to give the carburetor stability and the required position.
- The throttle control rod snaps into place.
- The choke cable is screwed into place.
- Next, you will need to connect all the hoses in strict order: first the fuel pipe, then the return line, after which you can connect the remaining hoses in any order.
- The fuel filter box is screwed to the carburetor body.
- After this, the box is attached to the engine compartment frame.
Which carburetor is better to install on Niva 21213
The domestic auto industry, after more than fifty years, continues to firmly hold a leading position in the car markets. The VAZ family has a very reasonable price and is quite easy to maintain.
Huge demand has appeared for the Soviet SUV VAZ-21213, as well as its analogues. This type of VAZ car has achieved enormous success in world motorsport, setting unattainable records. This type of car is very actively exported to European countries and beyond.
Car owners who do not have much experience in servicing this type of car quite often encounter various problems associated with the operation and repair of the Niva. One of these common problems is carburetor repair and replacement.
Many drivers do not know which model is better to choose, how they differ from each other and what to follow when choosing one or the other.
Symptoms of a problem
If the carburetor begins to produce a rich mixture, you will understand this by the following signs:
- Fuel consumption increases
- Loud exhaust is heard from the muffler and the smoke turns black
If the engine receives a lean mixture, you will understand this by the following sign:
- Loud bangs are heard from under the hood.
In both cases, the engine heats up noticeably more, and its power is also lost.
If you encounter a similar problem, remember that it is a natural consequence of using the carburetor. Any element of the car requires care, regular inspection and maintenance. Therefore, the VAZ 2106 carburetor must be adjusted from time to time.
Before proceeding with the adjustment, you need to make sure that the cause of the breakdown is not the failure of any element inside the device. You need to disassemble it, wash it and clean it. And only after you are convinced that all components of the structure are in full working order, you can begin adjustment.
How to properly adjust the carburetor on a Niva - a step-by-step process
The engine in the VAZ-21213 Niva is equipped with a Solex family carburetor. Many Niva owners complain about the capriciousness of this device. The manufacturer claims that Solex is correctly adjusted at the factory, but this statement is not always true. Problems with the engine power system unit arise not only due to its incorrect configuration, but also due to the negligence of the car owner himself.
Ignoring recommendations on the frequency of replacing air and fuel filters leads to the fact that the most important mechanism in the engine power system refuses to work correctly. The goal to which all carburetor adjustment processes come down is to ensure stable operation of the power unit over the entire speed range. Adjusting the Solex carburetor on the VAZ 21213 Niva is an essential condition for trouble-free operation of the engine.
Step-by-step adjustment of the Solex carburetor on the VAZ 21213
Adjusting the Solex carburetor comes down to part of the adjustment processes in the float chamber and adjusting the idle system. This is quite painstaking work that requires certain knowledge. Correctly setting up Solex in the future will allow you to enjoy an economical, hassle-free and comfortable ride in a VAZ 21213 Niva.
All work should begin with establishing the optimal amount of fuel in the chamber:
- Start the engine for a few minutes; while the engine is running, you must also periodically press the gas pedal;
- After running the engine for five minutes, it must be turned off;
- The fuel supply hose is disconnected;
- The screws securing the carburetor cover are unscrewed;
- In a horizontal position, the upper part of the power system mechanism rises;
- A ruler measures the distance from the surface of the carburetor cover to the fuel level.
The level should be within 25 mm in the chambers, but this may vary since the collector is not horizontal, so you should measure the value in the chambers and average it. If the level exceeds the norm, then use the float tongue to remove some of the gasoline and reassemble the mechanism in the reverse order. Then start the engine again and make observations. Gasoline should not leak from small diffusers, otherwise the appearance of fuel will indicate an overflow. There is no need to press the gas during the adjustment!
Adjusting the starting system
You can adjust the Solex starting system both on an installed carburetor and on a dismantled one. In the first case, the adjustment comes down to determining the number of crankshaft revolutions, but with the carburetor removed, it is possible to adjust the starting system due to the gaps at the edge of the dampers. On the engine power system device removed from the vehicle, adjust the gap between the damper and the chamber wall - the gap should be 1.1 mm. Adjustment work is carried out using a wrench or screwdriver.
More experienced and advanced car owners prefer to adjust the Solex by determining and setting the crankshaft speed. This method is faster, but also requires certain specific knowledge. This technique consists of the following:
- Air filters are dismantled;
- The choke is disconnected, the engine starts;
- Using available tools, the air damper is opened by a third;
- The lever sets 3200 rpm of the crankshaft;
- The air damper should be closed, loosen the lock nut, and use the adjusting screw to reduce the rotation speed to 3000 rpm;
- Tighten the locknut.
Using a gas analyzer, you can also configure the starting system. The device measures the amount of carbon monoxide in gases. If the value is 8%, then there is no need to configure the launch system. If the value is below 8%, then the screw on the diaphragm mechanism cover should be tightened, and if the value is higher than normal, the screw should be loosened and the measurement taken again.
Adjusting idle speed
This procedure is necessary to ensure that the power unit operates stably and that the exhaust gases contain as few harmful substances as possible. In the garage, using your own efforts, all the work can be done using a tachometer. The motor is first brought to operating temperature, after which the adjustment itself is carried out directly. Using the mixture quantity screw, the crankshaft rotation speed is set at 850-900 rpm, after which the quality screw is tightened with a screwdriver until the speed is set at around 800 rpm. A similar procedure must be carried out several times until the engine begins to operate stably, and a minimum amount of vacuum in the tube is observed.
Correct tuning of Solex will allow the car owner to enjoy high-quality, and most importantly, trouble-free engine operation. Experts recommend adjusting the idle speed twice a year. Thus, it is possible to achieve significant fuel savings and the emission of a minimum amount of harmful substances into the atmosphere, plus, a properly adjusted mechanism of the engine power system will significantly save personal funds on the services of service stations.
avtooverview.ru
Symptoms of pollution
Every owner should know when to start worrying and flush the carburetor. The critical state of this element can be determined by a number of characteristic features:
Unfortunately, it is not always possible to say that the source of the problem is the carburetor when the above symptoms appear. Therefore, in such cases, it is imperative to first carry out a full diagnostics of the engine. Only after this can you start thinking about how to clean the carburetor.
If you constantly monitor the condition of this unit and regularly clean it, this will subsequently allow you to avoid many unpleasant moments, including unnecessary financial expenses and loss of time due to vehicle downtime.
Owners who neglect to wash this unit in a timely manner often experience the symptoms described above. In especially severe cases, when it is heavily clogged, dust and dirt as a result of vacuum may even end up inside the cylinder, and this can lead to the appearance of scuff marks on its mirror and carbon deposits on the surface of the piston.
Important Tips
After the carburetor has been cleaned, it must be reassembled in the same order. During disassembly, you must immediately remember where the fuel and air jets were located. In addition, the float chamber level and idle speed should be adjusted.
Considering this opportunity, after cleaning the power system unit, you should check the condition of the fuel pump and fuel tank. Some vehicles may have a mechanical fuel pump. It also needs to be checked and, if necessary, cleaned with an aerosol cleaner. If this is not done immediately, then very soon the dust present on the membrane and valves of the pump may again enter the carburetor and lead to new blockages.
To restore the fuel tank to proper condition, it will first have to be dismantled. Experts also recommend regularly cleaning this unit, since a lot of dirt often accumulates in it due to the use of low-quality gasoline. Subsequently, the sediment formed in the fuel tank can penetrate into the carburetor, and this happens with enviable regularity, even though fuel enters it through the fuel filter and the float chamber mesh.
To bring the fuel system into working condition, it is necessary to clean all key elements, starting with the gas tank and ending with the carburetor. Using an integrated approach will ensure stable engine operation and normalize fuel consumption.
Preparatory activities
Before starting work, you should take care of the materials and tools used:
Carburetor cleaning spray
Various chemical reagents are offered for use on the shelves of car dealerships. Each carburetor cleaner has its own advantages and disadvantages. The most common among users are LIQUI MOLY, Gunk Carb Medic, Run Way, ABRO CC-200.
You need to know that you cannot use WD-40 as a carburetor cleaning liquid, since it contains oil that is undesirable for this process.
The cost of special products for cleaning up the carburetor can range from, for example, $6 for a 350 ml can of Liqui Moly MTX Vergaser Reiniger to $18 for a spray with a capacity of 0.75 liters of IPONE Spray Carbu Cleaner.
If the level of contamination is not severe, it may be sufficient to use gasoline for cleaning. But it will be problematic to wipe off heavily ingrained soot.
Flushing with removal from the engine and complete disassembly
Here we need the same tools and tools.
The order of work is as follows:
- We carry out the work provided for in paragraphs 1–12 from the previous chapter.
- Disconnect the air and throttle valve drive cables from the carburetor.
- Using a 13mm wrench, unscrew the nuts (4 pcs) securing the device to the engine.
- We disconnect the heating block from it by unscrewing the screw with a Phillips screwdriver.
- We unscrew the fuel quantity adjustment screw by hand.
- We do not remove the throttle valves.
- Using a slotted screwdriver, unscrew the fuel quality adjustment screw.
- Soak the carburetor body in kerosene (gasoline, acetone). After this, we clean it with a toothbrush.
It is also advisable to soak the carburetor body in kerosene - Small parts and the carburetor cover are washed and cleaned in the same way as with partial disassembly.
Video: cleaning the Solex carburetor
After assembling the carburetor and installing it on the engine, it is necessary to adjust it.
Other washing methods
Sometimes it happens that there is no special means for cleaning the working unit nearby. In such cases, solvent No. 646 can help. Although you shouldn’t rely too much on it. The effectiveness of this cleaning method is quite low, and it only allows for a short period of time to remove contaminants from the surface of the carburetor.
The proper operation of this part depends not only on the frequency of its cleaning, but also on the product used. In order not to make a mistake in choosing this product, you need to carefully familiarize yourself with its composition and properties in the store. It is imperative to take into account the activity of using the cleaning agent. We should also not forget that all elements of the fuel system require regular cleaning. To ensure proper operation of the carburetor, it is recommended to clean it of dirt every 10-15 thousand km.
Trouble-free operation of a vehicle depends on many components, not least of which is the carburetor. Every car owner should regularly check its condition. This is especially true for those who use low-quality fuel. This factor increases the likelihood of clogging by an order of magnitude. But you can avoid the negative consequences caused by a dirty carburetor if you clean it regularly.
Every car owner can handle this task with his own hands, so you don’t even have to turn to specialists for help. When disassembling this power unit, it is only necessary to remember the location of the main parts. But first you need to understand what is the best way to flush the carburetor.
This must be a special composition designed to remove contaminants from the internal and external surfaces of the working unit. It is not recommended to save on the purchase of cleaning fluid, otherwise this may soon result in new, even more serious problems for the car owner, the elimination of which will require not only more time, but also financial costs.
causes of contamination, ways to rinse and clean at home
Carburetor maintenance involves periodically flushing the structure once every two years, as well as immediately when signs of clogging appear. This recommendation is due to the fact that low-quality fuel leads to clogging of the structure and its malfunction. Let's take a closer look at how you can wash a carburetor at home and what are the features of this process...
Signs of carburetor contamination
Corrosion products, water and dirt may be present in gasoline. It is these harmful impurities that lead to contamination of the mechanism. The most common signs of contamination include the following:
The device in question is contaminated both inside and outside. It is worth considering that the above signs may indicate other problems with the engine or fuel system. Before starting work, it is recommended to replace fuel and other filters, which eliminates the possibility of rapid clogging of the carburetor after cleaning it. The device can be cleaned using special liquid agents or compressed air.
Features of cleaning
Before considering methods for cleaning the carburetor without complete dismantling, we note that this design is complex, as it consists of a large number of parts. Despite this, cleaning can be done while the vehicle is in use, for which special additives are added to the fuel. To remove dirt that is deposited inside, regular washing will not be enough.
Among the features of carburetor cleaning, we note the following points:
In order to blow through the device, you need a compressor that supplies air under pressure.
Cleaning methods at home
Carbon deposits and other contaminants can be cleaned and washed at home as follows:
Without dismantling
Among the features of the method, which does not involve removing the unit, we note the following points:
Before cleaning, you should study the manufacturer's recommendations for using the additive.
With partial disassembly
The method, which involves partial disassembly of the mechanism, is very popular today. The cleaning process has the following features:
During partial disassembly, it is possible to carry out high-quality washing, since it is possible to visually determine the degree of contamination.
Complete disassembly
If the cleaning procedure in question has not been carried out for many years, then it should be performed when the device is completely dismantled. The work is carried out as follows:
There are also companies that provide carburetor cleaning services.
Means used
You can clean the surface of carburetor parts from various contaminants and carbon deposits using the following available substances:
In addition, in specialized stores you can find and purchase special products offered in a wide range:
It is recommended to give preference to special products, as they are more effective.