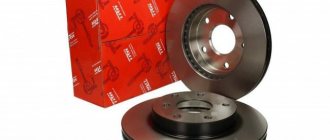
Removing and installing the VAZ 2107 front suspension spring
Place the car on a lift or inspection ditch;
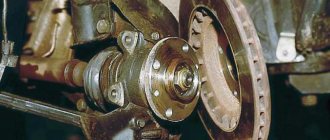
holding the end of the rod by the flats with a wrench A.57070, disconnect the upper end of the shock absorber and remove the front wheels. Having straightened the locking plates, unscrew the bolts securing the caliper to the bracket. Move the caliper to the side and secure it so that it does not hang on the hoses. Remove the shock absorbers with brackets.
Disconnect the ends of the anti-roll bar from the lower control arms.
Using puller 67.7801.9513, press the pins out of the holes in the levers and move the steering rods to the side.
↑ Spring compression with device 67.7828.9504
1 — suspension spring; 2 — screw of the device; 3 - support plate.
- Insert screw 2 of tool 67.7828.9504 into the hole in the upper support of the suspension spring.
- Then place the support plate 3 on the spring coil 1 and on the screw 2 from below and secure it to the spring with a clamp.
- Screw the nut onto the screw from below so that the nut retainer fits into the socket of plate 3.
- By turning screw 2 with a wrench, compress the suspension spring until the suspension arms are completely unloaded.
- Take out the axis of the upper arm and disconnect it from the body.
- Disconnect the lower control arm axle from the cross member and remove the suspension assembly from the vehicle.
- Remove the spring, smoothly unloading it, remove the device and repeat the operations for the other suspension unit.
- Remove the engine splash guard and stabilizer bar.
NOTE! When removing suspension components, it is necessary to note the number and location of the adjusting washers between the axis of the lower arm and the cross member, as well as the adjusting plates between the cross member and the body side members, so that when installing the units, put these washers and plates in their original place.
↑ Installation of cross member A.70526 to support the engine when removing the front suspension cross member.
Supporting the engine with a cross member A.70526 or a hoist, remove the cross member.
Install suspension components and parts in the reverse order of removal.
Install springs on the front and rear suspensions of the same group (group A is marked with yellow paint, and springs of group B are marked with green). In exceptional cases, it is allowed to install group A springs on the front suspension, and group B springs on the rear suspension.
The front suspension should only have springs with yellow markings on the outer surface of the coils.
↑ Sequence of tightening nuts and axles in rubber-metal joints
To prevent improper distribution of forces in rubber-metal joints, tightening the nuts and lever axles must be done in the following order:
- Place the car on a level surface and place the wheels parallel to the axis of the car;
- load the car with a load of 3136 N (320 kgf);
- under these conditions, use a torque wrench to tighten the nuts securing the axles of the upper and then the lower arms and the nuts securing the axle of the lower arm to the cross member.
Check and adjust the front wheel alignment angles.
How to replace rear springs on a VAZ 2107
Replacement of rear springs on cars of classic models, such as the VAZ 2107, is carried out in two cases: if one of them significantly subsides or in case of mechanical damage. You should definitely remember that both need to be changed at the same time, otherwise the car will lose stability on the road due to tilting to one side. Unlike the front ones, replacing the rear springs does not require special tools and can be done in 1-2 hours without much labor. In particular, to replace the front springs you need a set of special pullers.
Rear springs for the VAZ 2107 are available in two sizes:
- Type A – length exceeds 273 centimeters – red color;
- Type B – length less than or equal to 273 cm – green color.
To work you need to stock up on tools:
- Two keys for 19;
- Two keys for 10.
In addition, you need to purchase two springs and two spare sets of rubber stands. If it is necessary to change the springs, then the stands may be suitable for further use. However, it is better to change them too while the car is disassembled, so that you do not have to do the same work again later.
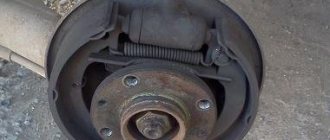
To remove the springs on a VAZ 2107, you need to unscrew all the parts that interfere with the free movement of the bridge in the vertical plane. First, using 10mm wrenches, you need to unscrew the brake fluid pressure regulator rod.
After this, in order to avoid damage to the brake pipes, you need to unscrew the bolt securing the brake pipe tee using a 10mm wrench.
Next, use two 19mm wrenches to unscrew the lower shock absorber mount on the side where replacement is planned.
After this, we jack up the rear of the car on the side where you planned to work, the bridge lowers and the part is released. We take out the part to be replaced along with the upper and lower rubber pads, and install a new one in its place.
You should pay attention to the presence of protrusions on the linings on both sides. On one side the end of the coil rests on the protrusion, on the other we rest:
- into the protrusion on the car body for the upper lining;
- into the protrusion on the bridge platform for the lower lining.
After installing the part in its normal place, remove the car from the jack and screw on the shock absorber. The replacement of one element is completed, you can move to the other side. Having replaced both springs, we assemble the brake system parts in the reverse order. At this point, the work of replacing the rear springs can be considered completed. For VAZ 2107 vehicles with a long service life, before unscrewing the nuts, it is recommended to treat them with a special penetrating lubricant such as WD-40 to make work easier.
Replacing rear springs
Replacing the rear springs of a VAZ 2107 is much easier than replacing the front ones. For this you will need:
- Keys for 10 and 19;
- jack.
The replacement procedure is as follows:
- unscrew the pressure regulator rod in the rear brake circuit;
- unscrew the rear pipe tee fastening;
- unscrew the lower shock absorber mount;
- jack up the car and release the shock absorber and spring;
- remove the spring along with the gaskets;
- check the condition of the gaskets, replace if necessary;
- install the spring with spacers and assemble the suspension parts in the reverse order of disassembly.
Video on replacing rear springs
Replacing the front suspension spring of a VAZ 2107
Today we will talk about replacing the front suspension spring of a VAZ 2107 with your own hands. The article will be accompanied by photographs and a detailed description of all actions.
According to the length under the normalized load, the front suspension springs of the VAZ 2107 are divided into two groups: A - “long”
and
B - “short”
. The front suspension springs of group A are marked with yellow paint, the front suspension springs of group B are marked with green paint.
The vehicle must have springs of the same group installed. The front suspension springs on a VAZ 2107 should be replaced in pairs if at least one of the springs shrinks, deforms or cracks.
To do the work of replacing the front suspension spring on a VAZ 2107 with your own hands, you will need ties to compress the springs.
Warning:
Use only reliable factory-made ties to compress the spring and strictly follow the instructions for their use. The suspension spring has great strength. The spring breaking off the ties can cause serious injury.
How to remove the front suspension springs of a VAZ 2107
1. First of all, you need to prepare the car for repair.
2. Remove the front wheel from the car.
3. Remove the shock absorber from the VAZ 2107.
4. Loosen the two nuts securing the lower front suspension arm to the axle.
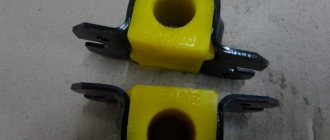
5. Disconnect the stabilizer cushion clip and remove the cushion.
6. Press the lower ball joint pin out of the steering knuckle.
7. Install the jack under the lower arm without loading the front suspension of the VAZ 2107, and unscrew the nut securing the pin.
8. Carefully unload the suspension (by lowering the jack) and at the same time, using a mounting blade, move the stabilizer through the upper stud securing its bracket.
9. Remove the jack.
10. Using a mounting blade, pry the spring from below and remove it from the lower arm support cup.
11. Remove the spring and the insulating rubber gasket from the upper support cup.
Installing a front suspension spring on a VAZ 2107
1. Before installing the spring on the VAZ 2107, attach the upper rubber gasket to the spring with insulating tape, ensuring that the end of the screw surface of the gasket coincides with the end of the spring coil. We install two ties on the spring, without catching them on the last turns, and tighten the spring to a height of no more than 280 mm.
2. Install the front suspension spring on the lower arm support cup and orient the spring so that the end of the spring coincides with the screw surface of the lever support cup.
3. Place the jack under the lower arm and lift it, making sure that the rubber gasket is installed on the upper support cup.
4. Raise the lever with a jack and guide the pin of the lower ball joint into the hole in the steering knuckle.
5. Tighten the self-locking pin fastening nut 4-5 turns. We loosen the ties and remove them through the technological hole in the lower arm.
6. Raising the lever, press in the pin of the lower ball joint and tighten the self-locking nut.
7. Install the remaining parts in the reverse order of their removal.
8. Having installed the car on the wheels, we finally tighten the nuts securing the lower suspension arm to its axle and securing the stabilizer pad holder.
9. Similarly, we replace the second spring of the front suspension on the VAZ 2107 with our own hands.
Let us remind you that the previous article was about adjusting the front wheel bearing of a VAZ 2107 with your own hands.
Replacing the front springs of a VAZ 2107
To work you need:
- set of wrenches;
- jack (screw or hydraulic);
- wheel wrench;
- metal brush;
- hammer;
- mounting blade;
- insulating tape;
- wire hook.
Replacing the front springs of a VAZ 2107 is carried out as follows:
- jack up the car and remove the wheels;
- remove the shock absorber;
- loosen the front arm nuts;
- put the car on a block and jack up the lower arm to make it easier to remove the stabilizer;
- unscrew the stabilizer cushion mounting bracket and remove it;
- remove the jack from under the lower arm;
- loosen the nut from the lower ball joint pin without unscrewing it completely;
- carefully knock out the support pin from the steering knuckle;
- support the lower arm with a jack without loading it;
- unscrew the nut from the lower ball joint pin and lower the lower arm;
- secure the upper arm with a wire hook;
- pry the spring with a mounting blade at the bottom and remove it;
- remove the spring gasket;
- check the condition of the gasket, replace if necessary;
- attach the gasket to the new spring using electrical tape;
- insert the spring into place using a mounting spatula;
- smoothly lift the lower arm with a jack, controlling the position of the spring and inserting the lower ball pin into the steering knuckle;
- Assemble the suspension parts in the reverse order of disassembly and install the wheel.
Video on replacing front springs
How to change springs on a VAZ 2107
How to replace rear springs on a VAZ-2107
Over time, the elasticity of the metal decreases, the car sags, and in potholes the wheels begin to reach the wheel arch liners. It's time to replace the rear springs . The procedure is not complicated and a driver with minimal plumbing experience will be able to fix the problem on his own. This article is suitable for owners of all “classic” VAZs from 2101 to 2107 . Sometimes replacing the spring spacers with thicker ones helps. They are available in three versions with different thicknesses. If the springs haven’t burst, then the Zhiguli car is still ok with inflated spacers.
Helpful information
A short rod unscrewed from the stocking will facilitate dismantling and installation. For ease of assembly, a new rubber spacer and a metal lining are fixed to the spring with electrical tape or tape. Reinforced springs with VAZ 02 - 04 will increase the load capacity, but the car will become rougher to drive. It is easier to replace the torque rods with new ones without wasting time pressing the bushings in a vice. When experimenting with the height of the springs, you should remember the length of the shock absorber stroke. They may have to be lengthened or different ones used. During disassembly, the brake hose receives extra stress, which can lead to damage.
Read, it may be useful: Hood deflector
Follow safety precautions and replacing rear springs will not be a hassle.
Replacing suspension springs on a VAZ-2107
We carefully inspect the suspension springs. Sagging springs, as well as those with cracks and severe corrosion, are replaced.
Check the technical condition of the insulating gaskets and replace them if they are damaged.
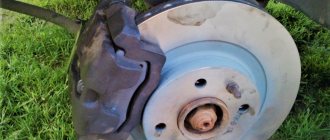
Replacing front suspension springs
To remove the front springs, we use a special device consisting of two grips installed between the coils of the spring and a screw tie.
Install the device into the spring and remove it.
Press the lower ball joint out of the steering knuckle (see Replacing ball joints).
We move the hub on the upper ball joint to the side. Use a 22mm wrench to loosen the nuts on the lower arm axle. (See Replacing the rubber-to-metal joints of the lower control arms on a vehicle.)
After making sure that the coils of the spring are tightened securely, push the lower suspension arm down and remove the spring along with the device from the lower arm.
A rubber insulating gasket is installed on the top of the spring
Having compressed the spring three times until the coils touch, check its elastic characteristics at the control points.
Replace the damaged gasket with a new one. The length of a working spring in a free state should be equal to 360 mm. It is allowed to install identical springs on the front suspension only with yellow markings on the outer surface of the coils (group A).
Installation of springs is carried out in the reverse order of removal.
We install the car on the wheels, and then tighten the nuts of the lower control arm axles.
Replacing rear suspension springs
We disconnect the shock absorber from the rear axle beam bracket and...
We compress the spring with two special ties.
Instead of zip ties, you can use two or three strong staples, which are inserted from two opposite sides into a spring compressed by the weight of the car.
When hanging the wheel, they will not allow the spring to fully decompress.
A compressed spring is dangerous, so in addition to ties or staples, you can tie its coils with steel wire.
Using your hands, move the rear axle beam down and remove the spring.
A plastic gasket is placed under the lower part of the spring, and a rubber vibration-isolating gasket is installed on top.
We check the condition of the rubber gaskets and, if necessary, replace them with new ones.
Install the spring in the reverse order of removal.
We replace the second spring in the same way.
We install both springs of the same group (with markings on the outer surface of the coils with paint of the same color).
Class “A” springs (yellow) are installed on VAZ-2107 cars.
It is allowed to install springs of class “B” (green color).
In case of damage (cracks, peeling), replace the compression stroke buffer by moistening it with a soap solution before installation
Replacing the front suspension springs of a VAZ 2106 - detailed instructions
- While the car is “on wheels”, tear off the wheel mounting bolts with a “balloon”.
- Jack up the car with a screw jack on the side where you are going to change the suspension spring.
- Next, you need to hang the wheel and completely remove it from the car.
After this, remove the shock absorber, this is done as follows:
- To do this, use the key at "6, 13, 17 and 19".
- The rod must be kept from turning with a key.
- Next, loosen the nut and remove it.
- Also remove the cushion washer, spring washer and upper shock absorber mounting pad.
8. Unscrew the two fastening nuts of the bracket to the lever and remove the spring washers.
9. Remove the shock absorber from the bottom using the mounting hole in the arm.
10. Loosen the mounting nuts that secure the lower arm to the axle, but do not rush to remove them.
How to replace rear springs on a VAZ 2101 - 2107
- 183 6 175k
- 76 1 90k
A sure sign of the need to replace the rear springs on a VAZ Classic (2107, 2106, 2105, 2104, 2101) is sagging of the rear part of the body. Moreover, ground clearance is significantly reduced even at minimal loads.
Let us visually analyze the entire process of installing standard springs with medium spacers. You can also experiment a little and install springs with high spacers, but this is allowed if you install simple springs from 2101, their article number 21010-2912712-01, and not reinforced springs from 2102, article number 2102-2912712. What are the best springs to install on VAZ cars is described here.
Springs from 2102 are much higher than standard ones; if they are used in combination with high or medium spacers, they will most likely lift the car very much. Consequently, the travel of standard VAZ shock absorbers is not enough, which means you will also have to change the shock absorbers to longer ones, for example Moskvich ones. Part number: 402-2915006-A. Additionally, it will be necessary to carry out welding work to weld additional rings onto the shock absorber itself. But replacing conventional springs with cargo springs is necessary in cases where you load your Zhiguli every day.
The tools we need to carry out the work:
- two jacks, for example, “trapezoid” and “frog”;
- large screwdriver;
- two keys for 19;
- balloon wrench.