The pins of VAZ door hinges are a sore spot for owners of cars from “kopeck” to 2114. These cars use not the highest quality hinges, which become loose after just a few months of active use of the car. They also become unusable due to hard locks, when you need to slam the door hard to close, and also because of roads, when driving on which not only the hinges, but also the body itself slowly but surely deforms. If the hinges completely become unusable, then the doors will simply stop closing, since the clip will not fit into the lock (grip). How to replace fingers?
Door hinge repair options
Failure or severely deformed hinges are repaired using the following methods:
- Complete door replacement. It is complicated by the fact that it is not always possible to find new VAZs for old ones. You have to buy old elements that are partially worn out.
- Inserting new hinges. A good option, but you will have to make additional adjustments and eyeliner. When inserting new ones, you will need a welding machine; for cutting, at least an impact drill, but a gas cutter is better.
- Replacing old fingers. It will only work if the hinges themselves remain intact and undeformed, and only these metal pins are bent (or come off the axis).
Replacing door hinges, as well as fingers, is the most rational option in this case. It's inexpensive and relatively easy to do. If necessary, additional equipment can always be rented at a service center or automotive supply store. The cost of the hinges themselves for the VAZ 2110 and similar models is only about 300-500 rubles. You can also find old, used ones for sale. You will have to pay less for them. But new VAZ 2110 doors will cost several thousand rubles. And they are sold, as a rule, without glass and cladding. Their installation is an additional waste of money.
General Features
If during an accident there was a direct impact without sliding, which resulted in a dent without a scratch, this greatly simplifies the restoration technology, since in this case painting of the damaged part or its fragment is not required. There are various ways to straighten a defect on a car door without painting. Therefore, to remove these defects, different tools and materials are used. To better understand how to fix a dent on any car part, you should find a video that discusses the repair technologies described below.
One of the peculiarities of working with a door is that when repairing it, it is relatively easy to provide access to the dent from the inside of the part. To do this, you need to remove the door panel, then full access to the inner surface will open, and the defect can be corrected by tapping or pressing without using a lever. In addition, if necessary, you can remove the dent on the removed door.
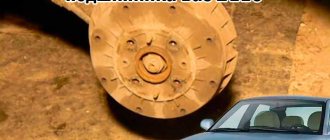
Replacing pins in hinges
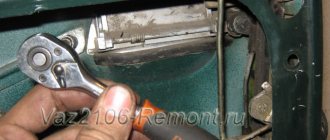
So, if the repair only involves replacing the fingers, then the first thing you will need to do is remove the door to gain access to the hinges (3-4 fasteners are simply unscrewed, depending on the model). Next, the fingers are knocked out. If they do not come out due to corrosion or deformation, then you should first thoroughly fill everything with WD-40 to remove the rust and repeat the operation. If this fails, you will have to drill out the pins or replace the hinges completely.
When installing new pins, be sure to lubricate them with grease or oil, and after installation, adjust the door (lower or raise it a few millimeters through a tightening rod). The door should fit accurately into the catch when closing without additional physical effort. Otherwise, the wear and tear on both doors and hinges will be much higher. After 1-2 years of such operation, you will have to completely replace the door along with the hinges.
The main difficulty in repairing VAZ door hinges is to correctly knock out the pins (the same fingers). It’s most convenient to just rivet it and then straighten the loop if necessary. The most aesthetic method is to drill out each end of the finger, after which its edges are ground off or simply squeezed. The drill is immediately taken to the minimum size, then gradually increases literally by millimeter. This will take quite a lot of time, but the loop will not be damaged.
If the finger has other deformations, it may be necessary to make a through hole through the pins. This will not prevent the use of new fingers in the future. For this purpose, either an impact screwdriver or a powerful drill with a high-quality drill bit (carbon steel is ideal) will be useful.
Tools and materials
Proper soundproofing of car doors begins with preparing the tools and necessary materials:
- For vibration isolation - material such as Vibroplast M2 or Shumoff M2
- Sound absorber and heat insulator material Accent 10mm (they can recommend Spleen, but in doors Accent gives a better effect)
- To eliminate squeaks Bitoplast 5mm and Madeline (it is thinner and is useful where Bitoplast will not fit)
- Industrial hair dryer (construction)
- Screwdriver Set
- Shoe knife (can be wallpaper), sharp scissors and marker
- Ruler
- Solvent
- Hard rolling roller
The materials can be bought as a ready-made set (the price is slightly higher), or in sheets, briefly about their properties:
- Viproplast is the most popular and affordable vibration-absorbing material today
- Vibroplast does not require heating during installation if the air temperature is 25 degrees or higher
- Vibroplast is resistant to water and other aggressive environments, does not absorb moisture from the air
- Vibroplast has high elasticity, so it can be conveniently applied to any textured surfaces
- Complete versatility of application of vibroplast (it can be used for sound insulation in any area of the car)
- Vibroplast has anti-corrosion properties and provides additional protection against corrosion
- Vibroplast has excellent sealing properties, so it provides good sealing of surfaces
- Accent is a sound-absorbing porous material with a special improved structure
- High frequency absorption range
- Absorbs about 90 percent of noise
- Excellent thermal insulator
- Covered with metallized film on top
- Bitoplast is a sealing material with sound-absorbing properties
- The mounting layer makes it easier to use
- High wear resistance, durability
- Madeleine is probably the most favorite material among most installers, allowing to compensate for friction and completely eliminate the occurrence of squeaks and other sounds.
- Although it is also “anti-creaking”, it is much thinner than Bitoplast, which allows it to be used in places where the gaps are very small, and the thickness of madeline is only 1-1.5 millimeters
- It is also very simple to install: you just need to stick a piece of Madeleine on one of the two rubbing surfaces, and all friction disappears and squeaks too, so it is simply irreplaceable in soundproofing the doors and interior of any car
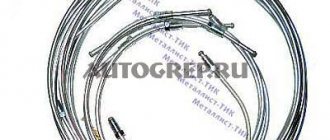
Replacing the entire hinge
If the door is sagging, then the likely cause is deformation or mechanical wear of the hinges. It is corrected by completely replacing them, along with the fingers. You don't have to buy them. You can make it yourself if you have a metal cutting machine. Such repairs will be cheap - you will only have to pay for the purchase of high-quality metal plates.
It is recommended to cut the loops strictly along the boundaries of their wedging. Fingers are placed last. And again, you need to lubricate them, hammer them, and lock them, as the manufacturer himself recommends. Replacement without taking into account their manufacture (if you do it yourself) will take at most several hours, including removing and reinstalling the doors. All that remains is to make the adjustment. And you should understand that in the next few days the noose may fall. This is shrinkage. The door may creak and may not always slam shut normally. If necessary, readjustment is performed.
Lada 2110 › Logbook › Getting rid of "Ryzhikov" and spray painting.
When I bought the car, it had a couple of saffron marks on the arches and above the windshield - painted over with anti-corrosive agent, it wasn’t particularly an eyesore, but after my first wash the anti-corrosive agent disappeared. I decided to paint them since they became very noticeable. It’s November, it’s -7…-15 outside, it’s good that there’s an underground garage (the temperature in it is +3). After reading information on the Internet, I realized that they don’t paint at temperatures less than +15... But the desire to paint was very strong and I decided to take a risk!
I bought: 1) A can of original paint using code 448 (rhapsody), just in case I bought a second one. 250 RUR 2) Rust converter "Tsinkar" 120 RUR 3) A can of acrylic varnish 250 RUR 4) A can of Anticorrosive - I left it, I will coat the arches in the summer. 150r 5) Degreaser - 0.33 liters, take more! But it's better in the form of a spray. 6) Sandpaper, p80, p320, p800, p1500. 7) Emery disc Primer in a can. 250 RUR 9) Putty 200 RUR - should have been used, the result would have been simply super! I took a bunch of newspaper from home, masking tape, a heater that raised the temperature in the garage to +6, a hairdryer, and rags.
After reading a variety of sources on the Internet (videos, articles), I realized that everyone has their own technique. Day one (1)
I drove the car into the garage, twisted the wheels and placed them under the brake discs.
Then I took a grinder and began to remove the rusty paint (Guys, I don’t recommend doing it by hand). I cleaned it as best I could, removing it above the windshield and rear window manually with sandpaper. Then I applied rust converter and the deep rust turned black, let it dry and degreased everything.
Then he took a newspaper and painter and began to paste over it. Cover all the joints of newspapers properly, otherwise the spray may blow into the cracks and there will be a surprise later.
I applied the contour before the primer, so it will do just fine - the main thing is to cover the metal with primer.
I degreased the metal, applied two layers of primer on top, here is the first layer of paint in the photo. I applied all the layers at intervals of 1 hour (I was running home from the garage and was frozen). Arriving at the garage to apply the second coat of paint, I suspected something was wrong... having applied the second coat, I realized that the paint began to collect and run off... In general, after a couple of minutes they told me that I needed to degrease before applying a coat of paint! I came home exhausted...
Arriving at the garage, I saw a picture... I could be seen from afar with such a wing)))) All the paint is in waves and the soil is visible. I took acetone and wiped everything off! Oddly enough, acetone did not take the original paint. And I decided to reconsider the painting technology!
Before each action, you need to degrease the surface (I saved money, but my small bottle of degreaser was enough for me). Spray cans with Paint, Primer and varnish - keep warm! I put it on the heater! Otherwise, the paint does not come out of the can evenly. I applied a little primer to the degreased surface, then dried it with a hairdryer, sanded it with 1500 grit sandpaper (I didn’t want to use putty, I decided to fill the sinks in layers), then degreased it and repeated this two more times. A total of 3 layers of soil.
The last time I degreased it and began to apply the paint in thin layers (so that the paint did not drip), drying the layer with a hairdryer. Drops of paint should go into the area, but either because of the low air temperature or the cold spray cans, everything started to flow on the first day. I also degreased it properly before applying a new coat of paint. 5 layers of paint were applied... a bit much... I also wanted to hide the transition of the paint to the original color.
Final door adjustment
Adjusting a door after replacing pins or hinges is about aligning the locks to the normal level for precise closure of the catch. If you plan to replace them, then it is better to focus on the so-called silent locks. They cost slightly more, but allow the closing mechanism itself to not wear out so quickly. When installing them, you can select any level. They work on the principle of a classic latch. At the moment of closing, they do not create additional resistance, so the door will close even with a slight push. The lock will no longer be able to open while moving.
After installing the hinges or fingers, you need to use a building level to check whether the VAZ door is level.
If yes, you can start adjusting. It is best to do this from a clamp. Everything with it is quite simple - we move it a little higher and towards the cabin. You can do this a few millimeters at a time until the closing force is minimal.
Before replacing pins or hinges, you should determine exactly what is causing the doors to be beveled. It may be enough to just make an adjustment, or maybe you will have to completely change the fasteners.
What to choose?
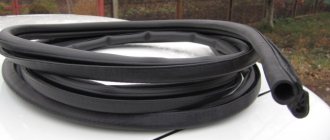
Sometimes you are amazed at the imagination and thoughts of those who are trying to save money on car repairs. If we talk about rubber seals, some advise using drip tubes instead, others go the other way, inserting window seals.
Do not follow such advice under any circumstances. They won't lead to anything good.
There are several truly correct and effective options, which we will introduce you to using the table.
| Option | Peculiarities |
| Ready-made kits from the manufacturer | They are designed specifically for the VAZ 2110 model. These are mass-produced rubber bands that fit perfectly on the dozen doors. Their design is double-circuit, which allows you to install additional seals if necessary. |
| Measuring rubber bands for VAZ | In stores you can purchase ready-made or soldered seals for each door. Or a solid tape, from which they will cut you a piece of the required length |
| Seals from Priora | Experts believe that these are the most effective and reliable seals. This is due to the three-chamber design with a steel fixing strip and high quality. These elastic bands do not wrinkle and keep their shape perfectly. |
| Rubber bands from GAZelle | A frequently encountered option that has similar characteristics to the standard elements for the dozen. The price is about the same |
When choosing the length of the required piece of seal, measure the internal length of the installed rubber bands on both doors separately. Take it with a reserve, because you can always cut off the excess.
The fixing elements should be caps and high-quality, effective glue. When purchasing the rubber itself, they will tell you which glue is best to use.
How to replace door hinges on a VAZ 2110 car
If you need to replace the hinge on the front door of a VAZ 2110, then in addition to dismantling the door, you also need to remove the front fender. Then:
- A workplace is prepared, preferably a table, which is covered with a soft cloth to preserve the paintwork. This is not necessary for major renovations.
- Replacing door hinges on a VAZ 2110 begins by cutting off the old hinges at the base.
- Rust is cleaned and removed from the installation site of new hinges.
- New hinges are screwed to the car body pillar.
- The door is installed in the opening.
- Fixed in the correct position relative to the body. In this case, you need to monitor the gaps along the threshold and between the roof and the adjacent door.
- The door is pre-fixed using any method.
- The wing is put in place.
- Gaps are controlled.
- The wing is removed.
- The hinges are welded to the door.
- All additional fixations are removed.
- The correct installation of the doors is checked. To do this, you need to open and close them several times.
How to replace door hinges on a BA 2110 is clearly visible in the video.