In cars with a manual transmission, the clutch needs to be replaced periodically. To replace the mechanism with your own hands, you need to stock up on special equipment and instructions for performing the replacement. If your car's disk mileage ranges from 70 to 150 thousand kilometers, then you should replace the clutch.
But you also need to take into account the operating conditions of the car and the manufacturer of the clutch mechanism that is installed in the car. After analyzing all these factors, you can watch a video about replacing the clutch with your own hands.
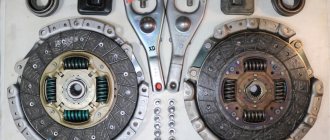
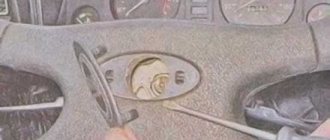
Changing the clutch yourself
The cost of a complete clutch replacement can vary depending on the quality of the parts and the availability of the necessary tools for the job.
If you decide to do everything yourself, then without a new release bearing, clutch, disc and basket, cylinders, cable, you will not be able to complete the complete replacement process.
Causes of clutch failure
The causes of clutch failure can be divided into several categories:
- Wear of friction pairs in the clutch mechanism.
Most often, the clutch driven disc wears out. The pressure plate, which cannot receive torque from the driven disk, wears out a little less often. It is very rare for the engine flywheel to wear out.
Most often, wear of friction pairs in the clutch is caused by natural wear and tear during vehicle operation. In this case, only replacing worn clutch parts will help.
Slightly less often, wear occurs due to the fact that the friction pairs do not fit tightly to each other and, because of this, slip relative to each other while the car is moving. The reason for this may be a worn diaphragm spring, which does not create sufficient pressing force. In this case, the clutch basket needs to be replaced.
Also, the reason for the friction pairs not fitting tightly to each other may be a jammed release bearing, which prevents the pressure plate from returning to its original position. In this case, the release bearing must be replaced.
We recommend: When is it advisable to do geometry (wheel alignment)?
A very rare situation occurs when the clutch slave (or master) cylinders jam and also prevent the pressure bearing from returning to its original position. In this case, the clutch master (or slave) cylinder needs to be replaced.
With this malfunction, the clutch slips and an unpleasant smell of burnt brake pads appears. The car urgently needs diagnostics and repairs.
- The clutch drive system is not tight.
On all modern cars, the force from pressing the clutch pedal is transmitted to the release bearing using a hydraulic system. If the hydraulic system is not sealed, sufficient force is not created on the release bearing to press the diaphragm spring. In this case, there is no separation of friction pairs in the clutch. Thus, the transmission input shaft still receives torque from the engine. In this case, it is difficult or impossible to change transmission gears. When you try to change gear, the gearbox gears may crack and grind.
This malfunction requires diagnostics of the hydraulic system, restoration of its tightness or replacement of worn components - the clutch master or slave cylinder.
- Clutch pedal does not operate smoothly.
When you do not release the clutch pedal smoothly, the connection between the driven disc, pressure plate and flywheel occurs too abruptly. Because of this, shock loads occur on the clutch driven disc. The clutch driven disc itself is quite fragile and does not withstand impacts well. From impact loads it begins to crack, and then completely crumble. Operate the clutch pedal correctly and you will protect yourself from this trouble.
How to properly remove and install a gearbox
If you have a rear-wheel drive car, first disconnect the clutch that connects the manual transmission to the driveshaft. And if your car is equipped with a front-wheel drive mechanism, then start by removing the drive shafts, do not forget to install plugs during replacement. Now disconnect the cables.
Unscrewing the nuts on the mount, remove the input shaft, which is located in the bearing inside the engine flywheel. The appearance of oil stains in the area of the rod indicates a problem with the seal.
Let's start the installation. From special equipment, you will need a winch to rotate the shaft on the gearbox during installation. This way it is guaranteed to fit into the splines that are located in the flywheel. The last stage of installation is the process of adjusting the length of the rod.
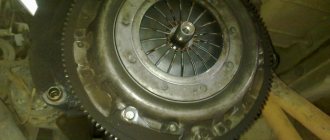
Independent work on replacing disks and baskets
You need to start the repair process by unscrewing the bolts in the basket, then you should remove all the parts that are in the flywheel. Pay attention to the surfaces of the flywheel so that there are no traces of oil there.
The driven disk must also be clean; if there are marks, the oil seal must be replaced. Also change the driven disk and basket if you find damage on them in the form of deep scratches. The flywheel and driven disc of the basket must be clean and free of grease. Cleaning can be done with gasoline.
We insert the disc into the basket and put the mount either on the manual transmission input shaft or on the mandrel. There is a hole in the flywheel where we place the entire set of parts. Insert until it stops and screw the basket onto the bolts.
This process must be done two or three times to ensure an accurate and even installation. Now you can tighten the bolts, applying a force of 2.5-3.5 kgf/m. Information about the force power is available in the repair instructions for your car brand. We change the clutch basket according to a similar scheme.
Changing the engine oil with your own hands - step-by-step instructions on how to correctly, quickly and easily change the oil in the engine and transmission (125 photos and videos)Do-it-yourself speed controller - how to make a simple adjustment device or smooth descent (120 photos)
- Can a non-owner apply for compulsory motor liability insurance?
You have replaced the clutch and feel vibration in this area - you need to adjust the centering of the disc or check the tightening power of the basket.
Which side should the clutch disc be placed towards the engine? Which is correct?
Which side should the clutch disc be placed towards the engine? Which is correct?
I have my own sad experience of incorrectly installing the flywheel disc, when I assembled everything and at the first start there was no clutch at all, and even grinding sounds were heard. I had to remove the box again and change the disk side. Technically, this is what happened:
The disc hub rested against the flywheel support bearing, and the damper springs rested against the flywheel mounting bolts. Because of this, a gap of several millimeters has formed between the disc and the flywheel (that’s right - the working part of the clutch disc should fit snugly against the working surface of the flywheel)
The basket pressed on the disk from the reverse side, which led to the disk being pinched between the basket and the flywheel. Even when the clutch was depressed, the release bearing did not do its job, and the clutch disc remained clamped, but torque was transmitted from the engine through the clamped hub and the damper spring housing.
What should you do to avoid mistakes when installing the clutch disc? There are three ways:
1) Some manufacturers mark the sides of the disk, which side should face, with inscriptions on the damper spring housing. Depending on the country of destination or production, the words will be in different languages.
The gearbox side is marked with the following words - GEARBOX SIDE, PP, Getriebeseite, GB SIDE, TRANS SIDE, T/M SIDE
The internal combustion engine side is marked with the following words - COTE VOLANT, FLYWHEEL SIDE, ENGINE SIDE, MOTOR SIDE, FW SIDE, SCHWUNGRAD-SEITE
2) Empirically, i.e. Apply the disk with different sides to the flywheel and see which side will lie better over the entire surface and will not cling to anything. But this option can lead down the wrong path, since some clutch discs have almost the same hub offset and, regardless of the side of contact, will not cling.
3) The best way to determine the side when there is no marking is to inspect the clutch disc itself, it is best to use a measuring tool (caliper - Columbian)
Here is the side from the gearbox side, it should lie tightly on the basket, as you can see, on this side the hub sticks out.
And in the basket there is a special opening for the housing of the damper springs, and the springs themselves are 75 percent placed towards the basket (gearbox)
But on the internal combustion engine side, the springs protrude less, by 25 percent, the body is seated almost flush with the working part (feredo), the hub practically does not protrude.
By the way, here is the inscription “FLYWHEEL SIDE”, meaning that the side is directed towards the flywheel (engine)
Changing cylinders
There is a reason to change the main cylindrical system if the functionality of the system does not improve after replacing the o-rings. Replacement with new clutch cylinders is installed when the brake fluid runs away even after replacing new cuffs.
Perform the process of removing the working cylinder and installing it according to the following diagram:
- We get rid of the spring near the pedal.
- We unscrew the two nuts that secure the cylinder to the gearbox;
- The process of unscrewing the rubber hose attached to the working cylinder is carried out by weight;
- We screw a new type cylinder to the hose to avoid leakage of the brake compound;
- We pump everything out of the cylinder, unscrew the fitting, close the hole;
- We unscrew the nuts that secure the master cylinder to the car body;
- To release the hinge connected to the pedal, you need to pull it towards you. Pull out the pin, this will release the cylinder from the pedal.
- Install the two cylinders in the same way as you disassembled them.
After replacing the cylinders, bleed the main clutch. When the air stops escaping, the cylinder is installed correctly.
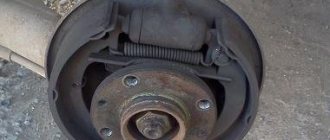
Diagnostics of mechanism parts
To diagnose the condition of the coupling, you need to gain access to the unit. To do this, disconnect the engine from the transmission and roll out the tractor. Then an initial inspection of the unit is performed. Then unscrew the six nuts securing the basket to the flywheel and dismantle the assembly for a full inspection.
Release bearing condition
The bearing is replaced: the contact surface is worn out, it is noisy when rotating and has play in the races, the bearing is jammed.
Practitioners recommend that, in addition to the original bearing of the MTZ 80 tractor, you can install a KamAZ 5320 release bearing, which has proven itself in the operation of the tractor clutch mechanism.
When worn out at the contact areas of the bearing and fork drive, the parts can be restored by welding metal, followed by processing to the appropriate size.
Condition and degree of deterioration of the working surfaces of the feet and their integrity
When the working surfaces of the legs exceed 2.5 mm, they are replaced or welded on with subsequent processing.
When installing new paws, you need to pay attention to the contact plane of the levers with the release bearing. Often, castings of levers have non-identical contours and a contact surface; when applied to a bearing, they protrude beyond the working surface, capturing the part holder
In this case, the protruding part is ground off. When replacing paws, you also need to pay attention to the degree of metal hardness. One of the reasons for the rapid erasure of the feet after repair is the mismatch of the material used or the lack of hardening of the working surfaces of the part.
Friction disc condition
If cracks, uneven wear, lifting of the linings, wear of the hub splines and play, loss of damper springs, as well as sufficient wear of the linings are detected, in all cases the disc is replaced.
Condition of the working plane of the basket pressure plate and the mounting holes for the paws
In case of uneven wear of the pressure plate, leveling by milling and grinding is allowed, taking into account the tolerance of the disk thickness of at least 21 mm. If the mounting holes for the release levers are broken into an ellipse, or if cracks are detected, the disc is replaced with a new one.
Flywheel contact plane condition
If acceptable ellipse of the flywheel surface is determined, alignment is carried out by milling and grinding. If the surface is worn too much, it must be replaced.
After defect detection of parts has been carried out, based on the condition, a decision is made: to carry out routine repairs of the unit with the replacement of worn parts or to replace the assembled unit.
Replacing the clutch slave cylinder
First, we disconnect the cotter pin element, which drives the hydraulic drive mechanism itself, using pliers. We use them to remove the spring. We do not scroll the fitting hose completely.
Do-it-yourself engine repair - major restoration and maintenance of an internal combustion engineDIY bumper: how to make a unique polymer bumper for a car at home (125 photos)
Do-it-yourself car painting - preparation for coating and the main stages of high-quality car painting (100 photos)
Using the 13th key, remove the 2 bolts from the crankcase. And only now we take out the pusher. Access to the cylinders is open. How to further replace the working clutch is shown in more detail in the video.
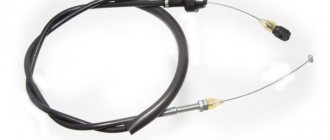
Replace the cable and release bearing
Replacing these parts is advisable after exceeding the 150 thousand mileage mark of the car. By freeing the fork from the spring, you can remove the cable. Unspinning the connection will make it possible to remove the cable from the clutch pedal.
If necessary, replace the entire part. To remove the spent cable, you need to pull out the pin. We install the new one using the same method as you removed it.
You know your car better than anyone, so armed with the appropriate equipment and tools, you can replace the clutch yourself without much difficulty.