The generator serves as a source of electricity for the on-board network of the VAZ 2101 during operation of the power unit. In the event of a power outage, the car ceases to perform its functions stably. Under certain circumstances, battery life may be reduced or consumers may be damaged. Therefore, the generator should be given due attention and if problems arise, they should be corrected in a timely manner.
Appearance of the VAZ 2101 generator
Tuning the “classic” series VAZ 2101 – VAZ 2106 – replacement of the standard generator
In general, it would be unfair to accuse the generator of the G-221 model, previously installed on VAZ 2101 - 2106, of low reliability or of the fact that it cannot cope with providing energy to the car in its basic configuration.
At the same time, it should be recognized that the maximum 42A produced by this generator cannot be considered too impressive and already on the VAZ 2106 model, in which the high beam, compared to previous versions, is “heavier” by 100W, the characteristics of the G-221 are at the limit . If we talk about even minimal tuning of classic VAZ cars, such as installing additional electricity consumers in the form of powerful fog lights, a modern sound system, heated mirrors, etc., then you can practically forget about regular battery recharging using the G-221. The optimal solution in this situation is to replace the G-221 generator with its more powerful analogue. Replacement options for G-221
Time does not stand still, and choosing a sufficiently powerful new energy source for the VAZ 2101 - 2106 is not so difficult.
The first simple and affordable way to solve this problem is to install a generator from a VAZ 2105, which is capable of delivering a maximum current reaching 55A. In general, this is not so much, but to provide power for a small amount of additional equipment, such indicators may be quite enough. When installing such a generator, you do not need to perform any modifications to the mounting. Certain changes will only have to be made to the option of connecting the generator to the on-board electrical network. This need is associated with different placement of the regulator relay (on the “five” generator it is combined with the brush assembly, and on the G-221 it is placed separately).
A generator from a VAZ 2108 or VAZ 2109, which also produces 55A and is capable of successfully providing a number of additional devices, is also quite suitable for this role.
As a third option, we can propose replacing the standard VAZ 2101-2106 generator with a VAZ 21074 generator with the nomenclature 372.3701-03. This source of electricity is capable of delivering up to 73A and such power indicators should be enough to realize almost any tuning fantasies. As in previous options, installing a generator with your own hands does not require much effort or special skills.
An even greater power reserve is provided by installing a generator taken from an injection Niva. This unit already produces 80A, which makes it possible to ensure the operation of a large number of different devices even at idle engine speed.
Finally, the fifth and last option for replacing the G-221 generator is to install a modern unit from a VAZ 2110, capable of generating 105 - 110A (depending on the modification).
As for the practical implementation of such a replacement of the generator on a VAZ 2101-2106, as an example, consider the installation of a generator from a VAZ 21074, or rather its most successful modification - model 2107-3701010, for which, moreover, it is quite easy to find spare parts. Let's make a reservation right away - the standard relay-regulator K1216EN1 is far from perfect (in particular, it has very poorly implemented thermal compensation), so it is recommended to replace it with something more reliable, for example, with the 67.3702-01 regulator, which has useful seasonal settings.
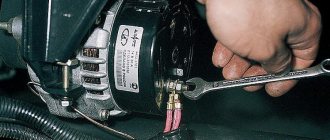
Again, as far as the physical installation is concerned, standard fasteners are used, but the electrical connections deserve more detailed mention, although there are no special problems in their implementation and this procedure is performed in the following sequence:
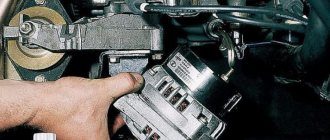
- First of all, we disconnect and isolate the wires coming from the standard relay-regulator (traditionally it is located on the left wing in the area of the brake and clutch reservoirs).
- Next, we connect the new generator, while almost everything corresponds to the previous diagram: wires with a ring circuit, traditionally thrown onto the bolt. We do not connect the gray wire anywhere, but simply isolate it, and connect the yellow wire to the terminal.
Breakdowns and repairs
If you suspect that the generator on the VAZ 2101 is not working, check it yourself. It's done like this.
- Start the engine.
- Open the hood.
- Pull out the choke adjustment knob, bringing the engine speed to 1200–1300 rpm.
- Remove the positive terminal from the battery. If the engine stalls, the unit is faulty.
The fact that the engine stalls indicates that it is running only on battery power. If you notice a malfunction immediately after it occurs, and your battery is freshly charged, you can drive a dozen or two kilometers until the battery loses power. This will allow you to get to your garage or the nearest service center. But don't try to go far. You may end up in the middle of the road and have to ask for a tow or call a tow truck.
The most common cause of failure of a VAZ 2101 generator is low tension in the belt that drives its rotor. The belt tension is considered normal when the deflection in the middle of the shoulder between the crankshaft pulley and the water pump pulley when pressed lightly is 10–12 mm. You can easily check this parameter yourself. It changes when the engine is not running with the application of a small force with a mounting blade. Few people measure such a deflection with a ruler. Usually everything is clear to the eye.
Adjusting the belt tension is more difficult than identifying a deviation of a parameter from the norm, but the average owner of a VAZ 2101 is quite capable. Keep in mind that you should not overtighten the belt. This can lead to failure of the bearings in which the shafts of the VAZ 2101 generator and water pump rotate.
The order of work is as follows.
- De-energize the vehicle's electrical system. Remove the negative terminal from the battery.
- Using an open-end wrench, loosen the nut securing it to the adjusting bar.
- Using the paddle as leverage, tilt the unit away from the engine.
- Achieve the required deflection in the middle of the belt shoulder between the water pump and the crankshaft.
- Secure the generator. Tighten the nut on the adjusting bar.
Often the unit fails due to excessive wear of the brushes. Through them, excitation voltage is supplied to the armature, that is, the working surface of the brush constantly rubs against the contact surface of the rotor shaft and wears out. Worn brushes must be replaced. Any car enthusiast can perform this operation with his own hands.
The procedure does not require removing the unit:
- de-energize the vehicle's electrical system; remove the terminal from the negative terminal of the battery;
- unscrew the screws securing the brush holder; disconnect it from the device;
- make sure that the length of the working part of the brushes does not exceed 12 mm;
- replace worn brushes;
- return the brush holder to its place.
The malfunction has a peculiarity: the problem appears gradually. The indicator light on the instrument panel first blinks from time to time, then the blinking becomes frequent, and finally it begins to light constantly, signaling a breakdown. Do not let the generator fail completely; change the brushes in a timely manner.
Repair of VAZ 2101 generator: disassembly, cleaning, replacement of parts
We will consider in detail the process of disassembling, cleaning, replacing failed parts, assembling and installing the VAZ 2101 generator . In the example below, model 37.3701 will be disassembled; model G222 is very similar to it.
Spare parts that are useful for performing the above processes:
- Andycar brand bearings;
- generator capacitor;
- diode bridge;
- nuts for 8 (4 pieces);
- relay-regulator (if it needs to be replaced).
Replacing the unit
It is not difficult to remove the generator from the classic Zhiguli model. But it is mounted at the bottom of the engine compartment, under the engine, and must be removed from below. This means that you will need an inspection hole or overpass. The preparatory operation consists of placing the car in a pit and removing the engine crankcase protection, if any. It is also necessary to open the hood and remove the negative ground terminal of the battery. Now everything is ready for removal.
The work is performed in the following order. Disconnect the generator of your VAZ 2101 from the vehicle's electrical system. Unscrew the nut securing the positive wires to the generator. Disconnect the brush connector and the diode bridge connector.
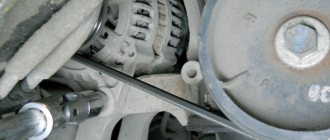
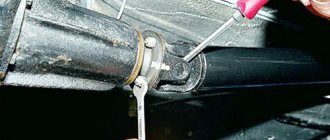
Unscrew the nut securing the unit to the adjustment bar a couple of turns. If possible, use a socket head and an extension with a universal joint. Tilt the generator so that the belt sags on the pulleys of the crankshaft, water pump and VAZ 2101 generator. Remove the belt.
Go down into the pit. Using a 19 mm wrench, unscrew the large fastening nut. The bolt that secures the unit is located at the very bottom of the engine compartment and is exposed to wind and water, snow and dirt, so it often sticks. Knock it out with a hammer. Carefully remove the generator from the VAZ 2101.
If repairs are expected, proceed to it. Replacement is planned - mount the generator on your VAZ 2101 in the reverse order. To connect, connect the plugs and tighten the nut securing the wires.
Required tools:
- a universal puller necessary to remove the bearing (it is possible to use a rod puller, but this is not so convenient);
- metal brush, sandpaper with a cloth base;
- hammer;
- penetrating fluid WD-40;
- standard set with keys and screwdrivers.
In the photo you can see a VAZ 2101 generator before repair. After repair, changes in it will be obvious.
Disassembling and assembling the device
How to disassemble the mechanism with your own hands for further repair?
Detailed instructions for disassembling the generator are presented below:
- First of all, the device is dismantled from the engine compartment; after removal, it should be cleaned of dirt. To do this, you may need a compressor and a rag soaked in kerosene.
- The pulley itself is removed from the assembly using a special puller. To remove this element, you need to unscrew the nut and, having secured the puller in advance, compress the pulley itself. The key together with the conical washer can be removed.
- Next, the nuts are unscrewed from the coupling screws, there are four in total, after which the back cover can be removed. The rotor element is removed from the installation site.
- After this, the nuts are unscrewed, which secure the tips of the diode components with the contacts of the stator windings. Next, you need to remove the plug from the central contact of the device winding from the blocks and disconnect the stator element from the cover.
- After performing these steps, the screw nut that secures the rectifier unit is unscrewed. The disassembled mechanism must be repaired or replaced. Further assembly steps are carried out in reverse order.
Loading …
Repair of VAZ 2101 generator: disassembly, cleaning, replacement of parts
- Clean the generator from accumulated dirt, dust, and oil.
- Position the generator so that the pulley rests on the floor, unscrew the pulley nut, and put a key on it at “19”. Next, hit the key with a hammer several times, holding the pulley from turning.
- Using a “10” wrench, unscrew the 4 bolts of the tie rods connecting the generator into one piece.
- Install the generator so that the shaft is on top, knock out the key with a chisel, hitting it with a hammer.
- Remove the front cover of the generator. If this cannot be done easily, you need to knock it out by weight.
Worth checking out:
- Remove the control relay from the generator.
- Use a hammer to knock out the rotor using the hole under the relay.
- Using a socket wrench set to “8”, unscrew the 3 nuts that secure the stator of the diode bridge. If the bolts turn, you need to fix them with pliers on the other side.
- Before removing the stator, treat the joints with WD-40 penetrating fluid. Wait a few minutes, then carefully knock it out with a hammer. After removing the stator, remove the diode bridge. Unscrew the condenser and use a universal puller to press out the rear rotor bearing.
- Remove the front cover and tie plates. Damage to the bolts installed there is possible, so it was necessary to prepare 4 “8” nuts in advance.
- Remove the plates and press the bearing through the frame.
Relay for the warning lamp of the battery charge of the VAZ 2101 Zhiguli
- Repair manuals
- Repair manual for VAZ 2101 (Zhiguli) 1970-1985.
- Battery warning lamp relay
The RS-702 type relay is designed to turn on a warning lamp in the instrument cluster when the generator voltage is insufficient to charge the battery.
The relay is installed in the engine compartment on the top of the right wheel mudguard. In the off state, the relay contacts are closed. The relay winding (when the generator is running) is under the rectified phase voltage of the generator and the relay contacts are open. If the voltage between terminal “30” of the generator and ground is 13.8–14.5 V, the rectified phase voltage is 5–7 V.
Data to check
| Contact opening voltage*, V | 5,3 ± 0,4 |
| Contact closure voltage*, V | 0,2 – 1,5 |
| Relay winding resistance at 20° C, Ohm | 29 + 2 |
* At a temperature of (25±5)° C.
↓ Comments ↓
1. Technical data
1.0 Technical data 1.1 Main overall dimensions of the VAZ-2101 car 1.2 Main overall dimensions of the VAZ-21011 car 1.3 Main overall dimensions of the VAZ-2102 car 1.4 Technical characteristics of the cars 1.5 Controls and monitoring devices 1.6 Ignition switch 1.7 Interior ventilation and heating controls
2. Operation and Maintenance
2.0 Operation and maintenance 2.1. Vehicle operation 2.2. Vehicle maintenance
3. Engine
3.0 Engine 3.1 Features of the device 3.2 Possible engine malfunctions, their causes and methods of elimination 3.3 Removing and installing the engine 3.4 Disassembling the engine 3.5 Assembling the engine 3.6 Bench tests of the engine 3.7 Checking the engine on a car 3.8. Cylinder block 3.9. Pistons and connecting rods 3.10. Crankshaft and flywheel 3.11. Cylinder head and valve mechanism 3.12. Camshaft and its drive 3.13. Cooling system 3.14. Lubrication system
4. Fuel system
4.0 Fuel system 4.1. Power system 4.2. Carburetor
5. Ignition system
5.0 Ignition system 5.1 Setting the ignition timing 5.2 Gap between the breaker contacts in the ignition distributor 5.3. Checking ignition devices on a stand 5.4 Possible ignition malfunctions, their causes and methods of elimination
6. Starting and charging system
6.0 Starting and charging system 6.1. Battery 6.2. Generator 6.3. Starter
7. Transmission
7.0 Transmission 7.1. Clutch 7.2. Gearbox 7.3. Cardan transmission 7.4. Rear axle
8. Chassis
8.0 Chassis 8.1. Front suspension 8.2. Rear suspension 8.3. Shock absorbers 8.4 Possible malfunctions of the chassis, their causes and methods of elimination
9. Steering
9.0 Steering 9.1 Features of the device 9.2. Inspection, check and adjustment of steering 9.3. Steering mechanism 9.4. Steering rods and ball joints 9.5. Pendulum arm bracket 9.6 Possible steering malfunctions
10. Brake system
10.0 Brake system 10.1. Features of the device 10.2. Checking and adjusting brakes 10.3. Clutch and brake pedal bracket 10.4. Main cylinder 10.5. Front brakes 10.6. Rear brakes 10.7. Rear brake pressure regulator 10.8. Parking brake 10.9 Possible brake malfunctions, their causes and methods of elimination
11. Electrical equipment
11.0 Electrical equipment 11.1. Electrical circuit diagrams 11.2. Lighting and light signaling 11.3. Sound signals 11.4. Windshield wiper 11.5. Heater electric motor 11.6. Control devices
12. Body
12.0 Body 12.1 Features of the device 12.2. Repair of the body frame 12.3. Paint and varnish coatings 12.4. Anti-corrosion protection of the body 12.5. Doors 12.6. Hood, trunk lid, bumpers 12.7. Body glazing and windshield washer 12.8 Instrument panel 12.8. Removal and installation 12.9. Seats 12.10. Heater
13. Features of repair
13.0 Features of repair 13.1. Car VAZ-21011 13.2 Cars VAZ-21013 13.3. Car VAZ-2102 13.4 Cars VAZ-21021 and VAZ-21023
14. Applications
14.0 Appendices 14.1 Tightening torques for threaded connections 14.2 Tools for repair and maintenance of vehicles 14.3 Used fuels, lubricants and operating fluids 14.4 Basic data for adjustments and control
Also check out
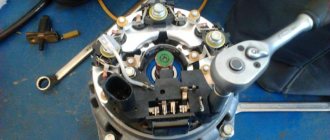
Now the VAZ 2101 generator is disassembled, all its parts need to be cleaned and washed (for this you should use sandpaper, a knife, or a wire brush).
The photographs show a 1996 model, but since that time the location of pin 61 has changed. On the old diode bridge the contact was placed on a wire, on the new one it is directly soldered into the bridge.
How does the generator work?
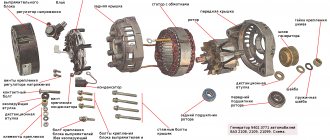
First, let's look at how the VAZ 2101 generator works and what its technical characteristics are. The diagram, unit structure and explanation of the constituent elements are given below.
Scheme of the generator unit "kopeck"
Designation of mechanism elements
Connection diagram for Generator 2101
This usually happens when the generator is faulty, when electrical appliances are powered from the battery. Most often, the light comes on for the following reasons: Slipping of the V-belt on the generator pulley.
Horn switch. But still it must be considered part of the structure. GENERATOR AND RELAY 702 FOR INDICATION OF GENERATOR OPERATION
Disassembling the stator and rotor Next, remove the rotor assembly with the rear bearing from the front cover.
When the engine is not running, the readings should be within 11.6 V. The generator brushes, generator pulley and other structural elements can fail. But still it must be considered part of the structure.
Direction of rotation - right on the drive side Maximum output current at 14 V and rotor speed min - 42 A Maximum rotor speed - 13 min Gear ratio engine-generator - .04 The generator rotor is driven by a V-belt from a pulley mounted on the crankshaft motor shaft. Considering the simplicity of the “penny”, to troubleshoot the problem you only need a multimeter and the ability to use it.
DIY diagnostics
We figured out how to connect the generator and what is the charging circuit for the VAZ 2101, now let’s talk about diagnostics. There are quite a lot of malfunctions of the generator unit on the “penny”. The generator brushes, generator pulley and other structural elements can fail.
To check the generator unit on a VAZ 2101, you can use several options:
- Diagnostics with the engine running. You need to start the car, if the indicator on the dashboard lights up, you should pull out the choke and increase the speed of the power unit to one and a half thousand. in a minute. Then disconnect the negative terminal from the battery for two seconds, and if at this moment the engine stalls, then the mechanism is inoperative and needs to be checked. Do not disconnect the battery for more than a few seconds, as this will cause the diode bridge to become inoperable.
- Another verification option is to use a tester. This option allows you to determine the performance of the brushes, as well as the field windings. To do this, you will need to disconnect all the wiring that goes to the mechanism and diagnose the resistance. Using a tester, measure the resistance between pin 67 and the device body. The unit is serviceable if, during the test, the resistance level was in the region of 4.2-4.7 Ohms at a 20-degree room or air temperature. If the indicator turns out to be different, then most likely the generator brushes need to be replaced.
- The easiest way to check is this: connect a multimeter to the battery terminals and start the car. If the generator is working, then there will be charging, and if not, then there will be no battery voltage (the author of the video is the Pavel Pavek channel).
Selecting a generator for VAZ 2101
An assistant will be needed to carry out the inspection. Controls the generator output voltage of the regulator relay, which is an electrical circuit. You will need to disassemble the generator and replace the bearings. If the diodes fail, the rectifier unit is replaced with a new one. Engine compartment lamp.
Main components of the generator Structurally, it consists of the following main elements: Rotor - a moving part that rotates from the engine crankshaft. How to remove the generator To carry out dismantling you will need the following tools: Spanners 10, 13 and an engine compartment lamp.
It also happens that the wire simply oxidizes and the contact is lost, but this needs to be identified at an early stage, otherwise you won’t be able to go very far with a dead battery. The stator is the stationary part of the generator and also has a winding.
With the required tension, the deflection should not exceed 10 mm. how to connect generator 2108,2109,21099 to 2101 (classic) part 2.
Generator for Lada 2101-2107/2121 100A cars
- Characteristics
- Equipment
- Applicability
- Questions
- Reviews (6)
Main characteristics
Equipment
Product passport/warranty card
Individual technical passport of the product (with company ID)
Installation and diagnostic instructions
Applicability
Questions
I ordered your generator on Autodok, it’s not clear what relay to buy for it, before this it was like on nines with a round chocolate bar, now the mount is different, send me the article number of the required relay
good afternoon, could you tell me the power of these generators at idle and increasing up to 4 thousand revolutions in comparison with LG0101 LG0108 LG01214
Good afternoon, Semyon! Dependence of current output on generator rotor speed: Generator LG 0101 (LG 0108) 1600 rpm/46A; 1800 rpm/57A; 2000 rpm/65A; 2400 rpm/77A; 3500 rpm/98A; 5000 rpm/110A; 6000 rpm/115A.
Generator LG 01214 1600 rpm/52A; 1800 rpm/65A; 2000 rpm/76A; 2400 rpm/93A; 3500 rpm/123A; 5000 rpm/139A; 6000 rpm/143A. Thank you for contacting us!
hello, I have a question: I bought a more powerful generator lg0107 and it turned out to have a built-in relay, and I have an external relay, how to connect it correctly? Tell me? VAZ 2103
Good day. Generator 0101 - interested in the initial excitation frequency of the generator. Thank you.
October 15, 2017
Good morning. Please tell me which model of three-level regulator from ENEOGOMASH is compatible with your LG0101 generator. Thank you !
August 12, 2017
Hello! Please send me an electrical diagram for installing the LG 0101 generator. The car is equipped with a VAZ-2106 engine. The car has a new instrument cluster 346.3801. Year of manufacture of the car is 2004. The car has a generator 37.3701 installed; 55A.
By mistake, I bought a generator without a built-in relay (we live in a small village, there are no shops; I bought it at the local market, but the tent with spare parts has not been running for 2 months), is it possible to install it on a VAZ 21053 and, if not difficult, provide a link to the connection diagram.
Hello. I would like to know the compatibility with the VAZ 21213 (carburetor). The standard generator has a built-in relay regulator. Thanks in advance. PS the generator has already been purchased, but I don’t know how to connect the RR. If you have a diagram, please share.
December 15, 2016
Hello, the question is, will there be any modifications required when installing the LG 0101 generator? Is everything working properly?
Good afternoon Yes, no modifications required. However, during installation, it is important to pay attention to which voltage regulator is currently installed in the vehicle - remote or built-in. The generator model depends on this. Thank you for contacting us!
I purchased an LG 0101 generator. It does not have a built-in regulator relay. I had one with a built-in regulator. The question is how to connect it so that everything works like with my generator, help. I wanted it for so long but only found it without a pill. thanks in advance.
Hello, after replacing the original generator with the LG0101, it became noticeable at idle the flickering of the low and high beams, as well as a slight howl of the generator between 1200-2000 thousand engine revolutions, what could this be?, the ground is new everywhere, the charging relay is also new, the belt new and tensioned, so charging is excellent 14.2 at idle, the generator is super, but these little things are a little annoying and I want to solve them as soon as possible, thanks for your attention!
October 30, 2016
if you install an LG 0101 generator on a VAZ 2103, how will this affect engine performance and fuel consumption?
Hello. After replacing the original generator with a 100A 2101, a constant crackling sound appeared in relay 75.3777-10 and weak blinking of all the lights (dimensions, dashboard, headlights, reversing lights). The voltage regulator is new. What could be causing this problem?
Generator design and characteristics
Only two brushes are fixed in the brush holder of the generator G. Diode bridge The rectifier or diode bridge is a horseshoe-shaped plate with built-in six diodes that converts alternating current into direct current. Lamp switches located in the front door pillars.
Headlight switch. We unscrew the nuts securing the front bearing cover of the VAZ generator. Then remove the screws, front bearing covers and press it out using a mandrel. Oil pressure warning lamp VAZ Generator brushes VAZ Next, you need to check the protrusion, it is called their working area of the brush in height, it is important that it is at least 12 mm, otherwise the brushes need to be replaced, and also look at the uniformity of wear. It makes the magnetic field stronger or weaker as needed, thereby stabilizing the generated voltage. How to remove a VAZ classic generator. Brushes creaking.
This indicates that the motor is powered by a battery. In order not to risk the new battery, it is recommended to accurately identify the cause of boiling.
What is needed for maintenance
Very often a malfunction occurs such as excessive wear of bearings. As a rule, the one located in the front cover fails. You can even detect a breakdown by hearing. A loud whistle indicates its failure. The reason that it is in the front cover that the bearing fails is that it is subjected to a very large load. After all, it is on this side that the belt is located.
The 2106 generator's brushes, made of graphite, are in constant contact with the rotor. Their strength is quite high, but despite this, the effect of friction makes itself felt. Therefore, they need to be replaced with new ones from time to time. If this is not done, the field winding will not work.
No power is supplied to it, and the magnetic field that is necessary to generate electricity is not created. It happens that the excitation winding, or one of the stator windings, begins to “short” to ground. To verify this, it is necessary to completely disassemble the VAZ 2106 generator, and then use a multimeter to test all windings without exception.
You should have at least an idea of how to check the windings for breakdown. Please note that there must be a certain resistance in the stator, depending on the generator model. If there is no resistance, there is a short circuit to the device body.
Choose your own way out of this situation. You can either rewind the stator winding, replace it completely, or install a new power source. The price of a new one, of course, is rather high - about 3000-3500 rubles. You can buy it at a dealership for three times the price, but will it work properly?