09 April 2020 Lada.Online 5 003 4
In January, AVTOVAZ announced the start of sales of the updated LADA 4×4. The new SUV received a completely new instrument panel with a new climate system, more comfortable seats, the Era-GLONASS system, a number of styling and technical improvements, as well as an improved noise and vibration insulation package on the body panels. Let's find out how much quieter and more comfortable it has become in the interior of the updated Lada 4×4.
An expert from the magazine “Behind the Wheel” compared the noise level inside the cabin of the new Lada 4×4 2021 and the Lada 4×4 of the previous generation (generation).
How harmful is noise?
Noise surrounds us almost everywhere, most often we simply do not notice it, however, increased levels can be harmful:
- Noise is considered to be any extraneous sounds that reach your ears.
- Increased noise irritates and distracts the driver, causing rapid fatigue
- Fatigue and irritation often lead to accidents
- In addition, the driver’s reaction is reduced, which is associated with great risk on the road.
- Prolonged exposure to increased noise leads to a narrowing of blood vessels throughout the body.
- This can lead to headaches and increased blood pressure, as there is an increased load on the heart.
- Prolonged stress on the heart causes angina and even heart attack
- So noise is not just an annoying interruption to conversation or music, it is harmful to your well-being and health.
Isolation goals
We make sound insulation in the field
Every driver who decides to soundproof his car sets several main goals:
- Reduce the amount of sounds coming into the cabin from engine operation. Due to this, the performance of the acoustic system is significantly improved;
- No sounds from outside enter the cabin;
- At the same time, thermal insulation occurs. Thanks to this, the cabin will be cool in summer and warm in winter.
Hood insulation
Who did soundproofing in the field?
The process begins by removing the hood cover. After this, all operations occur in this order:
- Remove the factory sound insulation if it is noticeably frayed;
Note: if it still performs its main tasks, then work can be carried out directly on it.
- Clean the surface from foreign particles. If you had to wash the surface using water, you should dry it before starting work;
- Prepare vibration material. For this purpose, you can use any domestic materials (for example, Vizomat);
- Spread it over the area occupied by flat elements. The material should be evenly distributed between the stiffeners;
- Prepare a second layer, which is called soundproofing. Here you need to use materials that can protect against the penetration of extraneous noise. Spleen is a good choice.
Note: when using a construction heat insulator, you must choose one that has a layer of foil.
- Carefully install it on top of the first layer, using any construction adhesive;
- If the factory sound insulation has been removed, it should be used as a third layer.
We insulate the floor
Floor and its sound insulation
There are three main ways to soundproof a floor. In this case, each driver can independently choose the most suitable one for him:
- Use materials that are specifically designed for this type of work. These are vibration materials, soundproofing materials, as well as damping coatings;
- Compared to the previous one, it is a more budget option. A soundproofing coating is installed on the floor, which is fully consistent in size. Nothing else is applied on top, but the carpet upholstery is immediately installed in place;
- The third method is similar to the first, only in addition to the above actions it is also necessary to cover the bottom with an anti-corrosion compound. It's not cheap.
Noise insulation of wheel arches
Everything happens in this sequence:
- Prepare the interior by removing everything unnecessary. It is advisable to remove all seats;
- Carefully remove the casing;
- Clean the floor from all foreign parts (dust, dirt). In addition, it is necessary to completely degrease the surface so that the installed material adheres tightly to it;
- Make patterns from cardboard, and then cut out the necessary elements from a special material;
- The resulting patterns should be applied to the floor to see if everything fits and if there are any discrepancies. If something does not match, correct it;
- Coat the bottom of the car with an anti-corrosion compound;
- Pasting occurs in three layers: vibration material, soundproofing elements, damping materials.
Note: It is under no circumstances recommended to close the technological openings, as they are needed for ventilation.
Ceiling insulation
Ceiling and its sound insulation
At the factory, the car ceiling is not equipped with insulation at all. Therefore, the driver must try to correct this deficiency. It all happens like this:
- The ceiling must be dismantled. Before this, you need to remove all fasteners and parts that interfere with this;
- Remove all parts from the interior, especially paying attention to those on the windshield;
- Remove the mirror, passenger handles, etc. You don’t have to remove the glass, but if you’re afraid of breaking it, it’s better to do so;
- To dismantle the standard thermal insulation, you must use a special spatula for this purpose. The entire surface should be wiped with a dry cloth to remove foreign elements;
- Degrease the ceiling;
- Apply a layer of vibration insulation, the second layer is noise insulation;
- Leave it like this for about 10 hours until completely dry;
- Now you can put everything back together in reverse order.
Thus, you can carry out high-quality soundproofing of the car interior with your own hands. Before performing this process, it is recommended to study thematic photos and pictures. A video with a detailed description will also be very helpful. The instructions located on our website will help you quickly cope with this process. For work, it is better to choose materials whose price is not too low.
Materials for work
Today, in pursuit of savings, many glue batting, linoleum or cheap building materials, without thinking that the absorption of sound and vibrations in such materials is extremely low, and toxicity can be high.
To perform the work, choose the following materials:
- Vibration absorber - created to dampen vibrations, its plastic structure converts vibration energy into heat, the basis of such materials is bitumen. However, this does not mean that construction bitumen is an equivalent replacement (Bimast or Vibroplast)
- Vibration reflector is a material that completely reflects all noise in the opposite direction (Splen); it can be offered as a noise absorber. If you are not planning on acoustics in the cabin and you don’t need a radio either, then this material is suitable for processing inside your cabin, otherwise take a sound absorber
- Sound absorber - the structure of this material dissipates noise, as if absorbing it (Accent, felt)
- Additional materials – Decolin – purely for decorative purposes, Madeline – muffles squeaks from friction of surfaces, Viek – aluminum foil, can be useful when processing doors
Luggage compartment
Trunk noise insulation
Almost the entire floor of the trunk, including the back of the rear seat of the Niva 21213, is covered with finishing material in the form of carpet. This material is durable, attractive in appearance and easy to clean. If you dismantle it, you can see a soundproofing mat, the thickness of which is 15 mm. The car's noise insulation is presented in the form of this material, and the manufacturer used mastic as vibration insulation. It covers the floor of the luggage compartment, while its thickness does not exceed 1.5 mm.
The standard sound insulation of the Niva 21213 car is of high quality, but despite the presence of a three-layer cake (mastic, felt and carpet), the manufacturer did not take care of vibration and noise insulation of the arches. As for efficiency, mastic, which is more considered actikor, was used to vibration-proof the luggage compartment floor. The factory-installed sound insulation only covers most of the floor area of this vehicle. Similar noise protection is used in the Niva 2121 model.
To carry out additional sound insulation, the following materials will be required:
- Vibroplast Gold (StP)
- Vizomat MP (StP)
- Accent 15 LM KS (StP)
- Splen 3004 (StP)
- Stroyizol SD 90
- Adgilin.
The tools you will need are: a hair dryer, a square, a ruler, a tape measure, a knife, scissors, screwdrivers, an awl and others.
Details about sound insulation
Sound insulation of the hood
The hood is the easiest part of the car to work on and the easiest place for beginners to practice:
- Open the hood, remove the factory insulation from the lid, if any.
- Then wash the surface thoroughly
- After drying, degrease, if you find rust, then you need to clean it, prime the metal and paint, otherwise corrosion will continue
- The first layer is vibrating material: cut out a piece, remove the film, warm it up, then apply it and roll it with a roller
- There is no need to glue the stiffeners, photo below
Vibration insulation treatment of the hood
- Now we degrease the surface again and stick on a sound reflector (for example, Splen), only in one single piece, covering the entire surface of the hood cover and the stiffeners too.
- It is better to use foil material, it is more resistant to high temperatures.
- In addition to sound reflection and, as a result, noise reduction, Spleen will also be a heat insulator, which will be very useful in winter (the engine warms up faster and cools down more slowly).
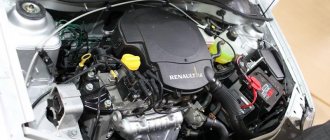
- In addition to the hood cover (see Soundproofing the hood without problems), the partition between the engine and the passenger compartment, the so-called engine shield, must be subjected to the same treatment.
- The main vibration and most of the engine noise pass through it, so you understand, it is impossible to exclude its processing
Roof
First, remove the ceiling trim with your own hands, to make it easier for you, call an assistant, then:
- Clean and wash the surface
- After this, degrease
- It is better to stick the vibration absorber with an assistant, so that he holds the material while you roll this material.
- It is recommended to take a thinner vibration and noise absorber for the roof - vibration material 2-3 millimeters thick, a noise absorber no thicker than five millimeters
- If you heavily weight the ceiling, the roof of the car may bend into the cabin
Cornfield ceiling with trim removed
- The order of gluing is the same as on the hood: vibration absorber, then sound absorber and return the trim to the ceiling; it’s easier and neater to do this with two people, without creases in the trim.
Salon
Niva sound insulation of the interior is probably the most difficult area and it takes a lot of time to process; it is better to allocate a whole day for this work:
- This is where all the tools come in handy - you need to unscrew all the seats, then remove the rugs and floor trim
Important: Collect the fasteners in a box or jar so as not to lose them, and do not seal the fastening holes during processing, otherwise it will be difficult to assemble the interior.
- It is important to eliminate rust: clean, prime and paint, the surface needs to be washed, the bottom is the dirtiest place
- Then degreasing
- The vibration absorber here can be placed 5-6 millimeters, and the noise absorber 10 millimeters
- The vibration absorber is placed on the wheel arches in two layers
- Then comes the assembly of the interior
Niva interior treated with vibration absorber, then noise absorber
Door processing
The instructions for processing all doors are the same:
- First, unscrew all the handles, panels and remove the trim
- Then degrease the surface through the technological holes; it is recommended to work with cloth gloves so as not to scratch your hands
- Insert the vibrating material in pieces through the same holes, roll it with a roller, if this is not possible, roll it with the handle of a hammer or a large screwdriver
- After gluing, check the proper operation of the window lift cables and handle rods so that they do not jam
Gluing the door panel with vibrating material
- Then these same holes are sealed. You can use a vibration absorber, you can use “Viek” - this foil was mentioned at the beginning of the article
- After processing the door should look like this:
Door after sealing technological holes
- Then the sound absorber is glued on top in a solid piece; it is also recommended to glue the sound absorber to the inside of the skin
- Along the edges of the door, where the trim comes into contact with the metal, you need to stick Madeleine, and around the handles too. Most of the squeaks should go away
- After that, screw the casing back, and don’t forget the handles
Noise insulation in the new Lada 4×4
The expert says that basically this is still a Lada 4x4. Nothing has changed in terms of technology or chassis. The same dynamics, brakes, handling and indestructible suspension, BUT the noise level has noticeably decreased. All thanks to the new instrument panel, stove, pile headliner and new door seals. In total, this gave a decent result.
The expert did not rely only on his ears, but took out a professional sound level meter, which he used to measure the noise level in two cars (at speeds of 60, 80 and 100 km/h). It turned out that the interior of the updated SUV became quieter by an average of 3-4 dB
. That's a lot.
We separately measured the noise from the stove fan. On a new car the heater is 5-6 dB quieter
. Excellent result!
However, the expert notes that the transfer case is still the main driver in the car, and the engine and road noise are audible. But all this became quieter. And most importantly, the level of aerodynamic noise has greatly decreased.
Summarizing
, the presenter says that the current update of the Lada 4×4 can be called cosmetic, but it also affected the level of comfort. The new Lada 4×4 has become more comfortable, safer and nicer inside without a significant increase in cost.
It is worth noting that during the test drive the camera in the SUV interior was installed in approximately the same place. This allowed viewers of the video to auditorily compare the noise level while driving. Here is one of the popular comments on this video:
“The noise level has noticeably decreased”... The presenter shouted, trying to drown out the howling and whistling.
How do you rate the sound insulation of the updated Lada 4×4?
Hood treatment
Soundproofing of the Niva begins with finishing the hood, since this is the simplest design. The stages of work are given below:
- open the hood, remove the standard insulation;
- thoroughly wash the surface;
- the dry cover is degreased, areas with corrosion are cleaned, primed, and painted;
- Initially, the vibromaterial is laid (a piece is cut to size, the film is removed, the material is heated, applied in place and rolled with a roller);
- degrease the surface again, glue the sound reflector so that a single piece covers the entire part of the hood, including the stiffeners;
- many recommend using special foil because it is more temperature resistant;
- The engine partition (the shield between the engine and the passenger compartment) is treated in the same way.
Sound insulation of NIVA interior
I didn’t really like my native Shumka. I remove it and send it to the landfill.
The factory Shumka turned into such rubbish in six months. It all fell apart and was soaked in water. This piece was located along the driver's feet. he got the most out of life. If he had lain there for another year, there would definitely be frogs in the car. I throw it away without any doubt or regret
The dashboard was dismantled without much effort. Considering that I did this for the first time in my life.
Based on the remnants of threads from the original Shumka sticking to the body, we can draw a conclusion about its quality and application technology.
Gutted. It probably took 1.5 or 2 hours for all the work. Removing seats and other small items.
The process has begun. The material is SGM 2.3mm (the same as STP standardplast) convenient and practical. Vibration filter. 8mm SPLEN will be glued on top of it.
The process is underway. And ahead is the covering of the rear space. It will probably be very tedious and dreary. And today I am no longer strong and want to sleep. I managed to disassemble and cover everything with vibroplast except the torpedo.
Closer. The tunnel will be glued with another layer of SGM 2.3mm, since the store has run out of special Vizomat (the same SGM only thicker. Special material for particularly noisy areas of cars
Niva Chevrolet and sound insulation on your own
Niva Chevrolet and sound insulation
Chevrolet Niva and the sound insulation of the interior of this car will be the topic of our article. As you know, this car is domestically produced, the result of fruitful cooperation between Western and Russian engineers. But, nevertheless, to improve and enhance the acoustic characteristics, installing sound insulation for the Chevrolet Niva becomes a necessity.
Non-standard approach
After completing all the work on vibration and noise insulation of the floor, body, arches, and rear side members of the luggage compartment, another useful opportunity presented itself when assembling the interior.
Without resorting to special measures, you can easily and simply additionally cover the entire floor of the luggage compartment with a single sheet of building reflective thermal insulation, previously used to insulate the house. Shown in the photo below.
Thermal insulation is simply laid on the trunk floor without the use of glue, in a single sheet cut to the shape and area of the trunk floor. I used reflective building thermal insulation of the Adgilin type with a thickness of 4 mm. The end result is shown in the photo below. If you lift the carpet, under it you can see a layer of thermal insulation, under which there is a layer of “felt mat + Accent”, and under them a layer of vibration insulation Vizomat MP. The design turned out to be compact, dense, multi-layered.
Sound insulation of body side walls
To soundproof the side walls of the body, a slightly different combination of materials was used. In particular, Vibroplast Gold sheets were used as the first layer of vibration insulation; the appearance of the material is shown in the photo below.
The main difference between this material and the previous one is that it is simpler and more convenient to install (does not require heating with a hairdryer), is easier to cut, and requires less effort when adjusting to the mounting plane. The photo below shows the installation of a vibration isolation layer on the side wall of the car body. The presence of unclosed technological holes on the side members (through which there is access to the side wall of the body) makes it quite convenient to install protective materials.
After installing the vibration-proofing material, we install sound insulation. For this I used Accent sheets 15 mm thick. The material is laminated with foil on the outside and has an adhesive layer on the inside, protected by paper. Easy to cut and install.
Among the features of using Accent sound insulation, the following can be highlighted: the mating surfaces of the sheets are attached end-to-end. There is no need to use an auxiliary tool to press onto the plane. After the vibration and noise insulation is installed, the technological holes in the side members can be closed on the side walls of the body. Shown in the photo below.
Noise insulation, interior noise reduction.
Noise insulation, interior noise reduction.
Posted by mackleud » 02 Feb 2010, 18:50
Re: interior noise reduction
Post by ALK » 02 Feb 2010, 19:16
Who knows what's going on behind the fence of the zoo? ©
Re: interior noise reduction
Post by bambr » 02 Feb 2010, 20:32
Re: interior noise reduction
Post by ALK » 02 Feb 2010, 20:43
bambr more precisely just like this
why did you put the 2nd and 3rd layer? foam rubber and cross-linked PPE? in fact, both have a honeycomb structure and there is air inside
Well, the thermal conductivity coefficient of MB will be different.
I have water accumulating on the vibration. dew point or what?
Who knows what's going on behind the fence of the zoo? ©
Re: interior noise reduction
Post by bambr » 03 Feb 2010, 02:39
Re: interior noise reduction
Post by Vigilant Falcon » 03 Feb 2010, 02:43
Re: interior noise reduction
Post by SERЁGA » 17 Feb 2010, 20:40
Re: interior noise reduction
Post by _JJ » Mar 19, 2010, 01:15 pm
It's time to put down the Shumkov and assemble the interior. I'm assembling the engine shield and the tunnel above the transfer case + rear arches. Cover it first with vibroplast and then with splen. Fill the floor with pushsal and throw 8 mm construction insulation on it. what do you think? How effective is the sound insulation? And our stove is a box going into the engine compartment, in my opinion it also needs to be covered with something.
Roof finishing
After dismantling the ceiling cladding, sound insulation of the Niva 21213 and analogues in the roof part is carried out as follows:
- the surface to be treated is cleaned and washed;
- perform degreasing;
- a vibration absorber is glued, followed by rolling;
- when finishing the roof, it is recommended to use thinner material (2-5 mm) so as not to weigh down the ceiling;
- if you overdo it, the roof of the car may bend into the interior;
- The gluing sequence is identical to the hood treatment.
Lockers
It would seem that the sound insulation should end in the interior, but no, we recommend not stopping there and gluing the fender liners. If you don't have them, we recommend purchasing them. They are inexpensive, and they will be more than enough use.
We remove the old fender liners and thoroughly wash them from dirt. Over the years of operation, a lot of it accumulates there. After this, we degrease it in the same way as the hood. Now we apply the remaining sheets to them, measure and cut.
Sound insulation glued to the fender liners gives a very good effect. It’s enough to imagine winter tires that make terrible noise on the highway. 60% of sounds come from winter tires, so soundproofing the fender liner is a very useful thing. The material should be glued to the part that faces the car, not the wheel.
After gluing, we install the fender liners in place. If you don’t want to bother with standard fender liners, you can buy a more prestigious set. Fender liners with good sound insulating properties are made of a special fabric that absorbs sounds and impacts of small stones against it. Such fender liners are usually used on expensive cars, but you can make them yourself.
Soundproofing Niva 21214 in parts
Soundproofing Niva 21214
Soundproofing Niva 21214 is a process that is necessary to improve the sound characteristics of the speaker system. Niva is a domestic car, created as a result of the painstaking work of Russian and Western engineers. Currently, it is one of the most purchased car models in Russia. It would seem that this is the ideal car. But still, to improve sound quality, it is recommended to perform high-quality noise insulation. On Niva 21214, sound insulation can be easily done with your own hands.
Sound insulation of the trunk door
The noise and heat insulation of the tailgate was carried out in approximately the same way as in the case of the rear doors. The main stages of the work are shown in the photo below. The first layer was installed with an overlap of vibration insulation, using both Vizomat MP (on open surfaces) and Vibroplast Gold (in door cavities). Shown in the photo below.
Before installing the plastic trim of the trunk door, I covered almost the entire plane of the panel with vibration insulation. This was done because the plastic on the rear door turned out to be very soft compared to the plastic on the rear doors.
As it later turned out, when the car moved over bumps, the layer of vibration material located on the trunk door panel began to come into contact with the same layer installed on the door itself. The sound effect was, to put it mildly, very unpleasant. As a result, in order to eliminate the sound, I had to purchase a thin heat insulator Spleen 3004, since it was no longer possible to install an Accent with a thickness of 15 mm.
As a result, after installing the separation layer, the noise disappeared, and the thermal insulation of the rear door increased slightly. But it was worth the extra cost in both money and time.
What's next?
Next, we disassemble the interior of the car. We remove everything except the dashboard - door trim, trunk, trim and seats. The more you unscrew, the better it will work. Work should be done in such a way that it is convenient and comfortable. If it is possible to tear off the factory sound insulation, do it right away. In some places there are bubbles, there is air underneath, and this is corrosion over time.
After disassembling, we begin to wash everything from dirt and degrease. First, we arm ourselves with a rag and water and wash everything well. If the car is new, just wipe it with a damp cloth. In any case, it should be very clean. It is recommended to start from the ceiling so that all dirt, if any, falls down immediately, and not after it has been washed. After this, take a degreaser (for example, brake cleaner) and treat all areas well. First we pour it, then wipe it with a rag.