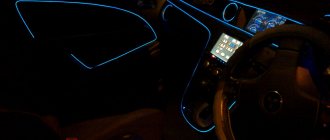
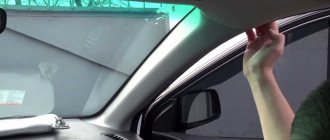
Do you need underbody lighting?
The LED underbody does not provide any benefit or practical purpose to the driver. Its main goal is to attract the attention of others so that other car enthusiasts admire the work of the master. If you look at this creative from the other side, then with the help of lighting you will be able to quickly find dropped keys or a wallet.
Unfortunately, traffic police officers also pay attention to original cars. You need to understand that they will definitely stop the driver of such a car and ask to show documents.
Precautions during operation
In order to ensure that after completing the work you get the desired result and avoid damage, you must adhere to safety precautions. You can adhere to the following rules:
- Carry out work with good lighting from an inspection hole or on a lift;
- You can and should use gloves and safety glasses;
- Before installation, make sure you have sufficient skills and experience working with electronics;
- Use tools as intended.
If all work is performed correctly and precautions are taken, your car will literally shine with new colors. However, you must understand that you are installing a decorative element for the purpose of obtaining aesthetic pleasure. It would be right to think about how other road users experience it in the same way, and that the traffic police officers do not succumb to the temptation to stop you. Use common sense and be tolerant.
Allowed or not?
Many drivers do not know whether installing underbody lighting is legal. They are also interested in what fines may be imposed on the owner. Of course, many motorists claim that they have not had any conflicts with traffic police officers over the lighting. But sometimes such tuning is assessed as a deliberate change in the design of the car.
Unfortunately, the law does not have a specific clause on which there are requirements regarding lighting. The driver has the right to make adjustments only after permission from the State Inspectorate, but only if they affect the functioning of the car.
It is believed that if the backlight is installed according to the rules, then no sanctions will be imposed on the driver. Otherwise, a traffic police officer may regard the tape as a device that “illegally” transmits a light signal. In this situation, the driver will be deprived of his license. An additional fine of 3,000 rubles is imposed.
Do-it-yourself overexposure of buttons on a VAZ 2114
Replacing the standard button backlighting on a VAZ 2114 will require the preparation of certain tools, materials, as well as some time. To work you will need the following list of necessary things:
- soldering iron with a thin tip;
- solder;
- tweezers;
- small knife or flat screwdriver;
- LED elements of the desired color.
Which LEDs and in what quantities should I buy?
The buttons installed on the dashboard of the model in question come in old and new styles. In the first case, small light bulbs or LEDs are used as a backlight element, and in the second, boards with sealed SMD LEDs are used.
Each button is equipped with two LED elements: one is responsible for illuminating the button itself, and the second indicates the activation of a particular function. The exception is the low beam headlight button - it does not have a power indicator LED. Therefore, if you plan to replace the LEDs on all five buttons, you will need to purchase 9 backlight elements. The type of the latter can be determined only after disassembling the button. The old model requires 12 V LEDs with a diameter of 3 mm. The new sample uses elements marked 0805. When using standard LEDs, it is recommended to additionally install a resistor with a resistance of 500 Ohms to 1 kOhm along the power circuit (directly in the button), which will prevent the element from burning out.
Kinds
Today, lighting for cars is created on the basis of LED strips. They do not heat up, do not fade and shine brightly. Ribbon is available in a variety of colors and shades. If desired, car enthusiasts can install RGB backlighting to control the glow themselves.
In addition to LED strip, the use of neon lighting is allowed. Unfortunately, it is not very popular due to installation difficulties. It is easy to damage. Most often, this option is installed on exhibition models of cars that are not planned to be used.
Connection
There are LED panels (clusters) on sale that are powered by 12 V. You can immediately connect them to the mains and enjoy the wonderful lights. But as the engine speed changes, the brightness of their glow will change. In fact, they will normally glow at a voltage of about 12.5 V; low voltage will cause the clusters to glow dimly.
Each cluster consists of LEDs and a resistor. There is one resistor for three lamps, which is needed to dampen excess voltage. The LED strip is designed in a similar way, and if you need a piece, you can cut it at a specific location.
Serial connection
Our lamps can be switched on in series, thereby making a homemade cluster. To do this, you need to connect them to each other, and connect the remaining two terminals to the on-board electrical network. For example, for a voltage of 12-14 V you will need three white LEDs. As you know, LEDs of different colors have different supply voltages. Thus, in this example we get the following supply voltage: 3.5x3 = 10.5 V.
For an LED, one terminal is considered “plus” (cathode), and the second is considered “minus” (anode). A serial connection means that the “plus” of one terminal is connected to the “minus” of the next and so on until the end. But they still cannot be connected directly to the network. We connect a quenching resistor (resistance) of 100-150 Ohms with a power of 0.5 W in series with the resulting chain.
This circuit also depends on the voltage of the on-board network. However, using it, you can connect any number of LEDs in chains of 3 pieces in parallel with a resistor. A parallel connection means collecting several identical chains, where the plus of one chain is connected to the plus of another chain, and the minus to the minus. The nominal resistance is calculated according to Ohm's law.
Remember, if you just take and connect an LED to the car’s electrical network, you are guaranteed to burn it out.
Design methods
When installing lighting, a motorist can choose one of several options. Let's list them:
Direct connection. The lighting device is connected to the car's electrical network.
Flicker. To create a flashing light, a controller with a specific function is used.
Remote. To control the backlight, the driver uses the remote control or a button on the instrument panel.
Autonomous operation. The operation of the lamps does not depend on the car's electrical network.
The car enthusiast can choose one option, or several at once. It depends on personal preference.
Calculation of wire cross-section and fuses
It must be said right away that all connections must be made only through fuses. Inserting it into the circuit is very simple. The positive wire from the button is connected to one contact of the fuse, and from its second contact the same wire is connected to the positive contact of the diode strip.
So, in order to calculate the rated current of the fuse, you will need to know how many meters of diode strip are connected through it. Rounding up, it is generally accepted that one linear meter of tape (60 diodes) consumes 5 W of power. This means that to power them you need a current of 5/12 = 0.41A.
Advice! In order not to overload the fuse, it must be taken with a margin of at least 20%. This means that for two meters of tape you need a fuse of at least 1A.
Now all that remains is to calculate the required wire cross-section. It is generally accepted that 1 square millimeter of copper wire can withstand a load of 10A. However, even here you should not forget about the reserve. It is best to calculate based on the fact that for each square millimeter there will be no more than 7.5 A load.
detailed instructions
Do-it-yourself installation of underbody lighting should begin with electrical work. First, you will have to develop an electrical circuit for all LED segments and test it for functionality. There are several connection methods: parallel and serial. The latter is a connection of segments in turn, when 2 wires are connected to the battery. This scheme is best suited when you plan to install a tape along the entire perimeter of the bottom. The parallel method means that the wires from the sections are combined in parallel, and one wire is output to the battery.
Next, the tape is cut into several parts, while simultaneously preparing the wiring for soldering. This is necessary to connect all the segments together. At the joints, the tape is soldered to the wire, remembering to follow the polarity. Only then is the resulting circuit connected to a power source. If everything went perfectly, then the soldered areas are insulated with heat shrink tubing.
As for fastening, you will need a profile. It should be cut into pieces, the length of which should be several centimeters longer than the section of the LED strip. The reserve will be required to install wire fasteners after the soldered areas, and the wires must be long. The fact is that the wires and tape connected by tension can break during vibrations. If the length is too long, the tape will sag, which will result in an uneven glow of the bottom.
Nylon ties will help secure the tape better. They are installed in the profile holes at intervals of 10 centimeters. The excess ends are cut off, and the finished part of the backlight is attached to the base with self-tapping screws.
The next stage of installation is to connect the sections into one electrical circuit. To ensure that the electrical circuit is durable, all wires are individually passed inside the tube and secured with ties. After this, you will have to find a place in the car interior to install the power button. Last but not least, installing a fuse is required.
Once the functional blocks are in place, all that remains is to connect them to the power system. You can connect them to the battery through the cigarette lighter outputs, or use other options for this.
The battery often has high voltage. It negatively affects the operation of LEDs, overloading them. Accordingly, the operating time of the tape is reduced. This can be avoided if you use stabilization circuits. You can assemble them yourself.
The last stage of work on installing the backlight is testing. While in the garage, the driver needs to turn the light on and off several times. If the LEDs are too bright, you will have to force yourself to get used to it.
Installing backlighting requires a person to have knowledge in the electrical field. If the driver is not sure that he can cope, then he should seek help from a specialist.
Tools and materials
To carry out this work you will need the following tools and materials:
- Soldering iron with 20-40 W power. Such soldering irons have small tip sizes, so working with them is very convenient.
- Wires. It is best to choose stranded copper wires. The cross section should be calculated based on the load (more on this below).
- Voltmeter. A very ordinary multimeter that can measure voltages up to 12 volts will be sufficient.
- Diode tape. There are several options here. For the interior, a regular unprotected tape with a frequency of 60 diodes per meter or 120 diodes per meter is suitable. For the bottom, as well as for external use in general, it is necessary to use silicone tape.
- To illuminate door handles, pockets and other small items, it is best to purchase point diodes without a base.
- Double sided tape.
- Plastic clamps.
- Clean rags and solvent or gasoline.
- Thermocembrics.
Recommendations for use
Many drivers, especially those who do not like tuning, believe that the presence of backlighting is the path to getting fines. In fact, car enthusiasts themselves do not fully understand whether underbody lighting is allowed in the country or not? It is indeed possible to install it, but according to the prescribed rules. In this case, no claims will be made against the owner of the car.
If the driver still decides to take a risk and install a tuning light, then he needs to study the regulations regarding changes to the car. Sometimes traffic police officers know that lighting is allowed, but they specifically extort money and issue fines.
Choosing a belt for the machine
I will try not to pour water, but will briefly look at what to look for when choosing an LED strip.
LED Matrix Type
LED interior lighting . To illuminate the car interior, including the trunk, choose SMD 3528 60pcs/m (the size of one LED crystal is 3.5x2.8mm). Why she?
Firstly, we get an average power of 4.4-4.8 W per linear meter with a luminous flux of about 250-300 Lm. With such power, LEDs do not require heat dissipation and the LED strip can be easily mounted on plastic elements. And the luminous flux is sufficient to fully illuminate any interior elements.
If you don’t have enough brightness, take 120 pcs/m.
Secondly, this is the most common tape on sale, we buy it in the first store we come across.
Options like SMD 5050, 5630, 5730 are not suitable due to their high power. Unpleasantly high brightness and the need to mount a heat sink make them not the best choice for LED car interior lighting.
Exterior car lighting . Here we turn on the head. If there is LED lighting under the bottom of the car, you can choose more powerful LEDs - SMD 5050 30/60 pcs/m. The aluminum profile will be our heat sink (more about installation later). For LED illumination of license plates or (God forbid) headlights, this is a bad choice. Such LED lighting will be a bait for traffic police inspectors (read about installation rules and fines at the end of the article).
Regular LEDs or RGB - there is no difference. RGB is a little more expensive, it is more difficult to connect and requires an additional control controller (read more about connecting an RGB strip). But it allows you to change the backlight color.
Protection class
There are mainly three protection classes on sale - IP20, IP65, IP68.
- IP20 – open tape without protective coatings, suitable for use indoors in dry rooms. Afraid of moisture, dust, and any mechanical influences.
- IP65 – with a protective silicone layer that can protect against condensation.
- IP68 - sealed, waterproof LEDs that can be placed on the bottom of the car.
For LED illumination of the glove compartment or the bottom of the dashboard, IP20 is also suitable if no one pulls it or pours water on it.
For illumination of other elements, IP class 65-68 is desirable.
Backlight installation requirements
Having found out that backlighting can be done using different types of tapes, the driver must understand the requirements for its installation. The main thing in installing LED lighting is to position the strip correctly, and the front and back colors must be a certain shade. All these rules are prescribed in state standards.
We list the basic requirements for bottom lighting:
The light located under the bottom cannot illuminate areas beyond it. The “rays” should be directed downward, and the brightness should be moderate. Lights that are too bright will distract other drivers from the road.
The reflected light must correspond to a certain shade. For example, the front is allowed to use yellow or white. You can't have white lights in the back and red or blue LEDs in the front.
The flickering and operation of the LED strip cannot coincide with the flashing of the emergency services. It is impossible for the backlight colors to shimmer from red to blue.
It turns out that there is no penalty for correctly installed lighting. But for violating the rules or for creating an emergency, the punishment is stricter.
IMPROVEMENT OF INTERIOR LIGHTS
The interior lighting of the VAZ 2114 can be customized with your own hands to suit your purposes and needs. The most interesting option is considered to be the complete removal of the standard lampshade, and the installation of a programmable analogue along with integrated LEDs instead. It is better to do such an upgrade as soon as it was noticed that the light in the VAZ 2114’s interior does not work - why repair an already broken old lamp if you can replace it with a new and much better one.
In addition, the new lamp will have the following functions that the standard version does not have:
- The ability to select brightness from three possible options, adjusted by pressing a button;
- Automatic shutdown after a certain time if the door is not completely closed or just open. This will prevent the battery from draining overnight;
- Smooth extinguishing of the lamp, switching off occurs within 10 seconds.
Is it possible to legalize the use of backlighting?
If the driver is thinking about how to make the backlight “legally,” then he needs to understand that it is quite difficult. Few people know that neon tape is not certified, i.e. It cannot be installed on any vehicle. Neon glow will not be legalized. That is why it is used extremely rarely.
LED strip cannot be classified as a lighting device. No one can issue a fine on this basis. Despite this, LED strips are also not certified. If a car enthusiast, in addition to installation, makes changes to the design of the car, then he will also be subject to a fine (no more than 500 rubles). But in practice, many inspectors do not pay any attention to tuning, especially if it complies with the rules.
INSTALLATION OF NEW EQUIPMENT
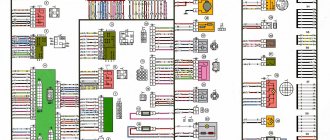
Now let’s figure out how to install an LED lamp on a car; for this we will definitely need a VAZ 2114 interior lighting circuit. This is done in the following sequence:
- Remove the lampshade;
- Unscrew the base of the case;
- We connect the new lampshade;
- Screw the LED lamp into place.
First we need to remove the original lampshade and disconnect the wires from it, all the contacts, we also need to remove the diffuser. The housing is screwed to the roof sheathing with four self-tapping screws; they are simply unscrewed and the housing is removed. Next, you need to take a new case and connect all the plugs in accordance with the diagram to the contacts that go to the battery. The new housing is screwed in exactly the same way onto the same four self-tapping screws, and the lens is snapped into place.
In this simple way you can update your car interior and make the interior lighting of the VAZ 2114 more comfortable and convenient.