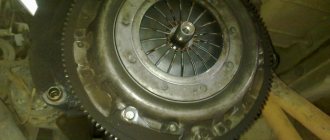
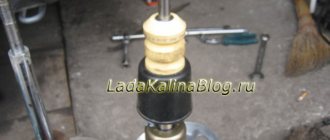
Replacing the release bearing VAZ 2108, 2109, 21099 1. Remove the gearbox from the vehicle VAZ 2108, VAZ 2109, VAZ 21099 2. Remove the ends of the spring clip from engagement with the bearing clutch. 3. Remove the release bearing from the guide sleeve. 4. Press out the four tabs of the spring holder and remove the spring holder. Then remove the release bearing from the clutch. 5. Before installation, check the new bearing. The release bearing should rotate easily, without jamming and have no play. 6. Install the release bearing on the clutch, with the protruding part of the inner ring facing away from the clutch, and secure it with a holder. 7. Before installing the release bearing onto the guide bushing, lubricate the guide bushing with a thin layer of grease. 8. Secure the clutch with the release bearing with a spring clamp and install the gearbox in place.
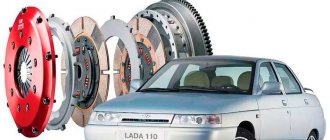
Replacing the clutch disc!
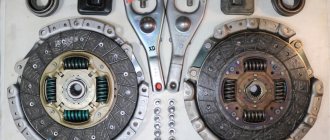
1. Insert the mandrel into the pressure plate hole and remove the six bolts securing the clutch housing to the flywheel (see notes 1 and 2). 2. Carefully remove the clutch cover from the driven disc. 3. Inspect the driven disk. There should be no cracks on the driven disk parts. Check the wear of the friction linings. Replace the friction linings or the driven disk in the following cases: a) the rivet heads are recessed to a distance of less than 0.2 mm; b) the surface of the friction linings is oily; c) rivet joints are loose.
4. Check the reliability of the damper springs in the driven disk hub sockets. If the springs are broken, the disc must be replaced. If warping of the disk is detected during a visual inspection, check its runout. If the runout value exceeds 0.5 mm, replace the disc. 5. Inspect the working friction surfaces of the flywheel and pressure plate: they should not have deep marks, scuffs, nicks, obvious signs of wear and overheating. It is unacceptable to loosen the rivet connections of the pressure plate parts. If defects are found on the flywheel or pressure plate, we recommend replacing them. 6. Carefully inspect and evaluate the condition of the support rings and the pressure plate diaphragm spring. The support rings must not have cracks or signs of wear. Cracks on the diaphragm spring are unacceptable. The contact points between the spring petals and the clutch release bearing must be in the same plane and have no obvious signs of wear.
7. Install the driven disk into the pressure plate housing so that the less protruding part of the hub is directed towards the flywheel. 8. Insert the centering mandrel into the splines of the driven disk from the diaphragm spring side. 9. Install the clutch on the flywheel and tighten the six bolts securing the clutch to the flywheel evenly diagonally to a torque of 19-31 Nm (1.9-3.1 kgfm). After this, remove the centering mandrel.
The clutch is a fairly important element in the design of a car’s transmission. With its help, the transmission is disconnected from the engine for a short period of time and smoothly connected to change gear. In addition to this main function, it is necessary to dampen gearbox vibrations and to protect transmission elements from overload. If for some reason the mechanism does not work on a VAZ 2109, replacing the clutch disc is inevitable. Replacing the clutch disc of a VAZ 2109 can be easily done on your own.
Replace clutch disc VAZ 2109
Types of clutch
According to the clutch design, there are three types:
- friction;
- hydraulic;
- electromagnetic.
In the first option, torque is transmitted using friction force. In the second case, using a fluid flow, and in the third, due to the action of a magnetic field. The most common is the friction clutch, which in turn can be of three types:
In addition to this, one more important division should be highlighted:
In the case of a dry clutch, dry friction between the discs occurs, while in the second, a special fluid is used.
Note! Today, most cars are equipped with a dry single-plate clutch.
Dry single disc clutch parameters
VAZ 2109 driven clutch disc
This device consists of:
- flywheel;
- clutch housing;
- pressure and driven disk;
- springs;
- couplings;
- trip bearing;
- clutch forks.
https://youtu.be/https://youtu.be/1858lZXHZ-g
_
Signs and causes of clutch failure
The VAZ 2108, 2109, 21099 clutch consists of a basket, a pressure bearing, a drive and driven disk. The main signs of a clutch malfunction are clutch slipping and incomplete disengagement:
- When switching off is incomplete (the pedal is pressed), there is difficulty shifting gears with the engine running, noise and crackling noises when changing gears, and large free play of the clutch pedal.
- When the clutch “slips” (the pedal is released), a burning smell may be felt in the cabin from the burning of the clutch disc linings, the car’s dynamics will deteriorate, the engine may overheat, and fuel consumption will increase.
In addition to the clutch disc itself, the release bearing can also fail - it serves to smoothly engage and disengage the clutch. When the release bearing wears out to the limit, you can hear a characteristic squealing sound - this is a sure sign that the bearing needs to be replaced. The cause of clutch failure may also be a breakdown in its drive mechanism, for example, a break or jamming of the clutch drive cable, a breakdown of the lever system, a fluid leak from the hydraulic drive if the clutch is hydraulic, or other similar breakdowns in the drive.
By the way, when replacing the release bearing at a service station, they may advise you to also replace the clutch disc. Usually, if problems begin with the clutch, it is better to replace all these parts, because replacing the clutch is very difficult: you need to remove the gearbox. But if someone wants to save on this, then all clutch parts can be purchased separately.
To work you will need the following:
- wrenches 8, 10, 13, 17 mm;
- torque wrench, 8 mm socket;
- jack;
- container for draining oil;
- inspection hole or lift.
- flat screwdriver, hammer.
When to replace the clutch disc
VAZ 2109 driven disk
Unfortunately, not a single manufacturer indicates exact figures for replacing or repairing the clutch, and this is not surprising, since the serviceability and service life of this unit will largely depend on the driver. It should be noted that the service life and the risk of current malfunctions directly depend on the quality of clutch operation. According to statistics, the driven or driven clutch disc often breaks. The following defects may be observed:
- any mechanical deformations;
- damage to damper springs;
- malfunction of the hub splines;
- wear of friction linings.
How to check disk thickness
- Using a measuring gauge, you can accurately determine the thickness of the disc. There is no need to remove the clutch to complete the process. You can't do without a lift with a gauge and instructions for use. This gauge is connected to the active clutch cylinder.
- It is not recommended to abuse traditional methods, since their use can increase wear on the clutch disc. You need to start the engine with 4th-5th gear active, press the gas with the clutch. If the engine does not stall, this indicates wear on the driven disk.
Replacing the disk yourself
Clutch disc basket VAZ 2109
It should be noted right away that on front-wheel drive cars, replacing a disc is a little more difficult than on classic models. In addition, different brands and models of cars have their own nuances for removing and installing the clutch. First you need to read the instructions and recommendations for changing the clutch yourself. It would be a good idea to consult with experts.
Note! In the process of replacing a damaged part, there is no need to skimp; it is better to immediately replace all elements that cause suspicion. As for rubber products, they need to be changed unconditionally. According to experts, the release bearing also needs to be replaced.
When replacing the clutch on a VAZ 2109, there is no need to completely dismantle the gearbox, drain the oil, completely remove the VAZ CV joints, etc.
How to change a clutch in a garage
- First you need to hang the front of the car on tripods.
- Next, the front wheels are removed.
- The clutch cable is detached from the gearbox and removed from the bracket.
- You also need to disconnect the speedometer cable from the gearbox.
- After this, the mounting bolts that secure the ball joints and steering knuckles are unscrewed.
- Next, you need to loosen the rear left trailing arm fixation.
- Carefully remove the mounting bolts of the extension bracket on the left, after which the lever rotates 90 degrees.
- A “mass” can be attached to the gearbox, which is also dismantled.
- The lower flywheel protective cover is unscrewed.
- The engine mount on the left side is turned away.
- The engine mount located at the rear is removed from the body, this also applies to the gearbox drive clamp.
- The drive is removed from the gearbox.
- The gearbox mount is unscrewed from the engine.
- The gearbox is removed from the engine and will hang on the drives.
- The clutch is unscrewed, in some cases it is the clutch basket.
- The release bearing is replaced.
- Using a convenient mandrel designed for centering such disks, we replace the driven disk.
- Assembly is carried out in the reverse order of disassembly.
In practice, everything will not happen as quickly as in theory, especially for beginners. Today, thanks to videos and photos, you can replace almost any part with your own hands, and you don’t have to contact a car service center. Detailed instructions will help you easily dismantle and properly secure the clutch disc. It is important not only to strictly follow the recommendations, but also to the quality of the purchased spare part. Among the wide variety, you must first of all understand that the price must correspond to the quality.
Any car sooner or later needs repairs, and if the gearbox becomes difficult to engage, most likely the problem lies in a faulty clutch. Replacing it on VAZ cars is not a difficult job, but quite labor-intensive, and requires certain metalworking skills.
Complex procedures
Replacing the clutch on a VAZ 2108-21099 is a labor-intensive and time-consuming process. To do this, you first need to remove the gearbox. After the gearbox is removed, you can proceed to the following operations.
Replacing the clutch cable
Replacing the fork and release bearing.
- Using a screwdriver, remove the protective cover of the plug.
- Unscrew the bolts securing the clutch basket and remove it.
- Use a screwdriver to press the spring off the release bearing clutch legs.
- We remove the bearing.
- We remove the spring.
- Unscrew the 3 bolts and remove the bearing guide sleeve.
- Use a screwdriver to grab the special protrusion and remove the plastic bushing of the fork.
- We remove the fork axle from the support sleeve and remove it from the basket.
Disassembly is complete, now we install new parts in the reverse order. When installing, it is necessary to lubricate the fork bushings with CV joint-4 grease.
- First, remove the basket and lock the flywheel.
- Unscrew the 6 bolts securing the casing to the flywheel.
- Carefully remove the clutch cover along with the driven disc, holding it with your hand.
- We inspect all parts for cracks and wear. We replace defective parts.
- We put everything back together in reverse order.
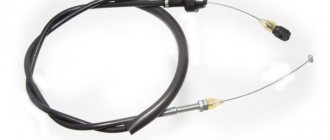
Replacing the VAZ clutch cable
VAZ-produced cars come in both front-wheel drive and rear-wheel drive, and they also have different clutch drives. If all VAZ classic cars have a hydraulic drive, then in many front-wheel drive cars (2108-2115) the release is controlled by mechanics, and the control element is a cable. Like all parts, the clutch cable (TC) wears out over time and therefore needs to be replaced periodically. The reasons for vehicle failure are:
- jamming of the cable itself in the “jacket”;
- breakage of the remaining threads of the vehicle;
- break of the cable itself.
If the vehicle itself is intact, but the clutch has become difficult to squeeze out, you can try to lubricate the cable. Litol or other grease is suitable as a lubricant, but it should be noted that this is a temporary measure, and you still need to prepare to replace the VAZ clutch cable. Changing the vehicle on a Zhiguli 2108-2115 is very simple:
- We disconnect one end of it from the pedal;
- unscrew the cable fastening nuts on the gearbox bracket (in Figures 1 and 2);
- disconnect the vehicle from the plug on the gearbox.
When is it necessary to change the unit?
The mechanism requires servicing in the following situations:
- The clutch "drives". Motor power drops.
- The unit slips or incomplete activation occurs.
- Clicking noises are heard when changing gears.
- The clutch disengages automatically.
- Vibration is noticed when the clutch pedal is pressed.
In each of the above cases, it is recommended to carry out partial maintenance or replace the unit in question.
Replacing a VAZ clutch disc
On VAZ models, replacement of the drive (basket) or driven clutch disc is periodically required; repairs to the vehicle are necessary in case of wear or breakage of parts. The main malfunctions of the clutch basket (CB) are:
- grinding the petals 2108-15 (they are erased by the release bearing);
- breakdown of the “spider” 2101-07;
- wear of the KS plate;
- breaking off steel petals.
The main malfunctions of the clutch driven disc (DC) are:
- grinding off friction linings;
- weakening or wear of damper springs;
- DS hub breakage.
In any case, replacing a disk on VAZ cars involves removing and installing the power transmission.
Clutch replacement for cars
VAZ 2106
On a VAZ classic, the clutch can fail for various reasons, and the problem may not necessarily lie in the basket or disc; often the cause of the breakdown is the clutch slave or master cylinder (MCC). Signs of a faulty GCS:
- the clutch does not appear the first time, you have to press the pedal several times;
- The pedal squeeze is “waddly.”
A defective cylinder head can be identified by external inspection; if the cylinder is faulty, it begins to leak. Clutch 2106 is replaced on a car lift or pit, the gearbox is dismantled, and then the disc and basket are removed.
VAZ 2107
All cars of the VAZ-classic family have almost identical power units and transmissions. The engines are very similar in appearance, they differ only in cylinder capacity and fuel system. Manual transmissions on the “Classic” differ only in the number of gears – there are 4-speed gearboxes. and 5-st. Manual transmission. All clutch baskets 2101-07 are the same, only the DS differs - the “penny” discs (2101) have friction linings that are smaller in diameter than the DS 2106.
Replacing the VAZ 2107 clutch is done in exactly the same way as on 2106 models.
VAZ 2109
On front-wheel drive VAZ 2108-09 cars, the clutch changes in approximately the same way as on a VAZ classic, the only difference is in removing and installing the gearbox - on the “nine” there is no driveshaft, but you have to remove the wheel drives (CV joints). There is also a difference - the VAZ 2109 has a cable drive (all “classics” have a hydraulic drive). Replacing the clutch on a VAZ 2109 is somewhat more difficult than on models 2101-07, and therefore the work takes longer.
VAZ 2114
The VAZ 2114 car has almost the same gearbox and engine as the 2109 model. The only difference is that many “nines” have carburetors, while the 2114 cars have injection engines. Therefore, replacing clutch 2114 is fundamentally no different from replacing clutch 2109.
VAZ 2115
If there are slight design differences between the VAZ 2109 and VAZ 2114 in the power unit and transmission, then there is absolutely no difference in engine and gearbox parts between 2114 and 2115, the cars differ from each other only in their bodies:
- VAZ-2114 is a hatchback;
- VAZ-2115 – sedan.
Accordingly, replacing the VAZ 2115 clutch is carried out in exactly the same way as on a VAZ 2114 car.
VAZ 2110
The 2110 clutch elements themselves (basket and disc) have slight differences from the parts of the VAZ 2114-2115 - DS 2110 has an increased diameter (200 mm on the “ten”, and 190 mm on the 2114). But in principle, all these parts are the same, and the 2110 gearbox is removed in exactly the same way as on the “fourteenth” or “fifteenth” model. Therefore, replacing the VAZ 2110 clutch is practically no different from replacing it on cars 2113-2114-2115.
We repair it ourselves (VAZ classic)
We replace the DS and KS on a rear-wheel drive VAZ as follows:
- place the car on a car lift or pit;
- turn off the engine, put the car in neutral gear;
- remove the gearbox lever mounting cover (unscrew the screws);
- we dismantle only the upper part of the gearbox lever; there is no need to remove it completely (we disconnect it at the place marked by the arrow in the figure);
- unscrew the propeller shaft bolts, dismantle the shaft itself (make marks on the cardan and rear axle gearbox - this is necessary in order to secure the shaft according to the same marks during installation to avoid unnecessary vibrations);
- disconnect the speedometer cable from the gearbox, as well as the control center;
- unscrew all the gearbox fasteners (including the traverse), remove the gearbox;
- unscrew the six bolts securing the basket, remove the parts;
- We put new parts in place and put everything back together.
When installing new spare parts, the disk must be centered, otherwise the manual transmission will not fit into place. A factory mandrel or an old “primary” from a “classic” gearbox is used as a center.
Installation of new spare parts, disk alignment
The new disk is installed in the same way as the old one, and is clamped by the basket, only before screwing the basket all the way, the driven disk must be centered, otherwise the input shaft of the box will not fit into it. The easiest way to center it is with a special mandrel, but if you can’t get one, you can do everything by touch. We screw the basket onto all the bolts, having previously pushed the driven disk under it, but we do not screw it all the way, but so that the disk moves under it. We need to align it in the center, this can be done by touch by sticking your finger into the middle hole, by touch we align everything in the center and only after that we tighten the bolts. We check whether everything is in the center, if so, then tighten the bolts, first locking the flywheel. The clutch is in place. If it is not positioned in the center, then if you put the box on, it won’t fit. Well, then we put the box on, if it doesn’t want to sit down, you can shake it, twist the drive so that the input shaft rotates and takes the desired position, everything should jump up quite easily. After that, we fasten everything that was unscrewed, see if there are any extra parts left on the sides, if there are any, then we screw them where necessary.
Do-it-yourself clutch replacement (front-wheel drive)
Unlike VAZ classics, on front-wheel drive 2108-2115 it takes a little longer to change the clutch, and the work of removing the gearbox is more labor-intensive. But with experience, professionals perform the operation of removing the gearbox quickly, and besides, there is a method in which it is not necessary to completely dismantle the gearbox; it is enough to just hang it up.
We do the replacement ourselves without completely removing the gearbox as follows:
- we hang the car on a car lift; if the work is being done in a pit, we place tripods under both front sides of the underbody;
- remove the battery terminal (minus);
- unscrew the front wheel bolts and remove the front wheels;
- unscrew the clutch cable mounting bracket from the box and move the cable itself to the side;
- dismantle the speedometer cable (if you do not remove it, when you move the gearbox, it may become overtightened and as a result burst);
- unscrew the ball joint nuts on each side (left and right bearing);
- unscrew the starter and move it to the side;
- unscrew the nuts of the front wheel hubs;
- unscrew the three fastenings of the lower gearbox casing and remove the casing;
- if there is protection under the engine, it must also be removed;
- dismantle the left mudguard;
- remove the three bolts of the left “crab” (bracket), which is attached to the front left, next to the front bumper;
- unscrew the fastening of the left lever (in the area of the wheel);
- loosen the other lever fastening (in the area of the box), move the levers down so as not to interfere;
- remove the left gearbox cushion;
- unscrew the bolts securing the gear shift rod, disconnect the rod;
- unscrew the rear gearbox cushion;
- unscrew the top two bolts securing the gearbox to the engine, screw in the long bolts of the cylinder head instead;
- unscrew all other transmission fasteners - now the box on the top bolts “moves away” from the engine;
- twist the six bolts securing the basket; we install the new parts in place, tightening all the bolts, move the box towards the engine, tighten the bolts to the end through the hole in the starter (turning the crankshaft). With this method, the centering roller will not fit here, so the clutch can only be secured in this way;
- We put all the removed parts back in place.
With this method, there is no need to drain the oil from the gearbox, since the wheel drives (CV joints) are not removed from the gearbox housing. The distance between the engine and gearbox is not too large, but there is enough space to attach the bolts of the basket.
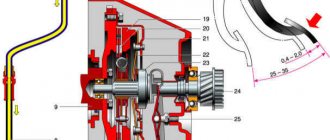
How to change gearbox seals
Before replacing the gearbox seals, it is advisable to clean the gearbox both outside and remove all dirt inside the clutch housing - the bell. Then proceed to replace the input shaft oil seal. This is done as follows:
- The release bearing is removed. You can immediately remove it or throw it away altogether, as a new one will be installed.
- Then you need to unscrew the oil seal cover: it is secured with 10 bolts.
- Next, carefully pull out the old oil seal. The most convenient and delicate way is to screw two self-tapping screws into the oil seal. Then we grab the caps of the screws with pliers and sharply pull them towards ourselves. This way the oil seal will slowly come out without damaging the seat.
- Then we thoroughly clean the seat and coat the oil seal itself with sealant. The sealant must be applied evenly along the outside of the part.
- We lay the oil seal evenly in the seat, then using the equipment (a piece of pipe of suitable diameter) we hammer it into place with light blows of a hammer on the pipe. It is enough to drive it in until it is flush with the gearbox housing.
- Install and tighten the oil seal casing. It will additionally sink it to the required depth.
- Lubricate the release bearing travel area with lithol, then install the new bearing from the kit.
At this point, work with the gearbox clutch housing is completed; you can proceed to replacing the drive shaft seals. Before installing them, it is extremely important to take into account that they must be installed in the direction of movement of the drives - they are marked with a special arrow in the direction of movement. If you mix it up, then very soon, especially if you drive at high speed, these seals will begin to leak.
Replacing gearbox seals for drive shafts is simple: the old elements are removed using a screwdriver or a pry bar (just pry them off and pull them out), the new ones are carefully driven in to the same level as the gearbox housing.
Important! There is no need to drive the oil seals too deep into the box - if they are recessed, they will block the oil passages. As a result, the axle shafts will not be lubricated in the gearbox, wear will occur on them, and the seats will subsequently break. In this case, you will have to change the box.
Before installation, the seals also need to be lubricated with sealant all around. This completes the transmission maintenance; it’s time to move on to the main task - replacing the clutch.