August 23, 2021 Lada.Online 2 690 0
From the factory, Lada NIva Travel (formerly ChevyNiva), Niva Legend (formerly 4×4, 2121, 2131) are equipped with a hydraulic timing chain tensioner. One of the popular and simple modifications is the replacement of the hydraulic chain tensioner with a mechanical (automatic) one. Let's figure out why this is needed and how to replace it yourself.
Hydraulic chain tensioner for VAZ 21214 device and principle of operation
Content:
general information
It has long been known that the quality of car parts produced at the AvtoVAZ plant is not of a high level. And timing parts are no exception. The chain has to be constantly tightened, almost every thousand kilometers. A hydraulic chain tensioner will help get rid of this problem. It is this device that we will talk about in this article. Let's look in detail at the operation scheme and replacement of the device.
Scheme of work
The figure below shows a diagram of the operation of the spring-hydraulic chain tensioner of the VAZ 21214 car. 1 – camshaft star; 2 – timing chain; 3 – chain damper; 4 – auxiliary device drive star; 5 – crankshaft star; 6 – tensioner “shoe”; 7 – hydraulic chain tensioner; 8 – line fitting; 9 – oil line; 10 – adapter fitting; 11 – oil pressure sensor (emergency).
Replacing the drive chain hydraulic tensioner
Detailed instructions with photos for replacing the hydraulic chain tensioner: The hydraulic tensioner is located under the cooling pipes in the front of the cylinder head.
Using a “10” wrench, which has five edges, we unscrew the tube fitting that supplies oil to the hydraulic tensioner. We take out the tube. Using a 10mm socket, unscrew the two nuts that press the tensioner to the cylinder block. Then we remove the hydraulic tensioner. At the same time as replacing the tensioner, it is recommended to replace the sealing gasket.
Assembly is carried out in reverse order. If after all the manipulations you start the engine and still do not hear the rattle of the chain, then everything has been done correctly.
Prices for hydraulic tensioner VAZ 21214 range from 400 rubles. up to 900 rub. Depending on the region. But there is no shortage of this device on store shelves.
5 thoughts on “Hydraulic chain tensioner for VAZ 21214 device and principle of operation”
- Oleg 09/10/2014
Thank you very much for the instructions with photographs, everything was explained point by point. The chain often had to be tightened, I hope that with the purchase of a hydraulic tensioner, this problem will disappear.
I finally found a normal article, where everything is described in detail on replacing the hydraulic chain tensioner for dummies like me. After that I changed it without any problems, but it was such a pain in the ass...
I had problems replacing the hydraulic tensioner. I couldn't figure it out right away. As it turned out later, the whole problem was that I did not replace the sealing gasket, so it gave me the heat
I always thought that I understood my car better than others, including the hydraulic chain tensioner. After reading the article and seeing the photos attached to it, I understood. That all this time I was doing the repairs wrong
I also dug almost the entire Internet, and only this article explained everything clearly. The 3D diagram itself was especially helpful. In one evening I replaced the hydraulic tensioner myself, saving money on car services
What is needed for the work?
Internal structure of the tensioner
The chain on a Chevrolet Niva wears out the timing mechanism more than the belt, so you will have to change the sprockets as well. Old gears will wear the new chain unevenly, leading to slippage and breakage. Naturally, this is hard mechanical work. But replacing the chain is done quite occasionally, so you can at the same time change the seals and gaskets, as well as all related worn parts.
First you need to purchase the latest timing chain (timing chain) for the Niva Chevrolet. To ensure its quality, lay the part flat and hold it suspended. If the ends sag by more than 1 cm or the sagging is uneven, it is better to refuse the purchase - most likely, the chain has already worked.
How to replace the hydraulic chain tensioner on Niva 21214
With the onset of cold weather, when starting the car, a strange rumbling sound appeared, which disappeared after a few seconds. I’ve only been on the Niva for six months and I still can’t confidently identify all the sounds and knocks, so I blamed the rattling of the exhaust tract. It just so happened that I got to the Nivovod masters (I changed the clutch), and they immediately recognized this sound, which was fraught with major troubles. The technicians advised us to install an automatic chain tensioner (ANT) “Pilot” produced by NPP “Rhodes”. I must say that before the Niva I had a VAZ-21063 and on it I myself installed the above ANC, drove it for more than two years, the impressions were only positive.
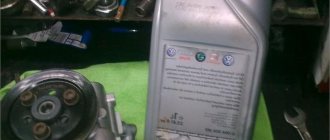
After studying relevant topics on our forum, as well as the range of online stores for Niva, the necessary device was purchased for 305 rubles:
Pay attention to the elongated pusher - in one of the stores of the Za Rulem chain, the saleswoman tried to hand me an ANC with a short pusher, for the “classics”. In addition, a new valve cover gasket was purchased (recommended by the technician), which two days later was replaced with a cork gasket due to leaks.
So, having replenished the theoretical knowledge in the field of hydraulics and mechanics, we proceed to the practical consolidation of the acquired skills.
1. We provide unobstructed access to the valve cover:
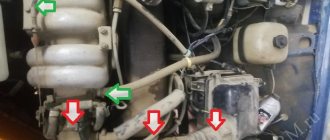
To do this, unscrew and move aside the corrugation from the air filter and the hoses from the receiver. I didn’t remove the gas pedal drive, it doesn’t really interfere. An orange rubber glove is put on the mass air flow sensor (I always do this to avoid accidental damage to the element of this sensor). We carefully wipe the valve cover from dust and dirt - it is very painful to see sand and dust on the exposed body of the block head later.
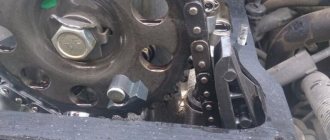
2. Unscrew and carefully remove the valve cover, using a headlamp or other bright light source to visually examine the condition of the damper and tensioner shoe. Having made sure of their integrity, just in case, we tie the chain to the camshaft sprocket with a wire (so that it doesn’t accidentally jump off).
3. Here is our lifeless friend:
I didn’t remove the cooling system pipes to make it easier to access; the usual condition of the pipe is in the letter Z, especially when you’re too lazy to unscrew various additional mechanisms and parts :)))
4. We dismantle the old tensioner, clean the mating plane from dirt and oil, install the new ANC according to the manufacturer’s instructions (measure the distance from the flange to the thrust pad of the shoe, lubricate the gasket on the side of the ANC flange with sealant, put the ANC on the studs).
5. Tighten the ANC on stiletto heels, pull out the pin:
The tensioner will click (normally, the rod comes out and snaps into place), we tighten the adjusting bolt with a wrench at the set torque - the instructions say about a force of 26 Nm, this is just “all the way”. I always use a torque wrench, since by nature I don’t measure the force with the diameter of the bolts and nuts, broken threads are my constant headache :(((
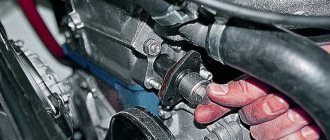
6. We proceed to dismantling the tee on the left side of the cylinder block. I used a 21 spark plug wrench. First, unscrew the oil supply tube to the tensioner (it is no longer needed) and remove it from the engine compartment. We spray WD-40 on the tee and, after removing the terminal, unscrew the oil pressure sensor. We do not lose the copper sealing rings. Since I did not drain the engine oil, it flowed out in a thin stream. He quickly screwed the sensor back in, pushed the key further along the sensor, and unscrewed the tee assembly with the sensor. The oil flowed more cheerfully, so having assumed the Z position, I plugged the hole in the block with my finger, with my other hand I managed to unscrew the oil pressure sensor from the tee, put one copper washer on its thread and screwed the sensor into the block without the tee:
Step-by-step instruction
Before starting troubleshooting, check that all timing components are free of mechanical defects. To do this, you need to remove the protective cover of the drive and perform a visual inspection of the parts: sprockets, damper, tensioner and shoe. If defects are found, these components should be replaced.
Tools
Before you start work, you need to prepare the necessary tools:
- keys to “13” and “38”;
- flat screwdriver;
- pliers.
To carry out work, the car should be placed on a convenient platform and supports should be placed under the wheels so that it does not roll. The gear shift lever must be set to neutral.
Engine compartment of VAZ 2101
Stages
- First you need to find the tensioning device; it is located under the pipes near the pump. Use the key to “13” to release the tensioner. Once the chain is loosened, the shoe should pop off.
- Next, you should take the key at “38” and throw it on the crankshaft pulley nut. Then you need to turn the crankshaft a couple of turns in a clockwise direction.
- Rotate the shaft until the marks on the camshaft sprocket and on the camshaft bearing housing coincide. In this case, the spring located inside the tensioning device, acting on the shoe, will automatically perform the necessary tension.
- It is advisable to additionally check the tension using a screwdriver. If everything is normal, then we return to the tensioner and tighten its head with a wrench.
Checking the tension with a screwdriver
After tightening the chain drive, you should start the engine and check its operation. It should work without extraneous noise. If the noise remains after tensioning, then the reason may be in the damper. Then you need to check its serviceability and replace it if necessary. It may not be possible to tension the chain drive the first time, so this procedure will have to be repeated several times.
During the procedure, it is necessary to ensure that the marks match so that the valve timing does not go astray.
This operation should be carried out every time after any repair work. In addition, a preventive check should be performed after the 10 thousand kilometers mark. If you learn how to check and tension yourself, this will make it possible to extend its service life and save on car service costs.
Removing the hydraulic tensioner of the camshaft drive chain and its pipeline VAZ-21214
The hydraulic tensioner is installed in the front part of the cylinder head (on the right side) under the coolant jacket outlet pipe.
The tensioner is spring-hydraulic: the preliminary tension of the chain (with the engine off) is provided by a spring, the working tension (after starting the engine) is by the pressure of oil under pressure, which is supplied through a steel tube from the adapter under the emergency oil pressure sensor.
1. Using a special split wrench “10” (encompassing five edges), unscrew the fitting of the oil supply tube to the hydraulic tensioner (for clarity, the hoses of the outlet pipe of the cooling jacket are disconnected).
2. Remove the tube from the tensioner.
3. Using a 10mm socket, unscrew the two nuts securing the tensioner to the cylinder head
4. Remove the tensioner.
5. Remove the sealing gasket
6. To remove the oil supply pipeline to the hydraulic tensioner, use a split wrench “10” to unscrew the tube fitting
8. Using a 21mm spanner, unscrew the cylinder block fitting
9. ...and remove the fitting and pipe with sealing copper washers.
We install the hydraulic camshaft drive chain tensioner and its tube in the reverse order.
We replace the hydraulic tensioner gasket with a new one.
We invite you to read the detailed instructions:
This sound is similar to a running diesel engine and occurs during a cold start. The tensioner is located under the hood, on the passenger side. You can find it under the cooling pipes, in front of the cylinder block. The tensioner has the shape of a cylinder, which is screwed on top with a lid, with a hole for oil supply.
Without this device, the engine will not operate. Over time, rotating parts weaken and stretch, and may even break.
The timing chain wears out, and this is natural, you just need to correct the situation in time. An unsuitable gas separating mechanism chain will make it impossible for you to operate a normally functioning vehicle. Holidays on the Black Sea. Search for gold, search for treasures.
Screwed in with two fastening nuts.
The tube is inserted and secured. It is simply impossible to make a wrong replacement. The device is located on the passenger side under the hood of the car.
NIVA CHEVROLET replacing hydraulic timing chain tensioner with pilot
Having opened the hood, you need to find the cooling pipes in the area of the front of the cylinder head, under them the hydraulic tensioner itself is located. A photo of the device that is installed on the Chevrolet Niva is located below. Location of the part in the car Components and principle of operation of the hydraulic tensioner As can be seen in the photo, the device has a cylindrical shape, and is screwed on from the outside with a lid with a small hole through which oil flows. Inside the device there is a small ball and a spring, which ensures free flow of oil in one direction and does not release it in the opposite direction.
Replacing the timing chain Niva 21214 injector
Here we will talk about independently replacing the timing chain drive on a Niva 21214. The timing belt affects the operation of the entire car, so the importance of this unit should not be underestimated. Replacing a chain drive is a rather complicated process, which, however, can be done by any car enthusiast, provided that he follows the instructions and shows a little diligence.
A chain has significant advantages over a belt drive. These include, first of all, its reliability. While a belt can break, this rarely happens with a chain. Usually it just stretches. It lasts much longer than the belt, which means it needs to be changed less often. But still, the chain does not last forever, and after a while it also has to be replaced with a new one. When replacing the chain yourself, it is very important to set the marks correctly and follow safety precautions.
When to change the timing chain?
The manufacturer does not give clear recommendations regarding the timing of replacing the timing chain on the Niva. Experts assure that the need for replacement may arise no earlier than after 100,000 km. But it is very important to periodically carry out diagnostic procedures for chain transmission. It may well happen that the chain weakens. This will be noticeable by the characteristic sound that the running engine will make. First you need to try to tighten the chain. If this cannot be done in the usual way, replacement becomes necessary. In this case, you can contact a service center, where this repair will be carried out by professionals, or you can try to change the chain yourself. The latter option is preferable in terms of savings and gaining the necessary experience.
If the mark on the camshaft gear does not match the mark on the bearing housing, it's time to take action. The chain drive also needs to be replaced if chips or cracks appear on it. All this suggests that your chain has served its intended life and it is time to replace it.
So, you have decided that you will make the replacement yourself. What do you need to do next? First of all, go to the store and buy a new chain there. You can check the quality of the chain you are purchasing. We take the chain and place it flat on our palms. If its sagging exceeds 1 cm, you better look for consumables elsewhere. In addition to the chain itself, you will also have to buy a set of oil seals, a tensioner, dampers, and a set of gaskets. Then we prepare the tools that will be useful in the work and begin the repair.
Replacing the chain drive
- Place the car on a level surface. Open the hood. Disconnect the battery. Remove the air filter.
- The choke cable should be disconnected and moved away. It is also necessary to disconnect all electrical drives and pipes.
- Remove the fan, generator belt and pump roller. The belt should be thoroughly examined. If deep cracks or other damage is found on it, it must be replaced with a new one. Remove the tray protection and thoroughly clean its cover.
- Remove the valve plug. Unscrew the camshaft sprocket screw.
- Take a wrench and unscrew the ratchet nut.
- Now we begin to rotate the crankshaft until the marks on it and on the engine casing completely coincide. Make sure that the marks also match on the bearing housing and camshaft sprockets.
Replacing the chain drive
7. Then remove the casing covering the motor. To do this you will have to remove several bolts. We remove the sedative. Unscrew the screw securing the oil supply pump. There is no need to remove the screw. It should only be loosened and left in place.
8. We begin to remove the tension element mechanism. We remove the MM line, remove the pressure sensor, after which you can remove the tensioner itself. 9. Remove the screw on the camshaft gear. We remove the gear. After this, remove the timing chain. At this point, the parsing process can be considered complete. Now let's assemble the mechanism. 10. We take the purchased oil seals and begin to install them in place of the old ones. First of all, we change the crankshaft oil seal. After removing the old component, clean the installation location and install a new oil seal. First, it is recommended to lubricate the new oil seal with engine fluid, for example. 11. Now we take the chain in our hands and also begin to lubricate it. After this, we put the drive on the crankshaft gear, the oil pump and then the camshaft. This sequence must be followed. When tensioning the chain, you need to ensure that the alignment of the marks is not disrupted.
12. Install the tensioner and carefully tighten the nuts securing it. We tighten the screws on the sprockets and check the alignment of the marks again. To do this, turn the crankshaft to the right again. 13. Replace the alternator belt. If the old belt is in good condition, then it is quite possible not to change it. 14. Lubricate the gasket that we will install on the cylinder head and install it. Don't forget to clean the seat from traces of the old gasket. We put the head in place and carefully tighten all the fasteners. We install all other parts in reverse.
Now let's check the operation of the mechanism. To do this, start the engine and listen to how the engine operates. By hearing it is quite possible to determine whether everything was done correctly or something went wrong. If the sound is familiar, rustling, then everything is done correctly. If there is a characteristic grinding sound, the procedure must be repeated.
How to tension a chain on a VAZ 2121, replacing the chain tensioner, when it needs to be replaced
Replacing the chain tensioner VAZ 21213, VAZ 21214, VAZ 2131
Chain tensioner - as is already clear from its name, it is needed only to tension the chain so that it does not loosen while the engine is running, and so over time this part breaks for various reasons, this happens, sometimes the tensioner simply cannot withstand very heavy loads breaks, for example, if you keep the engine speed in the red zone for a long time, the tensioner cannot withstand and breaks, but it can also break because it is not very durable, for example, there are a lot of very bad tensioners on the market at the moment qualities that really fail very quickly and after that they will need to be replaced with a new one, and you will learn how to do this from this article.
Where is the chain tensioner located?
It is located on the side of the engine, you can easily find it by the way if you approach the car from the right side of the engine compartment (The countdown starts from the back of the car to the front), there is also a battery installed nearby and there is a standard injection receiver in the form of curved pipes ( It is white), so when you stand on this very right side, look for the place indicated in the photo, this is the same tensioner.
When to change the chain tensioner
It changes only if it has become unusable, but how can you understand this, you ask? In general, when the tensioner becomes unusable, the car’s engine begins to run significantly louder, because the chain is weakened and thus there is such a roar as if you started the car with a diesel injection system, and not with a gasoline one, so if you hear something rattling in the engine, vibration may also appear, and by the way, this knocking should become less as the speed increases, that is, if the engine is noisy at idle and the chain rattles, then just give a little gas and if this knock goes away (the higher the speed, the weaker it should be knocking) then it is most likely really the tensioner, although many other parts could be to blame for this, but first you need to check it, since it is removed very quickly and is also checked accordingly.
An interesting article about biofuels produced from ordinary sawdust, read more here.
How to replace the chain tensioner on a VAZ 21213-VAZ 2131
Cars of the Niva family are very old models, in my opinion the very first cars went back to 1977 if memory serves, but these are new times and the car is still being produced and refined, so here are the chain tensioners that AvtoVAZ installed on its cars in Depending on the year of production, they may differ from each other, so for example, somewhere before 2000 or even higher, these cars of the Niva family came with the most common spring chain tensioners, these tensioners are very easy to remove, but one of their drawbacks (Or maybe an advantage) is the fact that they do not tension themselves, that is, from time to time you have to tighten them yourself, which is very inconvenient, but this is for someone, because it only takes 1-2 minutes to tighten the chain tensioner!
VAZ specialists answer
VAZ SPECIALISTS ANSWER
EVGENY BAYBORIN - engine development department ALEXEY KLIMENKO - transmission development department
YURY PROKHOROV – after-sales service department
ALEXANDER GUSEV – transmission development department
On my Niva VAZ-21214, the plastic chain guide broke more than once, once every 10-12 thousand km. I changed the chain, sprockets, tensioner shoe and the hydraulic chain tensioner itself, the oil line - I can’t find the reason!
The dampers used in the factory configuration, produced by JSC "Plastik" from Chelyabinsk, have proven to be quite reliable. In your case, the reasons for the breakdown of the original, factory damper could be factors such as an error in the initial installation, a deviation in the location of the damper mounting on the cylinder head, or the dimensions of the damper itself from the requirements of the drawing. In these cases, the damper may become distorted, ultimately leading to its destruction.
A serious threat of breakage of the damper also arises when shock loads are applied to it due to insufficient tension of the operating chain - usually this is due to a malfunction of the hydraulic tensioner, but in some cases the cause of this is excessive wear of the sprockets and chain, its significant elongation and sagging.
Calcifiers bought in a store may be inferior in strength to the original ones due to the low quality of their material - plastic.
I want to remake the VAZ-21214 timing drive according to the 21213 model. What is the difference between sprockets, chains, etc.?
The 21213 engine has a 21213 camshaft, which is driven by the long-established traditional double-row bushing chain 2103 (116 links). Here is the original kit - tensioner, shoe, chain guide. The stars are, accordingly, double-row. The number of teeth for all engine options is the same: 19 on the crankshaft nose, 38 on the camshaft and oil pump drive. Valve lever supports are mechanical. These details are well known to many from VAZ classic cars.
On the 21214 engine, to reduce noise and at the same time increase reliability, they used a single-row, but bush-roller chain 21214 (116 links), single-row sprockets, a camshaft 21214, hydraulic supports for valve levers, an original set - a hydraulic tensioner, a shoe, and a damper.
Conversion of the timing drive 21214 to 21213 is possible provided that the above parts are completely replaced, but the meaning of the event is questionable.
Is it true that in the 21124 engine (1.6 l, 16 valves), in the event of a timing belt break, the collision of the valves with the pistons is completely excluded?
Theoretically, the probability of valves contacting the pistons on the 21124 engine still exists, but compared to its predecessor 2112, it is small. For such an event to occur, the following factors must confluence:
— unfavorable combination of the true dimensions of parts within tolerances;
— high engine operating temperature;
- camshaft stop when the valve is fully open.
Neither during factory tests nor in operation (starting from October 2004) were there any cases of contact of valves with pistons on VAZ-21124 engines.
Is it true that you should end your trip by “blowing through” the engine at high speeds (about 3000 rpm) for one minute so that there is no carbon left on the spark plugs?
In the summer this makes no sense. In winter, at frosts of 20 degrees and below, if before this the engine was slightly warmed up or was idling, the “operation” can be useful. At the same time, such techniques do not eliminate problems caused by low-quality gasoline, malfunctions of the power supply and ignition systems. Difficulty starting the engine - and not only in winter conditions - is often explained by precisely these reasons.
NIVA CLUB
International Niva Club
- List of forumsAuto - EquipmentTechnical section Lada 4x4 NivaEngine - general questions
- Search
- Links
- Unanswered topics
- Search
- Online store "NIVA SHOP"
Active topics
Chain tensioner. Hydraulic tensioner.
- Go to page:
hydraulic tensioner (need help)
Post by Didik oleg » 08 Aug 2010, 21:48
Re: hydraulic tensioner (need help)
Post by simbir » 08 Aug 2010, 22:37
Re: hydraulic tensioner (need help)
Post by ALK » 08 Aug 2010, 23:02
Who knows what's going on behind the fence of the zoo? ©
Re: hydraulic tensioner (need help)
Post by medvedka » 08 Aug 2010, 23:53
Re: hydraulic tensioner (need help)
Post by ALK » 09 Aug 2010, 00:45
Who knows what's going on behind the fence of the zoo? ©
Re: hydraulic tensioner (need help)
Post by Didik oleg » 09 Aug 2010, 08:16
Re: hydraulic tensioner (need help)
Post by medvedka » 09 Aug 2010, 08:33
Re: hydraulic tensioner (need help)
Post by ALK » 09 Aug 2010, 09:41
Who knows what's going on behind the fence of the zoo? ©
Re: hydraulic tensioner (need help)
Post by Anton » 09 Aug 2010, 10:06
Re: hydraulic tensioner (need help)
Post by medvedka » 09 Aug 2010, 10:54
Re: hydraulic tensioner (need help)
Post by simbir » 09 Aug 2010, 12:42
Re: hydraulic tensioner (need help)
Post by medvedka » 09 Aug 2010, 13:06
Re: hydraulic tensioner (need help)
Post by Didik oleg » 09 Aug 2010, 13:27
Chain tensioner. Hydraulic tensioner.
Message from ivan. » 29 Oct 2012, 20:04
Re: Chain damper.
Post by wwm » 29 Oct 2012, 20:07
Re: Chain damper.
Message from ivan. » 30 Oct 2012, 17:37
Re: Chain damper.
Posted by doc Brown » Oct 30, 2012 8:09 pm
Re: Chain damper.
Post by extreme » Oct 30, 2012, 10:36 pm
Re: General questions about engine malfunctions.
Post by Scorpion » 06 Nov 2012, 13:30
Theory
A very common opinion is that the timing mechanism on engine 21213 is almost “eternal”. But let's define two important concepts. A working unit and a correctly functioning unit. The design of the Fiat of 66-67 of the last century is, of course, ingenious in its simplicity and margin of reliability, but still time takes its toll: the chain begins to play and “stretch,” the springs in the tensioner weaken and, as a result, the ignition begins to “float.” Each design has both its pros and cons. Yes, a double-row chain is quite “breakable”, but to keep it taut it requires more force than a single-row chain. This means the tensioner must have a “fresh” spring.