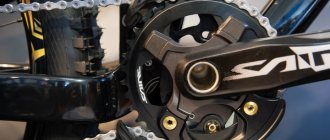
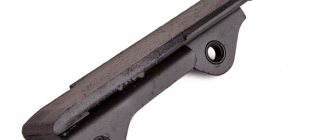
Rockring
Rockring is an element of power protection for the front sprocket of a bicycle from mechanical impacts against the side, the ground and other obstacles. The design of the rockring is extremely simple; it is a circle of standard dimensions, the diameter of which is slightly larger than the diameter of the largest bicycle star. The rockring is mounted on a standard mount and, in fact, replaces the largest sprocket of the vehicle chassis. The rockring can be used simultaneously with the front derailleur. For the manufacture of this protective element, metal and impact-resistant plastic are used.
Application of rockring
A chain guide for a bicycle in the form of a rockring is designed to provide power protection to the front part of the transmission. Thanks to its simple design, which is a circle of standard diameter, slightly larger than the dimensions of the largest star, it is not difficult to install.
Assembled using standard fasteners. When installing it, the largest star is not used, since the damper can completely replace it. Also, the operation of the rockring is often combined with the operation of the front derailleur.
Depending on the cost and purpose, it is possible to choose this element made of metal or high-strength plastic that can withstand high impact impacts.
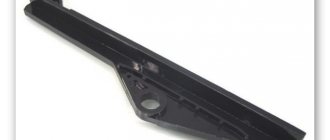
Many owners of two-wheeled vehicles choose a lightweight rockring model, called a banana among cyclists. It is a trimmed part of the circle, capable of reliably covering the most problematic parts of the chain from blows from below.
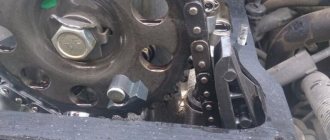
Roller damper
The roller guide is an element that simply maintains the chain in the correct position, preventing it from jumping off the sprocket even during aggressive driving. To protect the chain of high-speed bicycles, it is rational to use large-diameter rollers that protect the two front sprockets from mechanical damage.
Another type of protective device is a frame design. In this case, a special frame is responsible for holding the chain in the correct position. According to experienced cyclists, this design is characterized by high reliability and performance.
Mounting types
There are three standards for mounting a chain guide:
- BB – mounting on a carriage that presses the stabilizer to the bicycle frame. Typically used for bananas and other partial protections;
- ISCG (International Standard Chain Guide) – fastening to the frame with bolts at three points located around the circumference. The diameter of the circle is 59.24 mm, the distance between the mounting points is 47.77 mm;
- ISCG 05 is a standard that replaced the previous one just two years later. Currently supported by all major manufacturers. The diameter of the circle is 73 mm, the distance between the mounting points is 55.92 mm.
Diagrams of common types of fastenings
There are other standards, for example, experiments from SRAM, but they have not received widespread support.
Standard rockring device
Speaking about dampers, we should also definitely mention another type of protective accessory - a cassette type, which was invented and successfully used in practice by artisans. The design elements of the cassette-type device do not contact the sprocket; it is installed on the chainstay of the bicycle frame. The home-made cassette accessory does an excellent job of holding the bicycle chain on obstacles, but makes it very difficult to change gears.
Types of fasteners
Currently, four types of fasteners are used to attach the damper:
ISCG (International Standard Chain Guide) is a slightly outdated method. Fastening with bolts to the bicycle frame is carried out around the circumference in three places, every 47.77 mm. The circumference of the structure attached to the frame has a diameter of 59.24 mm.
ISCG 05 - this fastening option appeared relatively recently, just two years ago, but is already actively used by manufacturers of bicycles and their accessories. The circle has a diameter of 73 mm. The mounting points are 55.92 mm apart.
BB - fastening is carried out on the carriage, as a result of which the damper is pressed against the bicycle frame. This type is used in the banana design.
Direct Mount, D-Type, ES-Type, E-Type and others - a system for mounting in place of the front gear derailleur (instead of it). Considering the car and the small trolley of the standards for fastening the front derailleurs, there are just as many “calm” fasteners for this system. Outdated option.
In general, there are several more fastening standards, but listing all types does not make much sense.
Types of fastening of factory dampers
At the moment, there are three standards for attaching a protective accessory:
- ISCG – mounting the device on a bicycle frame by fixing it with bolts at three points around the circumference. In this case, the standard distance between the mounting points is 47.77 mm.
- ISCG 05 is the most popular device mounting method, supported by many well-known brands of bicycles and bicycle accessories. With a total circle diameter of 73 mm, the distance between the fasteners is 55.92 mm.
- BB is a type of mounting on a carriage that presses the damper to the bicycle frame.
About fastening methods
To achieve high efficiency when using a chain guide on a bicycle, it must be installed correctly. The following types of mounts are distinguished:
- To attach partial types of protection, which includes “banana”, use explosive mounts. In this case, the damper is placed on a carriage that presses it to the frame.
- ISCG mount, which involves installing the device on the frame by screwing it in three places. They are located in a circle with a diameter of about 60 mm. The distance between the mounting bolts is almost 48 mm.
- The ISCG 05 standard, which appeared just a few years ago, is considered the most progressive today and is used by world-renowned manufacturers of bicycle equipment. In this case, the diameter of the circle is increased to 73 mm, and the mounting points are placed at a distance of up to 53 mm.
Other fastening standards are known, but the ones described above are the most widely used.
Installing a bicycle chain guide with your own hands
The principle of installing dampers of various types is almost identical. To install the protective accessory, you will need the following tools:
- connecting rod squeezer;
- set of hexagons;
- carriage remover;
- thread locker;
- a key for unscrewing the system's bonnets;
- lubricant
The algorithm of actions aimed at self-installation of the damper should be as follows:
- Remove the connecting rods and sprocket from the system. If necessary, you can unscrew the carriage in order to fix the star and guide in the correct position.
- Screw the “banana” to the “ears” of the carriage cup.
- Install the connecting rods in the standard position, pulling the chain onto the sprocket so that both rollers are in close contact with the washers. Please note: the fastening elements of the rollers must be tightened simultaneously on both sides (outer and inner).
- Leaving a minimum gap between the internal damper plate and the star, you need to tighten the three adjusting bolts.
After performing these simple manipulations, you need to make sure once again that all elements of the system are securely fixed. Next, you need to adjust the chain tension, alternately switching to the smallest and largest sprockets. The length of the chain can be adjusted as needed by lengthening or shortening it. Installation work has been completed.
( 68 votes, average: 4.88 out of 5)
Bicycle rack
Bicycle rack for rear door
Related Posts
Which tensioner (chain guide) to prefer?
There are three varieties of this device.
Chain tensioner (calculator) ISCG
It is attached in a circle to the frame using three bolts, between which the distance is 47.77 millimeters.
Stabilizer ISCG 05
This option is the most popular due to its easy installation. The iscg05 tensioner mounting circle is 73 millimeters in diameter, and the distance between the fasteners is 55.92 millimeters.
We recommend:
- Rust on a bicycle and getting rid of it
- Where and how to store a bicycle in an apartment
- Chain cleaning machine and its purpose
Tensioner Truvativ X0/BB
The third option is that the “BB” is attached to a carriage that presses it to the bicycle frame.
In addition to this difference, chain tensioners (chain stabilizers) differ in the following characteristics:
- weight;
- material;
- cost;
- degree of protection;
- appearance.
In addition to metal, plastic is used to make them. The price of the product depends on what material is chosen.
Using rollers and frames
Directly playing the role of a chain guide is a roller designed to maintain the chain in the position necessary for high-quality driving. It holds the chain even during quite dangerous driving. Chain guides for bicycles are available on the market in the following variations:
- With top and bottom roller.
- With only one roller, since this is often enough for full functionality, providing reliable protection.
- With rollers of large diameters covering the two largest stars in the system. Such designs are more often used in high-speed bicycles for cycling.
- Having a frame design. Installed to the required tolerances and not subject to constant stress, it is lighter and easier to operate.
The latest bicycle chain guide presented is quite reliable in operation and has a high performance indicator.
Adjusting the derailleurs on a new bike
Slips and inaccurate gear shifts due to normal wear indicate detuned switches. This problem usually occurs with a new bike or if the chain and sprockets have recently been replaced.
General scheme for adjusting switches:
- set the optimal cable tension;
- adjust the speed in lower gears;
- adjusting the chain travel along the highest sprockets.
For the rear sprocket system, you still need to set the tensioner to the correct position, which will compensate for the sagging of the chain. Setting up the rear derailleur on a bicycle:
- Loosen the screw and remove the drive cable.
- Set the lower gears by placing the chain in the 1:1 position.
- By rotating the screw L, the guide roller coincides with the star.
- Install the cable into the switch.
- Rotating the pedals, set the highest gears: the chain is on the small sprocket at the back and the largest at the front.
- Using screw H, ensure that the roller and the active sprocket coincide in the same plane.
- The correct position of the tensioner is 5 mm from the lowest sprocket in a 1:1 chain position.
Correct position in the low gear setting (similar adjustment to screw H)
The front derailleur is adjusted in the same way according to the following scheme: setting restrictions for L – adjusting higher gears for H – adjusting the tension of the drive cable. However, first you need to check the coincidence of the switch roller with the plane of the outer stars. Perhaps just adjusting the rear derailleur will be enough. And of course, checking the operation of the transmission, in particular, chain tension, in practice.
In principle, adjusting the switches lasts for a long time. Proper use of the speed system will help reduce the rate of wear, and timely elimination of negative factors will allow the transmission to last as long as possible.
other methods
There are a lot of ways to make a bicycle chain tensioner with your own hands from scrap materials. To do this you will need a small sprocket and a fastener. The fastening can be a clamp from a flashlight on the steering wheel, a cut-out aluminum leg in which holes are drilled for attaching the sprocket and bolts that will press it to the frame. Some craftsmen even make fastenings from an ordinary plastic cutting board. The main thing is imagination.
The tensioner is usually attached to the chainstay. It is important to take into account that you need to tighten the chain from the bottom (preferably from the bottom up). After all, the upper part is always tense when pedaling.
Installing a damper on a bike
Replacing the chain tensioner (chain tensioner) yourself is not difficult - it will take half an hour. It is easy to consider the procedure using the ISCG model. You will need: a connecting rod squeezer, a device for removing the carriage, three hexagons (sizes 2.4 and 5 mm), lubricant and thread locker.
Assembly instructions:
- remove the connecting rods and sprockets (sometimes also the carriage); the large sprocket is moved to the place of the middle one, and a rockring is installed in its place - a damper element;
- a “banana” is screwed to the extreme protrusions of the carriage;
- tighten the fastening;
- check whether they are installed correctly: the travel of one of the pendants (6 inches) is turned to 12 o'clock, the other - to 11:30. The suspension when folded may touch the groove;
- drop a few drops of fixative into the fasteners;
- mount the connecting rods, install the chain, adjust the pressure rollers, taking into account that the grooves should be located exactly in the center;
- push the “pancake” towards the sprocket in such a way that the distance between similar elements is strictly proportional, and the chain of parts does not touch;
- secure the bolts.
Video: How to tighten a chain on a bicycle
How to install a chain guide on a bicycle
Chain damper.
You can also replace the chain tensioner on a bicycle yourself. As an example, we can take the most universal fastening model “ISCG”. Installation requires very little time - half an hour. So, before installing the tensioner, you will need to prepare 3 hexagons of size 2, 4 and 5 mm, a removable carriage device, a connecting rod squeezer, a wrench, a lubricant and a thread lock. To make assembly easier, you can use step-by-step instructions:
- You must immediately remove the connecting rods and sprockets. In some cases, even a carriage.
- The largest sprocket needs to be moved to the place of the middle one, and a rockring (stabilizer part) is installed in the large area.
- The so-called “banana” is screwed to the outer projections of the carriage.
- The bolts are tightened.
- The correct installation is checked: if the travel of the suspension, which has 6 inches, is turned to 12 o'clock, and with another value to 11:30, then everything is installed correctly. Please note that when the suspension is folded, the chain may lightly touch the groove.
- After checking, a little thread locker is dripped into the fasteners.
- Then the connecting rods are mounted, the chain is put on, and the rollers for pressing are adjusted. Please note that the grooves must be located exclusively in the center.
- The internal “pancake” is extended towards the star so that the distance between all similar elements is strictly proportional. The chain cannot touch parts.
- The bolts are secured.
Efficiency of use
The "extra sprocket" system helps keep the chain rigid in a position that allows for smooth transitions between gears. As they said earlier, excessive tension complicates the switching process; in a loose state, the links jump on the sprockets, which is why some speeds may not turn on or the accuracy of switching to other sprockets will sharply decrease.
The tensioner device only helps to temporarily compensate for elongations during operation, but does not eliminate wear itself. On bicycles with a multi-sprocket transmission, the chain stretches many times faster than in a standard front-rear sprocket system due to the constant slight misalignment. Exceeding the force of fixation of the switch rollers when stretched leads to the fact that the device can no longer cope with the chain, and you will have to shorten it yourself.
Tensioner installed additionally
Nevertheless, use on a mountain bike is quite justified: the chains are long enough, and in addition, there is no sagging at any ratio of front and rear sprockets. As for installing it yourself on a bicycle, where this is not provided, there is no particular reason for this: it will be much easier to remove a stretched chain and shorten it by removing excess links. In addition, the price of such devices does not spoil either.