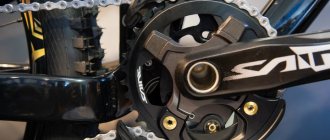
Rockring
Rockring is an element of power protection for the front sprocket of a bicycle from mechanical impacts against the side, the ground and other obstacles. The design of the rockring is extremely simple; it is a circle of standard dimensions, the diameter of which is slightly larger than the diameter of the largest bicycle star. The rockring is mounted on a standard mount and, in fact, replaces the largest sprocket of the vehicle chassis. The rockring can be used simultaneously with the front derailleur. For the manufacture of this protective element, metal and impact-resistant plastic are used.
Different ways to tighten the chain
Bicycles are different now, with significant differences in design. To properly tension a bicycle chain, you need to know the rules that apply to the type of vehicle you have.
If the bike has no gears
For a bicycle that does not have a gear shift system, the chain mechanism should only sag by 5 mm. To ensure proper operation of the vehicle and not encounter certain problems on the road, it is necessary to tension the chain in accordance with certain rules:
- Position the two-wheeler so that it stands on the handlebars and seat, and the wheels are on top.
- On the rear wheel you will need to loosen the nuts or eccentrics.
- By moving the wheel along inclined grooves (dropouts), it is necessary to achieve the correct sag of the chain mechanism.
At this point, the installation of the chain could be considered complete, if not for a number of subtleties that could greatly complicate this whole undertaking:
- the rear wheel is secured only if its axis is positioned strictly parallel to the carriage shaft;
- if the chain on the bicycle is too tight, then the rotation of the pedals will be complicated, and the mechanism itself will quickly become unusable;
- if the chain is very sagging, the cyclist will have to stop often and correct it;
- Removing links on the chain mechanism is required if, during its installation or tightening, further adjustment of the wheel along the dropouts becomes impossible, and the chain still sags.
If the bike has several speed modes
The tension force of the chain mechanism on a bicycle, the design of which involves the presence of a rear parallelogram derailleur, directly depends on the stiffness index that characterizes the spring on the derailleur.
With a long chain mechanism, the tensioner simply will not be able to compensate for excessive sagging, and accordingly, the chain will hit the frame
Owners of bicycles with an insufficiently long rear shifter should pay special attention to this problem. With a short chain mechanism, changing speed will be very difficult
As a result, the entire transmission structure will wear out faster. This problem is more pronounced in the case of double-suspension mechanisms.
A common problem when installing a new chain on this type of bike is the need to shorten it. To do this, you can use one of two methods:
- The chain mechanism is installed on the largest sprockets at the front and rear. Pull it and move the rear derailleur as far forward as possible. By adding two links you can determine the required chain length.
- The chain mechanism is transferred in front to the largest sprocket, and at the rear, on the contrary, to the smallest. The chain is then tightened until the frame on the rear shifter points straight down. The required torque can be calculated from the axes of the switch rollers - they must form one line in a strictly vertical direction.
If you have to deal with double-suspension bicycles, then setting the chain is carried out on a slightly different principle. To do this, you will need to press down on the rear pendulum so that the front cassette with sprockets moves away from the rear ratchet to the maximum distance. In this position, make a mark corresponding to the required length of the chain and remove the extra links.
Roller damper
The roller guide is an element that simply maintains the chain in the correct position, preventing it from jumping off the sprocket even during aggressive driving. To protect the chain of high-speed bicycles, it is rational to use large-diameter rollers that protect the two front sprockets from mechanical damage.
Another type of protective device is a frame design. In this case, a special frame is responsible for holding the chain in the correct position. According to experienced cyclists, this design is characterized by high reliability and performance.
We make a tensioner
It's easy to make and cheaper than buying it at the store. To do this, it is important to understand the role played by the chain tensioner (chain guide). This element performs a protective function: it helps regulate tension, preventing vibrations from decreasing while the bike overcomes obstacles. In addition, the chain tensioner (chain stabilizer) prevents jumping and protects against mechanical damage. It is used for vehicles with one speed or equipped with an internal switching device.
Standard rockring device
Speaking about dampers, we should also definitely mention another type of protective accessory - a cassette type, which was invented and successfully used in practice by artisans. The design elements of the cassette-type device do not contact the sprocket; it is installed on the chainstay of the bicycle frame. The home-made cassette accessory does an excellent job of holding the bicycle chain on obstacles, but makes it very difficult to change gears.
Calm down cassette
A separate world is the installation of a damper at the rear. This is rarely required on professional bicycles, but “among the people” it is quite in demand. Actually, such a damper is not placed on a cassette and does not come into contact with the star, as is the case with the system. The designs, also called “tensioners,” are usually made up of a roller that is mounted on the chainstay at the top or bottom and a support mechanism (although it is not required). Sometimes, for the sole purpose of holding the chain, a frame is used instead of a roller.
The benefit of the device here is twofold, because, in addition to holding the chain on obstacles, such a damper interferes with switching and wastes energy. On the other hand, they are very easy to make yourself, and their usefulness is not difficult to test.
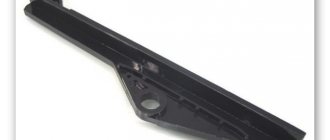
Chain guide for mounting on the frame stay
Types of fastening of factory dampers
At the moment, there are three standards for attaching a protective accessory:
- ISCG – mounting the device on a bicycle frame by fixing it with bolts at three points around the circumference. In this case, the standard distance between the mounting points is 47.77 mm.
- ISCG 05 is the most popular device mounting method, supported by many well-known brands of bicycles and bicycle accessories. With a total circle diameter of 73 mm, the distance between the fasteners is 55.92 mm.
- BB is a type of mounting on a carriage that presses the damper to the bicycle frame.
Option one. Correct
This option is suitable for those who have a properly prepared and properly stored bicycle. So, let's begin. You have a bicycle that was washed in the fall, its wheels were lowered, the switch and brake cables were loosened, the chain was removed from it and stored in a bag, and it was wintered in a dry room.
To begin with, simply wipe it with a slightly damp cloth, remove accumulated dust that can get on the mechanisms, and besides, it’s simply more pleasant to work with a clean and sparkling bicycle. Next, we make a small plan of what we need to do:
- Tidy up and put on the chain.
- Check and tighten all tightening and fastening bolts.
- Check that the wheels are in the “fighting position”.
- Adjust and tune the brakes.
And now about all this in order.
Installing a bicycle chain guide with your own hands
The principle of installing dampers of various types is almost identical. To install the protective accessory, you will need the following tools:
- connecting rod squeezer;
- set of hexagons;
- carriage remover;
- thread locker;
- a key for unscrewing the system's bonnets;
- lubricant
The algorithm of actions aimed at self-installation of the damper should be as follows:
- Remove the connecting rods and sprocket from the system. If necessary, you can unscrew the carriage in order to fix the star and guide in the correct position.
- Screw the “banana” to the “ears” of the carriage cup.
- Install the connecting rods in the standard position, pulling the chain onto the sprocket so that both rollers are in close contact with the washers. Please note: the fastening elements of the rollers must be tightened simultaneously on both sides (outer and inner).
- Leaving a minimum gap between the internal damper plate and the star, you need to tighten the three adjusting bolts.
After performing these simple manipulations, you need to make sure once again that all elements of the system are securely fixed. Next, you need to adjust the chain tension, alternately switching to the smallest and largest sprockets. The length of the chain can be adjusted as needed by lengthening or shortening it. Installation work has been completed.
( 68 votes, average: 4.88 out of 5)
Bicycle rack for rear door
Bicycle rack for car roof
Related Posts
How to make a bicycle chain tensioner
To save at least a little, you can make a bicycle chain tensioner yourself. But first of all, you need to understand why you need a chain stabilizer (aka tensioner) on a bicycle. This accessory is a protective element for bicycle transport. Thanks to the damper, the tension level of the chain mechanism is adjusted to prevent a decrease in vibrations when overcoming obstacles (jumping over stones, rails, and so on). In addition, the tensioner provides protection from mechanical damage and from sprockets. The damper is used on bicycles that have one speed or an internal shift mechanism.
Which chain guide for a bicycle is better?
There are only 3 types of standard tensioner settings:
Silencers differ not only in the type of installation, but also in other parameters:
- cost price;
- appearance;
- material;
- degree of protection.
The material can be used either high-quality metal or plastic. The cost of the product depends on these indicators.
DIY chain guide for bicycle
Spoke tensioner.
The tensioner can be made in various ways. The simplest one is made from ordinary one using pliers. Let’s just say this is an old-fashioned version that doesn’t look very nice, but is used by many. So, the spoke is bent into a spiral and placed on the transmission. The spiral must pull back the chain.
Aluminum plate tensioner.
Another, simplest manufacturing method can be considered a tensioner made of aluminum or duralumin plate. It is quite easy to make from scrap material, so for work you will need the following:
- aluminum or duralumin plate with a thickness of 8 to 11 mm;
- hacksaw and vice;
- technical oil;
- file and core;
- drill or drilling machine;
- hammer and drills;
- sandpaper;
- a tap having dimensions M10*1 and its holders.
Using a marker, you outline the old part on a metal blank, called a rooster, and then drill the central part of the hole. Next, the workpiece is sawed off as much as possible with a hacksaw and the external shape is brought to an ideal state with a file. Instead of a dropout, you can make a groove along the diameter of the shaft, which is subsequently inserted into the groove of the cock. Where the rooster is installed in the frame, there is a difference in width. Its width on a thin section should be 4 mm, and on a thick section – 8 mm.
Now you can finally drill the hole. Please note that the diameter of the drill should be slightly smaller than the diameter of the hole
. Especially if the metal is soft. It is best to use an electric drill, as a hand drill does not provide perfect accuracy. Then the thread is cut using translational and reciprocal movements.
IMPORTANT! The thread must be cut strictly perpendicular to the axes. To improve the appearance of the product, sand it with sandpaper and polish it
Don't forget to use .
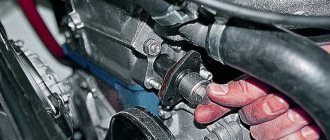
How to tension a chain on a simple bicycle
By “simple” we mean a bicycle with one rear driven sprocket. This can be either the classic design of a single-speed bicycle, which has one sprocket in front and one in the rear, and there is no ability to change gear ratios, or bicycles with a planetary hub. Although the latter have the same design (with one driving and driven sprocket), but due to the complex mechanism of the rear hub, which, in fact, is an analogue of a car’s gearbox, it is possible to change speeds. These schemes have one thing in common: the chain can be tensioned by shifting the axis of the rear hub. More on this later.
How to understand that the chain needs to be tightened
On bikes that don't have derailleurs or have a planetary hub, checking chain stretch is fairly easy. Pull it down with your fingers until it stops. The distance it has traveled should not exceed 10-15 mm.
But it should be emphasized that the chain should not be overtightened. Therefore, if the chain travel is less than 5 mm when pulled down, it should be loosened
Excessive tension results in greater pedaling effort and increased wear on the transmission, while too little tension can cause the transmission to fly off the front or rear sprockets.
Tension procedure
Turn the bike upside down. We loosen the bolts or eccentrics that secure the rear wheel in the grooves (dropouts) and tighten or loosen the chain tension by moving the wheel further or closer from the drive sprocket. Don't forget that it shouldn't be overtightened. After we have adjusted the required tension, we check the perpendicular position of the rear hub axis relative to the longitudinal axis of the bicycle. Tighten the fixing bolts or eccentrics.
There are times when it is no longer possible to move the bushing back. This tells us that the bicycle chain is too stretched and it would be advisable to replace it. But there is another way out. For this we need a squeeze. This device is designed to separate chain links. Thanks to it, you can remove several links, thereby shortening the chain. If you have a similar case, then a separate paragraph below in the article will contain brief instructions on how to remove unnecessary links.