Many Lada Vesta owners were faced with the need to dismantle the rear sofa and the entire seat. To do this, we contacted a car service. But, this procedure is carried out quite easily and simply with your own hands.
Video about dismantling all the seats on the Lada Vesta:
The video will show how quickly and without unnecessary hassle you can dismantle the rear seat, and will also tell you about some of the nuances and subtleties of the process.
Why remove the back seat?
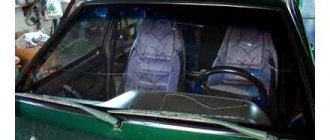
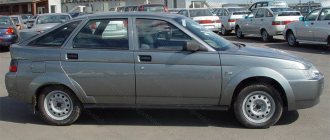
General view of the rear seat.
Of course, before considering the issue of carrying out the process of dismantling the rear seat of the Lada Vesta, it is necessary to understand in what cases this procedure will be needed.
So, let's consider in more detail in what cases it will be necessary to remove the sofa and the back of the car:
- To replace upholstery . This is often done when tissue elements are damaged. This could be holes burnt by cigarettes, spilled liquids, an accidentally torn surface, or, in extreme cases, a fire inside the car.
- Carrying out repair and restoration work on the body . It often happens that after a traffic accident, the rear part of the vehicle is damaged and deformations appear along the bottom of the cabin. This also includes side impacts in the area of the B-pillar and rear pillar.
- Replacement of upholstery or seats during the process of tuning and modification of the interior. In this case, you just need to remove the sofa and the back of the rear seat.
- Pasting soundproofing will also require dismantling the rear seat, since it is necessary to get to the bottom of the car.
- Other factors that will require dismantling the rear sofa and backrest.
Removing the rear seat of a Lada Vesta
The process of removing the rear seat on a Lada Vesta is quite simple and quite typical for all vehicles of the VAZ family. This procedure can be carried out in one pair of hands and requires minimal tools.
Let's consider the sequence of actions aimed at dismantling the rear seat:
- Of course, the manufacturer recommends removing the negative terminal from the battery when carrying out all repair and restoration operations. But, in this case, this is not necessary, so we will skip this operation.
- Let's start dismantling. First you need to dismantle the sofa. To do this, lift it up to remove it from the clamps.
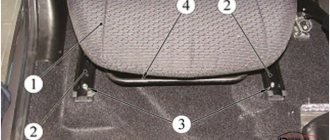
Location of the rear sofa seat latch.
Location of the rear sofa fastenings.
Rear seat back bolt locations.
Location of the rear backrest fastenings.
The installation process is identical to the dismantling process in reverse order.
Sequence of assembly of rear seats on Lada Vesta
After all the repair work is completed, you need to correctly put the rear seats of the car in place. To do this, follow the instructions:
- Install vertical backrests.
- Screw them in with special bolts.
- Fasten the seat belt, which is located in the middle.
- Secure the chair in the brackets.
- Gently press the front edge of the chair, finally installing it.
Caution and a serious approach to business will help you quickly and easily dismantle the seats on the Lada Vesta. The process of putting the seats back is easier than removing them and will not take much time. To do everything right, you can watch a video on dismantling the rear seats on a Lada Vesta car.
conclusions
As you can see, there is nothing difficult in the process of removing the rear seat of a Lada Vesta, and it is carried out quickly and in one pair of hands. Installation, like dismantling, can be done independently in your garage or even on the street
Car seat covers are not just about protecting car seats. This is also an element of the car’s interior, and quite an important one. The appearance of the seats radically changes the appearance of the interior as a whole, depending on the covers. Some people select covers to match the color of the car, others to match the color of the interior, while others, on the contrary, contrast the color of the covers and the car.
How to remove Lada Vesta seats
You can easily dismantle the Lada Vesta seats yourself, without going to a car service center. This is often necessary for:
- Replacement of covers or damaged upholstery;
- Gaining access to body parts for the purpose of repairing them;
- Tuning the interior in order to improve or refine it;
- Improved sound insulation and other tasks.
The front and rear seats are removed differently. The best place to start is on the sofa. An experienced user of Tolyatti cars knows how to remove the back seat of a Lada Vesta, because this process is typical for all AvtoVAZ products. The procedure is as follows:
- The battery turns off;
- The seat is raised simultaneously from both sides, as a result of which it is removed from the latches;
- The raised seat is moved towards the trunk, and then its edge adjacent to the backrest is raised upward so that the staples come off the brackets;
- The sofa seat can be removed from the interior;
- Next comes the turn of the back. First, unscrew the seat belt fastenings at the upper corners of the backrest;
- The lower backrest fastenings are unscrewed (in the lower corners);
- The backrest rises and pops out of the grooves attached to the body;
- Now we have it in our hands and can take it out of the cabin.
If the described instructions are not too clear, we suggest you watch how to remove the rear seat of a Lada Vesta in the video at the bottom of the article. Once we have a place to slide the front seats, removing them becomes much easier if we follow this order:
- The seats move as far back as possible;
- At the front end of the guides along which the seats slide back and forth, the heads of the bolts that hold the seats to the body become visible. We unscrew them;
- Next, the seats move forward, closer to the dashboard;
- We find similar bolts on the guide slides on the side of the rear seat and also unscrew them;
- Now the seats can be lifted and taken out of the cabin. In fact, four bolts hold each front seat together.
Now you have the space to implement further plans to maintain, repair and improve the interior of your car.
Should I put covers on the seats or not?
This is the personal choice of the car owner. But generally, cases have more pros than cons. Of course, if you put cheap covers from the market on beautiful seats, the interior of the car will lose a lot in terms of appearance. But more often it’s the other way around - the standard seat upholstery looks so-so, but good covers give it a more expensive, beautiful look. Often already worn out seats are covered with covers.
Another undeniable advantage of covers is in terms of practicality. They can be removed and washed, wiped, vacuumed. And the standard upholstery underneath is like new. Before selling the car, you can remove the covers if they are frayed and sell the car with apparently new seats. The covers can be changed just like that if you get tired of them. Buy and supply a different color, a different material...
What types of covers are there for Vesta?
Cases are different. There are “shirts” that usually cover only the front seats. There are covers that completely cover all seats.
Car covers come in different materials. And at different prices. From two or three thousand in the nearest market to several tens of thousands. There is also a complete refurbishment of the interior, but that’s a slightly different conversation.
Covers are made from leather, faux leather, synthetic fabric, velor, vinyl, Alcantara and even sheepskin.
Synthetic fabric covers are very comfortable and inexpensive. Easy to remove, wash and put back in place. But there are some disadvantages: they look simple, they slip in the heat, and they don’t absorb moisture well.
Velor covers are pleasant to the touch, beautiful, and do not heat up or cool down very much. It’s quite comfortable with them, but...there are also disadvantages. They wear out, velor is short-lived. Such covers often have to be replaced.
Vinyl covers are cheap, bright, but very uncomfortable. They overheat greatly and become tanned in the cold. No comfort.
Today we will install eco-leather covers on Vesta.
The central inserts are perforated. Since the car is silver, the covers are gray and black. Cases from the middle price category - without weights.
Let's start with the driver's seat, as it is the most difficult. First you need to remove it. You can put the covers on in place, but it will be more difficult and the result will be worse.
First of all, remove the headrest. We just pull it up.
Then we move the seat as far back as possible to get to the front bolts.
Use a Torx 40 wrench to unscrew these bolts.
After this, move the seat completely forward. Use the same torx to unscrew the two rear bolts.
Don’t forget to disconnect the connectors for heated seats and the passenger sensor (in the case of a passenger seat). The photo shows the connectors (bottom view):
Remove the lumbar support handle (if equipped).
To do this, you need to pull out the retaining bracket.
After this, you can remove the handle itself.
Carefully remove the seat from the car. It is advisable to call an assistant so as not to scratch the car body.
Depending on the weather, the seat can be taken home or to the garage for further action. You can continue to practice outside.
The seat lift handle can now be removed. The cover has a slot for a screwdriver.
We pry up and remove the decorative cover.
Under the cover we find two screws securing the handle.
Using a shaped screwdriver, unscrew them and remove the elevator handle.
The plastic cover on the side of the seat is held in place by latches. Carefully pry them off with a screwdriver and pull them out. Some latches need to be squeezed with pliers.
The casing does not need to be completely removed. Simply unclip the latches and thread the case using a ruler, for example, through the casing. If necessary, the casing can be removed; inside it is held on by a couple of latches.
On the other hand, the backrest reclining handle will interfere with removing the cover. It is held on a metal lever with a single latch. Bend it and remove the handle. Now you can remove this side panel.
We put the cover on the lower seat cushion. We thread, pull, tie and hook all the elastic bands and cords, depending on the model of the covers. Here we simply put rubber bands on the springs of the seat cushion, tightened and tied the main tightening cord of the covers. You can use special hooks from the cover set.
That's it, the bottom pillow is ready.
Assembling the seat. We install and snap back the plastic sides, put the elevator handle and the backrest tilt handle in place.
Next, we put the cover on the back of the seat. In some places, you may have to unfasten the standard seat trim. But there is no need to remove it completely. We tie all the laces and the cover is in place!
Find the location for installing the lumbar support handle.
Cut a hole large enough to fit the handle into place. The base of the handle should fit inside the cut out circle. It is better to cut with a scalpel or a stationery knife.
How to remove the back seat on a West
LADA VESTA. SEATS - REMOVAL AND INSTALLATION
Place the car on the workbench.
Open the hood and disconnect the earth wire terminal from the battery (spanner 10).
Removing the front seat.
Push lever 4, Figure 8-1, up and move seat 1 to the rearmost position.
1 — front seat;
3 — bolt of the front fastening of the slide;
4 - lever for moving the front seat
Unscrew the two bolts 3 securing the slide 2 (replaceable Torx T40 head, knob).
Depress the lever and move the seat to the forward position.
Unscrew the two rear bolts 1, Figure 8-2, securing the slide, disconnect the rear wiring harness blocks from the seat, remove the seat (replaceable Torx T40 head, knob).
Removing the rear seat.
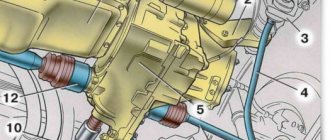
Take your hands by the front edge of the cushion 1, Figure 8-3, of the rear seat and pull it up until the loop 2 of the cushion frame comes out of the hole of the clamp 3 on the body. Repeat this operation on the other side of the seat.
Grasp the cushion 1, Figure 8-4, of the rear seat, move it back towards the trunk, then lift the rear edge of the cushion to remove the hinge 2 of the cushion frame from the grip 3 on the body. Repeat this operation on the other side of the seat and remove the rear seat cushion from the vehicle interior.
Unscrew bolt 5, Figure 8-5, securing the right seat belt buckle and the lower mounting point of the middle seat belt (replaceable head 14, knob).
Unscrew bolt 3 securing the rear seat back bracket to the body floor (replaceable head 14, knob).
Tilt the right backrest 4 and the left backrest 6 forward by pulling up the locks 1 and 2.
1 — lock of the right back of the rear seat;
2 — lock of the left back of the rear seat;
3 — rear seat back bracket mounting bolt;
4 — back of the rear seat, right;
5 — bolt securing the lock of the right and lower point of the middle seat belt;
6 — rear seat back left
Unscrew bolts 1, Figure 8-6, securing the brackets for the left 2 rear seat backrest, remove the backrest (replaceable head 14, knob).
Unscrew the bolts 1 securing the right 3 rear seat backrest brackets, remove the backrest (replaceable head 14, knob).
Install the seat in the reverse order of removal. When installing the front seats, apply Fiol-1 lubricant to the rubbing surfaces of the slides. Consumption rate is 10 g per seat.
Figure 8-6 — Fastening the rear seat back: 1 — bolt for fastening the rear seat back bracket; 2 — rear seat back left; 3 — rear seat back right
Present the vehicle to the Quality Control Department. The quality control department will check the vehicle for compliance with the requirements of this TI and TU 017200-254-0023934 in the scope of work performed.
How to put on rear covers
First of all, remove the rear sofa cushion. We simply pull the front part of the sofa up. There are latches. Here is the mounting bracket in the photo on the removed pillow, bottom view:
Thanks for subscribing!
And the mount itself. Rear seat strip. It may break when the bracket on the pillow is pulled out of it, then it must be replaced.
Then we move the entire cushion of the back sofa towards the back. There are hooks under the back that hold the pillow.
We spread the pillow cover in a convenient place - on a table or workbench, face down. Place a sofa cushion on top (upside down). We stretch the cover, fasten all the elastic bands, tie the laces.
The rear sofa cushion is ready. Let's put it aside. We take hold of the back of the rear seat.
Remove the three rear head restraints. Immediately put covers on them and put them aside. The smallest headrest is medium. The case on it is also smaller, keep that in mind.
Next up is most of the backrest.
Using a 14mm socket, unscrew the lower fastening of the middle seat belt. The belt remains on the back of the seat.
Unscrew the front two bolts and two more at the back. We use a 13mm head.
Carefully, so as not to hit the car body, we pull out part of the backrest from the car. We place it on the table.
Remove the isofix child seat mount, which is located on the back side of the backrest. To do this, pry up the fasteners with a flat screwdriver and pull the fastener out of the back.
It is better not to remove the cover near the back recline button unless necessary. Very delicate fastenings, can be broken. It's better to just slide the cover under it.
These covers have a flap around the seat belt. After putting on the covers, you just need to fasten it with Velcro.
Then we thread the headrest locks.
We insert the child seat mount back.
Where necessary, we tighten it, tie the laces, and fasten the clasps of the case. The backrest can be replaced. With the second, smaller part of the back, we repeat all the points. We also install it in place, tighten the backrest mounting bolts and fasten the middle seat belt. Place the sofa cushion in place.
That's it, eco-leather covers on the seats. If small wrinkles have formed, don’t worry; they will smooth out over time. But the more you tighten the covers during installation, the better. This is a relatively budget option. There are covers that are twice as expensive, they need to be tightened, stitched, etc. But these look not bad either, better than the standard non-luxury seat upholstery, although this is also not for everyone.
Now you don't have to worry about getting your seats dirty. By the way, during the installation process, these new covers got dirty with grease like grease, all the bolts were in it. So the grease was wiped off with a damp cloth, not a trace remained, which pleased me.
Here are photos to compare the standard upholstery and seats with covers.
Rear seat disassembly sequence
In order to carry out repairs or installation without causing damage to property, we follow the sequence of disassembly. The first thing you need to do is remove the rear sofa of the Lada Vesta. To do this, carefully feel the latches in front with your hands and pull them up. The latches will release and it will rise. There is no need to raise it high.
The next step is to move it towards the trunk and lift the edge located near the trunk up until the brackets come out of the brackets. Now you can remove the back seat and remove it from the Lada’s interior.
Important!
When releasing the lower seat from its fastenings, be careful; it may break. The latches coming out of alignment can also occur when the Vesta seat is put back into place. They are made of fairly hard plastic and are quite fragile.
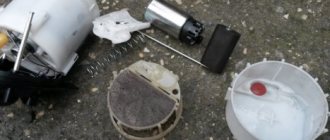
If the gas tank equipment needs to be replaced or repaired, there is no need to remove the backrests. Under the noise insulation carpet there is a hatch with a fuel pump.
In order to disconnect the middle fastening of the seat belts, use a socket wrench with a 14-mm head to unscrew the screw, and then remove it. All work is carried out carefully, since the manufacturer lubricates all bolted connections with grease before assembly.
Unscrew the side screw of the bracket. There are two of them, one for each back. In this case, we use the head at 13. After this, we release the seat cushions from the clamps and tilt them forward. We unscrew one more 13 bolt from the back and you can remove the seat on Vesta.
How to remove the front seat of a Lada Vesta Sedan
The process description is suitable for many car brands.
- We place the car on a level surface and open the front doors.
- Move the driver's seat all the way back. Remove two screws (head 10).
- Move the chair forward as far as possible and unscrew the two screws at the back. The size is similar.
- We remove the chair from the car interior and place it on the surface of the workbench for work.
Using the same principle, we remove the front seat of the Lada Vesta.
Unlike “Classic”, “Lux” and “Comfort” chairs have:
- greater rigidity;
- lateral support;
- quality of fabric upholstery;
- the presence of an armrest;
- heating system.
Reviews
| № | Positive |
| 1. | Vasily , 35 years old (drive2.ru) Sverdlovsk: with my height of 178 cm, there is more than enough legroom in the trunk. I regularly go night fishing with my friends. |
| 2. | Petrovich , 42 years old (prom.ua), Krasnodar: in order not to scuff the interior upholstery, I put on covers, now I fold the seats and don’t worry about damaging the fabric. |
| 3. | Dmitry , 35 years old (autotoday.com), Omsk: the trunk of the Lada Vesta is not the largest, but there is enough space for one person of average height. In emergency situations, a child can also be accommodated. |
| 4. | Ivan Gennadievich , 45 years old (rozetka.ua), Rostov-on-Don: there is enough space in the back, I always relax in comfort. I place the sofa in the front row and fold the backrest 180°. In Lada Vesta, the recreation area is well implemented. |
| 5. | Mikhailovich , 43 years old, Kursk (avtoflit.com): I can’t say anything bad about the salon, I’ve laid out the chairs several times. There is enough space for an average build. It will be difficult for obese passengers to climb and position themselves. |
| 6. | Valentin , 33 years old, Voronezh (autotoday.com): every weekend we go out of town, we spend the night in a tent, and the child is only in the car, he really likes it. |
| Negative | |
| 7. | Nikolaevich , 38 years old (prom.ua), Saratov: I am 185 cm tall, there is not enough space, my legs are bent at the knees. It is extremely difficult to spend the night in this position. |
| 8. | David , 44 years old, Moscow (avtoflit.com): the recreation area is poorly implemented in the Lada Vesta. For example, in Renault Logan the design is more flexible, you can customize it to suit yourself. |
| 9. | Ivan , 32 years old, Voronezh (drive2.ru): when folded, the backrest creaks, which interferes with sleep. A long rest is impossible, so just a short rest for a couple of hours. |
| 10. | Valery , 35 years old, Pskov (autotoday.com): in general, there is enough space with the backrest folded, but I would like more, since I need to arrange things and food. |
Removing the back of the rear seat on a Lada Vesta
- Unscrew the seat belt fastenings on the left and right side of the backrest (bolts at “14”).
- Unscrew the screws at the base of the back (2 in total).
- We unfasten the fastening one by one and remove the backrest from the car interior.
If necessary, we carry out preventive maintenance and install in the reverse order. On the Lada Vesta SV station wagon, the rear seat is removed by pressing the side plastic latches and folding the backrest to a horizontal position.
Rear seat layout
To fold the rear seat on a Vesta, pull the lock on the backrest up. As a result, the rear seats fold almost horizontally, but there is no flat floor. The folded backrest is approximately 10-15 cm higher than the level of the trunk floor. Alternatively, raise the trunk floor (raised floor).
How to fold out the rear seats on a Lada Vesta
Transformation of Vesta's salon on video:
Read also instructions for removing Vesta seats, as well as a comparative review of all LADA car seats.
LADA reveals the interior of the new LADA Vesta SW Cross and LADA Vesta SW, which combine expressive design and versatility. Bright and fast, these cars embody a new philosophy of comfort and functionality, complementing the model range of one of the most popular cars on the Russian market - LADA Vesta.
The interior of LADA Vesta SW Cross and LADA Vesta SW is made in a single concept with the body design and represents a real living space. Especially for Vesta SW Cross, designers created a bright orange color scheme for the interior design - these cheerful accents are used on the doors, dashboard and seat upholstery. Stylish lighting decorated the dashboard - the instrument cluster scales now have an orange border.
Equipment that was previously unavailable and, as a rule, used on models of a higher class deserves special attention. This is the first introduced three-stage heated front seats, a center console with an armrest and a storage box, equipped with a USB port, a socket and buttons for heated rear seats, a rear center armrest with cup holders.
Thanks to the use of a new concept in the body design, the space above the heads of the rear passengers was increased by 2.5 cm, and the back of the rear sofa folds in a ratio of 1/3 to 2/3. The luggage compartment of the car is a multifunctional space, equipped with a double floor, an organizer, three nets for securing cargo, and various niches. The luggage compartment volume, taking into account the niches, is 480 liters (up to the curtain shelf), including 95 liters under the false floor, and the luggage compartment volume with the second row seats folded (up to the window sill line) is 825 liters. The luggage compartment is accessed using a button located on the trunk lid.
How to put covers on a Lada Vesta without removing the front seats
Standard set of covers:
- front and rear headrests (2 pieces each, plus one small one);
- front backrests (2 pcs.);
- base (2 pcs.);
- backrest is composite (2 pcs.);
- rear sofa (1 piece).
Before you start putting on the covers, remove the seat pad and the plastic handle for the lumbar support.
- To do this, we press the casing at the location of the handle, and use pliers to squeeze the metal bracket out of the core.
- Pull the cover carefully without damaging the fabric.
- We put the braid under the bottom of the chair, pull it through, and tie it in a knot. We first move the chair forward (backward) all the way for convenience.
- We put the covers on the backrests, tuck the material under the plastic clamps of the headrests. You can remove them with a flat screwdriver or by hand.
- We insert the braid into the gap between the back and the base, pull it tight, and tie the thread.
By analogy, we put covers on the passenger seat.
How to remove the front seats and rear sofa of Lada Vesta
It is necessary to remove car seats when installing covers, as well as for repairs or modifications to the interior. The process is not complicated, but it has some features that are best known in advance. For example, in addition to the usual tool (14 head), you will also need a Torx T40 (asterisk). Let's look at the process of removing Vesta seats.
Front seats
Move the seat as far back as possible. Remove the two front skid mounting bolts.
Move the seat all the way forward and remove the two rear mounting bolts. Disconnect the connectors with the heating wires and remove the front seat.
Installation is carried out in reverse order. Apply Fiol-1 lubricant to the rubbing areas of the slide, 10 g per seat.
Backseat
To remove the rear sofa on Vesta, lift the cushion up so that the front fastening (hinges No. 2) comes out of the hole in the fastener (No. 3).
Move the rear seat towards the trunk, then lift it up so that the hinge (No. 2) comes out of its engagement on the body (No. 3). Remove the rear seat.
Remove the bolt (No. 5) securing the right seat belt buckle and the lower mounting point of the middle belt. Unscrew the four bolts (No. 3) of the lower fastening of the sofa backrest. Pull the latches (No. 1 and 2) up and tilt the backrest forward.
Remove the bolts (No. 1) and then remove the rear seat backrest.
The process of removing the front and rear seats of Vesta is also shown in the video:
Let us remind you that model covers will help improve the interior of Vesta, as well as preserve the interior from aging.
Key words: Lada Vesta seats
Found an error? Select it and press Ctrl+Enter..
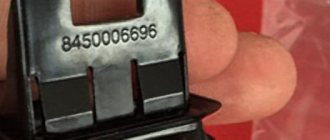
Purchase and replacement of rear seat latches Lada Vesta
The luggage compartment of the car is spacious, but sometimes it is not enough to transport oversized cargo. The owners remove the back and dismantle the sofa.
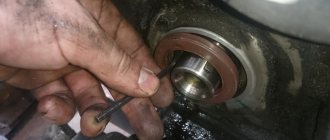
During frequent installation and dismantling, the mountings for fixing the pillow wear out. The material is plastic and will crack if not handled carefully.
| Name / catalog article | Price in rubles |
| Latch 8450006696 (old model) | From 150 |
| 8450030620 (new sample) | From 190 |
| Analogs from General Motors A2656521 | From 170 |
*prices are as of March 1, 2019.
Conclusion
The process of dismantling the front seats and rear sofa is simple. If you follow the described recommendations, installing the covers will take no more than half an hour.
How effective the covers are is up to you to decide individually. Don’t forget that every time you get into the car you rub down the seats, subsequently holes and scuffs form. The service life of the seat is reduced by a third. When selling a car, worn out (damaged) seats serve as the basis for a discount on the price of the car.