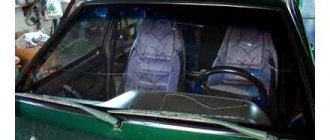
Many Lada Vesta owners were faced with the need to dismantle the rear sofa and the entire seat. To do this, we contacted a car service. But, this procedure is carried out quite easily and simply with your own hands.
Video about dismantling all the seats on the Lada Vesta:
The video will show how quickly and without unnecessary hassle you can dismantle the rear seat, and will also tell you about some of the nuances and subtleties of the process.
Why remove the back seat?
General view of the rear seat.
Of course, before considering the issue of carrying out the process of dismantling the rear seat of the Lada Vesta, it is necessary to understand in what cases this procedure will be needed.
So, let's consider in more detail in what cases it will be necessary to remove the sofa and the back of the car:
- To replace upholstery . This is often done when tissue elements are damaged. This could be holes burnt by cigarettes, spilled liquids, an accidentally torn surface, or, in extreme cases, a fire inside the car.
- Carrying out repair and restoration work on the body . It often happens that after a traffic accident, the rear part of the vehicle is damaged and deformations appear along the bottom of the cabin. This also includes side impacts in the area of the B-pillar and rear pillar.
- Replacement of upholstery or seats during the process of tuning and modification of the interior. In this case, you just need to remove the sofa and the back of the rear seat.
- Pasting soundproofing will also require dismantling the rear seat, since it is necessary to get to the bottom of the car.
- Other factors that will require dismantling the rear sofa and backrest.
Removing the rear seat of a Lada Vesta
The process of removing the rear seat on a Lada Vesta is quite simple and quite typical for all vehicles of the VAZ family. This procedure can be carried out in one pair of hands and requires minimal tools.
Let's consider the sequence of actions aimed at dismantling the rear seat:
- Of course, the manufacturer recommends removing the negative terminal from the battery when carrying out all repair and restoration operations. But, in this case, this is not necessary, so we will skip this operation.
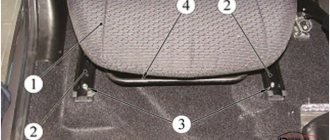
- Let's start dismantling. First you need to dismantle the sofa. To do this, lift it up to remove it from the clamps.
Location of the rear sofa seat latch.
Location of the rear sofa fastenings.
Rear seat back bolt locations.
Location of the rear backrest fastenings.
The installation process is identical to the dismantling process in reverse order.
conclusions
As you can see, there is nothing difficult in the process of removing the rear seat of a Lada Vesta, and it is carried out quickly and in one pair of hands. Installation, like dismantling, can be done independently in your garage or even on the street
Car seat covers are not just about protecting car seats. This is also an element of the car’s interior, and quite an important one. The appearance of the seats radically changes the appearance of the interior as a whole, depending on the covers. Some people select covers to match the color of the car, others to match the color of the interior, while others, on the contrary, contrast the color of the covers and the car.
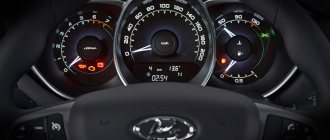
Checking the operation of the heated windshield
The efficiency of the windshield heating, like other heating systems in the car, depends on the ambient temperature. Vesta owners have noticed that at -3 degrees, only 3.5 minutes are enough for the ice and snow from the windshield to melt. Then we make one sweep of the wipers and all the ice goes away:
At lower temperatures, for example, when it is -20 degrees outside, the windshield heats up more slowly. Thanks to the heater, after 3-4 minutes the first signs of thawing appeared at the bottom of the glass. The main part of the ice disappears only after 7-10 minutes, you can go.
By the way, if the filaments are clearly visible inside the glass and the heating does not work, contact your dealer with this question; it is possible that this option is simply not activated on your car.
On Lada Vesta SW and Lada Vesta SW Cross, the heated windshield is activated with a separate button. Heating efficiency on video:
Should I put covers on the seats or not?
This is the personal choice of the car owner. But generally, cases have more pros than cons. Of course, if you put cheap covers from the market on beautiful seats, the interior of the car will lose a lot in terms of appearance. But more often it’s the other way around - the standard seat upholstery looks so-so, but good covers give it a more expensive, beautiful look. Often already worn out seats are covered with covers.
Another undeniable advantage of covers is in terms of practicality. They can be removed and washed, wiped, vacuumed. And the standard upholstery underneath is like new. Before selling the car, you can remove the covers if they are frayed and sell the car with apparently new seats. The covers can be changed just like that if you get tired of them. Buy and supply a different color, a different material...
What types of covers are there for Vesta?
Cases are different. There are “shirts” that usually cover only the front seats. There are covers that completely cover all seats.
Car covers come in different materials. And at different prices. From two or three thousand in the nearest market to several tens of thousands. There is also a complete refurbishment of the interior, but that’s a slightly different conversation.
Covers are made from leather, faux leather, synthetic fabric, velor, vinyl, Alcantara and even sheepskin.
Synthetic fabric covers are very comfortable and inexpensive. Easy to remove, wash and put back in place. But there are some disadvantages: they look simple, they slip in the heat, and they don’t absorb moisture well.
Velor covers are pleasant to the touch, beautiful, and do not heat up or cool down very much. It’s quite comfortable with them, but...there are also disadvantages. They wear out, velor is short-lived. Such covers often have to be replaced.
Vinyl covers are cheap, bright, but very uncomfortable. They overheat greatly and become tanned in the cold. No comfort.
Today we will install eco-leather covers on Vesta.
The central inserts are perforated. Since the car is silver, the covers are gray and black. Cases from the middle price category - without weights.
Let's start with the driver's seat, as it is the most difficult. First you need to remove it. You can put the covers on in place, but it will be more difficult and the result will be worse.
First of all, remove the headrest. We just pull it up.
Then we move the seat as far back as possible to get to the front bolts.
Use a Torx 40 wrench to unscrew these bolts.
After this, move the seat completely forward. Use the same torx to unscrew the two rear bolts.
Don’t forget to disconnect the connectors for heated seats and the passenger sensor (in the case of a passenger seat). The photo shows the connectors (bottom view):
Remove the lumbar support handle (if equipped).
To do this, you need to pull out the retaining bracket.
After this, you can remove the handle itself.
Carefully remove the seat from the car. It is advisable to call an assistant so as not to scratch the car body.
Depending on the weather, the seat can be taken home or to the garage for further action. You can continue to practice outside.
The seat lift handle can now be removed. The cover has a slot for a screwdriver.
We pry up and remove the decorative cover.
Under the cover we find two screws securing the handle.
Using a shaped screwdriver, unscrew them and remove the elevator handle.
The plastic cover on the side of the seat is held in place by latches. Carefully pry them off with a screwdriver and pull them out. Some latches need to be squeezed with pliers.
The casing does not need to be completely removed. Simply unclip the latches and thread the case using a ruler, for example, through the casing. If necessary, the casing can be removed; inside it is held on by a couple of latches.
On the other hand, the backrest reclining handle will interfere with removing the cover. It is held on a metal lever with a single latch. Bend it and remove the handle. Now you can remove this side panel.
We put the cover on the lower seat cushion. We thread, pull, tie and hook all the elastic bands and cords, depending on the model of the covers. Here we simply put rubber bands on the springs of the seat cushion, tightened and tied the main tightening cord of the covers. You can use special hooks from the cover set.
That's it, the bottom pillow is ready.
Assembling the seat. We install and snap back the plastic sides, put the elevator handle and the backrest tilt handle in place.
Next, we put the cover on the back of the seat. In some places, you may have to unfasten the standard seat trim. But there is no need to remove it completely. We tie all the laces and the cover is in place!
Find the location for installing the lumbar support handle.
Cut a hole large enough to fit the handle into place. The base of the handle should fit inside the cut out circle. It is better to cut with a scalpel or a stationery knife.
Thoughtful design
In a passenger car, the manufacturer assumes in such a situation that the interior will be transformed. To increase trunk loading volume, the rear seats can be folded down. As a rule, they fold out in a 60/40 ratio (in some models the ratio is different, but this is rather an exception) and form a work surface combined with the trunk space.
You can load large cargo into such a space without any problems. Due to the extended loading zone, the car can now fit a refrigerator, a cabinet, and massive boxes. You just need to understand that, although the rear seats are upholstered on the trunk side with a different material that is more resistant to mechanical stress, it is still a material and not a hard surface. Corners and protruding parts of oversized cargo can tear this upholstery, then you will have to re-tighten the seats. Therefore, many drivers protect the upholstery by laying down a blanket or just a large rag.
The technology is simple. There is a lever at the top of the seat. Before unfolding the rear seats, press down on it and fold their lower part towards the back of the driver's seat. It folds back behind a loop sewn closer to the middle of the section at the junction of the upper and lower parts, or on the side of the seat. With it in a vertical position, press the lever and lower the top of the rear seat. Sometimes (in some car models) you also need to pull the seat belt to the side to do this.
The upper and lower parts of the rear seat, when unfolded, should support each other, creating a stiffening rib. This is necessary so that a heavy load, if it falls on the folded back of the seat, does not push it through. Fold out the second part of the seat in the same way. We deliberately do not say “the second half” because the ratio, as mentioned above, is usually not 50/50, but 60/40, that is, one part is larger than the other. Why was this done?
If you want to save part of the rear seat for the passenger, but not the entire width of the cabin is needed for cargo, but only a part, you fold out the corresponding part of the rear seat, leaving the second for normal use.
How to put on rear covers
First of all, remove the rear sofa cushion. We simply pull the front part of the sofa up. There are latches. Here is the mounting bracket in the photo on the removed pillow, bottom view:
Thanks for subscribing!
And the mount itself. Rear seat strip. It may break when the bracket on the pillow is pulled out of it, then it must be replaced.
Then we move the entire cushion of the back sofa towards the back. There are hooks under the back that hold the pillow.
We spread the pillow cover in a convenient place - on a table or workbench, face down. Place a sofa cushion on top (upside down). We stretch the cover, fasten all the elastic bands, tie the laces.
The rear sofa cushion is ready. Let's put it aside. We take hold of the back of the rear seat.
Remove the three rear head restraints. Immediately put covers on them and put them aside. The smallest headrest is medium. The case on it is also smaller, keep that in mind.
Next up is most of the backrest.
Using a 14mm socket, unscrew the lower fastening of the middle seat belt. The belt remains on the back of the seat.
Unscrew the front two bolts and two more at the back. We use a 13mm head.
Carefully, so as not to hit the car body, we pull out part of the backrest from the car. We place it on the table.
Remove the isofix child seat mount, which is located on the back side of the backrest. To do this, pry up the fasteners with a flat screwdriver and pull the fastener out of the back.
It is better not to remove the cover near the back recline button unless necessary. Very delicate fastenings, can be broken. It's better to just slide the cover under it.
These covers have a flap around the seat belt. After putting on the covers, you just need to fasten it with Velcro.
Then we thread the headrest locks.
We insert the child seat mount back.
Where necessary, we tighten it, tie the laces, and fasten the clasps of the case. The backrest can be replaced. With the second, smaller part of the back, we repeat all the points. We also install it in place, tighten the backrest mounting bolts and fasten the middle seat belt. Place the sofa cushion in place.
That's it, eco-leather covers on the seats. If small wrinkles have formed, don’t worry; they will smooth out over time. But the more you tighten the covers during installation, the better. This is a relatively budget option. There are covers that are twice as expensive, they need to be tightened, stitched, etc. But these look not bad either, better than the standard non-luxury seat upholstery, although this is also not for everyone.
Now you don't have to worry about getting your seats dirty. By the way, during the installation process, these new covers got dirty with grease like grease, all the bolts were in it. So the grease was wiped off with a damp cloth, not a trace remained, which pleased me.
Here are photos to compare the standard upholstery and seats with covers.
Featured Posts
sailor 2
Can the passenger seat backrest be folded forward?
And how difficult is it to make it removable? Ideally, I would like to be able to remove this seat to transport length meters, and then put it back.
Alex Puff 3896
- Master of good deeds
- Administrators
- 3896
- 6759 publications
- My name: Alexey
- Moscow city
- Car model: Was T30 2.0 Mitsubishi Pajero 3.0 AT 2018
- Club card No.: B0008
It would be nice to clarify what kind of car.
Leshy 37
- X-trailomaniac
- Super ICS guides
- 37
- 265 publications
- My name: Leshy
- Moscow city
You can remove everything that was previously screwed on)))))
Anything that doesn’t fit between the front seats is best carried on a roof or trailer, especially on a permanent basis.
Dikobrazzi 6731
The seat can be removed simply - 4 screws and disconnect the electrical adjustment connector.
sailor 2
- X-trailer
- X-trail guides
- 2
- 32 publications
- Moscow city
It would be nice to clarify what kind of car.
X 2013 with diesel and automatic transmission
Smash 651
- Major X
- X-Trail Experts
- 651
- 3046 publications
- My name is Sergey
- City: St. Petersburg, Bolshevikov metro station
- Car model: T31 2.5 LE+ MCVT
The seat can be removed simply - 4 screws and disconnect the electrical adjustment connector.
The seat is yes, the question is about the back.
clubmaxima_vav 219
- X-trail guru
- Super ICS guides
- 219
- 717 publications
- My name: Anatoly
- Moscow city
- Car model: T-30, KIA Sorento
The seat can be removed simply - 4 screws and disconnect the electrical adjustment connector.
and also pillows, and then reset the error....
X 2013 with diesel and automatic transmission
I saw such a feature in the salon. The rear seat is removed (quite simply - the latch is pulled out), the backrest is placed forward on a flat floor, the front seat is all the way forward and the backrest is electrically lowered back flush with the seat. But it was on a leather X. Here's a friend on a rag, the back of the front one doesn't reach the flat floor. Fits on the back with overlap. It doesn’t work on the T-30 either (that’s understandable, the car is shorter).
sailor 2
- X-trailer
- X-trail guides
- 2
- 32 publications
- Moscow city
and also pillows, and then reset the error....
I saw such a feature in the salon. The rear seat is removed (quite simply - the latch is pulled out), the backrest is placed forward on a flat floor, the front seat is all the way forward and the backrest is electrically lowered back flush with the seat. But it was on a leather X. Here's a friend on a rag, the back of the front one doesn't reach the flat floor. Fits on the back with overlap. It doesn’t work on the T-30 either (that’s understandable, the car is shorter).
Do I understand correctly that the front seat can be removed as one module along with the backrest?
Alex Puff 3896
- Master of good deeds
- Administrators
- 3896
- 6759 publications
- My name: Alexey
- Moscow city
- Car model: Was T30 2.0 Mitsubishi Pajero 3.0 AT 2018
- Club card No.: B0008
Yes, right.
Once again, be prepared for errors in the SRS system, that is, airbags.
iv-325 160
- X-trailomaniac
- Super ICS guides
- 160
- 377 publications
- My name: Igor
- City: Astrakhan
- Car model: T-31 LE 2011, diesel, automatic, sunroof, chandelier.
- Club card No.: B1051
I saw such a feature in the salon. The rear seat is removed (quite simply - the latch is pulled out), the backrest is placed forward on a flat floor, the front seat is all the way forward and the backrest is electrically lowered back flush with the seat. But it was on a leather X.
This is really a trick, I have never seen or heard of this. I have just this option (skin), I need to try it.
And initially my friend was interested in folding, and not disassembling, the front seat. On the Nissan Pathfinder, it is the back that rests on the seat in front, resulting in a quite decent table for the owner’s needs.
Alyoshka 3
- X-trailer
- X-trail guides
- 3
- 21 publications
The rear seat is removed (quite simply - the latch is pulled out), the backrest is placed forward on a flat floor, the front seat is all the way forward and the backrest is electrically lowered back flush with the seat.
I do this when I drive length gauges
sailor 2
- X-trailer
- X-trail guides
- 2
- 32 publications
- Moscow city
I do this when I drive length gauges
Which seats are leather?
clubmaxima_vav 219
- X-trail guru
- Super ICS guides
- 219
- 717 publications
- My name: Anatoly
- Moscow city
- Car model: T-30, KIA Sorento
Do I understand correctly that the front seat can be removed as one module along with the backrest?
yes, but why? In the 31st and so 3.10 is included
sailor 2
- X-trailer
- X-trail guides
- 2
- 32 publications
- Moscow city
yes, but why? In the 31st and so 3.10 is included
I wonder where?
I measured the trunk with the rear seats folded down using a tape measure. It turns out to be about 2m long, I don’t remember exactly now.
Leshy 37
- X-trailomaniac
- Super ICS guides
- 37
- 265 publications
- My name: Leshy
- Moscow city
and also pillows, and then reset the error....
I saw this feature in the cabin... the backrest is electrically lowered back flush with the seat. But it was on a leather X. Here's a friend on a rag, the back of the front one doesn't reach the flat floor. Fits on the back with overlap. It doesn’t work on the T-30 either (that’s understandable, the car is shorter).
I couldn’t do this trick when I was 31 with skin, Guards 2008
clubmaxima_vav 219
- X-trail guru
- Super ICS guides
- 219
- 717 publications
- My name: Anatoly
- Moscow city
- Car model: T-30, KIA Sorento
I wonder where?
I measured the trunk with the rear seats folded down using a tape measure. It turns out to be about 2m long, I don’t remember exactly now.
through the front seat into the passenger's footwell... and even a little remains...
Alyoshka 3
- X-trailer
- X-trail guides
- 3
- 21 publications
sailor, yes, leather interior
I completely forgot that I didn’t post any photos for you.
Look how I do it when I drive long vehicles
tim_rubop 378
- Major X
- X-Trail Experts
- 378
- 1406 publications
- My name: Tim
- City: St. Petersburg
- Car model: Nissan X-Trail T31 2.0 CVT SE -F—
yes, but why? In the 31st and so 3.10 is included
diagonally or what???
so 1.86 cm)))
clubmaxima_vav 219
- X-trail guru
- Super ICS guides
- 219
- 717 publications
- My name: Anatoly
- Moscow city
- Car model: T-30, KIA Sorento
this is up to the back of the passenger... and if through the seat, then here they are - 3 and a half...
SAMURAY 10
- X-trailer
- X-trail guides
- 10
- 40 publications
- My name: Pavel
- City: Murmansk region. Polar
sailor, yes, leather interior
I completely forgot that I didn’t post any photos for you.Look how I do it when I drive long vehicles
I did the same on a rag, the aluminum ladder is 2m. lies with a little, 2012.
How to remove the front seat of a Lada Vesta Sedan
The process description is suitable for many car brands.
- We place the car on a level surface and open the front doors.
- Move the driver's seat all the way back. Remove two screws (head 10).
- Move the chair forward as far as possible and unscrew the two screws at the back. The size is similar.
- We remove the chair from the car interior and place it on the surface of the workbench for work.
Using the same principle, we remove the front seat of the Lada Vesta.
Unlike “Classic”, “Lux” and “Comfort” chairs have:
- greater rigidity;
- lateral support;
- quality of fabric upholstery;
- the presence of an armrest;
- heating system.
Removing the back of the rear seat on a Lada Vesta
- Unscrew the seat belt fastenings on the left and right side of the backrest (bolts at “14”).
- Unscrew the screws at the base of the back (2 in total).
- We unfasten the fastening one by one and remove the backrest from the car interior.
If necessary, we carry out preventive maintenance and install in the reverse order. On the Lada Vesta SV station wagon, the rear seat is removed by pressing the side plastic latches and folding the backrest to a horizontal position.
At the end of the trip
Before you fold down the rear seats, you need to check that they have not been damaged during transport. Folding, by the way, is done in the reverse order: push the upper part into place until it clicks, adjust the belt, then lower the lower part. If the upholstery is not damaged, the seat is not squashed, and the weight does not stretch the springs or loosen the fastenings, then your trip is successfully completed.
How to fold out the seats in a Priora
We once encountered the need to transport fabric in rolls. There were about 12 of them. They didn’t fit in the trunk, but they had to be carried.
They folded back the rear seats, lifted the clamp, and folded back the backrests. In many blogs we found that the backrests do not recline due to poor fastening, something broke there. But for us, ugh, ugh, everything worked out the first time.
What will fit with the seats folded down?
How to put covers on a Lada Vesta without removing the front seats
Standard set of covers:
- front and rear headrests (2 pieces each, plus one small one);
- front backrests (2 pcs.);
- base (2 pcs.);
- backrest is composite (2 pcs.);
- rear sofa (1 piece).
Before you start putting on the covers, remove the seat pad and the plastic handle for the lumbar support.
- To do this, we press the casing at the location of the handle, and use pliers to squeeze the metal bracket out of the core.
- Pull the cover carefully without damaging the fabric.
- We put the braid under the bottom of the chair, pull it through, and tie it in a knot. We first move the chair forward (backward) all the way for convenience.
- We put the covers on the backrests, tuck the material under the plastic clamps of the headrests. You can remove them with a flat screwdriver or by hand.
- We insert the braid into the gap between the back and the base, pull it tight, and tie the thread.
By analogy, we put covers on the passenger seat.
Connection
Not all 2180 owners are satisfied with the operation of heating the windshield, rear windows and rear-view mirrors simultaneously with the heater fan and air conditioning. There is one way out of this situation - installing a separate button. Even on Vesta models that do not have a heated windshield function as standard, it is possible to connect this very convenient function when replacing the glass unit. If you need to replace your heated windshield for technical reasons, you should contact an official Lada dealer. Under the guarantee, the procedure is carried out free of charge, after an examination. It is necessary to make sure that replacing the windshield with heating is the only solution to the problem, since not a single part will last better than the original one. Careful operation and compliance with the recommendations of specialists will significantly extend the service life of the heating device. High water pressure on the windshield should be avoided when visiting car washes. Timely replacement of wiper blades is necessary, because poor-quality wipers scratch the glass surface.
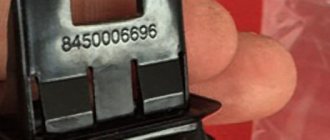
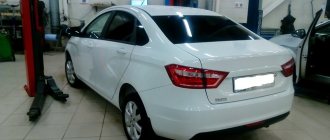
Purchase and replacement of rear seat latches Lada Vesta
The luggage compartment of the car is spacious, but sometimes it is not enough to transport oversized cargo. The owners remove the back and dismantle the sofa.
During frequent installation and dismantling, the mountings for fixing the pillow wear out. The material is plastic and will crack if not handled carefully.
| Name / catalog article | Price in rubles |
| Latch 8450006696 (old model) | From 150 |
| 8450030620 (new sample) | From 190 |
| Analogs from General Motors A2656521 | From 170 |
*prices are as of March 1, 2019.
Conclusion
The process of dismantling the front seats and rear sofa is simple. If you follow the described recommendations, installing the covers will take no more than half an hour.
How effective the covers are is up to you to decide individually. Don’t forget that every time you get into the car you rub down the seats, subsequently holes and scuffs form. The service life of the seat is reduced by a third. When selling a car, worn out (damaged) seats serve as the basis for a discount on the price of the car.