How to replace a bearing on a transfer case in a Niva
09/08/2019 mr.Podshipnik 0 Comment
HOME »
- Auto components
- »
- Replacing transfer case bearings
»
All drivers operating a NIVA car are well aware of the features of this car. Its distinctive feature is all-wheel drive. It has drive axles, two and three differentials. Also, this car has a transfer case, which differs from other VAZ models.
In this article you will learn how to replace the bearing on the transfer case in a VAZ NIVA car with your own hands.
How to detect a faulty transfer case on a VAZ NIVA
If you hear any external symptoms, you need to think about what the reason is. A significant part of Niva cars suffer from body vibration. It lies in the fact that the transfer case on the car is incorrectly centered. The reason may be wear of the transfer case bearing. To make sure of this, just in case, check the chassis of the car, it may be the cause of the vibration. The fixation of the cardan shafts may not be of good quality or the wheels may not be balanced. Rattling may occur if the fasteners for the transfer case mounting support are loose or the rubber band on it is torn. What needs to be done in order to diagnose this cause? Accelerate the car to 100 km/h and listen carefully to the noise in the area of the floor of the front seat of the car. If you hear rattling, immediately check how the car’s mechanisms are working, including the transfer case. Perhaps the reason lies in the violation of the distance of the intermediate shaft parts. Perhaps the elastic coupling has delaminated, or the constant velocity joint is installed incorrectly. Check if a complex of these problems occurs, then it is better to immediately replace the intermediate shaft assembly. If there is noise in the transfer case, then most likely the bearing in it has become unusable or the bolts and flanges of the elastic coupling are deformed.
Self-repair of transfer case on Niva
There is nothing fundamentally complicated in the design of the multiplier, except that it itself is not attached to the main gearbox as on more modern all-terrain vehicles. Intermediate driveshafts extend from the transfer case to the manual transmission. The rest of the device is represented by gears, satellites and bearings. The design also includes a free differential with locking.
We recommend: How to independently replace the timing belt on an 8 valve VAZ-2115 car
Tools
- Spanner 13.
- Flathead screwdriver.
- Key for 10.
How to remove a box from a car
- The machine must be installed on an inspection hole or lift.
- The transfer case levers are set to the neutral position.
- The lining of the central floor tunnel is removed.
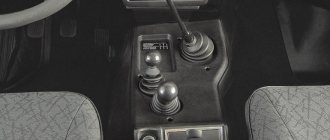
The tunnel cover must be removed to gain access to the transfer lever hatch
- The handles and lever covers are removed.
The handles and covers of all levers can be carefully removed
- The lever hatch cover is removed using four screws.
We get access to the insides of the transfer case
- The speedometer drive is disconnected from the transfer case.
You need to remove the sensor connected to the speedometer from the transfer case.
- The driveshafts are removed from the front and rear.
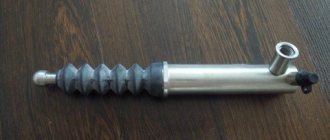
Cardan shafts fit to the transfer case front and rear
- After unscrewing several fasteners, the transfer case housing is removed. It’s enough to just push it forward a little (if you look in the direction of the car’s movement, backward) and down. We push with one hand and hold with the other.
When removing the box, the main thing is not to overdo it
Installation, centering and adjustment
- Install the engine mount brackets correctly.
- Install the transfer case without fully tightening the bolts of its fastenings.
- The flanges of the drive shaft of the box must coincide with the intermediate driveshaft.
- Install the transfer case supports and secure the fasteners.
- Connect the transfer case to the front and rear universal joints, and reinstall the differential lock sensor.
Centering the range multiplier can be done in different ways. The classic version of alignment is that the car is installed on a lift or inspection hole, and all operations are performed by two people, one of whom is sitting behind the wheel. The procedure is performed as follows:
- Fourth gear is engaged and the lock is disabled.
We put the transfer case in neutral position, engage the 4th gear of the manual transmission
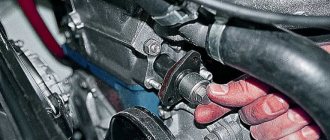
- The transfer case mounting nuts are loosened under the car.
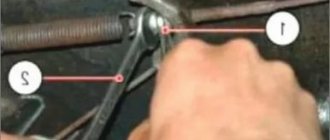
To center the range-multiplier, use a 15mm wrench to loosen the fastenings
- The driver begins to accelerate the engine, informing his partner about this, who directs the box to the desired position.
The assistant gets all the brunt of the alignment work; strength and dexterity are needed here.
We recommend: Removing scratches on a car body without painting
How to dismantle the transfer case on a Niva
As a rule, the transfer case on a VAZ NIVA car can be disassembled without problems, but this will require considerable time. In order to “get” to the transfer case, it is necessary to dismantle some more parts of the car. You need to select a set of tools, including:
— keys No. 13, heads and ratchet possible; - you need to have different screwdrivers.
To remove the transfer case, you need to remove the plastic trim inside the car that covers the transfer case. Unscrew the four screws and then the three fastening elements. Unscrew all shift knobs and remove the cover together with the corrugated rubber bands.
Attention: do not forget to disconnect the electrical wires, there are two of them.
The work in the interior is over at this stage, move to the outside of the car. There are two options: either drive into a hole in the garage, or put the car on a jack. When you jack up the Niva, you need to disconnect two cardans and drive the gearbox. To disconnect the cardan shafts, you need to unscrew all the nuts with a No. 13 wrench. When turning bolted connections, secure them with a screwdriver. Next you need to remove the speedometer cable. In this case, you need to unscrew the fasteners and disconnect the cable and secure it with wire. Unscrew the transfer case bolts and disconnect it from the gearbox. At the final stage of dismantling, you need to substitute some kind of support so that the transfer case does not fall. Just do it very carefully so as not to drop the transfer case.
Niva transfer case alignment
For a long time, drivers of Soviet Nivas have been convinced that aligning the car’s transfer case significantly reduces vibration, noise levels in the cabin and saves fuel consumption. Therefore, if you have just purchased a VAZ-21213, then you should immediately start this work. When you purchase a car second-hand, you should not rely on all the promises and assurances of the previous owner. Even if he assured that the alignment was carried out and everything was fine, it is best to check this fact and make sure of it. This work in itself is not difficult, but it requires additional hands, since the presence of an overpass cannot be done alone. Car service specialists recommend using a lift, because other devices require additional fastenings. The process itself is like this:
- one person sits in the driver’s seat, the car is lifted with him;
- the lock must be disabled and 4th or 5th gear engaged;
- it is necessary that the pins are in the middle of the support holes (to do this, move the dispensing supports apart with your hands);
- the second person from below must loosen the 4 nuts that secure the transfer case;
- the person in the driver’s seat must pick up speed and inform his partner about this (the assistant “on the go” tightens the clamps to the required level);
- in a car service center for centering, the car must pick up speed to 60 km/h (the speed must be set in 4th gear).
We recommend: The quietest and softest summer tires
It is important to know! On Niva 21213, the intermediate shaft is not a cardan, but a CV joint. For this reason, factory settings may dispense with height adjustment. But in the case when the dynamic alignment does not live up to expectations, you can try to tighten or lower the transfer case and repeat the alignment.
How to disassemble and reassemble the Niva transfer case
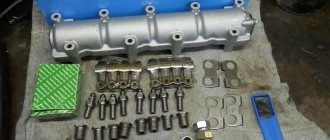
How to perform this operation correctly? Start by cleaning the transfer case from oil, dust and dirt. Next, you need to drain all the oil and rinse the transfer case with diesel fuel. Then you need to fix it on the bench table and loosen all the fasteners. It is necessary to unscrew the front axle housing fasteners and remove it. Remove the speedometer drive and driven gear. Next, remove the lock washer and pull out the axle and remove the lever that locks the differential. Then you need to dismantle the crankcase cover and the front axle drive and remove the spring with the retainer ball. Next, you need to unscrew the bolt that locks the differential lock fork. Then you need to remove: the rod, the fork and the locking clutch. The rear cover, together with the rear axle drive shaft, must also be dismantled. We remove the drive shaft and the flanges on it together with the front axle drive. Next, you need to remove the front axle drive shaft from the crankcase. And finally you get to the bearing. Remove it together with the thrust ring and oil deflector. Remove the rear axle drive shaft from the rear cover. Then remove the cover that protects the front drive shaft bearing and the inspection hatch. Next, dismantle the lever bracket that changes gears and remove the lock washer. And then you can very easily remove the axle and lever. The next step is to remove each of the mounting rings and the rear bearing, which “sit” on the intermediate and drive shafts. We take them out of the distribution box. Then we remove the rear bearing and remove the thrust ring. Removing the bearing is done using a special puller. We take out the gear, which is located on the drive shaft of the low gear (together with the bushing). The gearshift clutch, hub, and gear also need to be dismantled. Next, disassemble the differential. To do this, you need to press out the oil seals that are located in the front axle drive housing. Pay attention to their condition. As a rule, they all need to be changed. When you have removed the bearings with pullers, install new ones that you previously purchased at a specialized auto store. We do not recommend buying bearings at the market or secondhand. You may purchase a defective, low-quality product. Then again you will waste time, money and mood, and they will not last you long. When installing the bearings, do not forget to lubricate the seats with lithol 24. Assemble all parts of the transfer case in the reverse order as you did during dismantling. After installing the transfer case, be sure to fill in high-quality oil and check for noise while driving. Do not use used oil even if it has not reached its service life.
Malfunctions of VAZ transfer cases
The transfer case on the Niva is a fairly reliable unit; problems with repairs in the mechanism itself arise mainly due to insufficient oil level in the valve - if for some reason the oil leaks out, intensive wear of all parts occurs. Among the frequently occurring malfunctions are:
- vibration in the body at various speeds when the car is moving;
- vibration when the vehicle starts moving;
- noise in the transfer case when the car is slipping or turning;
- difficult upshift or downshift, difficult engagement of the lock.
A few more tips:
— when dismantling the transfer case, so that all parts can be unscrewed well and without problems, it is necessary to spray them with penetrating, lubricating liquid VD 40; — the drive and intermediate shaft must be installed in the transfer case in its entirety; - do not forget to lubricate the oil seals with Litol 24; — It is advisable to tighten all bolted connections with a torque wrench. However, if you don’t have one, then you can do this: tighten the bolts and nuts completely and then loosen them counterclockwise by turning the wrench twenty degrees.
If you follow the above instructions, you can easily carry out repairs and replace the bearings in the transfer case on your VAZ NIVA yourself without any problems. If you have any questions, you can always ask them in the comments on our website. I will be happy to give practical advice.
Vibration
Vibration in the body is the main “disease” of the Niva; it often occurs due to improper alignment of the transfer case. Most often, vibration occurs on VAZ 21213/21214 cars, since the transfer case is mounted only on two supports on the sides of the body; on the Chevrolet Niva, the transfer case is already installed on three supports. But before you start adjusting the position of the transfer case, you should check the condition of other parts of the chassis - vibration can occur for other reasons:
- driveshafts are poorly secured;
- wheels are not balanced;
- there is play in the cardan crosspieces (vibration is especially affected by play in the rear driveshaft crosspieces);
- The vibration comes from the engine itself.
Vibration when starting off on a Niva can also occur for the following reasons:
- the mounting supports of the transfer case have become loose;
- The rubber on the RK supports themselves broke.
Disassembling the transfer case
A complete repair will require an automotive tool kit and a transfer case repair kit (bearings, seals and gaskets, possibly some gears), a hammer and a bearing puller.
- Remove the front and rear covers of the RCP housing. To do this, you will need to loosen the nuts securing the covers and, using a pry bar, pull the cover towards you from all sides. On the other side of the box we perform a similar operation. The front cover will come out together with the shaft responsible for locking the differential, and the rear cover with the shaft responsible for the reduction gear.
- Using a hammer, knock out the differential assembly from the housing. The design of the differential located inside the transfer case is similar to that found in the axles. Having unscrewed the nuts securing the main pair, we open access to the satellites. If there is wear on the satellite teeth, then be sure to replace all the parts.
- We check each bearing for any extraneous sounds during rotation. If there are any, then remove the shaft nut on which the bearing sits and use a puller to press out the old bearing.
- The internal parts of the transfer case are installed in reverse order. It is recommended to use new bolts and nuts to ensure sufficient tightening torque for the shafts and housing covers.
- After assembly, fill in new semi-synthetic oil, not lower than GL-4 classification - 0.9 l.