Lada Vesta is a new phenomenon on the domestic car market, which few people have had to deal with so far. As of September 2019, this car in various body styles occupies a leading position in sales along with the Lada Granta, which corresponds to 20% of all car sales. It would not be an exaggeration to say that AvtoVAZ’s new products are selling like hotcakes, while the experience in their maintenance, repair and tuning is still limited. Obviously, motorists are interested in knowing how to replace certain products that are traditionally quickly damaged or are a favorite target for more effective replacement. In this article we will talk about how to remove Lada Vesta seats, plastic cards and other elements.
We remove the rear seat on a Lada Vesta with our own hands
Many Lada Vesta owners were faced with the need to dismantle the rear sofa and the entire seat.
To do this, we contacted a car service. But, this procedure is carried out quite easily and simply with your own hands. Video about dismantling all the seats on the Lada Vesta:
The video will show how quickly and without unnecessary hassle you can dismantle the rear seat, and will also tell you about some of the nuances and subtleties of the process.
Why remove the back seat?
General view of the rear seat.
Of course, before considering the issue of carrying out the process of dismantling the rear seat of the Lada Vesta, it is necessary to understand in what cases this procedure will be needed.
So, let's consider in more detail in what cases it will be necessary to remove the sofa and the back of the car:
- To replace upholstery . This is often done when tissue elements are damaged. This could be holes burnt by cigarettes, spilled liquids, an accidentally torn surface, or, in extreme cases, a fire inside the car.
- Carrying out repair and restoration work on the body . It often happens that after a traffic accident, the rear part of the vehicle is damaged and deformations appear along the bottom of the cabin. This also includes side impacts in the area of the B-pillar and rear pillar.
- Replacement of upholstery or seats during the process of tuning and modification of the interior. In this case, you just need to remove the sofa and the back of the rear seat.
- Pasting soundproofing will also require dismantling the rear seat, since it is necessary to get to the bottom of the car.
- Other factors that will require dismantling the rear sofa and backrest.
Removing the rear seat of a Lada Vesta
The process of removing the rear seat on a Lada Vesta is quite simple and quite typical for all vehicles of the VAZ family. This procedure can be carried out in one pair of hands and requires minimal tools.
Let's consider the sequence of actions aimed at dismantling the rear seat:
- Of course, the manufacturer recommends removing the negative terminal from the battery when carrying out all repair and restoration operations. But, in this case, this is not necessary, so we will skip this operation.
- Let's start dismantling. First you need to dismantle the sofa. To do this, lift it up to remove it from the clamps.
Location of the rear sofa seat latch.
Location of the rear sofa fastenings.
Rear seat back bolt locations.
Location of the rear backrest fastenings.
The installation process is identical to the dismantling process in reverse order.
conclusions
As you can see, there is nothing difficult in the process of removing the rear seat of a Lada Vesta, and it is carried out quickly and in one pair of hands. Installation, like dismantling, can be done independently in your garage or even on the street
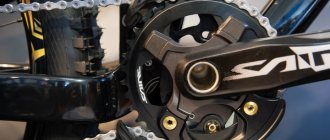
What is a fuel pump and why is it needed?
Fuel pump diagram
The gasoline pump serves to ensure continuous and uninterrupted fuel supply to the engine during operation. In most modern car models, it is located inside the gas tank, so access to it is not so obvious and can be difficult.
In VAZ cars, under the rear seat you can find a rectangular hatch, under which you can access the fuel pump. The fuel module kit also includes: a fuel level sensor with a float and a coarse filter - mesh. Two fuel lines are connected to the fuel pump:
feeder, from which the fuel rail with injectors is fed through a fine filter;
reverse, returning fuel through a pressure regulator, ensuring its constancy in the engine power system.
Lada Vesta: step-by-step instructions for removing the rear seat
More experienced Lada Vesta car owners prefer to do repairs themselves. For example, many can easily replace the fuel filter, change the routing of speaker wires, and soundproof the body. However, novice drivers may not know how to remove the rear seat. Lada Vesta is a car that will be quite easy to cope with this kind of task.
How to remove the rear seats on a Lada Vesta
The process of removing the rear seats on a car of this model will be simple and typical for most vehicles produced by the Russian automobile industry. A person can carry out this procedure independently, using a minimum of tools. During work, most often no difficulties arise if the driver follows a certain sequence of actions. But before you begin to consider the step-by-step instructions, you should understand in what situations you need to do this.
Why film?
Disassembling the rear seat is most often required in the following situations:
- 1. To replace the upholstery. Often, upholstery replacement is necessary if the fabric elements are damaged. This should include the appearance of stains from various drinks, holes formed as a result of wear, abrasions, and burnt material.
- 2. Body restoration work. Sometimes, after an accident, the rear of the car is damaged when the deformation occurs at the bottom of the passenger compartment. In case of side impacts in the rear or central area of the body, it may also be necessary to replace the rear seat.
- 3. Replacement of seats. Some vehicle owners replace armchairs and sofas when tuning the body and interior.
- 4. Other reasons that require removing the rear seats.
Step-by-step instruction
To avoid any difficulties during the procedure, it is important to adhere to a certain algorithm of actions. Step by step guide:
- 1. First you need to find the latches that are located on the back side. They need to be pulled up. During manipulation, the horizontal part of the sofa should rise.
- 2. Next, you need to pull the entire seat by the backrest, and then remove the front latches from the grooves. During this action, the seat is completely removed and remains in the hands. If you planned to replace the fuel pump or filter, then it will not be enough to remove the lower part of the seat. To perform more complex installation work, the backrest is also removed.
- 3. To dismantle the backrest, you need to find four mounting bolts. For more convenient operation, first unscrew the seat belt latches. Then you can start unscrewing the bolts.
This completes the procedure for removing the seat on the Lada Vesta. The sofa is completely disassembled and dismantled. Even an inexperienced car owner can cope with such a task.
To reassemble the seat, all steps should be performed in reverse order. First, the vertical backrests are installed and secured with bolts. Next, the central seat belt is secured, and the sofa is installed on the brackets. Finally, gentle pressure is applied to the front area to record the result.
see also
Comments 21
I’ve been wanting to get an Isofix mount for a child seat, but I can’t get around to it
Children's post... How to unscrew wheel bolts, also write in more detail.
Exactly. You need to describe how to unscrew the wheels.
I’d rather write how I peel off the “W” sticker and stick on the “L”.
And this is already plagiarism. :):)
Once I removed these bolts and never installed them again, I drive without them, nothing rattles or creaks, and to be honest, I removed the seat once. Then I bought the cheapest luggage rack, and if you need to transport something long, you can park it for 10 minutes, and then remove it. After all, we don’t carry long lengths every day, and there’s no need to kill or scratch the interior.
I build a boat here and often carry boards and plywood. I dream of a roof rack, but I haven’t pressed it hard yet)
And there seems to be more rattling from behind without bolts. Although I shook everything up in the trunk. Source not found. Yes, too lazy to look. A good knock will show itself anyway, if anything happens)
I've been driving like this for four years, it doesn't rattle, the sofa on my butt shakes well.
I build a boat here and often carry boards and plywood. I dream of a roof rack, but I haven’t pressed it hard yet)
And there seems to be more rattling from behind without bolts. Although I shook everything up in the trunk. Source not found. Yes, too lazy to look. A good knock will show itself anyway, if anything happens)
Regarding removing the bolts for a while... This year I also drove like this for a week (without bolts) while the summer season was opening, nothing changes, but you don’t have to unscrew and tighten them every time.
Read more: Problems with auto ru
Hmmm. Have you been looking for a handle to open the door from the inside for a long time?)
Well, before you do anything, you need to study what to unscrew where, so as not to break it off) I have a lot of experience in breaking off hidden fasteners.
On the one hand, yes...
Looks like this site looked different from a phone
How to remove the back seat on a Lada Vesta
Removing the rear seat in a Lada Vesta Car enthusiasts who independently carry out repair work or install new equipment, such as installing a subwoofer, are faced with the need to remove the interior seats.
Many people have questions about how to remove the back seat on a Lada Vesta. Removing it from the cabin will be necessary when it is necessary to:
- Body repair;
- Installation of covers;
- Installation of new equipment;
- Work on sound insulation of the Lada body;
- Replacing the fuel pump, filter and fuel indication sensor in the Vesta tank.
Rear seat disassembly sequence
In order to carry out repairs or installation without causing damage to property, we follow the sequence of disassembly. The first thing you need to do is remove the rear sofa of the Lada Vesta. To do this, carefully feel the latches in front with your hands and pull them up. The latches will release and it will rise. There is no need to raise it high.
The next step is to move it towards the trunk and lift the edge located near the trunk up until the brackets come out of the brackets. Now you can remove the back seat and remove it from the Lada’s interior.
When releasing the lower seat from its fastenings, be careful; it may break. The latches coming out of alignment can also occur when the Vesta seat is put back into place. They are made of fairly hard plastic and are quite fragile.
Main stage
1. Using two keys (17 and 19), unscrew the fitting nuts on both sides of the filter.
Or, if the fastening is on wire clips, press the fasteners.
In both cases, it is necessary to place a container for residual fuel to avoid getting it on clothes, body or floor.
2. Unscrew the nut of the fuel filter mounting bracket.
3. We take out the used element and replace it with a new one. At the same time, we take into account the direction of movement of fuel in the system. The arrow on the filter housing will tell you how to do this correctly. Sometimes there are additional inscriptions in (input) and out (output).
Tighten the fastening clamp nut.
4. Check the degree of wear of the O-rings. If necessary, we replace them too. (9)
5.Connect the pipes. We tighten the nuts on the fittings or clamp the clamps.
How to remove the front seats and rear sofa of Lada Vesta
It is necessary to remove car seats when installing covers, as well as for repairs or modifications to the interior. The process is not complicated, but it has some features that are best known in advance. For example, in addition to the usual tool (14 head), you will also need a Torx T40 (asterisk). Let's look at the process of removing Vesta seats.
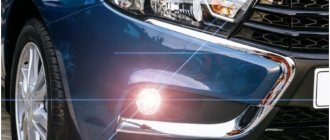
Front seats
Move the seat as far back as possible. Remove the two front skid mounting bolts.
Move the seat all the way forward and remove the two rear mounting bolts. Disconnect the connectors with the heating wires and remove the front seat.
Installation is carried out in reverse order. Apply Fiol-1 lubricant to the rubbing areas of the slide, 10 g per seat.
Backseat
To remove the rear sofa on Vesta, lift the cushion up so that the front fastening (hinges No. 2) comes out of the hole in the fastener (No. 3).
Move the rear seat towards the trunk, then lift it up so that the hinge (No. 2) comes out of its engagement on the body (No. 3). Remove the rear seat.
Remove the bolt (No. 5) securing the right seat belt buckle and the lower mounting point of the middle belt. Unscrew the four bolts (No. 3) of the lower fastening of the sofa backrest. Pull the latches (No. 1 and 2) up and tilt the backrest forward.
Remove the bolts (No. 1) and then remove the rear seat backrest.
The process of removing the front and rear seats of Vesta is also shown in the video:
Let us remind you that model covers will help improve the interior of Vesta, as well as preserve the interior from aging.
Key words: Lada Vesta seats
Found an error? Select it and press Ctrl+Enter..
Problem
It does not relate directly to the seat, but to its mounting. According to the instructions, in order to dismantle the rear sofa, you need to grab the cushion on the front side from below, and then pull it up - in this case, the cushion mount comes out of the lock.
Removing the rear seat of Vesta without damaging the retainer is not easy
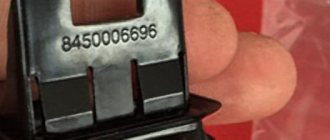
However, according to reviews from car owners, these same Lada Vesta rear seat latches often break, since they are made of plastic.
Therefore, if such a situation occurs, all that remains is to change the clips. However, it should be noted that such low-quality clips were installed on cars until approximately mid-2021.
Life hack: how to remove the rear seat on a Lada Vesta car, heated in the rear
Replacing car seats is required in rare cases; they are usually removed when working on the interior, for example Shumka. As practice shows, disassembling and removing the rear and front seats on a Lada Vesta car is not difficult; it takes 10-20 minutes. But if you do everything for the first time, questions may arise out of ignorance. Sometimes a heating system is installed in the back seat of a Lada Vesta; it saves passengers in cold weather, even if the stove fails or does not work. Three-level heating is installed in the front. Read the article to the end and find out how to install it. The original car seats are comfortable, anatomical, with lateral support. Seat pockets were made for the first time on a car; they are on the side. My back generally suffers on long trips. Depending on the configuration, the seats on the Lada Vesta differ; the Vesta SV cross and sport versions are different. The interior of the Lada Vesta car turned out to be truly cozy, attractive and everything in it, from the seats to the upholstery, was created in accordance with modern requirements. The new seats show a big gap between the Lada models of the 2000s and the current flagship - now the cushions have become softer and more comfortable for seating.
The seats of the Lada Vesta received little support in the lumbar region and slightly noticeable sporty lateral support. But for driving around the city and on the highway, such fixation in the seat is enough. Their adjustment works according to three parameters, but if it does not work, they can be replaced. For ease of use of the trunk, you can fold or even remove the rear sofa.
The seats on the Lada Vesta are a real breakthrough in the development of car seats on the Lada car. The standard version is already equipped with the necessary additions to keep your back healthy and ensure a comfortable ride.
Standard front seats and rear sofa - article number and price
If for any reason you decide to replace the seats, get ready to look for them by catalog numbers:
- Right front assembly. 845-000-79-07. Price – from 5,300 rubles.
- Driver's license plate assembly. 845-000-79-09. Price – from 5,300 rubles.
- Driver's seat with armrest assembly. 845-000-79-12, priced from 6,000 rubles.
- Rear sofa cushion (assembled). 845-000-79-32. Price – from 5,300 rubles.
- Left back of the sofa. 845-000-87-06, priced from 2,300 rubles.
- Right back of the sofa. 845-000-87-05. Price from 3,400 rubles.
For your own convenience, you can replace the standard set with an anatomical one if you spend a lot of time behind the wheel. Orthopedic chairs are a rather individual issue, because if you lack the back support that is in the factory version, you will most likely rush to buy the first orthopedic chair you find.
Be patient and take your time: consult a doctor, describe the nature of the problem that worries you, and ask what it should be. Today the market is full of various offers where you can find “your” option.
What does the seat assembly on a Lada Vesta car consist of?
It consists of a pillow and a backrest, which are supported by a frame. The connection of these parts is made with the possibility of adjusting the position of the backrest, height, and also the distance relative to the steering wheel with pedals. The side pockets on the car are designed for one of these adjustments.
To fix the rear sofa of the Lada Vesta, latches are used that can only be moved in two positions, so it is required that the backrests stand firmly without moving. The head restraints, which are mounted on a toothed slide, can optionally change their position. An armrest for the driver can be purchased by placing it near the handbrake. The seats are also removed by car owners so that covers can be put on.
You can, of course, use capes; they will be easier to remove to wash, but they bulge and look untidy; the covers are universal, but cannot be adjusted to fit.
Reviews
| № | Positive | |
| 1. | Ivan , 38 years old (drive2.ru), Sverdlovsk: I have a basic modification of the Lada Vesta, the seats are good and practical. In order not to get them dirty and wipe them every time I plant them, I bought covers. | |
| 2. | Vladlen , 43 years old (prom.ua), Samara: after a collision with oncoming traffic in winter, he dismantled the seats. The first time, I was a little doubtful of my abilities, but it turned out to be much easier. | |
| 3. | Peter , 46 years old (autotoday.com), Krasnodar: I’ve been using the car for three years, there are no covers, scuffs are visible on the seats. | |
| 4. | Gennady , 37 years old (rozetka.ua), Rostov-on-Don: I rented the car at a dealership and immediately bought covers so as not to get the seats dirty. It's been two years now and the interior looks like new. | |
| 5. | Dmitry , 44 years old, Kursk (avtoflit.com): you need to buy covers, because the bag is in the cabin, the ash falls, and burns the fabric. Due to the loss of appearance, the value of the car decreases when selling it. | |
| 6. | Vyacheslav , 41 years old, Saratov (autotoday.com): I treat the car with care, but in three years the upholstery has worn out, abrasions are visible in places. Considering that I am going to sell the car in the spring, this will negatively affect the price. They often ask for a discount. We urgently need to buy covers. | |
| Negative | ||
| 7. | Victor , 37 years old (prom.ua), Uralsk: the quality of the material is poor, the car is two years old, and the upholstery looks like it’s 100 years old. | |
| 8. | Fedor , 43 years old, Moscow (avtoflit.com): I heard that you can install front seats on a Lada Vesta from Renault Logan. They are more practical, better quality, more comfortable. | |
| 9. | Kirill , 33 years old, St. Petersburg (drive2.ru): I don’t know how it is in other configurations, but in the basic version the workmanship of the seats is poor, the upholstery is cheap and wears out quickly. | |
| 10. | Vasily , 44 years old, Pskov (autotoday.com): after purchasing a Lada Vesta, do not delay with covers, as the upholstery wears out to holes in a year and a half. | |
How to remove seats on Lada Vesta.
We put on the covers ourselves
We dismantle the seats ourselves. The need to remove them rarely arises, mainly in case of an accident, putting on covers, or an upgrade.
Procedure
- flat head screwdriver;
- pliers;
- set of covers;
- keys to “14 - 17” if you plan to dismantle the seats.
How to remove the front seat of a Lada Vesta Sedan
The process description is suitable for many car brands.
- We place the car on a level surface and open the front doors.
- Move the driver's seat all the way back. Remove two screws (head 10).
- Move the chair forward as far as possible and unscrew the two screws at the back. The size is similar.
- We remove the chair from the car interior and place it on the surface of the workbench for work.
Using the same principle, we remove the front seat of the Lada Vesta.
Unlike “Classic”, “Lux” and “Comfort” chairs have:
- greater rigidity;
- lateral support;
- quality of fabric upholstery;
- the presence of an armrest;
- heating system.
How to remove the back seat on a Lada Vesta
The rear seats structurally consist of an upper backrest and a lower sofa. We dismantle them separately from each other.
To remove the rear seat sofa, you must:
- Open the rear doors, and together with your partner, lift the sofa up, thereby removing its front part from the latch.
- Move the sofa towards the luggage compartment, remove the lower hinge from the lock.
- Remove the sofa from the car interior.
Removing the back of the rear seat on a Lada Vesta
- Unscrew the seat belt fastenings on the left and right side of the backrest (bolts at “14”).
- Unscrew the screws at the base of the back (2 in total).
- We unfasten the fastening one by one and remove the backrest from the car interior.
If necessary, we carry out preventive maintenance and install in the reverse order. On the Lada Vesta SV station wagon, the rear seat is removed by pressing the side plastic latches and folding the backrest to a horizontal position.
How to remove the back seat on a Lada Vesta with your own hands
The car is prepared for work, the negative terminal of the battery is disconnected.
Removing the rear seat
With your hands, you need to grab the front edge of the rear sofa cushion and pull it up until the loop of the cushion frame comes out of the latch hole in the passenger compartment. This operation is repeated on the other side.
Take the rear seat cushion and move it back towards the trunk. Next, the rear edge is raised to remove the sofa frame from the loop from the grip on the body. This process is repeated on the other side. The rear sofa is removed from the car interior.
Use a 14mm head to remove the bolt that secures the lock of the right seat belt and the lower fastening of the middle belt.
The same tool is used to unscrew the bolt securing the rear sofa backrest bracket to the floor of the car body.
The right and left backrests tilt forward by pulling the locks up. Use a socket to unscrew the bolts securing the bracket for the left backrest of the rear sofa, and remove the backrest.
Installing the seat in reverse order
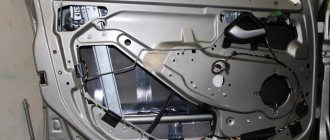
Removing the rear parcel shelf trim is done as follows:
- the pillow is dismantled as described earlier;
- unscrew the lower fastening bolts of the left and right seat belts using a 14mm socket;
- the rear seatbacks are lowered;
- the upholstery of the left and right side arch is removed;
- the self-tapping screw securing the side window trim is unscrewed with a Torx T20 head from the left and right sides;
- it detaches from the body by applying force to overcome the hold of the plastic fasteners;
- the buttons securing the upholstery of the trunk shelf are removed;
- use a flat screwdriver to remove the gaskets for the right and left seat belts from the holes in the upholstery;
- remove the trunk upholstery as an assembly with the left and right side window trim, threading the seat belts through the holes, and also disconnecting the wiring harness deck from the additional brake signal installed on the shelf upholstery;
- using a Torx T20 head, unscrew three self-tapping screws securing the fastening of the side window trim to the surface of the shelf for each side, the parts are separated.
Installation is done in the reverse order of removal.
Secure fixation
When choosing new seats for your VAZ 2114, pay attention not only to their price and convenience, but also to the method of fastening. Some seat models are very difficult to fit into the cabin, although they may suit your preferences. Improperly securing the seats can cause injury, especially at high speeds or in accidental collisions. If you have found a suitable model of seat, but it is not securely attached to its future installation location, take the car to a workshop where all the work will be carried out for you.
As mentioned earlier, it is better to take the recommended models of seats from foreign cars for replacement from Ford or Audi. Many drivers have noticed that Opel seats are also excellent for replacement and require a minimum of additions. Even chairs from Hyundai can become a more or less comfortable and quite acceptable option, if you slightly alter the design of the frame and fastenings.