In my last post, I described the process of installing a multifunction steering wheel in my car. Everything went well and started working right away, but there was one more unfinished issue - the lack of indication of the operation of the CC and OS on the device. Even before installing the steering wheel, a super-wonderful entry appeared on the drive that you can flash the Vesta’s tidy yourself, and anyone can do this and you just need to find a USBDM programmer. In general, once again, thank you very much for this wonderful post. The author in it literally broke down the process of flashing the device firmware and attached the firmware files, in general, guys ura12345678 and RUPARADOX, thank you very much!
The search for a programmer led me to the well-known Aliexpress website. The cost of this programmer in China is around 800 rubles. After looking at different options and reading reviews, I decided to order here. On the 11th day of waiting, the programmer was in my hands:
I would like to warn you right away that this seller does not include a disk with the software and driver, so I am attaching links to my disk with the necessary files: - driver - flashing program - program for creating a backup of the current firmware version
If you decide to make a backup of the firmware, then here is a good article. Creating a backup is a slightly more complex and lengthy process than updating the device firmware itself. The main thing is to do everything strictly according to the instructions and take your time! I made a backup of my firmware, just in case... I would also like to note that I performed these operations on a PC running Windows 8.1 64-bit. By the way, users starting from Windows 8 and onwards, before installing drivers and software, do not forget to disable driver signature verification; how to do this, you can see, for example, here
When everything is installed, you can proceed directly to the firmware. First, let's disassemble the tidy. The back cover is secured exclusively with latches. If the tidy is of the old type (white), then we see a seal, which, as they say, can be easily peeled off by heating it with a hairdryer. I decided to try to do this. I’ll say this, I managed to peel it off without damaging it, but it’s noticeable that the seal is a little worn out, maybe I just overheated it:
In general, I’ll say this: in the end I broke the filling anyway :))) And there’s really no point in saving it, because The software version is written on the sticker on the back, i.e. You can still see the intervention:
Read also: Installing the third row of seats
Experts' opinions
In the first copies of the Lada Vesta, when the ignition was activated and the engine was started, the dashboard backlight did not light up. The reason was in the software, this function was not active by default.
When driving in sunny weather, during the daytime, it was difficult for drivers to read the readings of sensors, instruments, and indicators. For this reason, the owners did not notice the temperature rise, oil pressure warning lamp signals, etc.
After numerous requests to the manufacturer - AvtoVAZ, engineers developed and released new versions of firmware for the dashboard.
- when the ignition is activated, the instrument panel lights come on;
- green cruise control indicator, located in the right corner of the central well;
- actual mileage and fuel consumption are displayed online at the bottom of the central well.
On the first firmware of the Lada Vesta under the index “026” the indicated options were not available. The dashboard lights were activated together with the daytime running lights (DRLs), which was not always the case and there was no need for DRLs. In general, the “innovation” is positively approved by the owners of Lada Vesta. Now it has become much easier to read data and indicators from the instrument panel without distraction from driving the machine.
Solution
Due to numerous requests to resolve the issue with the lack of instrument lighting in the Lada Vesta, which were sent to AvtoVAZ, the Russian plant produced new firmware. After this, already in the last days of June, all the necessary materials were sent from the factory to the dealership centers to update the firmware of the Lada Vesta dashboard.
And from the first days of July, dealership centers received new firmware. This software is marked with the index 35, while the previous version, which is installed on many sedans, is indicated with the index 26. Software 35 is focused on turning on the backlight of Vesta’s instruments when the daytime running lights are turned on.
The video demonstrates the backlight at PO 35
The firmware changes quite quickly - usually no more than a quarter of an hour. In addition, as reported by Ladnaya Mechanics, this service is paid and costs about 600 rubles.
It's much more comfortable to drive with the lights on.
Sequence of actions for self-flashing the dashboard on Lada Vesta
Preparatory stage
- programmer;
- laptop;
- software;
- cable for connecting the shield to a laptop;
- TORX key to “20”;
- spare diodes, indicators, if the old ones have burned out.
“12” steps of step-by-step instructions for firmware:
- Install on the laptop the software that comes with the equipment: Usbdm OSBDM V4.95 Programmer, HCS12 Programmer and USBDM driver.
- Remove the instrument panel, carefully peel off the factory seal, and remove the back cover.
- Activate the device, set the switch to the 3.3 V position.
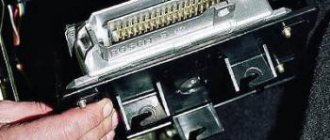
- Connect the programmer with a laptop using a USB cable.
Connecting the Usbdm OSBDM programmer
- Launch the HCS12 Programmer program on the laptop, select the “Detected” item as active.
- In the “Target” line, indicate the location of the firmware. Make Auto Reload active, click Detect Chip.
- Check the box for “Unsecure”.
- In the “Device Operations” section, on the “Target” tab, select “Erase Selective”.
- Click “Program Flash” to activate the firmware.
- Refuse to connect the panel during the activation process.
- Disable the programmer and install the equipment in its original location.
Torpedo tuning
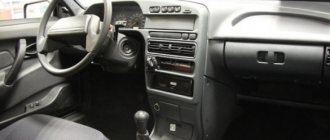
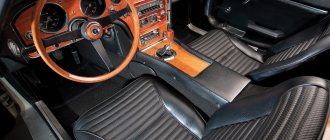
The “Seven” is known for its interior, which is very modest by modern standards. Therefore, VAZ 2107 owners change the internal structure of the car in various ways, trying to make it stylish and ergonomic.
The dashboard (colloquially referred to as a dashboard or dashboard) is the part of the car that both the driver and passengers see most often, so it is the part that receives the most attention when tuning the car’s interior. The dashboard of a car is a set of arrows and light indicators that allow the driver to monitor the technical condition of the car, control the performance of devices and systems, as well as the speed of movement.
The dashboard of a car is a set of arrows and light indicators that allow the driver to monitor the technical condition of the car, control the performance of devices and systems, as well as the speed of movement.
The standard “seven” torpedo looks quite simple and mean. In addition, it has a serious drawback - very weak backlighting, which is why at night the driver has to be distracted from the road, looking closely at the numbers. This is extremely unsafe when driving on the highway at high speed.
The standard VAZ 2107 torpedo has an outdated design and a small number of functions
Directions for improving the “Seven” torpedo could be as follows:
- purchasing tuned elements and installing them instead of standard ones;
- introduction of additional mechanisms and systems (thermometer, parking sensors, on-board computer, etc.);
- independent installation of instrument scales, lighting, etc. - both “native” and from other car models.
Any tuning option begins with dismantling the car’s dashboard.
Before any work related to the electrical circuits of the car, including removing the dashboard, it is necessary to de-energize the car, that is, remove the negative terminal from the car battery.
After removing the torpedo, you can begin to remake it. For this you will need:
- multi-colored LEDs (purchased at electrical stores);
- instrument scales (sold in a large assortment at car markets);
- arrows (you can choose from other cars at auto repair shops or in stores);
- hand tool.
Tuning of the instrument panel is carried out according to the following algorithm:
Remove the instrument panel from the dashboard.
Remove the arrows very carefully without damaging the pins on which they are attached.
Remove old stickers.
Degrease the surface with an alcohol-containing liquid, cut out and install new stickers.
Install new arrows and install the panel in place.
When replacing the hands, you need to take into account the main point: it is very important to install the hands correctly. In the zero position, the speedometer needle is between the 0 and 20 km/h marks
The new indicator must be in the same position after installation is complete, otherwise the speedometer readings will be distorted. To do this, at the beginning of work, you need to mark the location of the arrow on the dial, and during the installation of a new one, align it with the mark.
When replacing pointers, it is important to note the place where they are in the zero position to avoid distortion of instrument readings
You can improve the backlight by installing additional LEDs.
The dashboard of the VAZ 2107 after installing LED backlighting becomes much brighter than the standard one
List of firmware for Lada Vesta instrument panel
Previous firmware versions are not compatible with subsequent ones. This must be remembered when upgrading yourself. Incorrect selection of the version will damage the electronic engine control unit (ECU) and on-board computer.
| Software version | Gearbox type | Transmission |
| Lada Vesta 026 | 8450007022 | Manual transmission |
| 028 | 8450007022 | Manual transmission |
| 035 | 8450007022 | AMT |
| 036 | 8450007022 | Manual transmission |
| 019 | 8450030825 | Manual transmission |
| 022 | 8450030825 | AMT |
| 027 | 8450030825 | Manual transmission |
Read also: International car registration plates
As of March 2021, the firmware of the instrument panel on the Lada Vesta and the activation of the backlight in DRL mode are not carried out due to identified errors in the software.
Conclusion
Installing new generation firmware is extremely important for monitoring instrument performance, monitoring engine temperature, and reducing eye strain.
During the flashing process, be extremely careful not to break the sequence of actions. Remember about the compatibility of new generation firmware. If you encounter any difficulties during the upgrade, contact a service station specialist for help.
FakeHeader
Comments 24
I know. worth it to the maximum...
The standard light, if everything is working properly, is quite enough. The LEDs are redundant. Is the generator voltage normal? If normal, then look for a bad connection. If there is poor contact, xenon will not help))
The diodes do not glare and are clearly visible. If you install diodes the size of standard lamps, and NOT glue tapes...
and will it be regulated if I install diodes:?
The adjustment on my VAZ is not very noticeable on the tidy, but the interior light (also a diode) dims smoothly. Need to try.
The standard light, if everything is working properly, is quite enough. The LEDs are redundant. Is the generator voltage normal? If normal, then look for a bad connection. If there is poor contact, xenon will not help))
the generator is normal, I can see from the work and charging... it lights up normally, but I want it to be brighter, more beautiful, and not dim
The generator may be normal. The question is how much the light bulbs reach. As for brightness, everything should be in moderation. If you overdo it, it will become stressful.
The Vesta instrument cluster has a unique design and modern lighting, which is based on LEDs. To prevent the sun from interfering with reading readings, all indicators are hidden in three large wells. On the other hand, in cloudy weather they may, on the contrary, leave some areas in the shade. In this case, a backlight is needed, but during the day it does not work with DRLs. What to do?
If the Vesta dashboard lights turn on only together with the low beam headlights and do not work during the day along with the DRLs, then reading the readings may be difficult. You can change the way the backlight works in several ways:
Attention! Tampering with the car's electrical system on your own will void the warranty. The author is not responsible, you do all actions at your own peril and risk
You will need to disassemble the shield. Next, we find SMD LEDs, which are responsible for illuminating the on-board computer (they light up when the ignition is turned on), they have constant power, and are controlled by ground. Next to them there is another SMD diode, which is responsible for illuminating all scales. Our task is to connect the contacts of these LEDs with a jumper (a piece of wire, as shown in the photo). If you solder it on the back side of the board, then you do not need to completely disassemble the panel (remove arrows, etc.)
A short jumper is responsible for illuminating the scales in the wells. The longer jumper is for illuminating the hands, an idea borrowed from user Atom308.
Such upgrades are not uncommon for LADA car owners. It is also necessary to solder jumpers in the case of hardware improvements to the Priora instrument cluster with navigation.
Refinement process on video (author):
According to the Lada.Online website’s own information, there are several types of instrument panels for Vesta. Some are distinguished by brighter backlighting, others have a modified backlight operating pattern (it turns on together with the ignition and DRL). Currently they are not mass produced.
Attention! Since the beginning of July 2021, LADA dealers have received firmware for the instrument panel, which allows the backlight to turn on along with the DRLs. You will have to pay extra for the firmware
Are you satisfied with the Vesta instrument cluster? Let's remember that we previously looked at how to increase the brightness of the panel yourself, as well as change its backlight color.
Many car enthusiasts are not happy with the lighting of their dashboard in the evening and at night. But poor-quality lighting or its complete absence has a negative impact on road safety. Therefore, many craftsmen do auto tuning with their own hands, making additional lighting for their car. And first of all, the dashboard lighting is done.
Very often, LEDs are used for these purposes, which have many advantages and allow you to create high-quality lighting inside the car with your own hands. This article will tell you how you can install this type of lighting in the dashboard and the nuances that should be observed in this situation.
Reviews
| № | Positive |
| 1. | Nikolay , 28 years old (drive2.ru), Sverdlovsk: I was one of the first to buy a car, the dashboard firmware was stock 026. I felt the lack of backlighting in the daytime catastrophically. On the advice of my comrades, I independently updated to version 036. The backlight has become adaptive; when the DRL is activated, the brightness decreases, which was so lacking before. |
| 2. | Mikhali , 33 years old (prom.ua), Samara: I have factory firmware with code 028. The problem with the backlight has already been fixed, but the cruise control indicator does not work stably and periodically gives an error. I plan to upgrade to version 036. |
| 3. | Alexander , 36 years old (autotoday.com), Krasnodar: I’ve been actively using Lada Vesta for four years now, code 026 is preinstalled. Of course, the problem with the backlight and DRL is familiar to me, but this does not prevent me from driving the car. |
| 4. | Valery , 47 years old (rozetka.ua), Rostov-on-Don: I didn’t know about the possibility of flashing before, my garage mates advised me. I drove with constant discomfort for two years, now I know how to fix the backlight “bug”. |
| 5. | Kirill , 45 years old, Kursk (avtoflit.com): when driving in sunny weather, the lack of illumination of the visor is obvious. Fuel level and consumption are not visible online. I heard that you can reflash the control unit with a new code. I'll contact the specialists at the service station. |
| 6. | Sergey , 43 years old, Saratov (autotoday.com): I didn’t update the program code myself, I turned to the workshop specialists for help. The guys did everything in 20 - 25 minutes in total. I am satisfied with the quality, there are no complaints about the operation of the electronic control unit. |
| 7. | Anatoly , 46 years old, Stavropol (drive2.ru): bought a car second-hand, one of the first models. I knew about the problem with the firmware, so the service station updated the code to version 036. Now the dashboard is brightly backlit; when the daytime running lights are activated, the brightness automatically decreases, which is very comfortable for the eyes. |
| Negative | |
| 8. | Vasily , 38 years old (prom.ua), Uralsk: I have negative experience of upgrading software code. The first time I flashed it myself, the installation went wrong. I went to the service station because the car couldn’t even start and had to be towed. |
| 9. | Nikiforovich , 44 years old, Moscow (avtoflit.com): even after updating to the latest current firmware version, the backlight randomly changes brightness. I don’t know what caused this. I contacted the service station after diagnostics and they recommended reinstalling the program code. |
| 10. | Vasily , 36 years old, St. Petersburg (drive2.ru): I updated to version 028 for the first time, the operation of the dashboard was unstable. On the recommendation of my comrades, I decided to re-flash it to 036, since now the equipment is working normally, without any breakdowns. |
| 11. | Gennady , 46 years old, Pskov (autotoday.com): even after updating to version 036, my backlight did not become adaptive. When activated, the DRL does not change brightness. Obviously, the problem is in the program code. |
Read also: How to find out the power of a generator
Firmware for VESTA instrument panel, VestaLargusX-RAY engine
Firmware for VESTA instrument panel, VestaLargusX-RAY engine, post pinned
Firmware for ICE 1.6 Vesta, X-RAY, Largus with M86 block Firmware available from Motor-Master (Dynamic and Super Dynamic) and Chelyaba. Different versions - Euro2/5, with fan turned on at 95-97°, with quick start, normal heating. With preservation of the firmware number and checksum of the drain. Show in full…
Firmware for LADA VESTA dashboards, WITHOUT REMOVING the panel, saving the VIN. For panels with white scales PO - 26, 28, 35, 36
— Software firmware — Activation of cruise control and speed limiter — Disabling the seat belt warning light For panels with orange scales Software — 11, 19, 22, 27, 126, 226, 301, 501 — Software firmware — Display of REAL engine temperature — Activation of cruise control and speed limiter - Disabling the seat belt warning light
Register the VIN number in the tidy For those who independently flashed the tidy with ready-made firmware and did not register the VIN
Mileage adjustment. Reduce the mileage on the dashboard, register the real mileage after an unsuccessful winding and mileage “999999”
Enabling additional functions on LADA VESTA 1. Enabling the cornering lights using PTF for the Luxury package 2. Disabling the automatic activation of the rear wiper for SW and SW Cross 3. Enabling the sound signal when the standard alarm is turned on/off 4. Disable the hill start assist system ( HSA) 5. Follow Me Home (“take me home”) for the Luxury package 6. Turning off the DRL when the turn signal is ON, from the turn signal ON side, for the Luxury package
On the first Lada Vesta cars, the instrument panel was not backlit in the daytime, which made reading the readings in bright light difficult. In addition, after installing cruise control yourself, there will be no corresponding indication on the panel. All these shortcomings can be corrected by updating the dashboard firmware.
Dismantling
First you need to remove the glove box. To do this, you need to open the box and then press out the plastic hooks that secure the top of the lid.
Vesta glove box mount
Then you need to pull the cover towards you. It is held in place by 3 clamps from below. You just need to pull and the cover will come off.
The next step is to remove the glove compartment light, which is located in the upper left corner. First, you need to press out the lampshade using a knife or a thin screwdriver, and then disconnect the wires.
When you are done with the lampshade, you will need to unscrew 5 screws using a Torx T20 sprocket and remove the glove compartment.
In what cases is a built-in hob removed?
The built-in panel is usually removed in the following cases:
- The gas burner does not burn or the flame is weak - the reason is insufficient oxygen supply or excess carbon.
Eliminated by disassembling the burner unit, the air ducts are cleaned, which provide the flame with a sufficient flow of oxygen; Disassembling and cleaning the gas divider - The flame lights up and immediately goes out - if a cylinder gas supply system is used, the reason should be sought in the reducing line, since the pressure of natural gas is an order of magnitude lower than in the “Ballon” system. To eliminate this malfunction, you need to use a mechanic’s tool - a screwdriver - to turn the regulator clockwise on the cylinder reducer by one notch;
- The ignition unit does not respond to a soft start - there is a malfunction of the control board; the reason may be a malfunction of the starting capacitor, the capacity of which should be 50-100 Rf. It must be replaced by a service technician.
Dismantling a built-in hob is not difficult. In the case of a gas cooking structure, it is extremely difficult to do without the involvement of qualified personnel, because all safety measures of SNiP, PPB and electrical safety rules must be observed.
What are extractors used for and what fasteners can be unscrewed with them?
The design of extractors is described in detail, but for what purposes can such cutting attachments be used? The devices in question are used for unscrewing any types of fastening connections - aluminum, steel, plastic, hardened and other types of bolts, self-tapping screws. It is very difficult to drill a hole in a hardened bolt, so to make the work easier, you should heat it and temper the metal.
Extractors are used to remove broken bolts from the following parts:
- From a car engine block - and this applies not only to outdated car brands, but also to modern foreign cars. When assembling a vehicle, defective parts are encountered, which are identified directly by the vehicle owners. When dismantling the engine block, a set of extractors will help you unscrew a bolt with a torn head.
- From the car hub - not all car models use nuts to tighten wheels, but also bolts. When tightening or unscrewing the bolts that secure the wheel, the cap can be torn off. This unpleasant situation can be solved by using extractors, without the need to replace the hub
- From the valve cover. Often the bolts remain in the valve covers and cylinder head, which can be removed using a set of extractors. Car owners are advised to acquire such an indispensable tool as extractors for unscrewing broken bolts
- From a concrete wall. You've probably encountered a situation where, when screwing a self-tapping screw or mounting bolt into a wall, it becomes deformed. Such malfunctions can be solved simply by using an appropriately sized extractor.
- Ignition switch in a car - when it becomes necessary to replace the ignition switch on a car along with the mounting frame in which it is installed, this is problematic. The steel frame of the ignition switch is secured with special disposable bolts (vandal-proof). To unscrew them, you will need to use extractors.
- Damage to the spark plug - when unscrewing, this part on the car can be damaged. Such cases, although rare, are quite appropriate. To unscrew the remainder of the broken spark plug, you should use an extractor. The task is complicated by the design of the engine, since on most modern cars the spark plugs are located in the shafts
- Small bolts - often when repairing phones, laptops and tablets, a problem arises when one of the remaining screws refuses to unscrew. It is impossible to find such a small extractor, since they are not produced. There are several current methods to solve the problem. The first is to use a thin drill bit. A through hole is drilled in the screw, after which the fastener can be removed. The second is to glue the screwdriver blade with epoxy glue, after which hardens, unscrew the fastener. In this case, it is imperative to use high-quality resin glue
Depending on the size of the fastening joints, it is necessary to select extractors of appropriate diameters. The price of extractors is affordable for everyone, but those who like to save money need to be careful, as cheap Chinese analogues are of unsatisfactory quality. Already the first time they are used, the threaded edges are licked off. The situation is even worse when part of the nozzle remains in the drilled hole of the remaining part of the bolt. In this case, the ability to unscrew the rest of the bolt becomes more difficult.
Features of shield 2107
The peculiarity of the seven dashboard is that it has its own special way of attaching to the dashboard. On the six, you can remove the panel quite simply - just disconnect the wiring harness chips from the terminals on the shield and unfasten the latches. In the five, the scheme for dismantling the tidy is similar to the seven, but there, too, everything is somewhat simpler due to the changed shape of the front panel and fairly good access to the mounting screws.
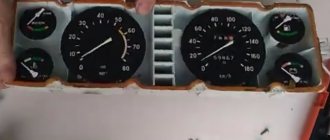
The VAZ 2107 dashboard received a completely different architecture and acquired new functions that were not available on the same 2105
For example, now before the driver’s eyes there was an economizer dial, which approximately showed the optimal driving mode for saving fuel, although few people pay attention to it. A much more useful thing was the ammeter, which disappeared in the top five
Due to the compaction of the architecture and the large number of devices and lamps, the design of the main printed circuit board changed - now the lamps were connected not by wires, but by socket contacts directly to the board.
How and where to store a car. VAZ-2109, VAZ-2108.:
| Preparatory work for car storage. VAZ-2109, VAZ-2108. Vehicle storage and maintenance. VAZ-2109, VAZ-2108VAZ-2108, VAZ-2109. How to remove a car from storage? |
Cleaning the drainage holes in the body of VAZ-2109, VAZ-2108 cars. Where and how to store the car. VAZ-2108, VAZ-2109 How to properly wash a car. VAZ-2109, VAZ-2108. Operating a VAZ-2109 and VAZ-2108 in severe frosts. What you must always have with you when operating a VAZ-2109 and VAZ-2108 in winter. How best to drive a VAZ-2109 and VAZ-2108 in winter? Care and restoration of body coating. VAZ-2109, VAZ-2108