Front suspension device on the VAZ-2110 device, design
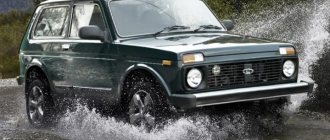
Front suspension VAZ-2110: device and design
Why a suspension is needed and what responsibility it bears, everyone knows from driving school, if not from school.
Therefore, we will not focus on general maxims, but will get straight to the point
The VAZ-2110 inherited from the eight and nine the MacPherson suspension, developed back in the 70s of the last century and tested on the experimental VAZ-2108.
Of course, adjustments were made to the design and today it looks like this:
Suspension diagram.
As can be seen from the diagram, there is nothing complicated in the design, and there is nothing superfluous. The Spartan suspension of the tenth family is of the type of independent suspension with hydraulic shock absorbers, coil springs 7 on the lower (23) wishbones. The right and left levers are hinged, using silent blocks, connected by a stabilizer bar. A stabilizer is necessary to maintain vehicle stability in turns and during active maneuvering. It is a rod made of springy steel with a bend for the muffler.
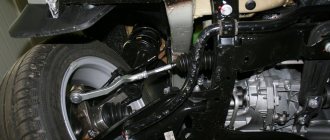
Front pillar
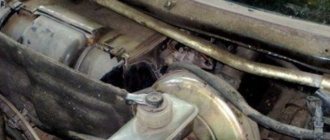
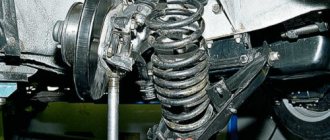
The most important, expensive and maintenance-requiring unit is the front shock absorber strut (16).
There's a suspension strut hidden somewhere here!
In the lower part, the rack is attached to the steering knuckle 19 using two bolts, one of which (18) is eccentric. By turning this bolt and releasing nut 17, the camber angle of the front wheels is adjusted. The front spring rests on the support cup 6 from below and on the upper support cup 10. To prevent breakdown of the suspension, a compression damper 9 is installed on the shock absorber rod.
The stand itself rests on top of cup 12, which is assembled with a rotary bearing 11. The upper support is a separate unit, it is fixed to the body mudguard using three self-locking nuts. The support has some elasticity in order to absorb high-frequency vibrations and not transmit them to the body, and free rotation around its axis by the rack and the front steered wheel is ensured by the upper bearing 11 and the lower ball joint 1.
The front struts are oil-based and dismountable.
Front suspension springs.
Front strut supports.
Front strut shock absorbers and protective covers.
The working shock absorber is installed in the strut housing. If necessary or when choosing a different type of shock absorber (gas, gas-oil), it is always possible to remove it from the strut body, repair or replace it. It should be taken into account that the figure-eight shock absorber is not suitable for the ten, since the strut body on the 2110 is shorter, although the design looks identical.
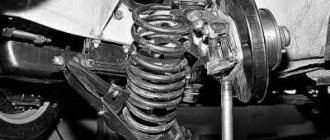
Ball joint and lower control arm
It is the ball joint that takes on all the loads - braking, accelerating, longitudinal and transverse, and in addition, it is the lower point of support of the steering knuckle.
Ball joint fastening unit.
Support 1 is fixed on the lower arm using three blind bolts. When disassembling this unit, you need to be extremely careful, since the holes in the steering knuckle for the support mounting bolts are not through and if handled carelessly, you can easily tear off the heads or break the body of the bolt. If this happens, you will have to drill out the remaining bolt or change the steering knuckle. This is labor-intensive and expensive work.
Ball joint with cover.
Lower suspension arm with silent blocks.
Stretch marks
To prevent bending of the lower arm and relieve braking and accelerating loads from it, braces are attached to it, the second end of which is fixed through a silent block to the front suspension beam.
Front suspension of VAZ-2110.
The stretchers perform another important function: they help regulate the longitudinal inclination of the rotary axis. This angle greatly affects the stability of the vehicle and its behavior when maneuvering. Adjustment is carried out using washers installed at both ends of the stretcher.
Rounded fist
An equally important detail is the steering knuckle.
Steering knuckle and hub assembly.
It is he who is responsible for the safety and fixation of the wheel bearing. The bearing is held in the fist by two retaining rings. Bearing type: angular contact, double row. It does not require adjustment throughout the entire period of operation.
The hub itself is pressed into the inner race, and it is secured with a nut, and the nuts on the right and left are the same and have a right-hand thread.
Rounded fist.
Wheel bearing.
conclusions
In short, this is how the VAZ-2110 suspension works. We examined only the basic elements of the design, but the essence is clear - repair and maintenance of the front suspension is not at all a complicated procedure, the main thing is to know its structure and promptly identify and eliminate faults. Take care of your suspension and let only smooth roads under your wheels!
Front suspension
The front suspension is independent, with telescopic swivel struts, wishbones, trailing arms and a stabilizer bar.
Front suspension: 1 — cross member; 2 — cross member bracket; 3 — adjusting washers of the front end of the extension; 4 — longitudinal stretch; 5 — telescopic stand; 6 — steering knuckle; 7 — adjusting washers of the rear end of the extension; 8 — ball joint; 9 — wishbone; 10 — stabilizer strut; 11 — rubber-metal hinge; 12 — car body bracket; 13 — stabilizer bar; 14 — rod cushion bracket
The suspension strut consists of a housing in which a hydraulic telescopic shock absorber is installed, a coil spring and an upper strut support. A bracket for attaching the steering knuckle, a swing arm and a lower spring support cup are welded to the outside of the strut body.
The coil spring rests with its lower coil on the lower support cup, and with its upper coil on the upper support cup mounted on the shock absorber rod. Also installed on the shock absorber rod is the upper support of the strut, consisting of a housing, a rubber cushion and a bearing. The support body is attached to the car body with three studs and nuts. The bearing allows the shock absorber rod to rotate in the support when the strut is turned, and the rubber buffer prevents the transfer of vibrations to the car body.
The shock absorber rod is protected from dirt and dust by a corrugated casing. In the event of a suspension breakdown, the stroke of the rod is limited by the compression stroke buffer.
The strut pivot arm is connected to the steering rod through a ball pin. Changing the length of the rod using its threaded insert allows you to adjust the toe-in of the front wheels.
1 — tie rod end 2 — threaded insert; 3 — steering rod; 4 — telescopic stand; 5 - rotary lever
The steering knuckle is attached to the strut bracket with two bolts and nuts. The upper hole of the bracket is made oval, and the bolt installed in it has an eccentric collar and an eccentric washer. When the top bolt is turned, the steering knuckle moves along the radius the required distance, using the bottom bolt as the axis of rotation. Thanks to this, the angle between the strut and the fist changes, which in turn allows you to adjust the camber of the front wheel.
1 — bracket for fastening the steering knuckle; 2 — rack body; 3 - upper (eccentric) steering knuckle mounting bolt; 4 - lower steering knuckle mounting bolt; 5 - steering knuckle
A double-row ball bearing is pressed into the hole of the steering knuckle and secured with two retaining rings. The wheel hub is pressed into the inner ring of the bearing.
At the bottom, the steering knuckle is connected to the wishbone of the suspension using a ball joint. The transverse lever is kept from moving by a stretcher, which is attached at its rear end through a rubber-metal hinge to the lever, and at the front end through a cushion to the cross member. By changing the number of washers in the front and rear brace mounts, you can change the position of the lever, thereby adjusting the longitudinal inclination of the steering axis.
1 — rear end of the longitudinal extension; 2 — adjusting washers; 3 - thrust washer; 4 — rubber-metal hinge; 5 - transverse suspension arm
The ends of the anti-roll bar are connected by struts to the wishbones of the vehicle's front suspension. The central part of the stabilizer is secured through rubber pads to the body. The movement of one of the levers is transmitted through the stabilizer to the second. This allows you to partially synchronize the operation of both sides of the suspension and thereby reduce the sway of the car on uneven roads and roll in corners.
Source
Rear suspension of VAZ 2107
Chassis front and rear suspension VAZ 2110 2111 2112 Removing the lever and extension of the front suspension VAZ 2110 2111 2112
The rear suspension of “classic” VAZ cars is directly connected to the rest of the chassis. The rear suspension of the VAZ-2107 includes a driving rear axle, which is connected to the car’s engine through a cardan drive and the rest of the transmission. The wheels are oriented strictly in the direction of travel of the car. These conditions determined the features of the rear suspension of the VAZ-2107. Like the front suspension, the rear suspension is a modernized version of the first VAZ model.
The figure below shows the rear suspension structure of the VAZ-2107. Number 1 shows the thrust spring between the axle (4) and the car body. Number 2, telescopic shock absorber dampening sudden vibrations. Transverse reaction rod 3 prevents the bridge from moving to the sides from the vehicle axis. Longitudinal rods 5 and 6 fix the position in the direction of travel. This arrangement of nodes allows you to compensate for road unevenness.
Extraneous knocks in the suspension
Body VAZ 2110 2111 2112 Removing the front bumper VAZ 2110 2111 2112
Often, a knocking sound from the front suspension of a VAZ 2110 appears when the ball joint fails
Please note that the knocking noise may disappear at high speeds, but appears when driving at low speeds. It is also emitted at the moment when someone gets into or out of the car
In the event that a knock in the front suspension appears precisely because the ball joint fails, the repair will cost you about 300 rubles.
This is how much the hinge and boot cost
Please note that it is best to fill a small amount of lubricant under the boot, for example, Litol-24 or CV joint. This can slightly extend the service life of the hinge.
Of course, no suspension can work without a lever system that gives the car stability.
The lower arm of the front suspension, attached to the wheel hub using a ball joint, is considered, perhaps, the main element of the design
Please note that the lever is attached to the body using rubber-metal silent blocks. In the event that the two sides of the car work independently of each other, without communication, the body will go wrong
Regardless of what levers are used, there will be no stability when the car moves during cornering or other maneuvers. It is for this reason that stabilizers are located between the left and right wheels. With their help, all suspension elements on both sides operate synchronously.
The front suspension of the VAZ 2110 also consists of one very important unit, with the help of which the shock absorber rod is movably attached to the body
Please note that in dozens, as well as in any front-wheel drive cars, the rack has the functions of a mechanism that turns the wheels
In other words, it should rotate without problems. The support bearing is very simple in design, no different from any other mechanism with a detailed operating diagram. But the front suspension of the dozens will not be able to work normally without this element
When carrying out repairs, you must pay attention to the condition of the support bearing.
If it fails, a knock or other extraneous sounds appear. It is quite possible that the bearing may simply jam. In this case, turning the steering wheel will be impossible. Replace the support bearing, as well as all other suspension elements, according to the repair and maintenance plan for the VAZ 2110 vehicle.
The tips from the steering rack are connected to the shock absorber strut. Approximately in the middle of the rod there are adjusting nuts, which are necessary for adjusting the toe angles of the wheels. The camber is adjusted using two bolts that secure the hub to the shock absorber strut.
The front suspension of the VAZ 2110 is very simple and contains a small number of elements. You can do the repairs yourself very simply, and you don’t need a large number of special tools
But pay attention - this type of suspension is very effective in city mode. If you need to drive in off-road conditions, it is better to look at rear-wheel drive cars or all-wheel drive
Suspension check
Knowing the meaning and design of the suspension, you will be able to check its condition every time you inspect the machine on a pit (overpass) and perform maintenance. Pay special attention to the condition of the protective covers on the ball joints. Check to see if any deformations, cracks or dents have appeared on the suspension due to shaking and bumps.
Be sure to check the condition of all rubber and rubber-to-metal parts, as well as the ball joint of each wheel. Remember: a malfunction noticed and corrected in time is much less evil than repairs when everything is already falling apart.
Encyclopedia of tuning and modifications for VAZ 2110, VAZ 2112
| Helical suspension (coilovers) allows you to easily adjust the car’s suspension to different operating conditions. But such adjustable shock absorbers have one big drawback - their high price (a set from 50,000 rubles). Want to save money? Try making homemade coilovers. |
| One of the popular ways of tuning a car is to lower it. To do this, the suspension is modified using different methods, for example, cutting off the springs (which is not recommended), installing a lowered suspension kit, installing air suspension, or using suspensions with adjustable clearance. I will dwell on the last method in more detail. |
| On the VAZ 2110 (and some other front-wheel drive cars), rubber silent blocks are used in the cross member of the front suspension. To change the characteristics of the suspension and handling, they can be replaced with rubber-metal hinges (popularly “daisies”). Let's look at this improvement in detail. |
| Car silent blocks are hinged elements that serve to connect parts of the front or rear suspension and dampen vibrations transmitted from one unit to another. Most often they are made of rubber, but for tuning enthusiasts they offer polyurethane silent blocks. Do you know what is better to choose polyurethane or rubber? |
| Buffers are interturn spacers made of durable and elastic material designed to increase the stiffness of suspension springs. According to the manufacturers, these accessories can not only make the ride more comfortable, but also extend the life of the suspension and increase ground clearance. They claim that the installation of an auto-buffer is comparable in its characteristics to the installation of an additional shock absorber and gives the effect of an air suspension. Is this really so? |
| If the car falls into a deep hole, cracks in the paintwork may appear on the strut support. Most often, Kalina owners encounter this defect, but older VAZ models (2108-21099, 2110-15) are also no exception. To extend the life of the body, there are special protective spacers that can protect weak points from damage, as well as prevent the further spread of existing cracks. |
| For the first time at AvtoVAZ, negative camber of the rear wheels was used on the sports Kalina. Later, minus camber of -1 degree was used on Grant and the new Kalina. Do you know how to make negative camber on a VAZ with your own hands? |
| AvtoVAZ recommends installing wheels with a camber angle of 0 degrees. When the wheels are parallel to each other, good traction and stable driving are ensured. Do you know why they do negative camber and how it affects the behavior of the car? |
| Many car owners complain about insufficient handling due to weak body rigidity and suspension mounting points. This problem can be solved using an integrated approach to improving the driving performance of the car - installing a subframe. |
| On front-wheel drive VAZ cars, the rear suspension is semi-independent (torsion bar), which has its advantages and disadvantages. To change the characteristics of the car, the rear suspension is changed to independent. Do you know how complicated this process is and what impressions you get after such tuning? |
| At the front of the car, as a rule, an independent MacPherson-type suspension, double-wishbone or multi-link suspension is installed. But the rear suspension may have significant differences. Depending on the car and its operating conditions, the rear suspension is dependent, semi-independent or independent with a different number of levers. Each design has its own characteristics, advantages and disadvantages, and which one is better? |
| Do you hear extraneous noise in your car when driving? You should not delay in finding the cause of the malfunction, but repair the failed part as quickly as possible. The table describes the main causes of noise when driving a car, as well as ways to eliminate the problem. |
| During the operation of the car, we involuntarily have to deal with the appearance of extraneous noise, no exception knocking or squeaking when turning the steering wheel. In this article, we will look at the possible causes of this problem and how to fix it. |
| The front struts of the VAZ 2110 are designed to absorb shocks and impacts on the car body. Their approximate service life is 60-100 thousand km. mileage, and it largely depends on operating conditions. If you notice that the car has become less stable on the road, replacing the shock absorbers will most likely solve the problem. |
Electrical equipment VAZ 2110 2111 2112 Cigarette lighter VAZ 2110 2111 2112
Front shock absorber struts VAZ 2110, 2111, 2112
Planned replacement of front suspension struts of VAZ 2112
I was tired of driving “like on waves”, so I bought:
2 VAZ racks = 1400 x 2 = 2800 rubles. Supports 2 pcs. (Balakovo) = 500 x 2 = 1000 rub. Anthers 2 pcs. = 150 x 2 = 300 rub. Chips 2 pcs. = 75 x 2 = 150 rub. WD-40 = 150 rub.
You will also need: Head 13 Head 19 Open-end wrench 17/19 Wrench 22 or 24 for the puller Pliers Mounting Key puller to unscrew the nut from the shock absorber rod Spring ties
We jack it up, unscrew the wheel, unscrew the two bolts securing the strut, one nut from the steering tip, there are 3 nuts under the hood that hold the support bearing and you can remove the strut.
We throw the spring onto the new stand and you can install it.
Let's go to the wheel alignment:
Camber/toe + work on the tip and camber bolt = 750+250 = 1000 rub.
Features when replacing the front struts of VAZ 2110, 2111, 2112
I won’t tell you how to change the front struts, since there is plenty of this information on the Internet. I will tell you what surprises you will have to face. After I jacked up the side on which I planned to change the strut and removed the wheel, I took a regular building level and pressed it to the disk
and set the level to “0”
(a level is needed with adjustable flasks). This is so that when assembling a new one, you can set the wheel camber to this level and then get to the service station for wheel alignment with minimal losses. There were no problems dismantling the rack, we proceed according to the Murzilka. But in disassembling it, I reached a dead end. When purchasing racks, you had to purchase special ones. key. I had to make a wrench to unscrew the top nut.
You need a piece of pipe suitable in diameter, insert a nut inside and tap it, making a 22mm head
Then we weld it to an unnecessary open-end wrench. Also, you need a tube to hold the rod from turning, making it oval
It's easier to remove the nut with a car. That's what I did with the second rack. You just need to rip it off and unscrew it a little. Then again along the Murzilka.
Struts and front springs SS20 Racing -50 Comfort
In these posts I will try to talk about the features of the SS20 Racing and compare them with the regular SS20 Comfort. There will be several parts. Next, under the cut.
(photos, as always, were taken with a KARKAM Q2 recorder)
I chose the racks with a -50 mm lowering for the comfort modification. There is also a sport modification, but according to reviews it turns out to be a stool. The racks have a one-year warranty.
The only thing I didn't like about the packaging was that there was nothing between the posts inside the box. They hit each other during transportation. The top cardboard in the previous photo doesn’t help with this, although it should. She is very thin.
Like these ones. I found this answer from an SS20 employee on Drive, a comment with this answer was written by a user with the nickname TeploVozniK, thank you. The SS20 Racing series shock absorbers have two settings: Comfort and Sport for each lowering value. Since shock absorbers are designed for operation as part of a lowered suspension (with lowered springs), their energy intensity is increased compared to stock ones. The Comfort settings for compression are practically the same as stock, while Sport has compression increased by 30% compared to stock. The rebound force of the Comfort is increased by approximately 60% compared to stock, while the rebound force of Sport is almost twice as high as stock. Best wishes. Shayakhmetov Vadim. Head of Service Programs Department Research and Production Enterprise
Only stands included. Standard SS20 shock absorbers are equipped with sound insulators.
Compared to conventional stands.
In details. Rotary... I'll call it a lever. So, the rotary lever is shifted a few centimeters down. This was done in order to minimize changes in wheel toe-in during suspension travel when lowering.
Not only the shock absorber rod was shortened, but also the body itself was shortened by several centimeters.
Stiffening ribs are welded to the bottom of the rack. According to the representative, the SS20 is made so as not to deform the struts during a side impact. There may be another purpose, I don’t know for sure. But because of these ribs, in the future I will not be able to install a TechnoMaster stabilizer with ball joints. But I’ll still think about what can be done. Maybe I’ll call the Bulgarian’s wife for help and cut them down.
The box contains information booklets, a warranty card and an SS20 SPORT sticker. Such booklets are in all boxes. But stickers are only found in boxes with shock absorbers and supports.
Springs with variable coil pitch and lowering of -50 mm. Cold wound. Initially I wanted to take the Eibach Sportline, but then I decided to assemble the suspension using components from one manufacturer. Four year warranty
They are quite light, which is good. According to the manufacturer, they are made of some kind of Japanese steel.
The springs have a transparent silicone braid that prevents knocking under strong compression.
Compared to a regular SS20 spring.
The box also contains a bunch of booklets and a warranty card-instructions!
It describes in detail how to remove shock absorbers and replace old springs. And what tools are needed for this.
We recommend: Automatic parking system Parkonik
Installation of a 20mm suspension stabilizer on a VAZ 2110, 2111, 2112
Participated in local amateur rally-sprint competitions. It was a great opportunity for me to experience
Repair of VAZ 2110 Lada Chassis
- Repair manuals
- Repair manual for VAZ 2110 (Lada) 1996+.
- Chassis
4.0 Chassis
Telescopic stand 1 – compression valve body; 2 – compression valve discs; 3 – throttle disk of the compression valve; 4 – compression valve plate; 5 – compression valve spring; 6 – compression valve cage; 7 – recoil valve nut; 8 – recoil valve spring; 9 – valve plate from...
4.1. Checking the technical condition of suspension parts on a car (Category). See the list of materials inside...
4.2. Rear suspension (Category). See the list of materials inside...
↓ Comments ↓
1. General data 1.0 General data 1.1. Vehicle Specifications
2. Engine 2.0 Engine 2.1 Possible engine malfunctions. 2.2 Replacing the coolant 2.3 Replacing the engine oil and oil filter 2.4. Installing the piston of the first cylinder to the TDC position of the compression stroke 2.5 Replacing the camshaft drive belt and tension roller 2.6 Adjusting the camshaft drive belt tension 2.7 Removing, troubleshooting and installing the flywheel 2.8. Replacing engine seal parts 2.9 Cylinder head 2.10 Grinding in valves 2.11 Adjusting clearances in valve drive 2.12 Removing and installing engine 2.13. Engine repair 2.14. Lubrication system 2.15. Cooling system 2.16. Exhaust gas system 2.18. Features of VAZ-2112 engine repair
3. Transmission 3.0 Transmission 3.1. Clutch 3.2. Gearbox 3.3. Front wheel drives
4. Chassis 4.0 Chassis 4.1. Checking the technical condition of suspension parts on the car 4.2. Rear suspension
5. Steering 5.0 Steering 5.1 Inspection and check of the steering on the car 5.2. Steering column 5.4. Steering mechanism 5.5 Possible steering malfunctions.
6. Brake system 6.0 Brake system 6.1. Vacuum booster 6.2. Main brake cylinder 6.3. Pressure regulator 6.4. Brake hoses and tubes 6.5 Bleeding the brake system 6.6 Replacing brake fluid 6.7. Front wheel brakes 6.8. Braking mechanisms of the rear wheels 6.9. Parking brake 6.10 Possible malfunctions of the brake system.
7. Electrical equipment 7.0 Electrical equipment 7.1. Mounting block 7.2. Generator 7.3. Starter 7.4. Ignition switch (lock) 7.5. Checking and replacing spark plugs 7.6. Integrated engine management system (fuel injection system) 7.7. Contactless ignition system 7.8. Lighting, light and sound signaling 7.9. Windshield wiper 7.10 Replacing the electric motor of the radiator fan of the cooling system 7.11. Heater electric motor 7.12. Cigarette lighter 7.13. Instrument cluster 7.14 Checking the carburetor solenoid valve control unit 7.15 Possible malfunctions of the EPHH control unit. 7.16 Electrical diagram of a VAZ-21102 car 7.17 Electrical diagram of a car with a carburetor engine 2110 7.18 Engine control diagram 2111 (pin M1.5.4) 7.19 Engine control diagram 2111 (pin MP7.0) 7.20 Control diagram for engines 2111 and 2112 (pin M1) .5.4N, "January-5.1")
8. Body 8.0 Body 8.1 Possible body malfunctions. 8.2. Replacing the buffers 8.3 Removing and installing the radiator trim 8.4 Removing and installing the locker 8.5 Removing and installing the wing 8.6. Hood 8.7 Removing and installing upholstery, trim and windshield frame lining 8.8. Trunk lid 8.9. Side doors 8.10 Removing and installing the front seat 8.11 Removing and installing the upper and lower lining of the floor tunnel 8.12. Seat belts 8.13. Rear view mirrors 8.14. Instrument panel 8.15. Heater 8.16 Anti-corrosion compounds for body treatment 8.17. Features of body repair of models 2111 and 2112 8.18. Body care
9. Appendices 9.0 Appendices 9.1 Fuels, lubricants and operating fluids 9.2 Basic data for adjustments and control 9.3 Filling volumes 9.4 Lamps used in the car
Do-it-yourself repair of the VAZ 2110 front suspension Detailed instructions
During the operation of a car, its suspension takes on the greatest load. Not only safety, but also driving comfort depends on the technical condition in which it is located. Today we will try to figure out how to repair the front suspension of a VAZ 2110 at home.
DIY suspension repair
It is worth noting that most of the repair work can be done on your own, without involving expensive specialists and using the services of service centers or service stations. So, first of all, you need to put the car on the handbrake and secure the wheels with wheel chocks. The entire repair process can be divided into several stages. Let's look at each of them in detail:
Repair of ball joints - remove the wheel and clean the suspension elements from accumulated dirt. Using a jack, slightly raise the front of the car. Unscrew the upper ball joint pin nut and press the pin out of the steering knuckle. After it comes out, remove the fastening of the ball joint and remove it from the upper arm along with the protective casing. Install a new device and assemble it in reverse order. The lower support changes in a similar way; Front suspension arms - work begins by removing the upper element, for which the steering knuckle pin is pressed out of the ball joint. Remove the bracket bolt from the bumper and unscrew the fastening nuts from the axle, then remove it, and remove the lever itself from the car. Using a special puller, damaged silent blocks are removed and new ones are installed in their place. Assembly is carried out in reverse order. It is not necessary to remove the lower element, just unscrew the nuts on its axis and, using a puller, remove the rubber-metal hinges, put new ones in their place and tighten the nuts. Removal is carried out only if the part is damaged, which, however, is quite rare;
Shock absorber - to replace this component, unscrew the fastening nut located on its rod. Remove all installed washers and the upper rubber cushion from it. Unscrew the lower shock absorber bracket, which connects it to the lower arm. Remove the broken part through the technological hole. Remove the mounting bracket and install a new shock absorber. Assembly is performed in reverse order.
It is important to remember that even if one shock absorber is broken, both must be replaced;
Spring - first of all, remove the shock absorber and disconnect the stabilizer bar from the lever. Loosen the fastening nuts on the lower axle, lightly jack the lower arm and use a lift to remove the ball joint pin from it. Lower the jack, slightly weakening the spring, and use a spatula to remove it from the support cup located below. Compress the new spring using special ties and put it in place. Using a jack, slightly press the lower arm up and insert the ball joint into the steering knuckle. Fix it and then remove the clamps from the spring. The remaining parts of the suspension are assembled in the reverse order in which they were dismantled.