Small and inconspicuous parts of the car are almost always ignored by drivers, because the chassis or the engine itself seem more important and require special care. However, big problems with the car most often arise due to some “little thing” - for example, the ignition relay. This is a miniature device that plays a very important role on the VAZ 2107.
- Principle of operation
- Relay location in the car
Table: designations of relays and fuses
- How to check the ignition relay on the "seven"
Video: checking the relay yourself
- Photo: main stages of work
Ignition relay VAZ 2107
The very first versions of the VAZ did not have a fuse and relay block, that is, power was supplied to the coil through the ignition switch itself. Such a motor starting system “ate up” a lot of electricity, and the contacts quickly oxidized and stopped functioning normally.
The VAZ 2107 is equipped with a modern ignition relay. Its main function is to reduce the load on the contacts when turning on the device, since the relay turns off some electrical circuits at the moment of startup. The ignition relay is used in both carburetor and injection VAZ 2107 models.
The miniature device reduces the load on the contacts, which extends the service life of all ignition elements
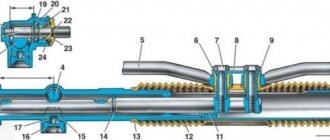
Principle of operation
The ignition relay is one of the elements of the entire ignition system. This system consists of:
- spark plugs;
- distributor;
- capacitor;
- breaker cam;
- coils;
- mounting block;
- switch.
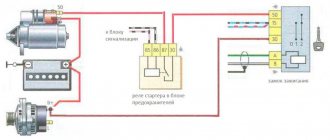
When the engine starts, power from the spark plugs goes to the ignition relay, which switches energy from some circuits. Thanks to this, the coil is supplied with the amount of power that is necessary to start the engine normally. To ensure uniform current supply, the relay works directly with the distributor and capacitor.
Relay location in the car
Any problems with the ignition relay on a VAZ 2107 begin with the fact that the driver cannot start the engine the first time. Suspicions immediately arise regarding the performance of certain components, but, as a rule, the relay is the first thing to be checked. On the “seven” it is located immediately behind the instrument panel and is fixed under the dashboard. This arrangement cannot be called convenient, because to get to the relay, you will need to remove the entire dashboard.
The ignition relay is located in a common block directly behind the instrument panel in the cabin
Table: designations of relays and fuses
| Fuse number (rated current)* | Purpose of VAZ 2107 fuses |
| F1 (8A/10A) | Rear lights (reversing light). Reverse safety device. Heater electric motor. Heater fuse. Warning lamp and heated rear window relay (winding). Electric motor for rear window cleaner and washer (VAZ-21047). |
| F2 (8/10A) | Electric motors for wipers, windshield washers and headlights. Relay for wipers, windshield washers and headlights (contacts). Wiper fuse for VAZ 2107. |
| F3/4 (8A/10A) | Reserve. |
| F5 (16A/20A) | Rear window heating element and its relay (contacts). |
| F6 (8A/10A) | Cigarette lighter fuse for VAZ 2107. Socket for a portable lamp. |
| F7 (16A/20A) | Sound signal. Radiator cooling fan electric motor. Fan fuse for VAZ 2107. |
| F8 (8A/10A) | Direction indicators in hazard warning mode. Switch and relay-interrupter for direction indicators and hazard warning lights (in hazard warning mode). |
| F9 (8A/10A) | Fog lights. Generator voltage regulator G-222 (for some vehicles). |
| F10 (8A/10A) | Instrument cluster. Instrument panel fuse. Indicator lamp and battery charge relay. Direction indicators and corresponding warning lamps. Indicator lamps for fuel reserve, oil pressure, parking brake and brake fluid level. Voltmeter. Instruments of the carburetor electro-pneumatic valve control system. Parking brake warning light relay. |
| F11 (8A/10A) | Brake light bulbs. Lamps for interior body lighting. Brake light fuse. |
| F12 (8A/10A) | High beam (right headlight). Winding for switching on the headlight cleaner relay. |
| F13 (8A/10A) | High beam (left headlight) and high beam indicator lamp. |
| F14 (8A/10A) | Side light (left headlight and right rear light). Indicator lamp for turning on the side light. License plate lights. Engine compartment lamp. |
| F15 (8A/10A) | Side light (right headlight and left rear light). Instrument lighting lamp. Cigarette lighter lamp. Glove box lighting lamp. |
| F16 (8A/10A) | Low beam (right headlight). Headlight cleaner relay activation coil. |
| F17 (8A/10A) | Low beam (left headlight). |
| * In the denominator for pin type fuses | |
More information about the electrical equipment of the VAZ 2107: https://bumper.guru/klassicheskie-modeli-vaz/elektrooborudovanie/elektroshema-vaz-2107.html
Types of relays used on the VAZ 2107:
- Relays and pin-type fuses located in the mounting block.
- Relay for turning on the heated rear window.
- Relay for turning on headlight cleaners and washers.
- Relay for turning on sound signals (jumper installed).
- Cooling system fan motor activation relay (not used since 2000).
- Headlight high beam relay.
- Relay for low beam headlights.
The VAZ 2107 uses only 7 main relays
The driver needs to know that the ignition relay on all VAZ 2107 models is installed next to the emergency power relay. Both devices have the same potential, so in case of breakdowns on the road, an emergency relay can be installed in place of the burnt-out ignition relay.
The ignition relay and emergency power relay have the same structure and potential, therefore they are considered interchangeable
Is the relay the same in carburetor and injection models?
VAZ 2107 has a very long development history. Today, all existing models can be divided into two types: old and new. Both carburetor and injection VAZ 2107 use exactly the same ignition relays, but you should carefully select a new relay based on the year of manufacture of the car.
Any type of power unit can be equipped with an old-style ignition relay, that is, the device can be considered universal. However, the new model relays are suitable exclusively for “sevens” after 2000.
The old unit uses relays of different sizes and shapes, the new ones use standard parts with increased performance
Possible malfunctions and ways to eliminate them
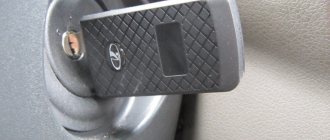
The nature of the lock assembly malfunctions on a VAZ 2109 car can also be electrical or mechanical.
The first group includes violations of the integrity of electrical circuits in the switch at a certain position of the key. If there is no contact, then the connected consumers may not work, or the car will not start at all. If there is contact, but the wrong parts of the circuit are closed, this is fraught with a short circuit and thermal damage to the lock. It will begin to melt and a characteristic smell will appear. Depending on the scale of the disaster, the contact group will most likely need to be replaced.
From a mechanical point of view, the core/larva may become stuck in some position. In this case, it will be physically impossible to turn the key in the lock. The only correct repair option is to replace the entire assembly.
To diagnose faults in electrical circuits, you need to stock up on the following tools.
- Multimeter or tester. If it is not available, as an option, you can use a control light operating at 12V voltage.
- A set of screwdrivers and keys for dismantling the lock. Since the only option for repairing mechanical faults is to replace parts that have failed, they will come in handy in this case as well.
Before starting diagnostics, you will have to disconnect the terminal block and ring all contacts in the sequence that corresponds to each of the key positions. For clarity, you should have an electrical diagram of the unit at hand. If the circuit is closed, there will be a resistance indication on the device.
Replacing the lock should begin with de-energizing it. To do this, you will have to loosen the fastening nut and remove the negative terminal of the battery. After this, the protective and decorative casing and the turn/window washer switches are removed. The lock is attached to the steering column using four screws or two screws and a hook latch. It may be difficult to remove due to the screws. In this case, they will have to be cut or drilled, doing everything extremely carefully. The terminal block is disconnected, and the dismantling process can be considered complete.
Assembling a new lock assembly occurs similarly, but in reverse order.
How to check the ignition relay on the "seven"
You can check the ignition relay directly on the car, so you can carry out this procedure yourself in two to three minutes. However, for accuracy of work, it is recommended to arm yourself with a multimeter or at least a regular indicator light. Next, you need to proceed according to the following algorithm:
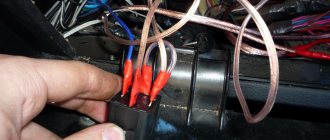
- Remove the connected block from the relay.
- Inspect the contacts for oxidation, damage and contamination.
- If necessary, you need to clean the contacts.
- Connect a multimeter to the relay contacts.
After applying power to the relay, it is necessary to measure the voltage that the device produces. If there is no short circuit when current is applied to terminals 85 and 86, then the relay is faulty. The functionality of the relay is determined by the closure of the contacts between pins 30 and 87. The numbering of the terminals is indicated on the relay itself on the reverse side.
Read about the contactless ignition system: https://bumper.guru/klassicheskie-modeli-vaz/elektrooborudovanie/zazhiganie/zazhiganie-2107/elektronnoe-zazhiganie-na-vaz-2107.html
Video: checking the relay yourself
https://youtube.com/watch?v=xsfHisPBVHU
Check and replacement
If the car shows signs of malfunction, there are signs of breakdown of elements of the ignition system, do not rush to immediately blame the starter or module for everything. Often the culprit may be an element that is insignificant in size and cost - the relay.
Dismantling works
To check the relay you need:
- Arm yourself with an ohmmeter or a multimeter more suitable for a motorist, which has all the necessary modes;
- Check resistance indicators;
- We check the holding coil by connecting one terminal of the tester to the relay connection terminal, and the second to ground, that is, the housing;
- Next, the pull-in winding is checked. Here the terminals are connected to the starter motor field winding connection bolt and the control wire connection bolt;
- If there is no resistance, there is only one output - failure.
Checking with a multimeter
Repairing the ignition switch does not make any sense. The element can only be replaced. Plus, it costs pennies.
To replace, you will need to perform a few simple steps. You don't have to be a car repairman here.
- Disconnect the battery by removing the negative terminal.
- Using a slotted screwdriver, unscrew the four screws on the steering column housing. This will allow you to easily remove the element.
- Using a Phillips screwdriver, unscrew another screw that holds the bottom of the casing in place.
- Remove the steering column protective cover.
- At the bottom there is a block of the harness with wires where the ignition relay is connected.
- To replace the relay, you simply need to disconnect the device from the block and install a new element in its place.
- Check the performance of the car with a new transmission.
Replacing the ignition relay on a VAZ 2107
To replace the ignition relay yourself, you do not need any special tools. You can easily get by with the devices that any driver has in their kit:
- a screwdriver with a straight and thin blade;
- screwdriver with a Phillips blade;
- 10mm wrench.
Using ordinary screwdrivers you can remove the ignition relay in a few minutes
If the relay stops working, it is impossible to restore it, since the original design of this part does not imply repair work. Therefore, if there are problems with the relay, you can only replace it with a new one.
Having reached the burnt-out relay, all that remains is to pull it out and install a new one in its regular place
The operating procedure for both injection and carburetor VAZ 2107 models will be the same. To create safe conditions during replacement, it is recommended to remove the negative cable from the machine’s battery before starting work. Then proceed according to the scheme:
- Start removing the instrument panel by unclamping the fasteners with a screwdriver.
- Remove the handles from the levers that hold the shield.
- Pull out the air duct nozzles by prying each of them with a screwdriver blade.
- Immediately after the nozzles, pull towards you and pull out the heater mode switch, having first disconnected the wires from it.
- Next, remove the line ends from this switch.
- Using a screwdriver, pull out the screw and its plug.
- Using a size 10 wrench, unscrew the nut securing the car's mileage reset handle.
- Push the handle as far into the dashboard as possible.
- Then remove the right edge of the shield.
- Disconnect the nut that secures the car's speedometer drive cable.
- Remove the hose from the fitting.
- Remove the wire blocks that go to the panel.
- After all this work, you can remove the instrument panel.
- The ignition relay is located immediately behind it, on a special bracket. Using a 10mm wrench, unscrew the fixing nut and remove the relay.
- Install a new one in place of the failed device, performing installation work in the reverse order.
The most common ignition switch problems.
Many owners of "nines" note one unpleasant feature of their iron "horses" - that over time, the ignition switch in them simply begins to jam. Even if it was installed quite recently. Most likely, this defect is a manufacturing defect and you need to contact the store where you purchased the new ignition switch (for this purpose, it is better to save receipts for such purchases) to make a return. However, if this option is not available to you, do not despair!
The fact is that when the ignition switch jams when starting the engine, voltage is supplied to the starter, which can lead to failure of this part. But this does not mean at all that you need to run to the auto store for a new part. In this situation, you can simply buy silicone grease and apply it inside the lock every time the lock jams.