Not very long ago, motorists came up with a way to make their car stand out from the crowd - installing side lights in the cornering headlights. This is a simple external tuning procedure. You can also not only exchange these headlights with each other, but also duplicate one or the other.
Before you learn how to correctly connect the lights to the turn signals yourself, you need to know that there are fines for this. This was introduced due to the fact that confusion with the lights may confuse other road users. Therefore, this procedure is prohibited by the State Automobile Inspectorate.
The traffic police fine system is as follows:
- ordinary citizens will pay 2.5 thousand rubles;
- officials will pay from 15 to 20 thousand rubles:
- Legal entities for such a violation will simply pay colossal fines - from 400 to 500 thousand rubles.
In addition to fines, equipment is confiscated. In this case, the vehicle is prohibited from operation, and the license plates are removed. Therefore, as you can see, the punishment for such tuning is quite severe. You will do this at your own peril and risk.
How to install side lights in turn signals
So, how to connect turn signals? To install such lights, we will need a light bulb with two filaments, a two-pin LED, a soldering iron, electrical tape and, of course, wires. Let's start the procedure:
- We lay the wires of the side lights to the base.
- We are replacing the light bulb with a new one.
- Next we will connect the wires to the light bulbs. Using a soldering iron we perform soldering:
- the first wire is one common negative for both side lights;
- the second is the positive wire for the side lights;
- the third is the positive wire of the turning lights:
- Next we need to connect the wires to the headlights themselves:
- connect the minus to the minus of the turning headlights;
- We also connect the positive wire from the paw to the positive of the turning headlights;
- We connect the second positive wire to the positive side lights.
- We wrap the insulation onto the wires and lay them down.
- We check the operation of the lights. In this case, the side lights will burn less brightly, and the turning lights will burn brighter.
If the light bulb is two-pin, then it is possible to choose a different color - not white, but, for example, yellow, so that the lights do not merge with each other. However, remember that such activity may result in a fine. But if you are ready, then your car will look original.
Manufacturing process:
Step one. Device diagram
The system's operation scheme is very simple; there is practically nothing to describe here.
All you need to do is connect the elements in a certain order to the gap between the turn signal lamps and the power supply. When operating in size mode, power must be supplied to a single wire. The author did not connect the side markers directly with the turning lights; he made a separate button to turn on the “American” lights if necessary. For these purposes, the fog light button was used. Step two.
Relay connection process The relay is connected using soldering.
How to do this can be seen in detail in the photo. The most important thing in this process is careful insulation of the soldering area and exposed conductors. Step three.
We connect the button and test the system. Now all that remains is to connect the system to the on-board computer socket, connect the button, the author even connected the power indicator. Now, after pressing the button, it begins to glow, which indicates that the system is turned on. Well, you can see in more detail how everything works in the video.
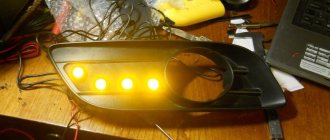
Many people want to improve their front optics, because with good light, driving is much more comfortable and safer for you, as long as your light does not interfere with oncoming drivers. There are many ways to do this. But some people want to get a unique and unusual look by tuning their headlights. To do this, for example, they install additional dimensions in the turn signals or completely transfer them there, creating the so-called American style.
The American style is that the lights are constantly on, their bulbs are in the turn signals and most often they are orange.
American cars on the VAZ 2114 are a very common practice, with them the car really looks more interesting, besides, in the dark, any additional light will not hurt. In poor visibility, a car with such tuning is more noticeable on the road. But you need to understand that such a change can mislead other road users and sometimes cause accidents.
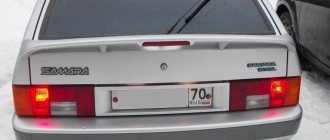
The yellow lights merge with the turn signals, and some road users may misjudge the situation. Therefore, it is better to use white dimensions, then the orange turn signals will stand out clearly. .jpg" alt="Dimensions in the turn signals of the VAZ 2114″ width="700″ height="467″ class="lazy lazy-hidden aligncenter size-full wp-image-4229″ srcset="" data-srcset="https: //vazremont.com/wp-content/uploads/2017/10/foto-1-3..jpg 300w, https://vazremont.com/wp-content/uploads/2017/10/foto-1-3- 660×440.jpg 660w» sizes=»(max-width: 700px) 100vw, 700px»>
The attention of traffic police officers to a car with such modification is increased, and they may stop you to check your documents more often.
When making an American VAZ 2114, everything must be done within the law; there are clear restrictions on any changes to the front optics. For example, you definitely cannot install red lamps, reflectors and any other devices with inappropriate color and operating mode. For such violations, a fine of 2,500 rubles was imposed.
Description of side lights
To begin with, we suggest that you familiarize yourself with the basic description of this type of optics. Let's look at the purpose, design and types of headlights.
7 important tips for choosing a phone mount for your car will be useful: the pros and cons of each type
Concept and purpose
Five additional headlights for cars
What are side lights? A marker light is an optical device that is placed in the front as well as the rear of the car, in accordance with traffic regulations. Front and rear marker lights are designed to indicate the dimensions of a vehicle so that the vehicle can be seen by other drivers. The photo shows that this type of optics can be used as parking lighting. Side lights must be on on every vehicle at night.
Types and device
Side light bulbs can be white, yellow or blue. In accordance with the traffic rules, the use of only white is allowed, however, in fact, traffic police representatives do not issue fines for such violations. As stated above, every car must be equipped with dimensions. Moreover, this type of optics can be installed either separately or as part of the main headlight unit.
As for the device, in this case the light source is a halogen light bulb. Of course, if you install xenon in the dimensions, the light source will be a gas-discharge lamp. As an option, diode bulbs, as well as entire blocks, can be installed in the headlights. If you are changing side or rear light bulbs, you need to remember that the light sources from behind should not shine as brightly as the brake lights (video author - Andrey Gorbunov).
Advantages and disadvantages
Instead of traditional lamps, diode lighting sources can be installed in the side dimensions. They allow you to emit a brighter glow, and if they blink, the voltage consumption will be lower. In particular, when compared with conventional headlights. In addition, one of the important advantages of diode elements is a higher service life, which on average varies around 100 thousand hours.
It should be noted that diodes are less sensitive to regular vibrations, as well as temperature changes and high loads. As for the disadvantages, this is the higher cost of lighting sources.
Features of operation
If you don’t know how to turn on the side lights, then there’s nothing difficult about it. We recommend that you read the service manual for operation; it contains more precise information on how to turn on the optics.
We will look at several ways:
- If the car is equipped with a power button located on the center console (as, for example, in the VAZ 2109), then this button activates the side lights, as well as the low beam. To turn on the first, the button must be pressed once, and when the next mode is activated, the low beam is activated.
- If you use a steering column switch, you need to work with it to control the optics. The switch should have a button that turns on the lights (the author of the video is the Rama rus channel).
It will be useful A hose fell out of a pistol at a gas station - who will be responsible and what to do
How to make American cars on a VAZ 2114
There are many ways to implement American cars on the VAZ 2114, each with their own pros and cons. Depending on your skills, desires and capabilities, you can choose any of the ones presented below, or come up with your own. .jpg" alt="Americans on VAZ 2114″ width="700″ height="467″ class="lazy lazy-hidden aligncenter size-full wp-image-4230″ srcset="" data-srcset="https:/ /vazremont.com/wp-content/uploads/2017/10/foto-2-3..jpg 300w, https://vazremont.com/wp-content/uploads/2017/10/foto-2-3-660 ×440.jpg 660w" sizes="(max-width: 700px) 100vw, 700px">
Turn signal lamp with two threads.
A two-filament lamp is a relatively good way. It is quite easy to install and easy to use. The lamp contains two filaments, one dim at 5 watts, the other brighter at 25 watts. A thread with low brightness is used as side lights, and a thread with strong brightness is used for turn signals. As a result, the turn signal is quite clearly visible against the background of the side lights.
To install, you will need a base with two +, or solder the wire directly to the lamp, but you need to be careful, in this case it may burn out.
Relay
The principle of signal inversion. In this case, the turn signal lamp is constantly on when driving, and when the turn signal is turned on, it begins to blink. The lights do not differ in brightness, as in the previous case, but the signal is highlighted due to the fact that the lamp goes out completely at the moment of operation.
Installation is simple, you just need to cut the wires a little and two five-pin relays, one for each headlight.
Relay with capacitor and diode
Data-lazy-type=”image” data-src=”https://vazremont.com/wp-content/uploads/2017/10/foto-3-2.jpg” alt=”Dimensions in turn signals” width=” 700″ height=”525″ class=”lazy lazy-hidden aligncenter size-full wp-image-4231″ srcset=”” data-srcset=”https://vazremont.com/wp-content/uploads/2017/10 /foto-3-2..jpg 300w, https://vazremont.com/wp-content/uploads/2017/10/foto-3-2-660×495.jpg 660w" sizes="(max-width: 700px) 100vw, 700px">
This method is, in fact, more correct than the previous one. An IN5819 diode and a 25 volt 4700 mF capacitor are added to the five-pin relay. The principle of operation is the same, but there is a guarantee that nothing will short out anywhere and will last a long time without problems.
Short circuit of the dimensions to the turn signal lamp
There is nothing easier than closing the turn signals on a VAZ 2114. But this method is fundamentally incorrect, and using it is strictly not recommended. The turn signal lamp is directly connected to the headlights, and there is essentially no turn signal at all.
Additional socket for turning headlight
Data-lazy-type=”image” data-src=”https://vazremont.com/wp-content/uploads/2017/10/foto-4-2.jpg” alt=”Additional cartridge for turn signal” width= »420″ height=»700″ class=»lazy lazy-hidden aligncenter size-full wp-image-4232″ srcset=»» data-srcset=»https://vazremont.com/wp-content/uploads/2017/ 10/foto-4-2..jpg 180w» sizes=»(max-width: 420px) 100vw, 420px»>
The most correct, according to the majority, but at the same time the most labor-intensive method is the introduction of an additional cartridge into the headlight. The cartridges are taken from unnecessary repeaters, cut off and soldered into the headlight. If done carefully, everything looks invisible; not everyone will realize the changes made.
Lada 21099 VQ30DET くろねこ KuroNeko › Logbook › Dimensions for turn signals on ONE lamp
There will be a “going out into the world” soon, which means we need to stir up some recognizable feature)
Let's call this the first stage of redesigning the front optics)
So, I'll start my story.
Suffering a headache from thinking about the trouble with the headlights, I came up with a few ideas. The first one is shown in the entry “Angel Eyes ala “collective farm” or something new?” (www.drive2.ru/cars/lada/2…/288230376152708140/#post).
Second - Philips Diamond Vision headlights with xenon effect
The third is turn signals. Not to be confused with the dimensions in the turn signals!
Precisely
turn signals-dimensions
. That is, the principle is not like this:
And such that the functions of the turn signal and dimensions are performed by ONE simple 21 W single-filament incandescent lamp. Well, I didn’t want to cut the turn signal)) I wanted to get confused) I chose yellow light. It contrasts wonderfully with the Philips' bluish light!)
The main task was to get them to work correctly in this mode. That is, the dimensions are ON - the turns are constantly on. You click the turn signal knob to the left - the left turn signal starts blinking, and the right one is constantly on. Front and rear turns work in the opposite direction (another feature). I managed this task halfway, using 2 5-pin relays.
This is like “what can you do with the headlights if you don’t disassemble them))”
It will be useful How dangerous is a smartphone while driving - a horror story or mortal danger, real statistics
If the video is upside down, sorry, I shot it that way) YouTube will redo it soon)
Why did you manage it halfway? the problem remains this: with the lights turned off, the turn signals do not work AT ALL. There is a solution, but I haven’t done it yet)) I need 2 more relays))) it’s a perversion of course, but I don’t care)
PS For “electric kettles”))) Explanation:
A. Take two ordinary five-pin automotive relays avtopasker.ru/goods/3434.htm; B. are connected according to the scheme ba.d-cd.net/d143bv/480.jpg in the same way on each side, namely:
1. To the wire that goes to the parking lamp (or take the “+” from the ignition), connect the relay to terminal “30”; 2. Disconnect the positive wire that goes to the turn signal lamp from the block and connect it to terminal “85” of the relay; 3. Connect terminal “87a” of the relay to the turn signal block from where you removed the wire; 4. Connect terminal “86” to ground; 5. We are happy with the result 6. We are indignant that the scheme has not been finalized, because without dimensions (or ignition - whatever you do), the front turn signals will not blink
Useful video
You can get additional information on installing dimensions in turn signals from the video below:
There are many tuning methods, the cheapest of which is modifying the headlights.
In addition to the basic replacement of low and high beam bulbs, car enthusiasts are often interested in how to make dimensions in turn signals. Some drivers even duplicate the side lights on a VAZ 2110 or VAZ 2114. This is done because the visibility of the lighting on the road surface is not very good, which is very important at night and in bad weather to prevent accidents.