Why does the timing belt slip and eat?
Tensioning the timing belt On many modern internal combustion engines, the timing belt is tensioned automatically; the mechanic only needs to fix the position of the tensioner roller. But there are also quite a few power plants where the belt is tensioned with manual checking. As a rule, the hands of an experienced craftsman cope with this task with a bang. It will be much more difficult for a beginner to do this. In this article we will try to provide recommendations and advice that will greatly facilitate the task of diagnosing the tension of the timing rubber ring.
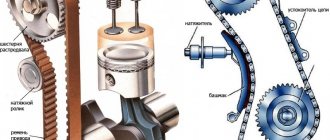
Tensioner device
The tensioner design includes the following elements:
- belt;
- video clip;
- bracket;
- connecting bolts and nuts.
The roller is a bearing with a seating sleeve inside and a plastic coating on the outside. The belt moves along the roller. The roller is mounted on a bracket, which, in turn, is attached to the car engine using bolts and nuts.
We recommend: Coolant temperature sensor: where it is located, types of sensors
There are two modifications of the tensioner:
- Eccentric. Includes bearing, plastic cover and bushing. The bushing has a through hole that is offset from the center. This hole is used to secure the roller to the car engine. To obtain the required belt tension, the eccentric is rotated and then the result is secured with a bolt.
- Bracket. In this modification, the roller is fixedly mounted on a bracket. The structure is attached to the power plant using bolts. To adjust the belt tension, the bracket is moved relative to the engine. This modification is more complicated than the eccentric one, but this does not make it any less reliable.
Some car factories install rollers with a spring bracket in their cars. In this design, the spring independently regulates the belt tension, that is, the unit is self-regulating.
Whatever device the belt tensioner has, the list of its main elements remains unchanged.
ATTENTION: The weak point of any tensioner is the bearing, which is constantly under load and wears out quickly. It is recommended to change this element every time the belt is replaced.
VAZ "Ten"
A popular car equipped with an engine with a timing belt drive. The manufacturer recommends replacing the rubber band of the GRS mechanism after 40-45 thousand kilometers, but diagnostics cannot be neglected before this period. The principle of “installing a new belt and forgetting about it” must be eradicated, understanding that being guided by this rule will not lead to anything good.
Attention. It is very important to regularly diagnose the technical condition of the belt and its tension.
In order to check the tension today, special electronic devices are used, although you can do without them. Only on the timing rubber product itself there should not be a drop of oil, dirt or signs of tear. Everything must be almost perfectly clean, without delamination, for the diagnosis to be most effective. Otherwise, it is better not to bother with diagnostics, but to immediately replace the belt with a new one, eliminating the reason why it was worn out or lubricant got on it.
Checking tension with a steelyard
Another important condition: the check must be carried out on a cold internal combustion engine.
The checking and adjustment process itself is as follows:
Now directly about the diagnostic process:
Attention. If the tension is accurate, the deflection should be 5.4 mm. Otherwise, adjustments will have to be made. If the value is less, then the tension is too strong; if it is more, the belt is too loose.
The adjustment is carried out as follows:
Note. The nut should be fixed so that the roller does not move and cannot be released.
It is also important to remember that excessive tension on the rubber timing ring reduces its service life and can easily lead to failure of the tensioner roller and even the pump. You should not listen to those false masters who claim that strong tension will supposedly eliminate all problems with the belt.
Weak tension always means the belt jumps over the teeth of the camshaft sprocket, which inevitably leads to disruption of the phases of the hydraulic valve mechanism. On the contrary, a strong tension is wear by the bearing of the same roller or water pump, as well as direct wear of the belt.
The tension can also be checked using a special device, such as “Contiteg”. The principle of its operation is quite simple, you just need to measure the amplitude of the belt vibrations.
The device always comes with a detailed description of its operation in a case. It consists of a device with readings, as well as a sensor, which must be brought to the belt (at a distance of 1 cm).
Attention. It is extremely important that the sensor “overlaps” the belt with only half its length.
How to tighten the timing belt of a VAZ
Author KakSimply! The timing belt is one of the main ones in engine drive. Its main job is to synchronize the rotation of the crankshaft and camshaft. Therefore, you should periodically monitor its technical condition and, if defects are detected, replace it. In addition, it should be properly tensioned so that it can be fully used.
Check the technical condition of the timing belt. Its surface of the toothed part must have a clear tooth profile, not be worn out, have no cracks, folds, peeling of fabric from rubber and undercuts. Pay attention to the integrity of the end surfaces; there should be no fraying or delamination on them; only a slight protrusion of the fabric fringe is allowed. Inspect the surface of the outer flat part, it should be smooth and free of cracks, folds, bulges and depressions. There should be no engine oil on the timing belt. If any of the defects are found, replace it.
Remove the generator and pump drive belt, and then the upper protective cover. Set the first cylinder to TDC by aligning the mark on the crankshaft pulley with the middle mark on the protective cover, and the mark on the camshaft pulley with the mark on the cylinder head cover. Using a 10mm socket, unscrew the nuts of the middle and lower protective covers and remove them. Disconnect the spring, loosen the bolts and move the tension roller bracket to the left until it stops. Remove the timing belt.
Check the belt tension mechanism. To do this, inspect the working surface of the roller; it should be smooth and free of burrs and nicks. Its bearing should rotate without jamming and smoothly. Check the elasticity of the tension spring; if it is weakened, replace it. Install a new belt. To do this, put it on the crankshaft toothed pulley and, pulling it, put it on the oil pump drive pulley, and then on the camshaft pulley. After placing the belt on the tension roller, install the spring by pressing the bracket to the right. Keep the timing belt tensioned and turn the crankshaft two turns without jerking. Do not loosen it when stopping the shaft. At this point, the spring will automatically set its tension. Secure the bolts. Check the alignment of the marks on the crankshaft and camshaft. If they do not match, reinstall the belt. Install the protective covers and tighten the nuts.
How to tighten the timing belt of a VAZ
Troubleshooting
The following signs indicate a malfunction or wear of the alternator belt tensioner:
- the headlights shine dimly;
- The indicator lights on the dashboard do not seem as bright as usual;
- interior heating works intermittently;
- the car siren has become duller and lower;
- the operating intervals of windshield wipers and turn signals have increased;
- There are no battery charging indicators;
- The alternator belt tensioner assembly makes a whistling sound, hum or squeak;
- When the engine is turned on, the roller or belt vibrates.
If at least one of the above symptoms is present, we diagnose the condition of the alternator belt tensioner. We perform all operations in a certain sequence.
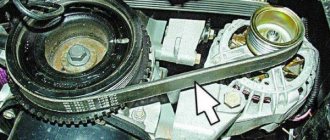
Step 1. Open the hood of the car and conduct a visual inspection of the unit. If cracks, traces of rust, or misalignment of the tensioner block or tensioner arm are detected, we replace, adjust, or adjust the worn parts.
Step 2. Start the engine and observe the operation of the unit. We pay attention to vibration, noise (creaking, crackling, whistling), resistance during rotation, beating of the lever during operation and other deviations from the norm. If extraneous sounds are heard from the unit, we try to understand which part is causing them.
Step 3. Check the serviceability of the video. To do this, remember the position of the generator belt and remove it from the unit, having first loosened the adjusting nut. Next, we proceed to inspect the video. Its surface should be smooth, without deep nicks and other damage that contribute to belt wear. We rotate the roller and make sure that the rotation is free and that the roller does not jam. If the roller is in order, we install it in its original place.
Step 4. Check the integrity of the belt. There should be no peeling or cracks on its surface, in the presence of which the belt must be replaced. We pay special attention to the uniform wear of the belt. If there is wear on one side, inspect the bracket or stud for attaching the roller. These parts may be bent or askew. If the misalignment is not corrected, the new belt will not last long.
Step 5. Check the belt tension. To do this, with the car engine stopped, we grab the belt and try to turn it 90 degrees clockwise. If the belt rotation angle deviates from 90 degrees, it needs to be adjusted.
ATTENTION! Experts recommend checking the tension of the generator drive belt at least once a week, and constantly having a new belt in your emergency supply.
Volkswagen
As you know, Volkswagen cars are equipped with timing belts and chains. According to the service book, the belt tension should be carried out so that one branch of the belt can be rotated 90*, as is the case with the Audi. Only here a few questions arise.
Timing belt tension on Volkswagen Passat
For example, one of them concerns the rotation force of the belt. Some people have strong fingers, others have weak ones. For this reason, it is recommended to carry out a combined tension and take the average value. More details below:
You should push off from the golden mean, when the belt does not clap or make noise.
Chain
For a long time it was believed that a chain was much more reliable than a belt drive. And this is true, but the chain is far from immortal. Timing chain malfunctions also occur. If the belt breaks, then there is, albeit a small, chance to save the engine. In the case of an open circuit, the situation can be much worse. The chain is more massive than the belt, and if it breaks, it literally grinds the engine. Severe damage to valves and pistons occurs. In general, there is only one fault with the chain - it breaks.
Among the reasons include the quality of the oil. The chain's lifespan is 250 thousand kilometers, but they rarely run for that long. There are widely known cases when the chain in the engine broke after a mileage of 100, as well as 60 thousand kilometers. But this is more often a factory defect in specific cars. Often problems are associated not only with oil, but also with engineers’ mistakes.
How to install and correctly tension the timing belt on a VAZ-2114: video
The timing belt must have a strictly defined tension.
If the tension is insufficient, it can hit the casing or jump over the teeth, which can lead to a violation of the valve timing.
What are the consequences of incorrect timing belt tension for the VAZ-2114 engine?
The timing belt has almost slipped. Pay attention to the gap from the belt to the engine, it is uneven
If the belt is significantly displaced, a picture similar to its complete break may be observed. Therefore, it is necessary to pay serious attention to the correct tension of the timing belt, both when replacing it and during operation of the vehicle. You can do this yourself, but be careful and be sure to follow the instructions below.
Proper tension (order and process)
Before you begin tensioning the timing belt, you must turn off the engine after idling in neutral gear. In this case, the engine crankshaft will stop in a position where all the forces acting on it will be balanced. Now let's start tensioning.
Video of replacing and tensioning the timing belt on a VAZ-2114
conclusions
Incorrect timing belt tension will lead to accelerated wear.
Accelerated wear of the timing belt due to incorrect tightening.
The engine on a VAZ-2114 does not bend the valve when the timing belt breaks, but still, there is a risk of getting up at night in a dark field in our big country. You will be lucky if the belt breaks at home or at work, and not on a long trip. To prevent this from happening, you need to set the timing belt correctly, as we wrote above!
Source
Belt on a used car
ATTENTION! A completely simple way to reduce fuel consumption has been found! Don't believe me? An auto mechanic with 15 years of experience also didn’t believe it until he tried it. And now he saves 35,000 rubles a year on gasoline!
The golden rule of a motorist is that it is better to change the timing belt on a car purchased second-hand without any checks of its condition, and thereby protect yourself from various kinds of troubles. The belt is inexpensive, you can change it yourself and save on services at a service station.
Now about how to check. Without removing the belt from the car, it is impossible to determine its entire condition. Although, you can turn its branch inside out, look at the condition and form an approximate opinion.
The most obvious signs of wear are cracks on the belt and abrasions. Their presence, however, does not yet mean complete failure of the product, but it is a hint of future problems. Despite the fact that the basis of any rubber belt is metal rods, after the rubber is abraded, there will be nothing left of them.
The metal base of the timing belt was invented for a reason. It is this that gives the chance to withstand a large number of forces and saves the functional state of the mechanism for a long period of time.
If you are lucky, you may become the owner of a used car that has a timing belt with an improved twig base. This means that the service life of the product is a priori increased by 30 percent.
You should also know that the decision to replace the timing belt is made not only if it is worn out. In most cases, the belt is replaced due to weakening, stretching, not fitting tightly, etc.
The central element of the entire GRS system is also the tensioner roller. And most often the belts break not because they are old, but because the roller jams. It is the roller that must ensure the correct tension of the belt; it is because of its poor performance that the belt easily jumps off the pulleys and breaks. Experts insist: be sure to change the roller along with the belt! It's hard to disagree with this.
In most cases, simultaneously with the procedure for changing the belt-roller set, many are forced to update the pump. The latter regularly performs its duties on some cars until the end of the car’s “life,” but this is rare. Much more often the pump fails before the specified time.
In some cases, the shaft gear is also replaced. This is especially true for used cars. An old and used gear is a big risk of breaking the new timing belt. To protect yourself from new replacements and major repairs of the internal combustion engine, it is also better to replace the gear.
A few words about the importance of correct tension
Many motorists know that improper functioning of the timing belt can cause very serious engine damage. This is due to the principles of operation of the mechanism, which boil down to the timely and high-quality opening/closing of the engine valves. This approach not only allows you to adjust the valve timing of the internal combustion engine, but also differentiates between sensitive valves and constantly knocking pistons.
Use your thumbs to force the strap inwards in the middle. Measure how much you can pull the belt out of the straight edge: you may need help to measure. The correct number of deviations must be indicated in the auto repair shop. Otherwise, 10 mm will be sufficient. Compare your measurements to the deflection indicated in the manual and adjust the tape accordingly.
Another way to tighten the timing belt
Loosen the adjustment screw slightly, but do not remove it. Loosen the adjusting screw slightly. Then loosen the bolt or screws slightly until the pump starts to move. If the belt is too tight, the pump will move inward towards the motor as the screws become loose. To get the correct tension, pull it slightly.
If the timing belt begins to work incorrectly, the gas distribution order is disrupted, as a result of which engine elements begin to wear out at an accelerated rate. Similar disturbances in the functioning of the engine can also occur due to improper belt tension.
If the belt is too loose, increase the tension by pulling the pump outward with a thick screwdriver or barbell. Attach to the melted front end of the pump housing, just behind the belt drive pulley. Not against any other part of the body or pipes that could be easily damaged.
Leave the other end of the lever on a solid part of the pump mounting bracket on the engine. Loosen the screw or screws slightly, but do not remove them. Check the belt tension while holding the pump in the desired position. Measure the deviation from the straight edge.
Checking belt wear
When the tension is correct, tighten the adjustment screw. Check the tension before tightening the bolt or pivot screws. Recheck it and adjust if necessary until it tightens the screws correctly. Inspect the belt on both sides for nicks, cuts, wear and marks.
Note! A break in the belt drive while driving not only negatively affects the condition of the engine, but can actually severely bend the valves. Repairing a car with such a breakdown often costs motorists five-digit sums of money.
Inspect every inch of the belt on both sides. Look for nicks, cuts, scuffs and cracks. Bend the belt to open up any cracks. If the tape is worn, replace it as soon as possible. Check the length of the belt between the pulleys and mark them with chalk. To open the rest of the belt for inspection, turn the engine slightly using a wrench on the crankshaft pulley nut.
How to tension the timing belt?
If the reel belt is not worn or torn, but only loose, you can easily tighten it. The procedure is quite simple and you do not need special tools or a mechanic. Of course, if you have absolutely no idea what a timing belt is and where it is located, the best solution would be not to try yourself as a master, but to leave the belt tension to professionals.
So how do you tighten your timing belt - step by step?
- Place the car in a level, comfortable place and make sure the engine is turned off
- Wear work clothes and gloves (and glasses will come in handy)
- Disconnect the battery - When working in the engine compartment of a vehicle, always disconnect the battery before starting work. This will give you confidence that the engine will not start and cause you harm. You can disconnect the battery using a wrench and simply loosen the nut that secures the ground cable to the negative terminal of the battery. (Do not disconnect the positive terminal, only the negative one)
- Find out where the belt is and whether there is only one belt or several. If you're not sure exactly where the belt is, or you don't know where to look for it, or your vehicle has more than one belt, consult your vehicle's owner's manual.
- Measure the belt tension - you can do this step by taking a ruler and placing it on the guide. To get the most accurate result
To find out what the measurements show and whether the belt tension is normal or stretched, you should consult your vehicle's owner's manual, as each manufacturer has its own specifications for determining the tolerance. However, it is good to know that in general all manufacturers recognize that a deviation of more than ½ inch (13 mm) is not within the norm.
You can also measure belt tension in two other ways. For the first, you will need a special testing device, which you can buy at almost any store selling auto parts, accessories and consumables.

