Why does the timing belt slip and eat?
Tensioning the timing belt On many modern internal combustion engines, the timing belt is tensioned automatically; the mechanic only needs to fix the position of the tensioner roller. But there are also quite a few power plants where the belt is tensioned with manual checking. As a rule, the hands of an experienced craftsman cope with this task with a bang. It will be much more difficult for a beginner to do this. In this article we will try to provide recommendations and advice that will greatly facilitate the task of diagnosing the tension of the timing rubber ring.
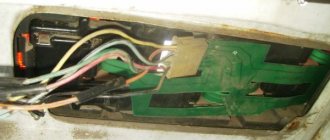
VAZ "Ten"
A popular car equipped with an engine with a timing belt drive. The manufacturer recommends replacing the rubber band of the GRS mechanism after 40-45 thousand kilometers, but diagnostics cannot be neglected before this period. The principle of “installing a new belt and forgetting about it” must be eradicated, understanding that being guided by this rule will not lead to anything good.
Attention. It is very important to regularly diagnose the technical condition of the belt and its tension.
In order to check the tension today, special electronic devices are used, although you can do without them. Only on the timing rubber product itself there should not be a drop of oil, dirt or signs of tear. Everything must be almost perfectly clean, without delamination, for the diagnosis to be most effective. Otherwise, it is better not to bother with diagnostics, but to immediately replace the belt with a new one, eliminating the reason why it was worn out or lubricant got on it.
Checking tension with a steelyard
Another important condition: the check must be carried out on a cold internal combustion engine.
The checking and adjustment process itself is as follows:
Now directly about the diagnostic process:
Attention. If the tension is accurate, the deflection should be 5.4 mm. Otherwise, adjustments will have to be made. If the value is less, then the tension is too strong; if it is more, the belt is too loose.
The adjustment is carried out as follows:
Note. The nut should be fixed so that the roller does not move and cannot be released.
It is also important to remember that excessive tension on the rubber timing ring reduces its service life and can easily lead to failure of the tensioner roller and even the pump. You should not listen to those false masters who claim that strong tension will supposedly eliminate all problems with the belt.
Weak tension always means the belt jumps over the teeth of the camshaft sprocket, which inevitably leads to disruption of the phases of the hydraulic valve mechanism. On the contrary, a strong tension is wear by the bearing of the same roller or water pump, as well as direct wear of the belt.
The tension can also be checked using a special device, such as “Contiteg”. The principle of its operation is quite simple, you just need to measure the amplitude of the belt vibrations.
The device always comes with a detailed description of its operation in a case. It consists of a device with readings, as well as a sensor, which must be brought to the belt (at a distance of 1 cm).
Attention. It is extremely important that the sensor “overlaps” the belt with only half its length.
How to tighten the timing belt of a VAZ
Author KakSimply! The timing belt is one of the main ones in engine drive. Its main job is to synchronize the rotation of the crankshaft and camshaft. Therefore, you should periodically monitor its technical condition and, if defects are detected, replace it. In addition, it should be properly tensioned so that it can be fully used.
Check the technical condition of the timing belt. Its surface of the toothed part must have a clear tooth profile, not be worn out, have no cracks, folds, peeling of fabric from rubber and undercuts. Pay attention to the integrity of the end surfaces; there should be no fraying or delamination on them; only a slight protrusion of the fabric fringe is allowed. Inspect the surface of the outer flat part, it should be smooth and free of cracks, folds, bulges and depressions. There should be no engine oil on the timing belt. If any of the defects are found, replace it.
Remove the generator and pump drive belt, and then the upper protective cover. Set the first cylinder to TDC by aligning the mark on the crankshaft pulley with the middle mark on the protective cover, and the mark on the camshaft pulley with the mark on the cylinder head cover. Using a 10mm socket, unscrew the nuts of the middle and lower protective covers and remove them. Disconnect the spring, loosen the bolts and move the tension roller bracket to the left until it stops. Remove the timing belt.
Check the belt tension mechanism. To do this, inspect the working surface of the roller; it should be smooth and free of burrs and nicks. Its bearing should rotate without jamming and smoothly. Check the elasticity of the tension spring; if it is weakened, replace it. Install a new belt. To do this, put it on the crankshaft toothed pulley and, pulling it, put it on the oil pump drive pulley, and then on the camshaft pulley. After placing the belt on the tension roller, install the spring by pressing the bracket to the right. Keep the timing belt tensioned and turn the crankshaft two turns without jerking. Do not loosen it when stopping the shaft. At this point, the spring will automatically set its tension. Secure the bolts. Check the alignment of the marks on the crankshaft and camshaft. If they do not match, reinstall the belt. Install the protective covers and tighten the nuts.
How to tighten the timing belt of a VAZ
Compression reduction
One of the symptoms of malfunctions is a decrease in engine compression and popping noises in the exhaust pipe. This happens after carbon deposits and shells form on the valve. Often the element may burn out. The cause of the burnout lies in the loose fit of the intake and exhaust valves to their seats. Other factors also influence the reduction in compression. These are deformation of the cylinder head, broken or worn springs, jamming of the rod in the bushing, lack of space between the valve and the rocker arm.
Volkswagen
As you know, Volkswagen cars are equipped with timing belts and chains. According to the service book, the belt tension should be carried out so that one branch of the belt can be rotated 90*, as is the case with the Audi. Only here a few questions arise.
Timing belt tension on Volkswagen Passat
For example, one of them concerns the rotation force of the belt. Some people have strong fingers, others have weak ones. For this reason, it is recommended to carry out a combined tension and take the average value. More details below:
You should push off from the golden mean, when the belt does not clap or make noise.
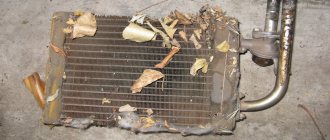
Belt edge wear
If the belt is visually very worn on one of the edges, then there may be damage to the flange or wear. In this case, it must definitely be changed.
For a long time it was believed that a chain was much more reliable than a belt drive. And this is true, but the chain is far from immortal. Timing chain malfunctions also occur. If the belt breaks, then there is, albeit a small, chance to save the engine. In the case of an open circuit, the situation can be much worse. The chain is more massive than the belt, and if it breaks, it literally grinds the engine. Severe damage to valves and pistons occurs. In general, there is only one fault with the chain - it breaks.
Among the reasons include the quality of the oil. The chain's lifespan is 250 thousand kilometers, but they rarely run for that long. There are widely known cases when the chain in the engine broke after a mileage of 100, as well as 60 thousand kilometers. But this is more often a factory defect in specific cars. Often problems are associated not only with oil, but also with engineers’ mistakes.
How to install and correctly tension the timing belt on a VAZ-2114: video
The timing belt must have a strictly defined tension.
If the tension is insufficient, it can hit the casing or jump over the teeth, which can lead to a violation of the valve timing.
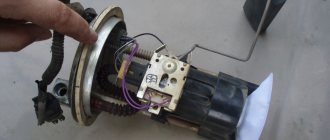
What are the consequences of incorrect timing belt tension for the VAZ-2114 engine?
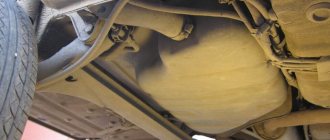
The timing belt has almost slipped. Pay attention to the gap from the belt to the engine, it is uneven
If the belt is significantly displaced, a picture similar to its complete break may be observed. Therefore, it is necessary to pay serious attention to the correct tension of the timing belt, both when replacing it and during operation of the vehicle. You can do this yourself, but be careful and be sure to follow the instructions below.
Proper tension (order and process)
Before you begin tensioning the timing belt, you must turn off the engine after idling in neutral gear. In this case, the engine crankshaft will stop in a position where all the forces acting on it will be balanced. Now let's start tensioning.
Video of replacing and tensioning the timing belt on a VAZ-2114
conclusions
Incorrect timing belt tension will lead to accelerated wear.
Accelerated wear of the timing belt due to incorrect tightening.
The engine on a VAZ-2114 does not bend the valve when the timing belt breaks, but still, there is a risk of getting up at night in a dark field in our big country. You will be lucky if the belt breaks at home or at work, and not on a long trip. To prevent this from happening, you need to set the timing belt correctly, as we wrote above!
Source
A few words about the importance of correct tension
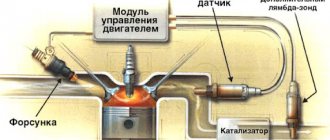
Many motorists know that improper functioning of the timing belt can cause very serious engine damage. This is due to the principles of operation of the mechanism, which boil down to the timely and high-quality opening/closing of the engine valves. This approach not only allows you to adjust the valve timing of the internal combustion engine, but also differentiates between sensitive valves and constantly knocking pistons.
Use your thumbs to force the strap inwards in the middle. Measure how much you can pull the belt out of the straight edge: you may need help to measure. The correct number of deviations must be indicated in the auto repair shop. Otherwise, 10 mm will be sufficient. Compare your measurements to the deflection indicated in the manual and adjust the tape accordingly.
Another way to tighten the timing belt
Loosen the adjustment screw slightly, but do not remove it. Loosen the adjusting screw slightly. Then loosen the bolt or screws slightly until the pump starts to move. If the belt is too tight, the pump will move inward towards the motor as the screws become loose. To get the correct tension, pull it slightly.
If the timing belt begins to work incorrectly, the gas distribution order is disrupted, as a result of which engine elements begin to wear out at an accelerated rate. Similar disturbances in the functioning of the engine can also occur due to improper belt tension.
If the belt is too loose, increase the tension by pulling the pump outward with a thick screwdriver or barbell. Attach to the melted front end of the pump housing, just behind the belt drive pulley. Not against any other part of the body or pipes that could be easily damaged.
Leave the other end of the lever on a solid part of the pump mounting bracket on the engine. Loosen the screw or screws slightly, but do not remove them. Check the belt tension while holding the pump in the desired position. Measure the deviation from the straight edge.
Checking belt wear
When the tension is correct, tighten the adjustment screw. Check the tension before tightening the bolt or pivot screws. Recheck it and adjust if necessary until it tightens the screws correctly. Inspect the belt on both sides for nicks, cuts, wear and marks.
Note! A break in the belt drive while driving not only negatively affects the condition of the engine, but can actually severely bend the valves. Repairing a car with such a breakdown often costs motorists five-digit sums of money.
Inspect every inch of the belt on both sides. Look for nicks, cuts, scuffs and cracks. Bend the belt to open up any cracks. If the tape is worn, replace it as soon as possible. Check the length of the belt between the pulleys and mark them with chalk. To open the rest of the belt for inspection, turn the engine slightly using a wrench on the crankshaft pulley nut.
Possible faults
Timing timing faults include incomplete valve closure and excessive clearance between the valve stem and the toe of the rocker arms. Gears, pushers, rods, rocker arm axles, bearing bushings and camshaft journals also wear out.
Let's consider the causes and consequences of some typical breakdowns of this mechanism, as well as signs of a timing belt malfunction.
When does the belt need to be tightened?
Having considered the previous paragraph of the article, it was probably not difficult to understand that monitoring the correct functioning of the timing belt is quite important. In particular, it is worth keeping the belt drive tension at the proper level. By the way, stretching is carried out only in two main cases:
Turn the adjusting screw as far as it will go. In some vehicles, the belt tension is varied by an adjusting ruler located on a slotted arm, which has a pulley at its end. The arm slides on a pivot screw and has a locking screw through a slot. Loosen the two screws and release the adjusting nut. Turn the adjusting screw to tighten the belt, tighten the hinge and secure the screws, checking the belt tension at each step.
Timing belt tension standards
In situations that do not correspond to those noted above, it is simply not worth touching the belt drive of the mechanism. Especially if the motor runs stably, without pronounced problems.
Troubleshooting methods
Now we list methods for eliminating these causes. Let's go in the same order.
- Belt tension . First you need to check the tension level and compare it with the one recommended by the car manufacturer (usually indicated in the technical documentation for the car, also can be found on the Internet). If this value is higher than the recommended value, then the tension must be loosened. This is done using a torque wrench. If you don’t have one, then it’s better to contact a car service. As a last resort, you can perform this procedure “by eye,” but use the indicated devices as soon as possible. You can also use a regular dynamometer and a regular wrench for this.
- Poor quality belt . If the two edges of the belt have different stiffness, then a situation will arise where the timing roller eats the belt from the softer side. You can check this by replacing its right and left sides. If after replacement the second side does not wear out, then the belt is to blame. There is only one way out, and it consists in purchasing and installing a new, higher quality part.
- Wear of pump bearings . To diagnose this problem, it is necessary to dismantle the belt and check for play on the toothed pulley. If there is play, it means the part needs to be replaced. Bearings cannot be repaired.
- The pump is installed crookedly . This situation is possible if, during the previous replacement, the adjacent surface was poorly cleaned, and small particles of the old gasket and/or pieces of dirt remained on it, but if this happens, then most likely you will understand this by the leak that appears after filling the antifreeze and starting the engine. When installing a new pump (or even an old one, if it is in good condition), be sure to thoroughly clean both surfaces (including the bolt holes), both on the pump itself and on the motor housing, and install a new gasket. In some cases, instead of a gasket, sealant is placed under the pump.
- Problems with the video . The video needs to be reviewed. It should have minimal play and a flat working surface. To check, you can use a ruler or other similar object of the required width. It also makes sense to check the presence of grease in the bearing. If its quantity is small, it should be added. If the roller is of poor quality, it must be replaced. It is almost impossible to repair the bearing, much less the roller surface.
- Damage to stud threads. To correct this situation, there are two options. The simplest is to use a saw with the appropriate diameter for turning internal threads and/or a die for turning similar threads on a stud. Another option is more labor-intensive and involves completely dismantling the block in order to restore the specified thread. This method is used if for some reason it is impossible to use the sword.
Installing washers under the roller
- Roller pin bend . Mechanically fixing a stud is almost impossible. Sometimes (but not in all cases, and it depends on the degree of curvature of the pin and the location of its bending) you can try to unscrew the pin and screw it back in, but with the other side. If the curvature is small, then such a solution may be successful. However, in most cases, shims are used. Let's consider this point separately, since most car enthusiasts consider this method a real panacea if the timing belt is eaten from the engine side or from the opposite side.
Stretching procedure
Let's say the timing belt on your car is literally slipping, or its tension is slightly off from the norm. What to do? Naturally, tighten the drive. Fortunately for many motorists, the tightening procedure is not so complicated and is completed within 5-10 minutes. To carry it out you will need the following tools:
In this article we will explain transmission belts and tread or racing surface. We will see some details to learn more about them, we will also explain what the main problems may arise. As we can see in the picture that appears on the right side, the transmission belt is made with a design that perfectly fits the motor drive pulley.
In case the belt needs to be changed, you must know how to identify it because it has a code that is printed on the belt, in this case the model, serial number and length of the transmission belt is recorded. The drive belt strips on the treadmill wear out with use. If, after training is complete and the engine is stopped, the belt is properly rolled, it will be time to change the drive belt, as wear in these grooves causes the engine to slip.
The actual tensioning procedure goes like this:
With the engine open, you must unscrew all the screws and remove the tension bolt in the protective nut. Now you can remove the belt without any problems and change or adjust it. To put everything back, you will have to tighten the screws and bolt and place the cover.
In general, tread strips can have imperfections or problems due to poor alignment. It is necessary for the tread strips to be adjusted from time to time and after installation. When the tread adjustment is performed, we see that the rear belt roller adjustment cannot be done correctly, making it impossible to perform the same center check if the front belt rollers are aligned.
Note! During repair work, you need to act carefully, without damaging adjacent timing elements. Often, the carelessness of inexperienced car repair workers complicates their lives by requiring additional repairs.
Keep in mind that poor maintenance will cause more tread wear, which will create higher levels of friction and drag, two factors that can lead to destruction of both the motor and controller board. To measure the tread of a treadmill, it is more than desirable that it be installed, since the adjustment position in which it is located is important. Be careful with the information provided in the machine's user manual, it is convenient to measure the tread. This can extend in general terms to about 1.5% if it is already in use.
Perhaps this is where the most important information on timing belt tensioning has come to an end. We hope that the material presented today was useful to you and provided answers to your questions. Good luck in operating and maintaining your car!
For band adjustment, you have several nuts to adjust it, so the band voltage will be changed. One of the best ways to measure the tread is this: stick a piece of tape on the strip, that piece will get stuck on the stretch meter or break the rope, let the group do the whole round and you will have the exact length of your tread.
Going to service stations
To avoid excruciating pain later:
Source
Repair cost
The average price for replacing a belt and roller in car services ranges from one to three thousand rubles. The price range is due to the fact that replacing parts on foreign cars costs approximately 2–3 times more than on domestic cars.
If it turns out that you also need to change the engine water cooling pump and the crankshaft oil seal, then the price will increase by another 1 - 1.5 thousand rubles.
Although there is a huge selection of products on the market at different price levels, you should only choose brands recommended by the manufacturer or their high-quality analogues. Using cheap parts can lead to serious damage and expensive repairs.
For example, if the valves are bent as a result of a belt slipping, then almost the entire cylinder head will have to be replaced. Even if the repair is carried out by yourself, the cost of replacing valves, pump, belt, filling oil and antifreeze, and other parts will be at least 10,000 rubles.
1200 rub. for the photo report
We pay for photo reports on car repairs. Earnings from 10,000 rubles/month.
Write:
Many owners of front-wheel drive VAZs are concerned about the problem of why the timing belt is eating ? Most often this question is asked by owners of the following VAZ models - 2108, 2109, 2110, 2112, 2114, Kalina, Priora, Grant (and this problem occurs on engines with both 8 and 16 valves). There is only one general answer to the question raised: the belt is skewed. And this, in turn, can happen for a number of reasons - the pump is installed unevenly, the roller is of poor quality, a washer of the wrong size is installed between the roller and the block (or it is missing altogether) and some others. Each of the listed problems is solved in its own way. In most cases, work to eliminate the causes can be carried out independently, provided you have the appropriate experience and tools. This will save money, and the repair work itself does not take much time and effort.
Human factor
As you know, the average service life of a rubber timing ring is 50-60 thousand vehicle kilometers. But this is only passport, unreal data. In fact, it is rare for any belt, even the highest quality, to “plow” so much. And the belt often suffers from factor number one - illiterate human actions.
Along with under-tightening of the belt, it is also customary to cite an overtightened version as a negative example. For some reason, some experts believe that a tightened belt will work more efficiently. Is it so? Certainly not.
The fact is that the strength of the rubber ring threads is not infinite. With a strong tension, and this is natural, a timing belt break is not far off. By the way, the same result awaits the belt if it is stored incorrectly.
And a loose belt, or rather, not tightened enough, is a sea of problems, absolutely everyone agrees with this. Such a ring will not last long, because vibrations will lead to uneven impact on different parts of the belt. Eventually it will break.
Timing belt
The negligent attitude of a person, in this case the car owner, has an extremely negative impact on the service life of any part of the car, including the belt. For example, if you don’t take enough care of the rubber ring cover of the GDS mechanism, the level of protection will gradually be reduced to nothing. This means that any pebble that gets on the rotating belt will tear it completely.
In general, negligence or absent-mindedness is dangerous everywhere, in any sphere of human activity. There is also an article of the criminal code that punishes this. Here, too, I want to not only warn careless owners, but take tough measures for their own good. Well, for example, how can you forget about NTZh and NPR rollers, because they work in tandem with the belt and have a direct impact on it?!
Note. Most automakers strongly recommend changing the rollers at the same time as the belt. This is explained by the fact that roller bearings tend to fail over time. Lack of lubrication or other reasons have a negative impact on the bearing. In turn, a poorly functioning roller bearing causes the belt to overheat, which then breaks.
A great many difficulties can be caused by various malfunctions of flywheels, for example, their flanges. Often, during the process of dismantling with your own hands, the owner does not act carefully, damaging the flanges. And after this, the latter function extremely dangerously for the belt, as they easily cut the edges of the rubber ring. An incorrectly installed belt guard can have the same result.
It is also not uncommon that, if assembled incorrectly, the shaft wheels may end up in different planes. What this leads to is probably not worth writing about.
The camshaft locking also has a negative effect on the belt, but this is a rare case. This usually happens due to insufficient lubricant levels. As a result, the forces in the drive increase and several teeth break off at once.
Timing belt tension
People often ask on forums whether it is possible to use a relatively new belt after repairing an internal combustion engine? Reuse is certainly possible, but the ring must be installed in the same way as before dismantling.
Correct belt tension without special tools
Below are instructions for properly tensioning the rubber ring of the gas valve mechanism on eight- and sixteen-valve internal combustion engines of the domestic “eight”, “ten” and other similar models.
Examination
First, the tension is checked:
Note. The tension on the “eight-valve” is checked as follows: take the front branch of the belt with your thumb and forefinger and turn it across with a little effort. If you can do it 90 degrees, it won't tighten.
But if the belt is not tightened, it will dangle. When the motor is running, hit the protective casing. All this should be checked by tightening the belt as needed. During throttle applications and idling, there should be no unnecessary noise coming from the belt.
Timing belt diagnostics
Checking on a sixteen-valve engine is carried out as follows. The belt is tightened, again, after turning the crankshaft two turns. Then the coincidence of the indicators between the camshaft wheels is diagnosed (there are two camshafts on the 16-valve). In this case, we are interested in the belt deflection, which should be within 5 point and 4 tenths millimeters under the appropriate load.
Two devices can help in checking.
In the first case, you need to place a tape measure between both camshaft sprockets. Then place a weight on the tape measure and ask an assistant to measure the deflection.
In the second case, we hook the scales in the very center of the belt between the shafts, and then pull it up until 10 kg is pulled out. And at the same time we ask our partner to measure the deflection, which should not be more than the above value.
Tension of the rubber ring of the GRS mechanism
Tension is carried out using a special wrench for the NTZ roller. If you don’t have such a tool, you can use handy tools. For example, take two nails and a screwdriver. The latter is placed between the nails. You can also make a key from a table fork, leaving only the outer teeth, which must be shortened and bent so that they fit under the holes of the NTZ roller.