Delivery by Russian Post (cash on delivery, no prepayment)
Advantages: the most widespread network in Russia, delivers to any corner of the country, including remote ones. Flaws:
- high cost of delivery of heavy or large parcels, as well as the weight of one parcel should not exceed 20 kg;
- long delivery times and queues in large cities for receipt.
To send your order by Russian Post:
- Place an order in our online store by phone or on the website (registration is not necessary);
- After we receive it, our manager will contact you by phone to clarify the cost, delivery time and your wishes. Next, we will pack your order carefully and then send it to you;
- You will receive the tracking number of the shipment via SMS from us and from the Russian Post; the message will indicate the full cost of the purchase, including delivery to your locality (that is, the cost of your order plus the cost of delivery by cash on delivery). You can control the status of the order coming to you using our tracking service, as well as independently, on the Russian Post website using the track number;
- To the Post Office, you will only have to pay the cost, including delivery.
Delivery time may vary depending on how far your locality is from Togliatti and usually ranges from 5 to 14 days.
The cost of delivery is calculated based on the volume, weight of the selected product and the distance to the recipient's settlement.
Required for sending:
- indicate full name recipient;
- Your mailing address;
- Your phone number (contact);
- Post office code.
Russian Post commission for cash on delivery service:
- purchase price up to 1,000 rubles. – 70 rubles + 5% of the amount;
- purchase price from 1,000 to 5,000 rubles. – 80 rubles + 4% of the amount;
- purchase price from 5,000 to 20,000 rubles. – 180 rubles + 2% of the amount;
- purchase price from 20,000 to 500,000 rubles. – 280 rubles + 1.5% of the amount.
Russian Post - Delivery of goods up to 20 kg throughout Russia. https://www.pochta.ru
Delivery time and cost Track the parcel Calculate delivery by mail
How to improve headlights on a VAZ 2109
Dim headlights have become a big problem for many car owners. Poor lighting on the highway means you can see only part of the objects along the way and there is no chance of normal, confident movement. Poor quality low beams in the city, especially in wet weather, mean the risk of not seeing a pedestrian on the road or not noticing cars driving without illumination.
So it’s always worth remembering what the light on the car should be. There are dozens of options for improving the brightness and quality of the light beam from headlights. Today we will look at some of them. Let us remind you right away that we will be talking about halogen headlights, which are permitted by law.
Although xenon improves the quality of light, it reduces safety due to significant blinding of drivers of oncoming cars.
If your car comes from the factory with halogen lamps installed in the headlight optics, this is exactly what you need to proceed from. It is interesting that even in this version there are many ways to improve the light beam, its direction and quality. So you should initially try legal methods and forget about powerful xenon and other not the most successful solutions.
It's best to use factory type optics, but today we're going to talk about how to improve the factory light. However, many motorists operate a car with poor low/high beams, without even suspecting that the optics were much better from the factory.
So, for many drivers, it will be enough to return the actual factory settings of the headlights in order to receive complete satisfaction in terms of the operation of the car’s optics. Let's look at a few improvement options.
Headlight lenses are faded - solves the problem by polishing or replacing
Dull headlight lenses are one of the serious problems for motorists. Yellow glass or a dark inner side are troubles that indicate a malfunction of the optics mechanism itself or a too long service life. Yellowed and scratched glass can be polished if it is smooth using the following options:
- buy a special polish for car glass, do not skimp on this product, otherwise it will not help remove microcracks and various other minor problems;
- prepare the headlight in a garage or other dry place for polishing, wash it and wipe it dry (it is not necessary to remove the optical device);
- Next, apply the required amount of polishing paste to the glass and rub it with a soft cloth over the entire surface; you can first polish a small area;
- then rub the polish into the glass surface with quick circular movements and watch for changes in the appearance of the headlight; the procedure can take quite a long time.
It is often recommended to use expensive toothpaste as a polishing material. In fact, this does not always work, so it is better to buy special products for such cases. Moreover, you can significantly delay the very expensive replacement of headlights by carrying out this operation correctly. Cloudy glass is one of the first causes of reduced light intensity in your car.
What to do if the headlight lenses are constantly sweating?
The issue of headlight glass fogging is also quite complicated. It often happens that the optics sweat, and this greatly reduces the penetration of light during the trip. It is best to check the tightness of all elements of the headlight unit, look for the presence of rubber seals and tightly closed covers. If you cannot find the reason on your own, take the car to a mechanic. Most likely, the headlight will have to be changed (it is better to perform this process in pairs for two optical elements).
Or maybe just change the light bulb to a powerful one?
One of the options for solving the problem of poor light on domestic cars is to install high-quality lamps. And if cars of foreign origin have quite good light bulbs installed from the factory, then our cars are equipped with something cheaper. Almost every buyer has to face this problem. Choose one of the following options:
Source: https://autodok24.ru/rashodniki/kak-uluchshit-svet-far-na-vaz-2109.html
A brief overview of the design of automotive optics
The design of a regular headlight is not complicated. Most often, the headlight combines the following elements:
- light source (LED, metal halide, xenon and other lamps);
- reflector (reflective element);
- light-scattering element (corrugated glass);
- housing with fastening.
Headlights with super-bright diode lamps are very popular among car owners. Such headlights require a record low amount of energy and can work for a long time without interruption.
The operating hours of such headlights range from 30 thousand to 100 thousand hours, while a conventional halogen lamp has a service life of only about 2000 hours.
Headlights for VAZ 2109
Most often, headlights are considered in terms of their functionality, i.e. how well they perform their assigned functions - road lighting. However, headlights can highlight the appearance of a car and add personality to even the most ordinary design.
In this article we will try to figure out which headlights are optimal for the VAZ-2109 car, methods for upgrading and tuning headlights, as well as common models of headlights and rear lights.
Standard equipment of VAZ-2109
The usual power of the lighting devices that come with the VAZ-2109 car is about 60 Watts. Despite their low power, such headlights can easily serve for 10 years, and even more if used carefully. But if you purchased an uncertified headlight, its service life will not exceed several weeks.
THIS IS INTERESTING: How to remove the rear window on a VAZ 2107
Headlights may not fit
Therefore, if you do not want to change your headlights every 2 months, choose high-quality optics from the original manufacturer. But if you are not satisfied with the classic headlights on the VAZ-2109, then you should carefully choose alternative options so as not to purchase a low-quality product at an inflated price many times over.
There are quite a few models of headlights for the VAZ-2109, but unlike the “official” models, it is not produced on an industrial scale, but is purchased as a piece. Therefore, when choosing, you should focus only on your experience and the integrity of the manufacturer. In the second part of the article we will tell you what to look for when choosing headlights, but for now we will talk about tuned headlights, their classification, varieties and distinctive features.
Reasons for choosing alternative optics
Today, more and more car enthusiasts prefer unusual alternative options to standard headlights. There are many reasons for this decision. The most basic:
Alternative optics
- alternative optics are developed taking into account increasing the aesthetic value of the car. If the alternative headlights looked less attractive than the base kit, there simply wouldn't be a need for them;
- alternative headlights are a great way to emphasize your individuality by adding a unique design to your car;
- The basic headlights are not always completely satisfactory for the car owner. In this case, replacing optics is dictated not only by the desire to stand out, but also by the need to replace a low-quality item with better quality headlights.
Standard headlights on the VAZ-2109 do not always meet all requirements. Due to unreliable sealant, moisture can get inside, the glass becomes covered with condensation and becomes cloudy. If oxidation of the headlight contacts occurs, it goes out. Changing just the glass is time-consuming and unprofitable - if the glass is not reliably insulated, any ingress of water will lead to a short circuit and damage the headlight. The only option left is to completely replace the base headlights with alternative ones.
Classification of car headlights
In order to properly navigate the many alternative optics options for passenger cars, in particular VAZ, we will consider the most common light sources.
- An incandescent lamp is a tungsten filament placed in a sealed bulb made of durable glass.
When heated, the metal filament emits tungsten from the surface and emits a beam of light. The disadvantage of such a light source is its short service life compared to other automotive optics. Over time, tungsten wears out and the lamp burns out. In addition, due to constant evaporation, the optics darken over time. - A halogen lamp differs from an incandescent lamp in that inside the bulb with a metal filament is halogen gas (most often I or Br).
Thanks to the gas, the heating temperature of the filament increases, and the lighting capabilities of the headlamp are improved. In addition, a halogen lamp lasts many times longer than an incandescent lamp (up to 1000 hours). - A gas discharge lamp allows you to create a much more powerful design.
Such lamps are also called “High intensity discharge” or HID. Illumination occurs due to the heating of gas under high pressure. HID lamps use xenon due to its maximum light output. The disadvantage of such a lamp is its high cost, because To operate such a device you need special equipment. - Light-emitting diodes or LED are the most efficient, long-lasting and bright lamp.
An LED is a semiconductor device that converts electrical current into light. In recent years, diode lamps have become more popular than others due to their relatively low cost, bright light and huge service life - more than 3 thousand hours.
LEDs
The most common halogen headlights are gradually making way for LED ones. LED headlights have not yet become widely used, but their use reduces maintenance costs, their service life is much longer than others, and their energy consumption is the lowest. However, xenon headlights are still considered the most prestigious. Let's compare them.
Comparison of xenon and diode headlights
The design of an LED headlight is much simpler than that of a xenon headlight, so low cost is added to the other advantages.
Xenon lamps are a privilege of business-class cars, and despite their high light emission characteristics, their maintenance is very expensive.
Just look at the cost of a separate ignition unit and control unit! In addition, when xenon headlights are on, they consume a huge amount of energy - when turned on at full power, they can drain the battery in just a few hours.
Xenon headlights
Delivery by transport company (cash on delivery, no prepayment)
Advantages:
- the cost of delivery of heavy and large-sized orders is much cheaper than that of Russian Post;
- There are practically no restrictions on the weight and dimensions of cargo;
- There is a wooden crate service - this is an additional guarantee of the integrity of the order.
Disadvantages: unfortunately, there are branches only in cities.
The estimated cost of delivery for an order up to 30 kg is 450 rubles.
List of transport companies with which we cooperate:
- TC "PEK" (cash on delivery service available);
- TC "Business Lines";
- TC "Energia";
- TC "KASHALOT" (KIT) (cash on delivery service available);
- TC "SDEK" (cash on delivery service available);
- TC "DPD";
- TC "ZhelDorExpedition";
- TC "VOZOVOZ";
- TC "Baikal-Service".
To send your order by transport company:
- Place an order in our online store by phone or on the website (registration is not necessary);
- After we receive it, our manager will contact you by phone to clarify the cost, delivery time and your wishes. Next, we will pack your order carefully and then send it to you;
- You will receive a shipment tracking number from us via SMS or email (if available). You can monitor the status of the order coming to you using our tracking service, as well as independently, on the transport company’s website using the track number. After the order reaches your locality and the manager of the transport company contacts you, you need to receive the order at their office or order home delivery;
- Upon receipt from the transport company, you pay the cost of delivery and order.
The cost of delivery is calculated based on the volume, weight of the selected product and the distance from the city of Tolyatti.
To send an order you must:
- indicate full name recipient;
- Your locality and region;
- series, number of passport or driver's license;
- Your phone number (contact).
TC "Business Lines" - Urgent delivery of goods from 1 kg throughout Russia. The exact cost can be found on the official website of the delivery service - https://www.dellin.ru
Delivery time and cost Track the parcel View the list of branches
TC "PEK" - Guaranteed safety of cargo for the entire duration of cargo transportation, clear information support, delivery of goods throughout almost the entire territory of Russia, Belarus and Kazakhstan in optimal terms and accurately calculated cost of services. The exact cost can be found on the official website of the delivery service https://pecom.ru/ru/calc
Delivery time and cost Track the parcel View the list of branches
TC "SDEK" - Low tariffs compared to foreign courier companies, while the quality of the services provided meets modern international logistics requirements. Developed network of own representative offices. The exact cost can be found on the official website of the delivery service https://www.cdek.ru/calculator.html
Delivery time and cost Track the parcel View the list of branches
TC "ZhelDorExpedition" - Serves only large cities and towns. The exact cost can be found on the official website of the delivery service - https://www.jde.ru/branch
Delivery time and cost Track the parcel View the list of branches
TC "Energia" - Cargo transportation in Russia, CIS and China. The exact cost can be found on the official website of the delivery service https://nrg-tk.ru
Delivery time and cost Track the parcel View the list of branches
TC "KASHALOT" (KIT) - Delivery of cargo from 1 kg to 20 tons throughout Russia and Kazakhstan. The exact cost can be found on the official website of the delivery service https://tk-kit.ru/calculate
Delivery time and cost Track the parcel View the list of branches
TC "Baikal-Service" - Transportation and delivery of consolidated cargo by road across Russia. The exact cost can be found on the official website of the delivery service https://www.baikalsr.ru
Delivery time and cost Track the parcel View the list of branches
TC "DPD" - Transportation and delivery of groupage cargo by road in Russia. The exact cost can be found on the official website of the delivery service https://www.dpd.ru
Delivery time and cost Track the parcel View the list of branches
TC "VOZOVOZ" - Transportation of groupage cargo by regular delivery routes between Russian cities. The exact cost can be found on the official website of the delivery service https://vozovoz.ru
Delivery time and cost Track the parcel View the list of branches
How to improve the light on a VAZ 2109
Dim headlights have become a big problem for many car owners. Poor lighting on the highway means you can see only part of the objects along the way and there is no chance of normal, confident movement. Poor quality low beams in the city, especially in wet weather, mean the risk of not seeing a pedestrian on the road or not noticing cars driving without illumination.
So it’s always worth remembering what the light on the car should be. There are dozens of options for improving the brightness and quality of the light beam from headlights. Today we will look at some of them. Let us remind you right away that we will be talking about halogen headlights, which are permitted by law.
Although xenon improves the quality of light, it reduces safety due to significant blinding of drivers of oncoming cars.
If your car comes from the factory with halogen lamps installed in the headlight optics, this is exactly what you need to proceed from. It is interesting that even in this version there are many ways to improve the light beam, its direction and quality. So you should initially try legal methods and forget about powerful xenon and other not the most successful solutions.
It's best to use factory type optics, but today we're going to talk about how to improve the factory light. However, many motorists operate a car with poor low/high beams, without even suspecting that the optics were much better from the factory.
So, for many drivers, it will be enough to return the actual factory settings of the headlights in order to receive complete satisfaction in terms of the operation of the car’s optics. Let's look at a few improvement options.
You can make payment in one of the ways convenient for you:
- To a SberBank or Alfa-Bank card. The most profitable method for the buyer, as well as the most convenient one, is to use the Sberbank Online service, Alfa-Click, an ATM, or through an operator at the bank. After placing your order, the manager will send you the card details. If you do not have a SberBank or Alfa-Bank card, you can also top up your card using the details at any SberBank or Alfa-Bank branch. Payment is credited within an hour.
- Yandex money. Customers who have Yandex.Wallet can quickly and easily pay for an order in our online store, the commission will be 0%.
- Yandex.Checkout is an online payment acceptance service. A convenient option with a large selection of payment methods for your order: plastic cards of any banks, including credit cards, in cash through terminals, ATMs or phone shops, Qiwi Wallet, Yandex.Money, WebMoney, from your phone balance, purchase on credit (payment in installments) . Please carefully check which email address you provided during the ordering process, as you will receive a receipt for payment for your order. Yandex.Checkout commission for transfer will range from 3% to 6% .
- QIWI wallet. If it is more convenient for the client to use a QIWI wallet or, if it is not available, to pay through the nearest QIWI terminal, the manager will provide you with the wallet number. Commission 0%.
- Payment at any bank using an invoice or receipt (+3% to the cost). If you do not use electronic wallets and plastic cards, we provide the opportunity to make payments at any bank in Russia. The site manager will send you a pre-filled receipt “Form No. PD-4” by e-mail; please carefully check the e-mail address you provide. The bank commission will be approximately 3% and depends on the bank itself
- Cash on delivery upon delivery by the Transport Company (payment for purchase upon receipt of the order).
- Cash on delivery upon delivery by Russian Post (payment for purchase upon receipt of the order). The order arrives at the post office, after which you pay its cost and pick it up, in which case the Russian Post charges a commission.
Headlights do not shine well: what is the reason and what to do?
High-quality lighting is the key to a comfortable and safe ride, especially at night. Weak or uneven headlights can be caused by a variety of reasons. However, often even an inexperienced driver can diagnose the problem and solve it.
There are several situations when headlights do not shine well:
- poor adjustment;
- low voltage;
- headlights are clogged;
- the headlight glass is cloudy;
- contacts are coming off.
One headlight is brighter than the other
There are cases when one headlight burns brighter than the other. This happens for the following reasons:
- One headlight has loose contacts. It is necessary to disassemble to check all connections.
- One of the headlights has mechanical damage. Such damage can only be eliminated by replacing the headlight.
- There is dirt on the surface of one headlight. One of the simplest and most common causes of dim light. It can be fixed just as easily - wipe the headlight with a wet cloth to clean the surface.
- Faulty light bulb. It is enough to replace the lamp with a new one.
Low beam headlights are dim
Current traffic rules oblige the car owner to turn on low beam headlights when driving during the day. Constant use of lighting increases the risk of breakdown. The reasons for the breakdown can be very different:
- Problem with contacts. Most often, oxidation damages the headlight. It is necessary to check all the “mass” under the hood and additionally the console. Inspect the headlight terminals - they may come off the fasteners. To prevent future natural oxidation caused by moisture entering the contacts, treat them with silicone lubricant.
- In most cases, cloudy headlights are the result of long-term use. And if cleaning the headlight does not help, it needs to be replaced.
- Faulty headlight bulb. It is enough to replace the old one with a new one.
How to make your headlights shine brighter
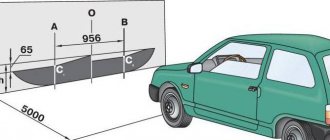
Poor headlight adjustment leads to problems. The light is not directed directly at the road, but to the side. Many car owners are not aware that light can be slightly scattered. This occurs due to even unnoticed damage to the bumper. Visually it will seem that everything is in perfect order. It’s not difficult to check how the light is directed:
- You should drive your car at night to the wall;
- using, for example, a laser level or by eye, determine the discrepancy from the norm;
- make adjustments if necessary;
The video will help you adjust the headlights yourself
Tinting technology
First of all, you need to cut out fragments of the film that completely match the shape and size of the VAZ 2109 glass. A professional approach involves dismantling the glass. However, do-it-yourself performers at home usually use a different method. In accordance with it, you need to attach papyrus paper to the glass and outline its contours. After this, cut out the pattern and transfer it to the tint film, and you need to leave some margin.
VAZ 2109 also needs to be prepared for tinting. First, the seals are removed from the windows, and then all the glass on which tinting will be applied must be thoroughly washed using detergent.
Then you need to prepare a solution of warm water and detergent or shampoo and pour it into a spray bottle.
The outer side of one of the glasses is sprayed with this solution and immediately after that a tinting film is applied to it with a transparent layer on the outside. In order not to confuse the sides, we do the following: first slightly separate it in one of the corners. After this, you should level and cut the film, leaving a margin of 1 cm, then spray the glass from the inside. Now you need to quickly, before the solution dries, separate the dark layer from the film, moistening it with a soap solution. It is advisable to have an assistant who would hold the transparent layer. The removed tint is applied to the inside of the glass, a transparent layer is applied on top to protect the tint from damage, and smoothed with a rubber spatula from the center to the edges without sudden movements to get rid of air bubbles.
Smoothing is continued until the transparent film comes off. It is removed and the protruding edges are trimmed by running a knife along the edge of the glass. After this, the tint can be dried with a hairdryer or left and moved on to the next glass.
It is advisable not to insert seals or lower tinted windows for two days after tinting.
There is another way of tinting without the use of film, where it is created by the artist himself. To do this, you need to prepare a 20% solution of rosin in liquid soda; it should have a dark yellow color. After filtration, a little ferric sulfate or ferric chloride is added to the solution until a red precipitate of iron resinite forms: it is separated, washed and dried. You can dissolve the sediment in gasoline, in this case you will get a brown tint. The color can be changed by using a different chloride, and the saturation can be changed by changing the concentration of rosin and metal salt.
The solution is applied with a spray bottle onto glass that has been previously dismantled, washed and degreased in a soap-soda solution. It is then washed, dried and placed in an oven, where it should be kept at a temperature of 600°C for 5-10 minutes. As a result, a highly durable film is formed on the glass.
Now let's talk more about the process itself.
- the headlights need to be dismantled and then disassembled;
- then you should remove the additional reflector for the turn signal;
- remove chrome from the lamp with fine sandpaper;
- apply primer.
The primer must dry well; this will require waiting at least an hour. Special paint must be applied to the headlight in 2-3 layers, otherwise the paint may simply peel off. After this, it will take time again for the paint to dry completely, this will take about one hour.
Once the paint has dried well, you can completely assemble the rear optics. You need to approach the application of sealant with special responsibility. The old sealant must be completely removed, then the tail light must be degreased and the new sealant must be applied directly. This must be done carefully, since if the sealant is applied incorrectly, the headlight may fog up, which can lead to serious consequences.
In general, tuning headlights is not a particularly complicated process, but if you are afraid of making any mistakes, of course, you can buy tuning devices. However, the tuning process itself is interesting; every car enthusiast would like to do everything himself, putting his soul into this matter.
Sources
- ladaautos.ru/vaz-2109/poshagovyj-tyuning-far-vaz-2109.html
- infokuzov.ru/tuning/fary-vaz-2109
- okuzove.ru/kuzovnoj-tyuning/tyuning-far-vaz-2109-svoimi-rukami.html
- drive2.ru/b/518553324232900727/
Repair and Improvement" on DRIVE2
Good afternoon friends! My hands also got to the headlights, I’ll immediately write about my PRO-SPORT headlights after installing the lenses and xenon DID NOT MELTED, as many said that it would be bad for them! I purchased a set of Bi-xenon lenses and a set of xenon (not bi-xenon) the function of low and high beam is performed by a curtain which is installed in the lens! The entire installation process took about 2 days, the main task was to figure out how to secure them in the case and, accordingly, so that everything would work and be adjusted, which seems to have been successfully accomplished. In general, I have grandiose plans for the headlights, but since I didn’t have enough time, I went according to a shortened plan, since I still needed to prepare for 07/27 AdrenalinFEST Chernigov 2013 and there was so little time! Get to the point!
Actually the lens itself!
Using an industrial hair dryer, I disassembled the main beam module into parts; from the module, I need the housing itself in which the angel eye is located. I tried on the lens inside (the lens is a bit small in diameter) and then the mask under the lens (decorative) came in handy, one might say it played an important role in the installation.
The mask fit perfectly, for greater proximity to the glass of the module, along the edges. I ground down the stiffness ribs so that the mask would fit more tightly, I put it on and looked and realized that I needed to repaint it matte black and then it would blend in with the color of the lens itself (from the outside you wouldn’t understand that there is a mask between the body and the lens) I attached the mask itself to the body using ordinary self-tapping screws in photos 5 and 11, you can see 4 screws placed crosswise, the main thing is that the mask itself is fixed exactly without distortions and other deviations, because it will affect the future lens light!
I made a hole in the lens body to install an LED (to create the effect of an eye), took one bright blue LED (I just didn’t want another color) in principle I was satisfied with the result of the glow, but in the future I’ll redo it - I want more brightness so that it’s really not visible during the day but in the evening time!(((LED connected to a common circuit with dimensions!
I put everything together and put it in its proper place. I tried to adjust it. And then another unexpected surprise awaited me, the angle of tilt adjustment up and down was very small, after disassembling everything I turned the module body back in my hands and came to the conclusion that I needed to move the fastenings lower, thereby raising the module and the adjustment angle will be greater, I went and bought 4 thick rivets with a leg diameter of 4.8mm, cutting the leg to the required length, drilling a hole on both sides (I took a 4.5mm drill) so that the new mount fits tightly and there is no play. I put everything back together, tried it, but it was a completely different matter. Then, when everything was ready for installation, it dawned on me that the lens turned out to be open and I needed to come up with something to remove dust and dirt; I saw an empty 2L at hand. plastic bottle, cut the part with the neck to pieces, left it (I also cut off the neck), brought out all the wires into the neck, and put on the lens mount housing with the other side (the diameter was perfect), but I had to struggle a little with fitting, I understand the collective farm, but I was running out of time for the next one I had to go to Chernigov for the day. As shown by unique tests, the dust and dirt protection from the bottle has proven itself to be excellent))) The final touch, I had to cut off the headlight mounting bar, the lens rested on it, I did not cut it off completely, but right under the headlight mount! You can see it in the photo!
The first photo is in the installed form. The boundaries of the light are less visible on the wall!
Dimensions, looks impressive! Especially in the evening, it’s cool to watch people move their necks!)))
Photo during the day in cloudy weather. Conclusion: I was very pleased with the result, the light is just crazy, so screw it, you don’t even have to turn on the PTF, they don’t add much light! What we have at the moment is 4 lenses on the near side, 2 near and 2 on the far side! It’s a lot of hassle to get everything right, but it’s worth it. And now I can proudly say that PRO-SPORT is shining.
Click, Comment"Thank you for your attention!
www.drive2.ru
Set of tools
First of all, for tinting you will need:
- shampoo;
- pure water;
- spray;
- glass cleaner;
- rubber spatula;
- sharp blade, knife;
- non-woven napkins.
The room in which work takes place must be clean and protected from precipitation. Having prepared everything you need, you can either dismantle the glass first or immediately begin gluing it. In any case, it must first be thoroughly washed and degreased.