How to remove the steering wheel on a grant with a cushion
Driving the Lada Grant requires some protection from the driver and passengers. Recently, airbags were installed in the Russian automobile industry. However, there is one problem: they are disposable, and when it works, they need to be replaced. This process is complex and requires some experience and knowledge. Sometimes it is also necessary to remove or replace a steering wheel that causes cracks or deformation when the driver hits it.
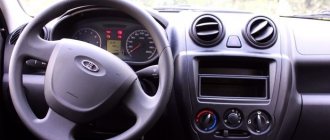
Lada Grant with airbag
Necessary condition for Lada Grant airbag failure:
- Running through the accident.
- Closing a package of pillows that prevented her from discovering a manufacturing defect.
- Battery failure causing airbags to deploy.
- Worn airbag module.
Prerequisites for failure of the Lada Grant steering wheel:
- Deformation of the structure due to the driver’s influence on the steering wheel.
- Hair wear and cracks.
- External causes that caused damage to the steering wheel.
The entire population becomes a prerequisite for a forced change of steering wheel and airbags.
It is believed that only unique steering wheel and airbag parts can be installed on the Lada Grant, but this is a misconception. There are some analogues of these parts, the presence of which is understandable only to tuning specialists and some car owners.
Let's look at the catalog numbers and manufacturers of the Lada Grant steering wheel:
- The unique VAZ product has the manufacturer’s catalog number - 21910-3402018-00. It completely becomes a place and doesn't even require any improvements in other improvements.
Basic version of the sports steering wheel
Granta airbags
:
- The VAZ plant produces unusual spare parts. It consists of several descending parts: a gas generation module (21910-8232010-00) and a safety control unit (21900-3824010-00).
Airbag module
Airbag control unit
Thus, you can realize that in addition to the standard Lada Grant steering wheel and airbags, there are also analogues that are rarely known.
To remove
Lada Grant airbag, you will need a 5 mm rod and a flat head screwdriver. What do you need, let's get to the process:
Causes of airbag failure
The reason for the failure of the Lada Granta airbags is:
- Triggered due to an accident.
- Closure of the pillow package, which prevented it from opening, or a manufacturing defect.
- Battery failure, which caused the airbags to deploy.
- Wear of the pillow module.
Reasons for failure of the Lada Granta steering wheel:
All this becomes the reason for the forced replacement of the steering wheel and airbags.
Catalog numbers and steering wheel analogue options
It is generally accepted that only original spare parts for the steering wheel and airbags can be installed on the Lada Granta, but this is a misconception. There are several analogues of these parts, which are known only to tuning masters and some car enthusiasts.
Let's look at the catalog numbers and manufacturers of the Lada Granta steering wheel:
- The original VAZ part has the manufacturer's catalog number - 21910-3402018-00. It fits perfectly and does not require any improvements or modifications.
Factory steering wheel
One of the sports steering wheel options
Catalog numbers and airbag manufacturers
Let's look at the catalog numbers and manufacturers of Lada Granta airbags:
- The original spare part is produced by the VAZ plant. It consists of several elements that include: a gas generator module (21910-8232010-00) and a safety control unit (21900-3824010-00).
Airbag module
Airbag control unit
Thus, you can understand that in addition to standard parts for the steering wheel and airbags of the Lada Grant, there are also analogues that few people know about.
This is interesting: How to remove the airbag on a Nissan Qashqai
How to remove Granta steering wheel
When you have decided to replace the stock Lada Granta steering wheel with a sports one, read the instructions on how to remove the steering wheel yourself. The steering wheel also needs to be removed when dismantling the dashboard, steering column and slip ring.
- 24mm socket head.
- marker. First of all, you need to disconnect the negative cable from the battery. Then set the steering wheel to a position corresponding to the straight-line movement of the car. Remove the driver's airbag module.
Airbag replacement technology
To dismantle the Lada Granta airbag, you will need a 5 mm rod and a flat-head screwdriver. So, let's get down to the process itself:
- As with any repair, you need to disconnect the minus terminal.
- Using the rods, you need to tighten the cushion clamps. This is done through special holes, the marks of which are on the side of the steering wheel.
In the places of the marks, press the rod on both sides to unclip the cushion latches
Removing the airbag module
Removing the plus terminal from the horn
Removing the negative terminal of the horn
Removing the wire clamp
We remove the wires from the seat
The nuances of replacement and what should be prevented
As with any car repair for the Lada Granta, when replacing the airbag and steering wheel, there are nuances that need to be taken into account. So, what is worth considering when performing dismantling work:
- Before you begin removing the airbag, it is imperative to disable the control module. If this is not done, then the probability of the airbag triggering when turned off is 99%.
- When the power is turned off, you need to wait until the activator capacitor discharges. The manufacturer recommends doing this after 1 minute, but as practice shows, it may take up to 3-4 minutes, so you should wait 5 minutes.
- Never allow water, oil or other liquid materials to come into contact with the cushion module.
- When installing the airbag, you should be outside the triggering area.
- After installing the airbag, you should turn on the ignition by reaching under the steering column.
Compliance with all the listed nuances will protect against airbag deployment and harm to a person, since in practice there have been cases when neglect of safety precautions became fatal for car service workers.
Steering wheel and airbag tuning
Technical diagram for disassembling parts when installing a sports steering wheel
Another option for mounting the steering wheel is to install a sports steering wheel. It is worth noting that in this case the driver is deprived of an airbag, but this function will be performed by a safety adapter.
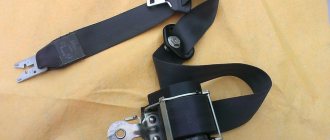
Safety adapter and fastenings to it
So, let's look at the process of installing a sports steering wheel on a Lada Granta:
- Since we have everything removed, the first thing we do is install the adapter. We attach it to the steering shaft, but do not fix it.
- We connect the signal wiring to the steering adapter. We insulate the airbag unit wires and leave them inside the adapter.
- We install an adapter on the slots. It will perform functions instead of airbags, since upon impact it is easily deformed and does not injure a person’s chest.
- We screw the tuning steering wheel directly.
- The last step is to check the steering wheel position. We drive forward and backward, if the steering wheel is not level, then remove the adapter and align it.
Read also: Unleaded gasoline AI 95 k5
Thus, you can tune the steering wheel of the Lada Granta. It is worth noting that if a sports steering wheel is installed, then you should definitely use seat belts.
Installed sports steering wheel with adapter for Lada Granta
Payment via Portmone
After selecting payment through Portmone, the payment system will launch, where you need to select the payment method: bank card or Portmone account.
The price in the Portmone payment system is converted into dollars at the exchange rate of the Central Bank of the country where you are located.
If you have a bank card in a currency other than the dollar, then the money will be debited from the card at the rate of the Central Bank of your country at the time of the purchase.
After specifying payment details and confirming payment, payment for the goods will occur.
Official website of the Portmone payment system https://www.portmone.com
Removing and installing the steering wheel on a Lada Granta car
Let's consider removing the steering wheel with an airbag, since without an airbag, removing the steering wheel is not particularly difficult and is performed in the same way as on models 2108-2110.
To complete the job, you will need a special airbag remover and a new steering wheel nut.
If you don’t have a puller, you can make one from an old slotted screwdriver with a blade width of 5 mm; to do this, you need to make a small groove in the middle of the blade.
1. Remove the terminal from the negative terminal of the battery.
On a vehicle equipped with an airbag, to prevent the airbag from deploying, wait at least five minutes after disconnecting the battery before continuing to operate.
The driver's airbag is mounted on the steering wheel with two plastic hooks 2 and 4, Figure 1, and two positioning hooks 8.
The hooks of the pillow fit into the holes in the bracket for fixation 2 and are fixed with spring clips. The airbag latches fit into recesses 3 on the steering wheel.
We set the steering wheel to the “straight” position and, by removing the key from the ignition switch, fix this position.
Use a thin flat screwdriver to pierce the hole marked on the steering wheel.
We also pierce a hole on the other side of the steering wheel.
Using two screwdrivers, press out the spring clamps through the holes (in the picture with the airbag removed), pulling the airbag towards you, we remove the hooks of the airbag from engagement with the clamps on the steering wheel.
We pull the pillow towards ourselves, overcoming the resistance of the clamps, and remove it from the recesses of the steering wheel.
Move the airbag away from the steering wheel
Disconnect the horn wire ends
Use a screwdriver to pry the clamp out of the wire block
Disconnect the wire block from the airbag connector
Removing the airbag
The removed airbag should be stored in a place protected from moisture and excessive heat, with its cover facing up.
Installing the airbag is done in the reverse order.
We connect the block of wires to the airbag connector, insert the lock into the block.
We connect the wire lugs to the terminals of the signal switch.
We install the cushion on the steering wheel so that the cushion clamps fit into the recess of the steering wheel, and the hooks of the cushion fit into the corresponding holes in the steering wheel.
Press the cushion until the hooks of the cushion snap into place with the steering wheel latches.
In a factory or car service center, plastic wedges are used to remove airbags (Figure 10).
And devices for removing pillows are used (Figure 11).
Place the removed airbag module with the actuator down and away from the workplace.
Set the front wheels of the car to the straight-ahead position.
Using a 24mm socket, unscrew the steering wheel mounting nut.
We mark the position of the steering wheel relative to the shaft, for which we use a core to put a mark on the shaft opposite the triangle mark on the steering wheel
Replacing the Lada Granta airbag
We remove the airbag when removing the steering wheel, when the airbag deploys, or when the airbag malfunctions.
The presence of an airbag on the vehicle is confirmed by the inscription “AIRBAG” on the cover of the driver’s airbag module installed on the steering wheel, the inscription “SRS/AIRBAG” on the cover of the front passenger’s airbag module located in the instrument panel, and the inscription “AIRBAG” on the label of the front airbag tape. seat belt.
The condition of the SNAP is monitored by a signaling device located in the instrument cluster, which, after turning on the ignition, in the absence of a malfunction, should turn on for 3–4 seconds and turn off.
If there is a malfunction of the SNBP:
— the indicator turns on again after 3–4 seconds of lighting when the ignition is turned on or while the vehicle is moving and remains on until the malfunction is eliminated;
— when the ignition is turned on, the indicator does not turn on.
Flashing of the indicator after turning on the ignition indicates that the SNAP control unit is in a locked state.
The factory recommends replacing airbag modules after ten years from the date of manufacture. The date is indicated on the airbag module label.
The driver airbag module uses a pyrotechnic gas generator, which consists of a housing filled with a solid pyrotechnic substance and an igniter. In it, gas is produced when a pyrotechnic substance is burned.
Removing the driver's airbag
We prepare the car for the job.
Turn off the ignition and disconnect the negative cable from the battery.
After disconnecting the battery, you need to wait 10 minutes until the airbag activator capacitor is completely discharged.
The driver's airbag is mounted on the steering wheel with two plastic hooks 2 and 4, Figure 2, and two positioning hooks 8.
The hooks of the pillow fit into the holes in the bracket for fixation 2 and are fixed with spring clips. The airbag latches fit into recesses 3, Figure 3, on the steering wheel.
We set the steering wheel to the “straight” position and, by removing the key from the ignition switch, fix this position.
Use a thin flat screwdriver to pierce the hole marked on the steering wheel. We also pierce a hole on the other side of the steering wheel.
Using two screwdrivers, press out the spring clamps through the holes (in the picture with the airbag removed), pulling the airbag towards you, we remove the hooks of the airbag from engagement with the clamps on the steering wheel.
We pull the pillow towards ourselves, overcoming the resistance of the clamps, and remove it from the recesses of the steering wheel.
Move the airbag away from the steering wheel
Disconnect the horn wire ends
Use a screwdriver to pry the clamp out of the wire block
Disconnect the wire block from the airbag connector
Removing the airbag
The removed airbag should be stored in a place protected from moisture and excessive heat, with its cover facing up.
Installing the airbag is done in the reverse order.
We connect the block of wires to the airbag connector, insert the lock into the block.
We connect the wire lugs to the terminals of the signal switch.
We install the cushion on the steering wheel so that the cushion clamps fit into the recess of the steering wheel, and the hooks of the cushion fit into the corresponding holes in the steering wheel.
Press the cushion until the hooks of the cushion snap into place with the steering wheel latches.
In a factory or car service center, plastic wedges are used to remove airbags (Figure 11).
And devices for removing pillows are used (Figure 12).
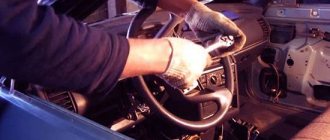
Photo report on removing the steering wheel yourself
First of all, read the material on removing the driver's airbag on a Priora. Then, when you have dealt with this, you can proceed further. Disconnect the power wires to the sound signal.
Then we put the head on 24 and rip off the nut, but don’t unscrew it completely yet. Before you start knocking it off the shaft, you need to mark the position of the steering wheel relative to the shaft - you can make marks on the steering wheel and casing.
When the nut is loosened, leave it on the shaft for now. Then we take and knock down the steering wheel from the reverse side, tapping it with medium force - on both sides.
When it comes off the splines, you can finally unscrew the nut and remove it from the shaft.
Carefully thread the horn power wires, as well as the airbag power wires, through a special hole.
And now the steering wheel is finally freed and you can remove it completely from the Priora.
If there is a need for replacement, then we perform it in the reverse order. Of course, the installation is carried out according to the marks that were originally set. The fastening nut must be tightened with a torque of 31 to 41 Nm. But you can take the average value and tighten it with a force of 40 Nm.
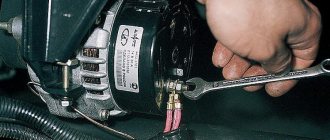
How to tighten the electric power steering rack?
The appearance of a knocking sound in the operation of the electric power steering is associated with the need to tighten the steering rack.
How to do it right:
- First you need to disconnect the battery; to do this, disconnect the terminals from it. Unscrew the battery mount; to do this, you need to unscrew two more nuts located at the edges. After this, the battery is removed and put aside.
- Then you need to lift the plastic stand, there are four more screws under it, they can also be unscrewed.
- Having done this, it is necessary to move this stand forward until the platform is disconnected from the air filter housing retainer pad. After this, the trim can be moved back, this will provide freer access to the rail itself.
- At the next stage, you will need to crawl your hand under the rail. Directly below it, as shown in the photo, there is a rubberized cap; it will need to be removed, this will allow the key to access the adjusting nut.
- To perform adjustment work, you will need a special wrench to tighten the rack; without it, the adjustment procedure will not be possible. Using this wrench, you need to crawl under the car rail to install the tool in the required hole.
- When adjusting, be careful not to overtighten the rack. If its tightening is very strong, then when cornering the rack will bite, and this, in turn, may affect the safety of movement. The angle of adjustment is always different, it depends on how much the nut is loose, but usually when performing such work the nut is tightened by approximately 30 degrees. This should be enough to get everything right. After the adjustment is completed, it will be necessary to check that this task was performed correctly. That is, you will need to make sure that the steering wheel turns normally to any position all the way and there is no knocking. If the knock remains, then the adjustment continues.
When might it be necessary to remove the airbag?
The picture shows that the airbag was already in operation, it needs to be replaced!
However, such a driver safety system will have to be removed to perform certain types of work in the following cases:
- when replacing a triggered element;
- when repairing the steering;
- when repairing individual circuits of electrical equipment.
Important points and secrets
When carrying out such work, you must adhere to strictly defined rules and installation procedures.
Attention! To avoid unexpected activation of the airbag during the dismantling process, you should turn off the power supply by removing the negative terminal from the battery. After which, you need to wait another 15-20 minutes for the accumulated energy to leave the activator capacitor. And only after making sure that there are no power sources at all can you begin to disassemble the steering wheel.
Let's sum it up
These are some simple and simple ways to fix the problem with the airbag warning light on. But it is important to understand that safety on the road is the most important thing. And it is better to spend money, but restore the functionality of this system, and these methods can be used temporarily, until repair work is carried out.
And even more so, it is necessary to repair the airbags if the car is sold, or at least warn the buyer that the system has already worked and decoys are used on the car.
Removal sequence
First you need to unscrew two screws on the back of the Priora steering wheel, which are located on both sides. To do this, you will need a 5 mm hexagon, while on both sides it is necessary to compress the spring clamps, preventing the pillow from falling out. It is important to remember that before starting work, you must remove the battery terminals to prevent the airbag from deploying.
We recommend: What to do if the instrument panel on a VAZ 2109 does not light up
After this, carefully remove the cushion from the front of the steering wheel. To do this, you need to carefully pry the clamp together with the wires and move it to the side, and also disconnect the power wires leading to the sound signal.
Please note that disassembling the airbag module is strictly prohibited.
Next, a pre-prepared 24-millimeter socket will come in handy, with the help of which the shaft nut is torn off; however, there is no need to unscrew it completely yet. At this stage, you need to somehow mark the position of the steering wheel, which will be needed for subsequent assembly to its original position. For this purpose, you can make appropriate marks on the casing or, in fact, on the steering wheel.
Once the nut has been loosened, you can begin to directly remove the steering wheel. To do this, you first need to gently tap it from the back with careful movements on both sides, but you should not use excessive force, because the steering wheel is still on the shaft. By progressively pushing the steering wheel, it is necessary to ensure that it is completely dislodged from the splines, and when this can be achieved, you can further unscrew the previously loosened nut.
After this, you can actually start removing the steering wheel. You need to act as before, carefully, threading the power wires for the horn and airbags through special holes. Upon completion of this procedure, you can finally remove the Lada Priora steering wheel.
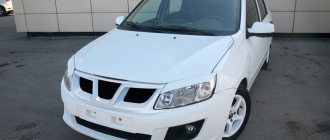
Removing the steering wheel and airbags for a Lada Granta
Operating a Lada Granta car requires certain protection for the driver and passengers. Not so long ago, airbags began to be installed on cars of the domestic automobile industry. But there is one problem: they are disposable and will have to be replaced when triggered. This process is difficult and requires some experience and knowledge. Also, in rare cases, it is necessary to remove or replace the steering wheel, which can crack or become deformed when the driver hits it.
Lada Granta with airbag
Causes of airbag failure
The reason for the failure of the Lada Granta airbags is:
- Triggered due to an accident.
- Closure of the pillow package, which prevented it from opening, or a manufacturing defect.
- Battery failure, which caused the airbags to deploy.
- Wear of the pillow module.
Reasons for failure of the Lada Granta steering wheel:
- Deformation of the structure due to the driver hitting the steering wheel.
- Braid wear and cracks.
- External factors that caused damage to the steering wheel.
All this becomes the reason for the forced replacement of the steering wheel and airbags.
Catalog numbers and steering wheel analogue options
It is generally accepted that only original spare parts for the steering wheel and airbags can be installed on the Lada Granta, but this is a misconception. There are several analogues of these parts, which are known only to tuning masters and some car enthusiasts.
Let's look at the catalog numbers and manufacturers of the Lada Granta steering wheel:
- The original VAZ part has the manufacturer's catalog number - 21910-3402018-00. It fits perfectly and does not require any improvements or modifications.
- An analogue can be the steering wheel from article number DM-K65100.
This part, just like the original one, can be installed without modifications. Available in black with red or blue accents. One of the sports steering wheel options - Tuning steering wheel. There are many options, and essentially any type or model can be installed. It is worth remembering that you will have to install an adapter between the tuning part and the steering shaft.
Catalog numbers and airbag manufacturers
Let's look at the catalog numbers and manufacturers of Lada Granta airbags:
- The original spare part is produced by the VAZ plant. It consists of several elements that include: a gas generator module (21910-8232010-00) and a safety control unit (21900-3824010-00).
Airbag moduleAirbag control unit
- Manufactures alternative airbags. They have the same catalog numbers as the original, but are highly reliable and accurate.
Thus, you can understand that in addition to standard parts for the steering wheel and airbags of the Lada Grant, there are also analogues that few people know about.
Passenger airbag
The passenger airbag module (PAIBP), Figure 13, consists of a gas generator 1, a housing 3, with an airbag folded in it, and a facing cover 7.
The gas generator consists of a housing filled with compressed inert gas and a pyrotechnic substance, and an igniter fuse.
An igniter is a device with electrical resistance and a pyrotechnic substance.
After receiving an electrical signal from the control unit, the electrical resistance heats up and ignites the pyrotechnic substance of the igniter, followed by ignition of the bulk of the pyrotechnic substance of the gas generator.
Removing the passenger airbag
We remove the instrument panel as described in the article - How to remove the instrument panel of a Lada Granta.
Disconnect block 1, Figure 14, of the instrument panel wiring harness from the MNPBP.
Using a 13 socket, unscrew two bolts 4
Press the clamps 5, disconnect and remove the passenger airbag module
Place the failed module on a flat surface with the facing cover facing up.
Installing the airbag module
Before installing the module, you must ensure that there is no damage.
Install the airbag module in reverse order
The tightening torque of the two bolts securing the airbag module is 13 – 15 Nm (1.3 – 1.5 kgcm).
How to remove the passenger airbag on a grant
The airbag on a Lada Granta car is removed to remove the steering wheel from the car, also in case of replacing the airbag contact ring and the sound signal.
You will need: two rods with a diameter of approximately 5 mm, a flat-blade screwdriver.
Operations are carried out when removing the airbag from a Lada Granta car
1. Disconnect the wire from the negative terminal of the battery.
WARNINGS: Attempting to remove an airbag module without disconnecting the power supply may result in unexpected deployment of the airbag. You can begin the following operations to remove the airbag only after the activator capacitor has completely discharged. To discharge the capacitor, you must wait at least one minute after turning off the power supply. Do not disassemble the airbag module.
The airbag module must not be dropped or exposed to water, grease or oil. The airbag module must not be exposed to temperatures above 95°C. When installing the module in the steering wheel of a vehicle, be outside the airbag deployment zone.
https://www.youtube.com/watch?v=5e-ZzCSEIu4
When you turn on the ignition for the first time after installing the airbag module, stand outside the vehicle and turn on the ignition switch by reaching under the steering column.
2. Compress the spring clips that secure the airbag module while inserting the rods into the two special holes located on the sides of the steering wheel.
3. . at the same time, an assistant must pull the airbag module towards himself with his hands and move it with the horn switch away from the steering wheel to the length of the connected wiring harnesses.
NOTE This is where the spring clips that secure the airbag module are located.
4. Squeeze the latch
5. . and disconnect the positive wire end from the horn switch.
6. Similarly, disconnect the terminal of the negative wire from the horn switch.
7. Use a screwdriver to pry and pull out the wiring harness block clamp.
8. Disconnect the wiring harness connector from the driver's airbag module.
9. . and remove the driver's airbag module from the vehicle.
10. Install the driver's airbag module in the reverse order of removal.
Removing the driver's airbag Lada Granta
- Open-end wrench 10 mm
- Small Phillips screwdriver or hex key
- Small flat screwdriver
Carry out the work when replacing the airbag and when removing the steering wheel.
Before removing the airbag, disconnect the wire terminal from the negative terminal of the battery. After this, you must wait at least 10 minutes for the airbag activator capacitor to discharge.
The airbag is mounted on the steering wheel with two plastic hooks 1 and two plastic clamps 2, which engage respectively with two spring clamps, and the airbag clamps fit into the recesses on the steering wheel.
1. Set the steering wheel to the straight-ahead position of the vehicle and, removing the key from the ignition switch, lock this position.
2. Using a thin screwdriver or hex wrench, make a hole in the location marked on the steering wheel.
3. Pierce a hole on the other side of the steering wheel in the same way.
4. Using two screwdrivers, press out the spring clamps through the holes (for clarity, shown with the airbag removed) and, pulling the airbag towards you, disengage the hooks of the airbag from the latches on the steering wheel.
5. Pull the airbag towards you and, overcoming the resistance of the airbag plastic clamps, remove them from the recesses of the steering wheel.
6. Disconnect the ends of the two wires from the terminals of the horn switch, and use a screwdriver to pry the small yellow clip on the orange connector of the airbag (indicated by an arrow in the photo) - it will slide forward. You can now disconnect the wiring harness from the airbag connector.
7. Remove the airbag from the steering wheel.
8. The dismantled airbag should be stored in a place protected from moisture and excessive heat, with its cover facing up.
Do not disassemble or repair the airbag yourself.
9. Having connected the block of wires to the airbag connector, insert the clamp into the block. Connect the wire lugs to the signal switch terminals. Install the cushion on the steering wheel so that the cushion clamps fit into the recesses of the steering wheel, and the hooks of the cushion fit into the corresponding holes in the steering wheel. Press the cushion until the cushion hooks snap into place with the steering wheel latches.
The article is missing:
Removing and installing the driver's airbag
The Lada Granta, unlike its predecessor Lada Kalina, is safer in many respects. Despite the fact that the models are essentially almost the same. Industrial security is an integral part of the entire system that ensures safety. The Lada Granta is equipped with an airbag on the driver's side, as well as side airbags for the passenger sitting in front and the driver. The front passenger also has the main passenger compartment on his side, as does the driver (in the luxury version)
Removing the driver's side airbag in a Lada GRANTA.
Before removing the PB, you must turn off the ignition and stop the car. Next, after raising the hood, remove the wire from the negative battery. Here’s another important point: the car’s wheels must be in the “straight” position, or rather in a straight line.
Then you are on the side of the steering wheel and unscrew the 2 bolts that secure the gas generator module assembly to the steering wheel, then disconnect the harness with the L-shaped plug from the gas generator module assembly and carefully remove the gas generator module assembly from the steering wheel.
Please note that if the module does not work, it must be placed on a flat surface with the lid facing up.
The next step is that you must unscrew the two screws securing the casing of the upper steering shaft and remove the casing (upper) with a Phillips screwdriver and be sure to remove the ring (sealing) from the ignition switch.
Next, you need to disconnect the on-board network wiring harness from the device connector (rotating), then disconnect the steering wheel signal switch harness from it.
And the last step is to remove the connector with the device (rotating) from the steering shaft with a flat screwdriver.
Installing an airbag in a Lada GRANTA car
Let us remind you that before installation, as well as during removal, the wheels (front) must be in the straight-line position of the machine, and the battery terminal (-) must be disconnected. Next, you need to install the connector with the device (rotating assembly) on the steering (or steering) shaft. Then remove the red key (transportation) from the device, which fixes the moving part of the device in the middle position. To do this, you need to rotate it around its axis by 90 degrees (+30).
Lada Granta suspension diagnostics
To identify and eliminate the cause of the rattling, I decided to inspect the entire suspension of the Lada Grant for the presence of play and “tired” elements (bushings, rubber bands, etc.), since I thought that the problem lay somewhere there. So, let's begin.
Checking the front struts
The first thing I did was check the front struts. While rocking the car from side to side, I simultaneously kept one hand on one of the racks. If the knocks were coming from the front shock absorbers, I would have felt them. However, there were no knocks.
Photo 2: Is there a knocking noise in the front struts of the Lada Granta?
I also looked under the front wheel arches to make a visual inspection of the front shock absorbers - I didn’t see anything special there, the struts were dry.
Photo 3: A-pillars are “dry”.
Checking the tie rod ends
An examination of the steering tips also showed that everything is normal: the anthers are intact, there is no play in the body (checked with a pry bar).
Photo 4: Checking the play of the Lada Granta steering tips
And when driving on uneven roads, when rattling appeared, there was no “recoil” in the steering wheel. As a rule, if the steering tip is broken, then on bumps a muffled knock can be felt directly on the steering wheel. I especially listened when I was driving on a dirt road, but I didn’t feel any characteristic knocks “through the steering wheel.” Well, let's look further.
Checking wheel bearings
To check the condition of the wheel bearings on my Grant, I alternately jacked up the right and left sides of the front to spin the wheels. When the hub bearings fail, mechanical noise appears during wheel rotation (humming, crunching, clicking, etc.). Also, when the bearing wears out, the wheel may “dangle” on the hub, and the greater the wear, the greater the play. You can easily feel the play if you rock the wheel from side to side, as if trying to turn it left or right with your hands. In this case, the wheel must be suspended and rotate freely. In my case, the hub bearings were in good condition.
Photo 5: Checking the wheel bearing of Lada Granta
I would like to note that wheel play can occur even if the wheel bearing is intact. So, for example, it happened in my case when I went to an official dealer for zero maintenance. When inspecting the chassis, a slight play was discovered in both front wheels, which was eliminated by tightening the front hub nut.
Checking ball joints
The next step was to inspect the ball joints. Visually, they had no damage, the anthers were intact. Using a pry bar, the play between the ball pin and the support body was checked (by analogy with the steering end) - there was no play. By the way, the wheel must be hung when checking the ball joint.
The photo below shows a ball joint. I forgot to film the moment when I was loading/unloading the ball with the mount, but on the right side of the ball you can see “traces” from the mount—flying dirt.
Photo 6: Checking ball joints
Checking struts, stabilizer bushings and silent blocks
A visual inspection of the stabilizer struts and silent blocks did not reveal any defects. Under load, no play was detected either, and it was still too early. Short stabilizer struts (like on my Grant) fail much less often than the long ones that are now installed on Vesta, so I think it’s premature to talk about their failure.
Photo 7: Stabilizer struts and silent blocks
Photo 8: Stabilizer bushings
I am not describing the diagnostic process in detail now, since my goal was to detect something that was openly “dangling” and making that same rattling sound when driving on a dirt road. All the nodes described above have nothing to do with rattling. Even if one of them failed, the sound from the tapping would be muffled, and not ringing and rattling.
Of course, if the rubber bushing of the stabilizer, worn out into “trash,” completely flew out, then the stabilizer arm could theoretically hit the metal clamp and cause that same rattling sound, but... this is not our case.
What we have: the suspension is normal, no loose parts were found. What then makes this rattling sound? We are looking further.