When driving a domestic VAZ-2110, owners often encounter unpleasant knocking noises in the steering unit.
Mostly this type of sound occurs when the driver is driving on crushed stone, dirt or broken road surfaces. The source of the knock is usually located under the steering wheel, and the feedback of this action is clearly heard. It is worth noting that the steering rack is subject to significant vibration influences when moving on Russian roads. In a situation where the car owner notices characteristic clicks in the engine compartment (rattling, rattling), the steering rack will have to be slightly tightened using a special head. To get to the necessary nut, it is by no means necessary to fix the 2010 VAZ model on an inspection ditch/pit, or to look for a lift.
How to adjust the steering rack on a VAZ 2110-VAZ 2112?
1. First, position the steering wheel so that both front wheels point straight forward, then remove the crankcase protection from below (If work is done from below and if the protection is in the way) and special.
Using a wrench, rotate the steering rack adjustment nut counterclockwise by 10-15 degrees and immediately check the play at the rack, if necessary, perform the procedure again and do the same by 10-15 degrees, just be careful and always take into account that the steering wheel should not be very hard to spin. Note! When adjusting, the most important thing is not to overdo it, tighten the adjustment nut a little at a time, about 10-15 degrees, and then check how the rack is adjusted, under no circumstances do a full turn of the adjustment nut, because you will only cause problems for yourself, because the steering wheel will not really turn, and unscrewing the nut is much more difficult than tightening it, so take this into account!
2. During adjustment, problems may arise, namely the inability to move the adjusting nut, it happens that you really can’t move it with your hands or with a hammer, but still, if you can’t do it with your hands, don’t forget about the hammer, if necessary you need to use it, namely insert special. key into the adjusting nut and hitting the tip of the key with a hammer, try to move the nut out of place.
Note! On new racks, as we said earlier, a plug is placed in this nut from the factory, it is picked up using a knife or a flat thin screwdriver, you don’t have to put this plug back, throw it away so that other people understand that the rack is far from new and has been adjusted , especially since you won’t even be able to put this plug back!
Additionally We recommend that you do this) You will gain new knowledge and learn about what was not indicated in the article.
Immediately arm yourself with a steering rack wrench specialized for the “ten”, and also get ready to remove the rods. From the tools, grab:
- Pliers;
- Mounting blade;
- Socket wrench 19;
- Hammer;
- Flat screwdriver;
- Set of heads - from 10 to 27.
Get started:
- Unscrew the nuts inside the passenger compartment and remove the fastening bolts of the lower universal joint to the steering rack gear shaft. To do this, you will need a 13mm socket. The bolt can turn, so hold it with an open-end wrench.
- In the engine compartment itself, remove the nut of the upper fastening of the rack boot.
- At the bottom of the car, remove two more nuts that secure the rack boot.
- Remove the boot.
- Raise the front of the car and remove the front wheels.
If you are going to remove the steering, but not dismantle the rods, follow these instructions:
- Remove the locking plate from the rod mount by prying it off with a screwdriver. Then unscrew the two bolts that secure the rods and rack;
- Using a 13mm socket, remove the nuts from the steering gear brackets connecting to the front panel;
- Move the rack forward a little to remove the gear shaft from the shield hole;
- Remove the rack together with the rods.
If you want to remove the steering rods, unscrew the rod end from the swing arm of the shock absorber struts. To do this you will have to do the following:
- Remove the cotter pin using pliers;
- Using a 19mm spanner, unscrew the ball pin fastening nut, but not all the way;
- Use a 17 socket to loosen the tension bolt of the rod end;
- Now press out the ball pin. To do this, insert a mounting blade between the swing arm and the tip. Press the tip away from the lever, and apply several blows with a hammer to the end of the rotary lever;
- Unscrew the ball stud nut completely;
- Remove the ball pin from the lever hole;
- Use a screwdriver to open the groove of the tie rod end;
- Remove the tip, holding the threaded adjusting sleeve with a 27mm wrench. Count the number of turns so that during reassembly you can tighten it by the same number of turns;
- On the tie rod, try to maintain the position of the threaded bushing. This way the toe angle of the wheels will remain as correct as possible.
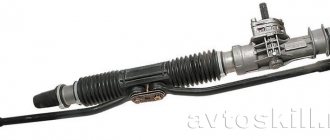
Price and features of the VAZ 2110 steering rack
On VAZ 2110 cars, the very first rack with straight teeth was installed, and on the latest versions of the car and on the first Kalinas, exactly the same rack was installed, but with helical gearing. Simple device, easy repair. The main thing is to correctly diagnose the malfunction. Then the location of the breakdown will be localized and this will significantly simplify the repair of the steering mechanism.
A new rack for a VAZ 2110 costs 4,230 rubles complete with rods. This is a VAZ unit. If you are not satisfied with this quality, you can add 700 rubles and buy a rack for a VAZ 2110 from Fenox. Frankly speaking, there is no particular point in overpaying, since the rack itself, the gear bar, runs for quite a long time under normal conditions.
Removing the steering column
If after adjustment the problem with the rack does not disappear, you will have to disassemble and repair it. But to do this it needs to be removed. There are two methods of dismantling: with and without tie rods. The latter method is preferable as it requires much less time. Before removing the steering rack on a VAZ-2110, the front part of the car needs to be jacked up on both sides. This is necessary in order to unload the traction.
In the cabin, in the area of the pedal block, you need to unscrew the steering shaft cardan bolt. After this, we go to the engine compartment and unscrew the 2 bolts securing the rods, having previously bent the locking plate. Then you need to unscrew the 4 bolts securing the steering column to the car body. When this is done, remove the column and remove it through the opening of the left wheel arch.
Tools and procedure
The steering rack must be tightened using the following tools:
- 10mm socket wrench or ratchet head;
- wrench head 13 with extension and wrench;
- a universal key that can tighten all structures with the necessary force.
To get to this element of the car mechanism, you need to remove the battery and remove its fastening elements. The sequence for tightening the steering rack is as follows:
- dismantling the battery. The power wires are removed from the vehicle's power source, after which the bolts or screws securing the device are unscrewed and the battery is removed from the installation site;
- Removing the battery mounting structures. The platform or brackets on which the battery was previously held are also unscrewed and removed;
- removing the plug on the steering rack nut. By touch it is not difficult to find the desired nut, which may be covered with a rubber plug. After removing the plug, you should start tightening the nut.
The steering mechanism in the VAZ-2110 model is tightened counterclockwise in the following sequence:
the nut is tightened counterclockwise until it stops, after which it is loosened a couple of notches - 24 degrees, which ensures minimal play (0.12 mm) between the nut and the rack; the play is checked - there should be no jamming or knocking between the rack and the nut; after this, the crankcase thread is cored or crushed (please note that the nut should not be damaged), and the fixation point is marked with paint to indicate in what position the nut should be in relation to the crankcase.
Correct adjustment of the steering column will help get rid of extraneous knocks, and the steering wheel should return to its original state on its own after each turn.
It is worth paying attention that excessive tightening of the steering rack nut can lead to the steering wheel biting in its extreme positions and the need to apply some effort to continue to fully control the car.
Adjusting the steering rack on VAZ 2110, VAZ 2111, VAZ 2112
Welcome! The steering rack turns the front wheels, but there are cars on which the rear wheels turn depending on the direction of movement, but the rear wheels in this case act as steering wheels, it is impossible to turn the rear wheels alone on such cars, but we are not talking about that, about the rack Let’s say a few words, the rack itself lasts quite a long life, especially if you constantly drive the car on good roads where there are no bumps and the like, then in this case the rack even after 100 thousand km. it won’t deteriorate too much, but because of Russian roads, which in addition to the rack and the entire chassis are loosened, the rack will already make itself felt at 40-70 thousand km, the first time it will need to be tightened, then approaching 100-130 thousand km . it will remind you of itself again, pull it up again and you can ride, but there is a big But! If the steering wheel starts to turn very tightly after adjustment, then you will need to think about replacing the steering rack, otherwise it may simply jam and the car will lose control (You can find out how the rack is replaced in the article entitled: “Replacing the steering rack on the tenth family").
Note! The steering rack is adjusted using tools such as: Special. a key that is needed specifically for adjustment (you will find it in a car dealership), as well as a flat screwdriver (the thinner it is, the better, with the help of it you will need to remove the plug that closes the nut with which the steering rack is adjusted on the car), You can’t do the same without a light, and without a lift it will be a bit difficult, because it’s easiest to tighten the rack from the bottom of the car, since it’s not convenient to do it from the top if you’re the first to do this and don’t know where the steering rack adjusting nut is located!
Where is the steering rack adjusting nut located? It is easiest to see it from below, if this is not possible and you do all the work from the engine compartment of the car (from above), then you will either need to lower your head under the rail, or turn on the camera, remove everything that is below and use the video clip to find this nut, the main thing is not to confuse it with anything else, and by the way, if you haven’t climbed under the bottom of the rack for a long time, then everything will be dirty there, take this into account too, because when the rack below is in a clean state, this nut will be much easier to see than otherwise case and also, on new slats, if it has never been tightened before, this nut will be covered with a plastic plug, it is removed (pry off with a flat screwdriver or knife) and using a special one. key, after which the rack is adjusted.
When do you need to adjust the steering rack? This procedure is very, very useful, the more play there is in the rack, the faster all the mechanisms inside the rack break down (There are gears), and with the help of adjustment, this play can be removed (If the rack is still new) or at least made not so large, what it is, in order to understand whether there is play in the rack, you will need to open the hood and by first holding one adjusting rod with your hand (Pull) and holding the other steering rod with your hand (Pull), you will determine if the rack has play, and the symptoms will be the following: The appearance of play in the steering wheel and knocking on the steering wheel when hitting bumps with the front wheels, but this could be for one more reason, namely because of worn silent blocks of steering rods, the symptoms will be exactly the same (How to find out whether silent blocks are worn or not, You can, by unscrewing the bolts that secure the steering rods to the steering rack, for more details on how to do this, read the article: “Replacing silent blocks in steering rods on a VAZ”).
Easily!
Thanks to the design of the car, any car enthusiast can easily remove and adjust or adjust the steering rack on the spot, because you just need to carefully read our instructions.
Causes of steering rack malfunction
If while driving, often on uneven roads, you find that all the vibrations are transmitted quite strongly to the steering wheel, then most likely the steering rack needs to be adjusted.
How to carry out this work in two different ways is written below.
Steering rack repair and inspection
If the steering rack had to be repaired for normal operation, it must be tightened in a vice. The play is determined by the wobbling of the rack, and if a serious angle of rotation is detected, you should turn the nut to an angle of about 15 degrees and check the play again. This sequence of actions is repeated until the extra turn disappears. You need to check the effectiveness of repair work while driving the car. Typically, experiments are carried out at low speeds - about 40 km/h, when various beating and biting of the steering wheel can be clearly determined. As experienced motorists advise, you don’t need to immediately tighten the rack at a large angle - a quarter turn is enough to start with. If this does not help, then you should tighten the nut gradually by a small part of the circumference and check the engine operation again. Once the knocking noise under the hood disappears, the car can be operated without problems for several years.
If a knocking noise occurs from the steering rack on VAZ 2108, 2109, 21099, 2113, 2114, 2115 cars and their modifications, it is possible to eliminate the knocking by tightening the rack stop plug with a special key.
Special tool - wrench for adjusting the steering rack
The key is a 17-point socket attached to a metal handle. There may be different versions of this tool from different manufacturers. See photo above.
How to use the key to adjust the steering rack 2108
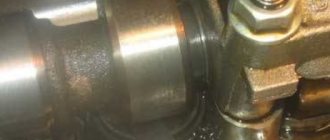
One of the malfunctions of the steering rack of VAZ 2108, 2109, 21099 cars is the development of teeth on the rack itself in the area of contact with the gear on the shaft. A gap is formed, which leads to rack play and a noticeable knock on the steering wheel.
If the problem persists, you can use a stop installed under the rack to adjust this gap. The movement of the stop is regulated by a plug installed in the end of the rack steering mechanism housing. The faces of the plug are internal, so you can turn it only with a 17-pointer, which is the key for adjusting the steering rack 2108.
To adjust, you need to insert the key into the plug and turn it 10-15 degrees counterclockwise. This way the stop will press against the rack. More information about adjusting the steering rack 2108: “Adjusting the steering rack 2108 for VAZ 2108, 2109, 21099 cars.”
example of adjusting the steering rack 2108, the rack has been removed from the car
Notes and additions
— To adjust the steering rack of other front-wheel drive VAZ cars, for example 2110, a similar key is used. It differs from the 2108 key in the size of the edge (by “24” for the 2110 steering rack).
— It is recommended to purchase a reinforced wrench for adjusting the steering rack (see photo at the beginning of the article), since during the adjustment process you will have to apply significant force when trying to turn the stop plug sealed in the body.
More articles on the steering rack of VAZ 2108, 2109, 21010 cars
Both RRP prices (recommended retail price) or the one indicated below are available for ordering.
| Not available | Buy |
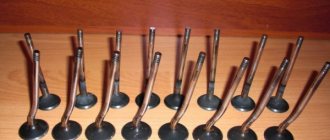
Steering ends: signs of malfunction
Steering ends are replaced when the following symptoms are observed: when driving over uneven surfaces, when accelerating or braking, a knock is felt, the steering wheel begins to vibrate and shake, play is noticed in the steering rod, and kickback is observed in the gas pedal. You can fully check the serviceability of the tips by checking the integrity of the anthers, etc.
Since these parts affect wheel alignment, they must be replaced on time so that the rubber does not start to wear unevenly.
The steering tips are changed on both sides at once (if one breaks, then after a while the other will break too).
When performing repair work to replace VAZ 2114 tips, the following tools are used:
- The key is “19”, the key is “24”, the key is “27”.
- Calipers.
- Press-out puller or mounting tool.
- Hammer.
- Brake fluid or chemical WD-40.
All work related to replacing tips on a VAZ 2114 can be performed either on a lift, or, as in this case, using a jack.
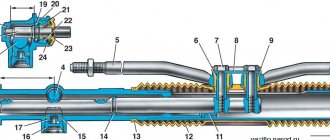
Removal and disassembly of the VAZ 2108-2115 steering mechanism
We remove the steering mechanism and disassemble it to replace the protective cover and rack parts.
It can be dismantled using 2 methods - with and without tie rods. In the first case, we press the pins of the outer tips of the control rods out of the rotary arms of the struts. In the 2nd option, we disconnect the internal tips of the control rods from the rack.
In the cabin, unscrew the bolt of the lower flange of the elastic coupling (see Removing the control column). In the engine department, using a 13mm wrench, unscrew the nuts securing the steering brackets to the front of the body on the right and left sides.
We move the steering mechanism forward until the splined end of the gear comes out of the hole in the front of the body and remove it through the hole in the mudguard.
We clamp the control mechanism housing in a vice with soft lips. Remove the support and spacer ring on the right side of the control mechanism housing.
We cut off the clamps securing the protective cover (they are disposable).
Remove the protective cover.
Remove the support and protective cap on the left side of the crankcase.
Using a special wrench with a 17-point octagonal head, unscrew the rack stop nut and remove it.
Remove the spring and retaining ring.
By hitting the crankcase on a wooden stand, we knock the rack stop out of its socket. A rubber sealing ring is installed in the annular groove of the stop.
In this video Volodya will show how you can repair the steering rack
from Lada
2108
. Visit.
https://youtube.com/watch?v=C7k3SkNBJxI
Remove the seal of the front shield of the engine compartment.
Using a screwdriver, remove the gear boot.
Remove the lock washer.
To unscrew the gear bearing mounting nut, use a special wrench with a 24 octagonal head (the diameter of the hole for the gear shaft is at least 18.5 mm).
Unscrew the gear bearing mounting nut and remove it from the shaft.
Having grabbed the flat of the gear with a 14mm wrench and resting it on the mounting blade, we remove the gear assembly with the bearing from the crankcase, and then the rack.
Using a screwdriver, pry up the support sleeve, remove its protrusions from the crankcase holes and remove the sleeve.
Before installing a new support bushing into the crankcase, we put new damping rings on it so that their thin part is opposite the cut of the bushing.
We install the bushing, making sure that its protrusions fit into the crankcase hole. We cut the rubber rings along the contour of the bushing and remove the cut parts.
We remove the retaining ring from the gear shaft and press out the ball bearing with a two-legged puller.
To press out the needle bearing we use a special puller. If there is none, use a drill with a diameter of 2 mm to make two holes in the end of the crankcase so that they extend onto the needle bearing ring.
Through the holes we knock the bearing out of the crankcase.
We wash the cavity of the steering gear housing.
Using a piece of pipe, press the needle bearing into place. Fast steel or cold welding can be used to seal holes.
Having generously lubricated the teeth of the rack, drive gear and bearings with FIOL-1 lubricant, we assemble the assembly in the reverse order. We install the protective cover in place and secure it with clamps.
Having adjusted the rack clearance, we tighten the stop nut by bending the crankcase threads.
Disassembling the steering column
We begin disassembling the control unit by removing the protective casing by cutting the plastic clamps. After this, use a special key of 17 to unscrew the thrust nut, take out the retaining ring, the spring and knock out the rack stop. Next, remove the boot and drive gear seal, remove the lock washer, and then use a 24mm wrench to unscrew the nut securing the ball bearing. We remove the gear. Now that there is nothing holding the rail in the case, we remove it through the right side of the case. We remove the needle bearing of the drive gear from its seat. To do this you will need a special puller. Check the drive gear bearings for play. If present, the bearings will have to be replaced.
The support sleeve must also be replaced. It has a cylindrical shape and is located inside the steering housing. The bushing is removed by prying it off with a screwdriver.
How to tighten the steering wheel on a VAZ 2110 car without removing it
So, if you have a question about how to tighten the steering rack on a VAZ 2110 without removing it, then you will have to buy a specialized wrench made in the form of an octagon, its size is 17 mm.
Attention: On a VAZ 2110 car, the steering rack is tightened when knocking noises occur during operation of the steering mechanism. When, while driving your car, you feel a knock made by the steering mechanism, this serves as a signal that it is necessary to adjust it
As a rule, a small kickback in the steering wheel of your car occurs when the car wheel falls into a hole or when it hits an obstacle. The steering rack can only be adjusted on a lift or overpass, and you can also drive into the inspection pit for this. So:
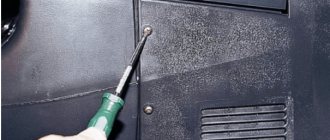
It is necessary first of all to remove the engine protection and this is almost impossible to do without a lift or inspection hole. After removing the protection, you need to take a flat-head screwdriver and a carrying lamp. You get from the back of the subframe to the back of the steering rack and in the place where the rack and the steering shaft intersect, you need to find the adjusting nut on the body.
Attention: Most novice car enthusiasts can easily confuse the adjusting nut with a plug; it is also difficult to find, since it is usually covered with a layer of dirt. This nut can only be adjusted with a special wrench, which must be purchased in advance.
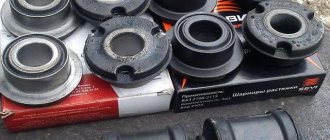
- If no one has touched the steering mechanism before, then there will definitely be a green plastic plug on the nut, which acts as a stopper and is installed at the factory. Using a screwdriver, you need to remove the specified plug, although it is very fragile, but without removing it you will not be able to turn the adjusting nut.
- After the stopper is removed, using a specialized wrench, tighten the adjusting nut clockwise. It is not recommended to press it all the way; the degree of clamping depends on how hard the steering rack was knocking before. It is necessary to turn the key approximately 10-15 degrees and check the river for play.
- In order to check the degree of tightening of the nut, it is necessary to turn the rack sharply in one direction or the other; if no extraneous noises or sounds are heard, this means that the nut is tightened sufficiently. If you want to install the stopper back, then you don’t have to do this, since it will no longer be of any use.
The entire process of adjusting the steering mechanism on a VAZ 2110 car will take you no more than half an hour, provided that you are doing this for the first time, but if you already have experience, then the procedure will take much less time and the main thing is that you are all do it yourself. Many service stations do not want to adjust the steering rack, since the price of this service is not high, it is much easier for them to replace this mechanism, but this service will already hit the car owner’s pocket. Thus, having studied photos and videos of the work process, and having made a fairly easy adjustment of the steering rack of your “ten”, spending no more than 30 minutes of his own time on this, the motorist is convinced that the VAZ 2110 car has an adjustable steering mechanism and this can be done independently .
If the steering rack is knocking on a VAZ 2110, do not rush to get upset. Perhaps adjusting it will help solve the problem. Do you know how to tighten the rack on the “ten” with your own hands without removing it?
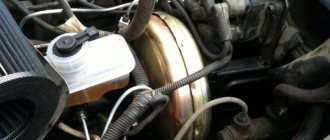
To tighten the steering rack of a VAZ 2110, you will need a special octagon wrench “17”. To find the adjusting nut, the lifter or pit is not required; you can get to the nut by sticking your hand under the vacuum brake booster and feeling the recess for the key in this place:
The VAZ 2110 steering rack is tightened counterclockwise (when viewed from above). We tighten the nut until it stops, and then loosen it by two notches (24 degrees), which ensures a gap of 0.12 mm. between the nut and the rack stop. We check the ease of movement of the rack, the absence of knocks and jamming. After that, the crankcase threads are punched (pressed) at two points (without damaging the nut) and marks are applied with paint that fix the position of the nut relative to the crankcase.
If you had to repair the steering rack to solve the problem. then the steering rack will be tightened in a vice. You can determine the play of the steering rack by shaking the rods (whiskers). To reduce the play in the steering rack, turn the nut counterclockwise by about 10-15 degrees, after which we check the play again. If necessary, tighten again until the play in the steering rack disappears. The output is different in each case, so there is no specific tightening torque. At the end of the work, do not forget to tighten the nut by threading the crankcase.
Source
How to eliminate backlash?
If you identify signs of a malfunction, do not despair; perhaps everything will cost you with minor repairs, especially since the rack itself very rarely fails. First, let's figure out whether there is play in the steering wheel and how to tighten the steering rack on a VAZ-2110 to get rid of it. First of all, open the hood and find the location of the column. We dismantle the engine elements that interfere with free access to it (air filter, air duct). Holding the steering rods with both hands, try to move the rack left and right. If play is detected, we get rid of it by adjusting the thrust nut.
Adjusting the VAZ-2110 steering rack is a fairly simple process, but this will require a special 17mm wrench with an octagonal head. Without this tool, work can not begin. If the key is at hand, go under the car and remove the engine protection. After this, move under the front of the car and find the location of the column. Remove the plastic plug from the thrust nut. Further adjustment of the VAZ-2110 steering rack is carried out by tightening this nut inside the column body. Rotate it 10-15 degrees, then check the amount of play. If necessary, repeat the procedure. It is important not to overtighten the thrust nut, otherwise the steering shaft will be difficult to rotate.
In addition, check the reliability of the tie rods. If necessary, tighten their fastening bolts.
Adjusting the steering rack without removing it
If you cannot decide how to tighten the steering rack on a VAZ 2110, we recommend that you familiarize yourself with the second option - without removing it.
For this method, arm yourself with a special wrench, which is made in the form of an octagon, 17 mm in size.
The steering wheel should be tightened to “tens” only in cases where knocking noises are observed during operation of the steering mechanism. It’s not worth it to just do work without a real need.
- Drive into the inspection hole or lift the car on a lift.
- Remove the engine guard, take a flathead screwdriver and hold a good light under the car.
- Locate the rear subframe at the rear of the steering rack. There the rack and shaft should intersect. The adjusting nut is located in that place. Do not confuse it with the adjusting nut plug. This is a common mistake made by beginners.
- If the steering gear was previously untouched, there will be a green plug on the nut. It functions as a stopper and is installed directly at the factory.
- Use a flathead screwdriver to remove the plug. It will probably break, but there's nothing wrong with that.
- After removing the stopper, pick up a specialized adjusting key and tighten it, moving clockwise. Do not press too hard. The degree of clamping directly depends on the strength of the knocks when moving.
- Turn the key 10 degrees, check the rack for play. If it is present, press more. It is not recommended to rotate more than 15 degrees at a time.
- Checking the degree of clamping is quite easy. Take the rack and turn it sharply in one direction or the other. If no extraneous noise is observed, the rail is tightened well.
- There is no point in trying to replace the stopper, even if you managed to keep it intact. It does not carry any benefit.
We tighten the rail ourselves
We will carry out the work from under the car, so it is advisable to use an inspection hole or overpass. You can tighten the nut from under the hood, but this is extremely inconvenient and will take more time, we checked.
We install the car and secure it with the handbrake; just in case, we put wheel chocks under the rear wheels. Next we do this:
- Remove the engine protection.
We extend the carrier so that it can be seen better.
This is the same nut.
This is what the plastic plug looks like.
You will have to try a little to get the wrench into the nut.