Troubleshooting the vacuum booster
Devices from different manufacturers may vary in characteristics and quality, and the price of the VAZ 2110 vacuum amplifier may also vary. Since the functioning of its mechanism affects the operation of other parts and components, and above all the car engine, it is worth not saving and carefully monitoring its serviceability.
If there is a hissing sound from under the hood, a burnt smell of oil is felt in the cabin, and the brake works like a stopped car only after repeatedly pumping the brake pedal with your foot, then you should immediately contact a car service center for diagnostics and, if necessary, replacement of this device.
You can test the “tens” vacuum brake booster for proper operation yourself. To do this, press the brake pedal repeatedly with the engine off. This method checks the uniformity of pressure in the cavities. Everything is fine as long as the valve body does not jam.
Then, when you hold your foot on the brake pedal, the engine starts. If the pedal is moved forward simultaneously with the foot, then the amplifier is operational. Otherwise, you need to make sure that the problem is this and not a problem with the tip flange or its fastening.
The pedal may still not function properly due to a faulty connection of the fitting on the engine exhaust pipe to the hose. This also has a detrimental effect on the performance of the braking system and its effectiveness.
How to determine that the vacuum seal is faulty
Content
A brake booster doesn't fail overnight. At first, the pneumatic unit shows signs of malfunction for a long time to the car owner, which can be easily ignored. The fact is that the car continues to drive acceptably, with virtually no effect on performance characteristics.
But at the same time, the driver’s attention may be attracted by such symptoms as:
- the speed increases, accompanied by hissing when you press the brake;
- the engine adjusts from time to time;
- The brake pedal began to behave differently when the engine was turned off.
Helpful information! It’s easy to check the serviceability of the vacuum seal on a VAZ 2110. With the engine off, pump the brake pedal as if you were bleeding the brakes. At the lowest point, fix the position and start the engine. If the pedal sinks to the floor, then the amplifier is working.
VUT and GTZ Priora on VAZ 2110
You can improve the standard brakes of a VAZ 2110 in various ways, and in this photo report we will look at how to install a Vacuum Brake Booster (VUT) and a Brake Master Cylinder (MCC) from a Lada Priora or Kalina on a “top ten” with your own hands. Required:
- VUT and GTZ Priora or Kalina
- 2 tees from classics
- 4 nuts x 8 for attaching the GTZ and pedal assembly to the VUT (the old ones are not suitable, they are larger)
- One-face brake bleeding device.
- 2 tubes from Priora with fittings 12x1 and 10x1 on the GTZ side, and 10x1.25 on the tee side.
- Brake fluid.
The photo shows:
- On the left is the Prirovskaya tube 12x1.0, and on the right is the “tens” 10x1.25
- On the left is a VAZ 2110 10x1.25, and on the right is a Prirovskaya 10x1.0
- General view of both tubes
If you want the replacement to take place with minimal alterations, then it is better to buy the VUT, GTZ and pedal assembly from the Priora. We dismantle the frill and remove the right half of the sound insulation of the engine compartment, the left one can simply be bent. Drain the brake fluid and unscrew the brake pipes.
In the cabin, remove the terminals from the brake light end switch and unscrew the 4 nuts securing the VUT to the body. Now you can easily remove the VUT and GTZ. If you couldn’t buy a prefabricated kit, then you need to install the pedal from the old VUT into the new one. Next, we assemble the VUT and GTZ into one unit and see that the pedal with standard mounting holes for the VUT will be rotated 90 degrees relative to the vertical position of the brake fluid reservoir.
To rotate the pedal to its normal position, you need to re-drill the mounting holes in the pedal assembly. We apply the pedal to the VUT and carefully mark where new holes need to be made. We try on and, if necessary, correct the resulting holes with a drill or file. The fastening nut is circled in red in the top photo. We screw the pedal assembly to the VUT. A few photos of the process:
- VUT and GTZ and pedal assembly
- Attaching the pedal to the VUT, the nut is inside, it is not easy to tighten
- The other side of the pedal was much easier
- VUT and GTZ assembled
We recommend: Replacing the low beam bulb on a Lada Priora: 3 best brands and step-by-step replacement technology
The resulting structure is installed in the car. There was no need to cut the frill, everything was installed as original. We install the tees. We screw the Priorov tubes to the GTZ and tees. We fasten the tees to each other with a pin, preferably 5. We replace the “sorcerer” (brake force regulator) using a pit. We unscrew the brake pipes from it, remembering where they were, and remove it by unscrewing 2 bolts.
We install a new “sorcerer” instead of the old one and screw on all the pipes. We insert a screwdriver into it in advance and return to the brake pipes. We fill the brake fluid into the reservoir. To remove air from the brake system, you need to tighten the tubes in the tees not completely (leaving a gap). We blow something into the brake fluid reservoir and wait until air stops coming out of the cracks between the tubes and tees. Then we tighten it. Don't forget to bleed the brakes and adjust the sorcerer. Immediately adjust the VUT rod.
After installing the Priorovsky VUT and GTZ on a car of the tenth family, at first you will have to get used to the new brakes (much less force on the pedal is required than before), but you will quickly get used to the good ones. For the result obtained, it is desirable to have good brake discs for 14 or 15 and brake pads. By the way, you can get a similar result by modifying the standard VUT.
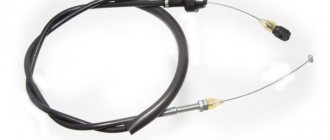
The process of replacing the vacuum booster on a VAZ-2110
Vacuum brake booster.
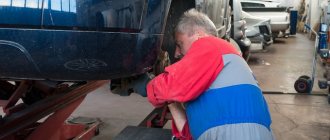
To replace a vacuum brake booster, you must have some knowledge of vehicle design. On a VAZ-2110 it is not so difficult to replace a part with your own hands.
You need to stock up on a set of tools - keys and screwdrivers and you can begin the procedure. Let's consider, step by step, the process of replacing the vacuum brake booster of the VAZ-2110:
- Remove the negative terminal from the battery.
- Disconnect the wire block on the brake fluid level sensor.
Disconnect the power from the brake fluid level sensor.
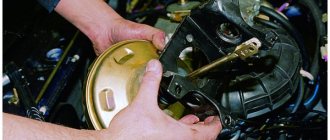
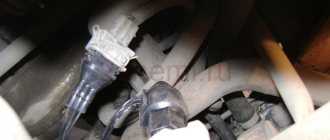
- We hold the vacuum booster return valve and with the other hand remove the hose from it.
Unscrew the hose from the check valve.
- Remove the master brake cylinder. There are only two nuts, but they can stick.
In the engine compartment, you need to unscrew the two fastening nuts of the brake master cylinder.
- Without disassembling the brake, namely, without disconnecting the brake pipes, we move the master brake cylinder to the side.
We remove the cylinder with tubes from the amplifier.
- From the interior side, unscrew the four nuts securing the brake pedal bracket.
We remove the vacuum booster mounts from the passenger compartment.
- After this, you can dismantle the vacuum booster.
- Using a screwdriver, remove the locking plate of the pin. We push out the finger and disconnect the vacuum booster pusher from the pedal.
Remove the locking plate with the finger.
- Next, we are interested in the two nuts securing the amplifier to the plate, unscrew it, most likely you will have to use wd-40. We dismantle the bracket.
After unscrewing the fasteners, remove the bracket.
- Assembly is carried out in the reverse order of disassembly.
This is what the engine compartment looks like without an amplifier!
Part selection
Amplifier Torgmash.
The original catalog number of the VAZ-2110 vacuum brake booster is 21103510010.
The price of this part is 4000 rubles. In addition, there are a number of analogues that can be used. Thus, the automotive market offers the following non-original parts:
- Pekar 2110-3510010 with an average cost of 2500 rubles.
Pekar 2110-3510010 is an amplifier with a sporty twist.
- DK 2110-3510010 - low quality and cost around 2000 rubles.
- Master-sport 2110-3510010 is an expensive but high-quality product.
Vacuum brake booster master-Sport
Symptoms of malfunction (check options)
There are several signs of a malfunction of the vacuum brake booster, and, accordingly, diagnostics of performance. Let's consider each of the options:
- We start the engine and let it run for a few minutes, after which it is necessary to turn it off. Press the brake pedal several times. During normal operation of the amplifier, the pedal will be depressed the first time, but subsequent times the stroke will be less and less. If the pedal stroke does not decrease the second and subsequent times, then there is a breakdown in the system and the part is not sealed. This means that the vacuum booster needs to be replaced.
- The second option assumes that the first option did not produce any results, and doubts have crept in. Depress the brake pedal and start the engine. With this turn of events, after starting the power unit, the pedal should go all the way down. If this does not happen, then there is an air leak and the amplifier does not work.
- With the engine running, hold down the brake pedal and then turn off the engine. Hold the pedal for another 1.5-2 minutes without releasing it. If there are malfunctions, the pedal will rise.
The amplifier has gaskets and O-rings, and these are the ones that most often fail.
Recommended: Check Engine Light Is On - What Does It Mean?
How to remove the vacuum seal on a VAZ 2110
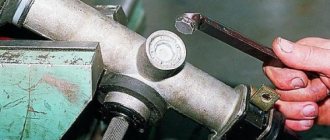
If self-diagnosis suggests a malfunction of the amplifier, then removing the vacuum seal on a VAZ 2110 is a matter of technique. To begin with, you should prepare a metalworking tool. It's good if there is a service kit. In his absence, you need to prepare the keys: three heads: 10 mm, 13 mm and 17 mm, a wrench with an extension, a pair of Phillips and slotted screwdrivers, and pliers.
Then, you can remove the vacuum seal on the VAZ 2110 in the following order:
- We disconnect the negative terminal from the battery (these are the rules of plumbing);
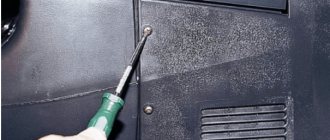
- We unscrew the upper screws that secure the soundproofing material to the engine shield;
- Disconnect the rubber band securing the expansion tank;
- Without disconnecting the connections of the coolant hoses, we move the tank to the side;
- Now it becomes possible to move back the sound insulation;
- Disconnect the terminal from the fluid level sensor on the brake cylinder cover;
- Holding the return valve, pull out the air supply hose from it;
- Next, you need to disconnect the vacuum seal and the brake cylinder. To do this, you need to unscrew the two outer fastening nuts;
- In order not to disconnect the brake pipes, smoothly moves the unscrewed cylinder away from the booster;
- Let's go to the salon. On the shield, along the perimeter of the brake pedal, we find four studs that are secured with nuts. We unscrew them;
- Then we disconnect the finger that connects the pedal and the amplifier pusher rod;
- After this, you can return to the engine compartment and remove the unscrewed unit.
With the amplifier removed, the pedal bracket will remain. It is secured with two nuts. It should be removed and reinstalled on a new vacuum unit for your VAZ 2110. Assembly occurs in the reverse order. After you managed to change the vacuum seal on a VAZ 2110, you do not need to bleed the brakes, because the brake pipes were not disconnected.
For reference! Most of the parts of the front-wheel drive LADA family are interchangeable with each other. VUT was no exception, with one small nuance: the stock in 2108-21099 is slightly longer than that of the “ten”. Therefore, to answer the question: will the vacuum cleaner from the VAZ 2109 fit the VAZ 2110? You can answer in the affirmative - yes. But the brake pedal will be located a little higher.
Troubleshooting
When the identified signs indicate a malfunction of the VAZ 2110 vacuum brake booster, you can try to provide first aid to your car yourself. In normal condition, the braking system should hold it in place at an inclination of 25º to a horizontal surface. If it doesn’t cope well, you should loosen the locknut and tighten the cable.
Then you need to check the full lever stroke, it is necessary that it is approximately 2-4 teeth. After tightening the locknut tightly, it is worth performing a series of safety brakes while simultaneously monitoring the stroke of the lever. Moreover, the rotation of the wheels when the lever is lowered to the end should be free, without force. If such a test reveals the inability of the amplifier to cope with braking, this indicates the need to replace it.
Many car services provide such a relevant service today as tuning the brake system of the VAZ 2110; the price of the unit in case of replacement is still higher than its improvement. It also affects the rear brake discs, in addition to the booster, which is upgraded by installing a special washer. This seemingly insignificant detail can significantly influence the operation of the amplifier and the braking process as a whole.
When the driver presses the brake pedal, the rod passing through the washer begins to exert pressure on the brake master cylinder. Because of this, the operation of the bypass valves begins a little later. Thus, installing a washer makes braking smoother, the pedal is softer, and its reaction in case of a sudden stop does not change.
But if a hiss has already appeared, the engine stalls when the brake pedal is pressed, or it has become very tight, it is necessary to replace the mechanism. Otherwise, driving such a car becomes unsafe for yourself and others. In preparation for replacing this unit, the rear of the engine compartment must be disassembled and the elastic seal, trim and frill removed.
The process begins by disconnecting the pad wiring from the sensor indicating the brake fluid level. While supporting the check valve, disconnect the hose from the amplifier. Next, unscrew both fastening nuts of the master cylinder of the braking system. It is smoothly turned away from the amplifier to the distance required to remove the latter, and this is done without removing the brake pipes.
Under the instrument panel located in the passenger compartment, you should unscrew all four fastening nuts of the brake pedal bracket, which is quite difficult due to their inconvenient location. Then the wires, bracket and amplifier itself are removed in the engine compartment at the same time as the brake pedal assembly.
Having disconnected the two fastening nuts, use a screwdriver to remove the locking plate of the mounting pin and, pushing it out, separate the amplifier pusher from the pedal. Having unscrewed the damaged amplifier from the pedal assembly, a new one is placed in its place. Moreover, it is necessary to ensure that its location is correct: the pedal should be at the bottom and the hose fitting at the top. After this, all previously performed operations are performed in the order opposite to removal.
How to replace the vacuum brake booster on a VAZ 2110-VAZ 2112?
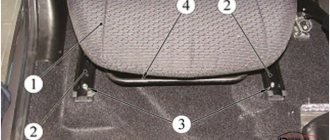
Removal: 1) First, unscrew all the screws that secure the soundproofing material (Most of the nuts are indicated by red arrows), then unfasten the belt securing the expansion tank of the cooling system (the tank is indicated by a blue arrow) and slightly lifting it up, remove it from the place where it is located.
We recommend: Antifreeze red, green, blue - what's the difference?
The hoses are connected to it, do not disconnect them under any circumstances, otherwise liquid will flow out, which will stain your car. Of course, you can put some kind of container and drain all the liquid from the expansion tank, but why do this if you can do without it and the work will go much faster, then carefully place the tank somewhere and fix it and then take out the left (look in the direction of the car) part of the soundproofing material and put it aside.
Note! The same thing will need to be done with the right side, in order to remove it, you first need to move the rear window washer reservoir to the side (On VAZ 2110 cars, this reservoir is not present, it is only present on the VAZ 2111 and VAZ 2112), to do this, disconnect the two wires that fit it (see photo 3), unfasten the belt that holds it (see photo 4) and carefully remove it
If there is a lot of liquid in the tank, then you don’t have to remove it, just carefully place it on the fender, but if there is none or you have pumped it all out, then disconnect all the tubes remaining from the tank and after that, remove it completely from the car and finally remove the right parts of the noise-insulating material, with a 10 mm socket wrench, unscrew the two nuts (see photo 1) and with a thin flat screwdriver, pry up the brake booster hose holder (see photo 2) and disconnect it too, and that’s it, you can take out the sound-proofing material material so that it does not interfere with the removal of the brake booster from the vehicle!
2) Now that the soundproofing material is removed, disconnect the wiring block from the brake reservoir cap (Indicated by a red arrow), then disconnect the hose from the check valve of the vacuum brake booster (Hose indicated by a green arrow) and unscrew the two nuts (Indicated by blue arrows) securing the Brake Master Cylinder to the brake booster, then carefully move the GTZ to the side, but just be careful, make sure that the brake pipes do not burst, otherwise you will have to change them.
3) After the operation has been completed, move to the salon and there unscrew the four nuts that secure the vacuum booster bracket to the body (Indicated by red arrows), and also disconnect the wire blocks (Indicated by blue arrows) from the brake light switch (Indicated by green arrow), when everything is done done, you can move again to the engine compartment of the car and, once there, pull out the vacuum booster assembly with the bracket.
4) Having placed the vacuum seal on the ground or secured it in a vice, first of all, pull out the metal stopper with small pliers (Indicated by the red arrow), then carefully knock out the rod (see small photo, it is metal and comes out very easily), pressing on it from above or vice versa from below .
5) And finally, unscrew both nuts that secure the vacuum seal to the bracket and remove it, this completes the operation of removing the brake booster.
Installation: Install a new brake booster in the reverse order of removal, during installation, do not make a mistake and do everything exactly the same as before, when it is installed, do not wear soundproofing material, but try how it works (How to check the brake booster, we have already wrote above), if everything is fine, complete the installation of all parts as they were previously.
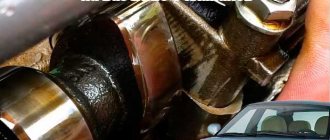
Location and design of the vacuum brake booster
The vacuum brake booster (VUT) on the VAZ 2110 is located at the rear wall of the engine compartment (directly under the wipers). You can see it by simply opening the hood and removing the protective cover.
This is a unit with a round body, located just below the wipers
This is a device with a round body, which is divided into 2 parts: vacuum and atmospheric. A diaphragm separates these parts. The vacuum chamber is connected to the intake manifold via a check valve. This valve creates a vacuum in the chamber. And a monitoring valve is connected to the atmospheric chamber, which is activated after pressing the brake pedal, as a result of which the vacuum chamber is connected to the atmospheric one. After this, the VUT diaphragm begins to put pressure on the rod of the main brake cylinder, brake fluid is pumped into the working cylinders, and braking begins. And when the driver releases the gas pedal, the diaphragm, under the action of the return spring, returns to its original position, and braking stops.
Basic elements of a vacuum booster