SOUND INSULATION WARRANTY 3 YEARS
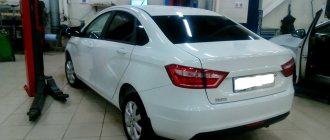
SOUND INSULATION OF LADA GRANT IN 10 HOURS
Soundproofing a Lada Granta takes 8-9 hours. 3 Mos Olympus craftsmen work on each car. The price of Granta sound insulation depends on the materials you choose; we offer several options for “Shumka” from 18,000 to 44,000 rubles . Next, we invite you to familiarize yourself with the noise insulation program - OlimpPlus . Which uses top materials from the ComfortMat company. Reduction of noise in the cabin reaches 70%. The price of soundproofing a Lada Granta under the OlympPlus program is 36,000 rubles.
Our specialized center for installing sound insulation Mos-Olympus cooperates with leading manufacturers such as ComfortMat, STP, ShumOff. We have developed several effective sound insulation programs to choose from. Everyone who contacts us will be able to choose a “Shumka” car according to their budget and efficiency. As evidenced by numerous positive reviews on third-party sites.
You can always control the quality of the service provided and be present during the disassembly, installation of sound insulation, and assembly of the car. Each Mos-Olympus master will always give a qualified answer to your questions about sound insulation.
Tools for disassembling the interior
- Basic set for the motorist. Sometimes such kits can be purchased as additional interior equipment for an additional payment when purchasing a car. This kit includes everything you need to disassemble the interior yourself.
- Vehicle Operation Manual. The diagrams presented in the manual will greatly simplify the disassembly process, and from there you can find out which tools to use for certain parts of the machine.
- A device that allows you to remove plastic clips. Many interiors are attached to each other with plastic connecting elements. Of course, you can use a regular screwdriver to dismantle them, but it can damage or deform the plastic parts.
Other parts of the machine
When the effect of soundproofing the doors does not seem so significant, the body has to be treated in a similar way. The procedure for performing the work basically looks the same as previously described, but there are some nuances:
- Only the most rigid anti-vibration materials are placed on the floor, the thickness of which must be at least 4 millimeters.
- "Barrier" or its analogues are used on wheel arches; ordinary vibration isolation will not work here;
- the ceiling in Grant is thinner than the rest of the body - here you should choose Splen and put Vizomat PB under it;
- the pillars, hood and engine compartment are insulated in the same way as the rest of the car.
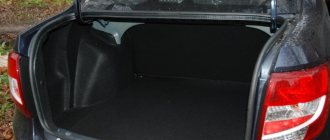
Finally, sound insulation is placed in the trunk. If everything is done correctly, then as a result, not a single extraneous sound will be able to penetrate into the cabin.
More details about the progress of work are described in this video:
Soundproofing the floor of Lada Granta
Many people do Shumka, but not many think about whether they are doing it correctly, and whether there will be a result? Is this result worth the money? Previously, like everyone else, I glued it according to this scheme - STP vibra + splen (4-8mm). There is little result from this. I decided to try it the way they do it at the factory, namely:
Vibration - when I disassembled the trunk, I saw a lot of standard vibration, and it did not fall off like on old basins, but was well glued and did not crack. I added vibration to the rear fenders and rear arches, closed some of the holes and that was it. Vibra 3.5 mm thick - it took 4 sheets.
As for the noise, there was none at all, there was nothing under the rear sofas and on the trunk floor, and there was nothing on the arches either. As a noise-absorbing material, I used non-woven fabric, also known as technical felt, thermal felt, batting, etc. there are many different names, but the essence is the same - the same garbage as a standard soundproofing carpet that lies on the floor and dampens noise quite well. Thickness -6mm, laid 2 layers, in some places even 3 layers. I glued it with regular glue.
The result is not yet very noticeable due to the lack of noise on all other elements - the floor, the doors. I’ll do them and describe whether there will be a difference. But I can say one thing for sure - you shouldn’t glue the splenium, it definitely doesn’t reduce the noise.
I’ll say right away that I didn’t waste my energy and money and didn’t do it as they usually do - instead of the traditional Vibra+splen I did this:
1 layer. - vibration 4mm - covered the opening areas (vocal) with it 2nd layer - synthetic felt (non-woven, does not rot, but gets wet) - 2 layers of 6mm each. The 3rd layer - 1.5mm vibration - covered almost 100% of the floor of the front passengers. I laid it on top of the felt - it is needed as a screen to reflect sound + protects the felt from water getting in from the rugs. Layer 4 - standard carpet - which was very wet during 1 winter, got very wet, I dried it and put it back. I also covered the door cards with felt... Once in place everything became normal, because... the felt can be compressed if necessary.
Result. — I’ll say right away that this sandwich is much better than Vibra + Splen. but I didn’t receive the Mercedes.
Lay the third layer on the floor
I decided to add another layer to the floor - I wanted to make it even quieter. I chose a 2mm noise block. It took 18 sheets, but this was not enough under the back seat, it was left a little unfinished. In general, let's look at the photo. I'm happy with the work, but I expected more.
I was doing heated seats, and since I took them off, I decided to add a little noise. Used felt with felt on top. Thickness is approximately 6-7 mm. This material is sold on auto markets, such as standard carpet. I put it only under the front seats and brought it under the panel as much as possible, there was some result.
standard carpet... it's not bad, by the way, it's very thick.
I cut it out of this material... and put it on top... on top because I wanted to create a layer like a noise block above the standard Shumka.
on the driver's side... really it was necessary to cut off the fender liner... it makes it a little difficult to press the clutch... but I know over time it will get better and it will be fine
Soundproofing the ceiling of Lada Granta
1st layer - vibroplast glued not 100% but approximately 80%, this was enough for the ceiling to stop rattling and become dull. 2nd layer - synthetic felt (8mm) - I glued it directly to the ceiling trim, because... I couldn’t take it out of the car, and it wasn’t easy to glue it to the roof - it was constantly getting in the way. I think it doesn’t make much difference whether you glue the sound absorber to the roof or to the sheathing, I left gaps between the pieces. There are stiffening ribs near the roof, otherwise it will not fall into place.
Tools for surface preparation and treatment
After the interior has been disassembled, it is important to put the exposed surfaces in order by cleaning and degreasing them properly.
To do this you will need the following.
- Brush. Regardless of the age of the vehicle, a large amount of debris and dust remains in the side panels and on the floor. For sound insulation to work correctly, you should get rid of debris using a vacuum cleaner, brush or rags.
- Degreaser. To ensure that the soundproofing materials adhere tightly to the surface of the interior, the surfaces should be degreased. It is important that the product is not too toxic, since you will have to work with it in a limited space.
- Emery and spatula. To level the working surfaces, you need to remove the remnants of old insulation from them, clean off any stuck pieces using sandpaper and a spatula. At the same time, try not to damage the protective layer of paint, as this will lead to subsequent corrosion of the body. Installation and measuring tools
- Construction hairdryer. Most vibration-absorbing materials are installed on surfaces exposed to high temperatures. A hair dryer can also be used to dry the surface when installing the material. The recommended specifications for this tool are 2000 Watts (power) and 350°C (operating temperature).
- Roller for rolling. It will make it possible to combine the insulating material with the surface as tightly as possible, especially at the bends.
- Tape measure, ruler and marker. Used for measurements and marking.
- Scissors. It is important that the blades of the scissors are sharp, which will ensure the correct contour of the cut parts
- A stationery knife as an auxiliary tool for scissors.
You will also need work gloves and trash bags.
Do-it-yourself noise insulation
Method No. 1
(photo by trumka91, Lada Vesta car). The first layer is vibration-proof. We heat the material with a construction hair dryer and glue its motor shield end to end. Roll with a hard roller.
The second layer is sound-absorbing (choose a material that does not absorb moisture). We glue it with a continuous carpet. There should be no gaps.
Method No. 2
(VAZ 2111 car). We apply mastic with a plastic spatula to the engine shield, trying to get into the most inaccessible places. After treatment, the mastic must dry (up to 72 hours, see instructions for the mastic). The second layer can be used as a soundproofing material.
Causes of noise in a car
First you need to determine the nature of the noise in the cabin, it could be:
- airborne - transmitted through the air in the audible frequency range;
- structural - propagate in a solid environment (engine vibration, body panels).
Airborne noise occurs when the gaps of doors, glass, or the presence of technological openings are not sealed.
Structural - cause vibration of almost all elements of the engine, chassis, exhaust systems, which in turn are transmitted through the body and floor to the car interior.
Manufacturers' recommendations (different methods)
Installation diagrams for trunk sound insulation with materials:
Bimast Bomb Premium (4.2mm)
Shumoff Mix F (6.2mm)
Accent Premium (8-10mm)
| Shvi layer | Material | STP (thickness, mm) | Shumoff (thickness, mm) |
| 1 | Vibration isolation (vibration damper) | ||
| 3 (optional) | Soundproofing (soundproofing membrane) | NoiseBlock (2mm) | Germeton A30 (3mm) |
Approximate price of materials (depending on body type):
Soundproofing materials
They can be roughly divided into three categories:
| Vibration-absorbing | Sound-absorbing | Soundproofing |
| Standard – covering using a fabric base | Accent - material represented by foamed polyethylene | Vibroton. Has a polyethylene base and a bitumen coating |
| Bomb or BiMast. Mastic and bitumen have excellent vibration insulation characteristics | Isoton is a material based on polyurethane and plastic | Barrier. The basis of the material is polyethylene in foam state |
| Vizomat - foil-based coating allows you to absorb more vibration | Bitoplast. Characterized by resistance to contact with water and long service life | |
| Vibroplast. It has an adhesive surface and a polymer base. | Splen is a polyethylene-based material, self-adhesive, simplifying installation work | |
| Madeleine. Fabric base, used for compaction |
To soundproof a roof or trunk, you will need different materials or a combination of them.
Engine compartment
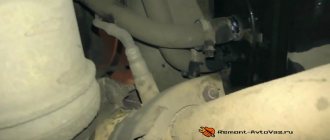
Do-it-yourself engine soundproofing starts with the engine shield. The main feature of the work is the need to remove elements attached to the partition. Since the engine shield is one of the most vibration-loaded body elements, the “vibration” on the side of the internal combustion engine must be glued over the entire accessible plane. You should prefer a material with a foil front layer, which will reflect heat waves, maintaining the temperature of the engine compartment (especially important for diesel internal combustion engines).
Pasting the inside of the engine shield is impossible without completely dismantling the dashboard, which on many foreign cars will require a lot of effort and care. If necessary, photograph the location of certain elements in order to put everything back together correctly.
Salon
If you covered 75-80% of the partition area on the engine side with vibration insulation, then 35-40% overlap will be sufficient for the internal part. Distribute the sheets in a checkerboard pattern. This way you can save on material and not lose quality. If the engine sound insulation is carried out only from the inside, then it is better to cover 95-100% of the area of the engine shield with “vibra”.
The noise absorber is glued directly onto the vibration damping sheets. When choosing a “noise”, pay attention to the frequency range in which the material is most effective. The smartest thing to do would be to combine material that works in the mid- and high-frequency ranges. Lay out both types of materials in a checkerboard pattern with an overlap of 2-3 cm. If you did not carry out external sound insulation of the wheel arches, then on the inside, on top of the vibration-proofing layer, place a sound insulator (for example, “Spleen”). The side parts adjacent to the motor partition are less vibration-loaded, so material up to 3 mm thick can be used as a vibration damper.
The instrument panel is covered with a sound absorber based on foam rubber or polyurethane. Sound insulation should not be compressed. When compressed, the porous structure loses its effectiveness. We recommend gluing the joints of plastic elements with an anti-creaking agent.
Hood
You shouldn't expect any special effect from the hood soundproofing. Only a small part of the sound waves generated by the internal combustion engine and transmission parts penetrates the cabin through the windshield. The hood mount does not contribute to the transmission of vibrations. Since the hood area is a thermally loaded part, dense material with a foil facing layer should be used as a vibration damper. Such “vibration” models need to be heated before pasting. Sound insulation of the engine cover will not noticeably affect the comfort in the cabin.
Recommendations
How you can soundproof your car (using the example of STP and Shumoff products):
- hood – “Vizomat MP” or “Bimast Super”; on top of the vibration-damping layer - “Splen” or a standard heat-insulating “blanket”;
- motor shield. Outside – “BiMast Bomb”. Inside – “BiMast Super”, 60% of the area – “Accent”, 40% – Isoton;
- dashboard - “BiPlast” or compositions of the “Comfort” and “Germeton” series from Shumoff. Self-adhesive material in rolls or Bitoplast is used as an anti-squeak;
- arches – “Vizomat MP”, “Spleen”, “Bilast”.
Treating the interior with soundproofing materials
Vibration-absorbing materials should be placed on all metal elements of the car. Even if the part does not vibrate at the moment, such a measure will protect the driver in the future.
Sound insulating materials act as an obstacle to the propagated sound; they are good for filling all small structural elements. Sound-absorbing materials are an additional layer applied to vibration insulation.
Soundproofing of the engine compartment: on the engine side, on the driver’s side or in combination
Let us immediately note that the best effect can be achieved when insulation is carried out both from the engine compartment and from the driver’s side. In other words, the dashboard will still have to be removed, which, for obvious reasons, many drivers don’t really want to do, especially when carrying out the work themselves.
The engine shield itself is the main barrier that separates the cabin from the main sources of noise, that is, from the engine and gearbox. It is important to understand that insulating this area is the most difficult process compared to other parts of the body.
Let us add that if you insulate the engine shield only from the engine side, while simultaneously implementing high-quality sound insulation of the hood, floor and front wheel arches, then you can also count on, if not ideal, but still quite decent results.
Algorithm for carrying out noise insulation work
First of all, Granta Liftback doors are soundproofed. This is explained by the fact that the main cause of noise lies precisely in them. Even if this work does not bring results and you have to continue installing the Shumka further, the cabin will become much quieter.
Before gluing, the sound insulation should be heated with a hairdryer, applied to the area to be glued and smoothed with a roller or other method. This will allow the material to take shape, literally merge with the surface being treated, repeating all its curves, which will improve noise absorption.
Conclusion Installing sound insulation yourself is not such a difficult job. Why overpay? Hone your skills on your car, maybe this will become your additional income in the future? There are a lot of people willing!
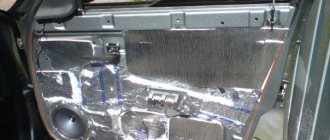
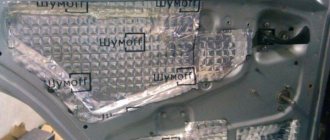
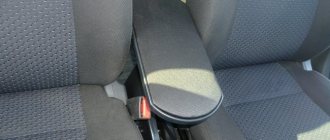
Doors
In Grant cars of different modifications (sedan, liftback, etc.), the procedure for performing work is generally the same. The process is divided into several stages. First of all, insulation is installed in the doors. As practice shows, very often after this many people do not see the point in processing the body. In any case, upon completion of this stage, tests are carried out, and based on the results, a final decision is made.
Anti-vibration materials require bitumen to be heated before application. A hair dryer is suitable for this. The finished element is applied to the surface to be treated and pressed with a special ribbed metal roller.
Depending on the desired result, materials of different thicknesses are used. It is important to completely glue the entire area without leaving a single free area.
Before you begin, you will need to remove the door trim. The surface must be cleaned of dust and grease.
Also check out
Gluing the sound insulation Gluing the vibration-insulating layer must overlap How to make sound insulation for the Lada Granta Sound insulation of the Lada Granta with your own hands
In some cases, problems may arise with the assembly, since the floor has become thicker, which makes the installation of some elements on standard mounts problematic. If the studs or bolts are too short, they must be replaced with longer ones.
To obtain ideal results, it is worth performing complete vibration and noise insulation of the interior (doors, trunk, dashboard, floor, ceiling, arches), then the noise level will drop to 20-50%. But the only disadvantage of this procedure is the expensive cost of the procedure and the time required of several days. The result of such work will be greater comfort and silence in the cabin.
Recommendations from manufacturers
Door insulation reduces external noise and increases vehicle comfort. When working with Granta doors, special attention should be paid to the clanking and ringing parts of window regulators and locks. They can be treated with special materials to eliminate the problem.
Work should begin by disassembling the interior - use plastic spatulas and clip lifters. You can replace the tool with regular screwdrivers. Cutting is done using a stationery knife or scissors; after application, the material is rolled using a metal roller.
The doors are treated in 4 layers. The first is a vibration isolator 2 mm thick. To increase work efficiency, the foil is rolled with a roller. The second layer is a sound absorber with a moisture-resistant sealant, the third covers the holes on the door body. The fourth, when soundproofing doors (cards, frames), Grant absorbs unnecessary sounds. Visually, it looks like a foam-like substance that is applied to the plastic door trim from the inside.