Firmware for the VAZ 2110 is simply a necessary procedure for those car enthusiasts who value fast and dynamic vehicle control. However, the question arises: should you entrust such a task to specialists or do all the work yourself?
There is no definite answer, since specialists provide some guarantees for their services, although a good specialist has yet to be found. At the same time, everything will cost the vehicle owner relatively expensive. But changing the “brains” of the car yourself allows you to save a lot and not worry about the fact that your favorite “iron friend” will fall into unreliable hands.
But it is recommended that those car enthusiasts who have at least a little idea of the complexity and importance of the upcoming procedure take on such a task. And here it will help you, if you have decided to do everything yourself and gain new experience, detailed instructions and useful tips on how to properly flash a VAZ 2110 with your own hands.
To give the car a modern look, you must first decide what firmware is needed, then find it on the Internet and, accordingly, download it. If you want to flash a VAZ 2110 injector, you should decide whether such an installation will really make sense. Also remember that in cases of failure of factory options, you will be provided with information about an error in the data output.
Before installing a new downloaded program, you should definitely check whether the car has factory firmware, which often provides for disabling misfire detection. If this option is available on the car, no further steps regarding flashing will be required.
In this case, you also need to check the type of factory installation, which can be done as follows: using a scanmatic, you should check the diagnostics, which will allow you to determine the system configuration of your machine. If you are unable to find the required type of available firmware, you will need to visit a specialized store that sells the cover and DF.
After such an acquisition, you will only need to correctly insert the pin onto the camshaft, connect the adapter and carefully monitor its parameters, because the adapter basically works in real time. If an error occurs during the establishment of communication with the electrical control unit, it is unlikely that you will be able to perform the brain firmware on the VAZ 2110 yourself.
If such an error does not occur, you will need to load into the ECU a selected and previously downloaded program for 2-mode firmware, for example, which is intended for the possible use of Economy and Sport modes. Then you should start modifying the ECU - carefully add a wire to its connector, which will allow grounding to ground during subsequent mode switches.
Description of firmware methods
You can, of course, take your car to a service center where professionals will do everything for a fee. But if you have little experience working with electronics, you can flash the VAZ 2110 yourself in 2 different ways. Let's take a closer look at each.
- To install the firmware, you need to purchase a special cable from a car store, then download the required type of firmware and the ChipLoader program. Then, in the passenger compartment of the car, where there is a passenger seat, you should put your hands under the dashboard and loosen the ECU mounting bolts, and on the other side, the driver’s side, remove the electrical control unit connector. It is recommended to rewrite the name of the firmware version; it is often indicated directly on the ECU. You should connect the purchased cable to the electrical unit and carefully connect the “K” line to pin 55, ground to pin 19, and on the “=” designation you should attach contacts numbered 18, 27, 37 and 47. The cable must also be connected to the COM port PC and, turning it on, configure the previously installed ChipLoader program so that it can connect to this port. In the program that opens, go to the menu in the field with the type of firmware that was installed, and to establish communication with the electrical unit, you must disable and re-enable pin 27. Select the firmware and load it into the ECU.
- The second method also involves choosing the optimal type of firmware for the VAZ 2110 car. You can find out which one is suitable only by error and trial. You can install the required ECU firmware without removing the chip from the car, using a computer and a program (ChipLoader or AutoProg). The main thing is to correctly connect all cable contacts to the electrical control unit.
In comparison with the first method, the second procedure discussed will be mastered only by those who have the skills to operate a soldering iron and microcircuits, since they have to disassemble the ECU and solder some of the wires to the contacts of the microcircuit. Only after this, the firmware, as in the first method, is uploaded into the memory of the electrical unit.
It's no secret that factory firmware hides a small herd of horses from us right from the factory. Chip tuning VAZ 2110
— the ability to free up the “three horses” and achieve an increase in engine power without replacing any parts, but only by replacing the program inside the chip.
What is Chip tuning and what does it give?
Cars with injection engines have an engine control unit ( ECU - Engine Control Unit
) is an electronic device that controls the engine.
In other words , the ECU is a computer.
, which is responsible for the operation of the internal combustion engine, i.e. it generates commands for the actuators of the fuel supply, ignition and turbocharging systems based on data received from speed sensors, crankshaft position, air flow, etc.
Factory firmware
created by the manufacturer with the condition of incomplete optimization, i.e. The engine must be powerful just enough to be a little more reliable than necessary. The engine should last a long time even when using low-quality fuel and low-quality lubricants. On the one hand, this saves a car that is not properly cared for from breakdown, and on the other hand, it increases fuel consumption and reduces power.
But if you care about your car, then the horses lost at the factory can actually be returned!
After using the appropriate powerchip, power will increase by about 8-10%, and on turbocharged engines even by 25-35%.
Chip tuning procedure
this is essentially replacing the factory chip with a tuning one or flashing the factory chip with a new program (firmware) to obtain higher efficiency, power and torque.
Let's clarify one more important detail:
Maximum power
- affects the maximum speed of the car, and to achieve
better acceleration of the car
it is necessary to increase not the maximum power, but
the power in all speed ranges.
Firmware decryption
Firmware is marked by the manufacturer with an alphanumeric code, divided into 5 groups.
the first group - the letter and number indicates the type (family) of the controller: J4 - control units (ECU) January-4/4.1; J5 - control units January-5.1/5.1.1/5.1.2; V5 — control units VS-5.1 (NPO Itelma); M1 - Motronic control units M1.5.4 (M1.5.4N); N (New) - new hardware implementation of M7 - Motronic MP7.0 control units
second group - the letter indicates the car, the state of development or the code of the topic: V - VAZ cars with front-wheel drive of the 2108, 2110 families; N - family of cars with all-wheel drive VAZ; For some reason, the exception was firmware for classics, for example, J5V26L52, etc.
third group - two digits indicate the conditional configuration number (00...99); for front-wheel drive VAZ cars, the following numbers exist: 03 - Euro-2 toxicity standards, 8-valve 1.5L engine; 05 — Euro-2 toxicity standards, 16-valve 1.5L engine; 07 - Russian standards, 16-valve 1.5L engine; 13 - Russian standards, 8-valve 1.5L engine. 26 - Russian standards, 8-valve 1.45L engine. Rear-wheel drive (classic).
the fourth group - a letter, denotes the ordinal software level (A...Z), the further the letter in the alphabet, the newer the software level;
the fifth group - two digits, indicates the calibration version (00...99), the larger the number, the newer the calibration. The new blocks Bosch M7.9.7 and January 7.2 and Mikas 10 have a different, yet unusual identification.
The first group in them is one letter - manufacturer code I - Itelma B - Bosch A - Avtel
third group - 3 characters (digital-alphabetic code) - symbol of the project according to the internal VAZ classification. 03E - project 2111, Euro II 18E - project 2111, Euro III 04D - project 21114, Euro II 18D - project 21114, Euro III 05D - project 21124, Euro II 08D - project 21124, Euro III 20E - project 21214, Euro II 21E - project 21214, Euro III 22H - project 21214, Euro III 01C - project 11183, Euro II C02 - project 11183, Euro III 02C - project 11183, Euro III 73D - project 11184, Euro III 73C - project 21126, Euro III C02 - project 11183, Euro III 26F - project 21067, Euro II 26E - project 21067, Euro II
fourth group - 1 letter - software version.
fifth group - 2 digits - calibration number
B103EQ09 - Bosch, M7.9.7, project 03E, software version - "Q", calibration number 09 I203EK34 - Itelma, January 7, project 03E, software version - "K", calibration number 34
Classification of tuning firmware designations
As a rule, there are no general rules, but this classification scheme for tuning firmware is often used: Calibrations of front-wheel drive VAZs - “V”, replaced by:
"A"
— for firmware for non-standard “hardware”
“B”
— “Butan” — firmware for operation on liquefied gas.
“C”
- “Cam” - firmware for non-standard camshafts.
“D”
- “Dynamic” - for dynamic firmware;
“E”
- “Economy” - for economical firmware.
DIY chip tuning VAZ 2110
Firmware procedure or chip tuning for VAZ 2110
It’s not complicated and it won’t be difficult to flash the ECU yourself. It will be more difficult to select the appropriate firmware, not only in terms of dynamic characteristics, but also in terms of compatibility with the ECU. The firmware is not universal, but is suitable for specific controller models, or more precisely:
When choosing the firmware, you will need to know: The model of your car Type of control unit The name of the old firmware (it is indicated on the unit!) After you select the desired option, there remains one more unpleasant moment - when, in case of incorrect firmware of the controller, a complete failure of the engine control system settings may occur, after why you will have to contact the service center.
You can flash the chip in two ways: Remove the chip from the controller and flash it separately Without removing the chip from the controller, flash it using a special connector You won’t be able to cover all the intricacies of flashing a VAZ 2110 in words, because There are many nuances and each case must be approached individually. Determine the type of control unit, its model, what firmware is used, etc.
All the subtleties of programming the VAZ 2110 ECU
can be found on the chiptuner website. In the Chip Tuning section you can find a program for flashing a VAZ 2110, a list of VAZ 2110 firmware and much more.
It's no secret that factory firmware hides a small herd of horses from us right from the factory. — the ability to free up the “three horses” and achieve an increase in engine power without replacing any parts, but only by replacing the program inside the chip.
What is Chip tuning and what does it give?
Cars with injection engines have an engine control unit ( ECU - Engine Control Unit
) - this is an electronic device that controls the engine.
In other words , the ECU is a computer.
, which is responsible for the operation of the internal combustion engine, i.e. it generates commands for the actuators of the fuel supply, ignition and turbocharging systems based on data received from speed sensors, crankshaft position, air flow, etc.
Chip tuning VAZ Lada 2110 in auto repair shops in Moscow
15 car repair companies
- Afto-service
- st. Polikarpova, 27, building 3
- +7 (495) 99… show all
- The site of the company
- Stomobil
- Tigerboxru
- Apollo Motors
- Dvs
- Tiger box
- London-auto
- RF-motors
- Autoelite service
- Gag-auto
- Apollo Motors
- TSM Motors
Popular companies
How to beat an online casino for 368,548 rubles using a hole in the algorithm? Step-by-step instruction
Hello! On the Internet I am known as Jerome Holden and I make money by testing the algorithms of the well-known Vulcan casino: I look for vulnerabilities in games, place bets and win the jackpot.
Now I'm gathering a community for a more global project, so I'm sharing the schemes for free. I tell you everything in as much detail as possible, there is nothing complicated, you can work directly from your phone, even girls can handle it)). You can test the algorithms, earn money and decide whether to join my team or not. Details here.
In three months, I earned 973,000 rubles from my schemes:
Factory firmware
was created by the manufacturer with the condition of incomplete optimization, i.e. The engine must be powerful just enough to be a little more reliable than necessary. The engine should last a long time even when using low-quality fuel and low-quality lubricants. On the one hand, this saves a car that is not properly cared for from breakdown, and on the other hand, it increases fuel consumption and reduces power.
But if you care about your car, then the horses lost at the factory can actually be returned!
After using the appropriate powerchip, power will increase by about 8-10%, and on turbocharged engines even by 25-35%.
Chip tuning procedure
this is essentially replacing the factory chip with a tuning one or flashing the factory chip with a new program (firmware) to obtain higher efficiency, power and torque.
Let's clarify one more important detail: Maximum power
- affects the maximum speed of the car, and to achieve
better acceleration of the car
it is necessary to increase not the maximum power, but
the power in all speed ranges.
Firmware decryption
Firmware is marked by the manufacturer with an alphanumeric code, divided into 5 groups.
the first group - the letter and number indicates the type (family) of the controller: J4 - control units (ECU) January-4/4.1; J5 - control units January-5.1/5.1.1/5.1.2; V5 — control units VS-5.1 (NPO Itelma); M1 - Motronic control units M1.5.4 (M1.5.4N); N (New) - new hardware implementation of M7 - Motronic MP7.0 control units
second group - the letter indicates the car, the state of development or the code of the topic: V - VAZ cars with front-wheel drive of the 2108, 2110 families; N - family of cars with all-wheel drive VAZ; For some reason, the exception was firmware for classics, for example, J5V26L52, etc.
third group - two digits indicate the conditional configuration number (00...99); for front-wheel drive VAZ cars, the following numbers exist: 03 - Euro-2 toxicity standards, 8-valve 1.5L engine; 05 — Euro-2 toxicity standards, 16-valve 1.5L engine; 07 - Russian standards, 16-valve 1.5L engine; 13 - Russian standards, 8-valve 1.5L engine. 26 - Russian standards, 8-valve 1.45L engine. Rear-wheel drive (classic).
the fourth group - a letter, denotes the ordinal software level (A...Z), the further the letter in the alphabet, the newer the software level;
the fifth group - two digits, indicates the calibration version (00...99), the larger the number, the newer the calibration. The new blocks Bosch M7.9.7 and January 7.2 and Mikas 10 have a different, yet unusual identification.
The first group in them is one letter - manufacturer code I - Itelma B - Bosch A - Avtel
third group - 3 characters (digital-alphabetic code) - symbol of the project according to the internal VAZ classification. 03E - project 2111, Euro II 18E - project 2111, Euro III 04D - project 21114, Euro II 18D - project 21114, Euro III 05D - project 21124, Euro II 08D - project 21124, Euro III 20E - project 21214, Euro II 21E - project 21214, Euro III 22H - project 21214, Euro III 01C - project 11183, Euro II C02 - project 11183, Euro III 02C - project 11183, Euro III 73D - project 11184, Euro III 73C - project 21126, Euro III C02 - project 11183, Euro III 26F - project 21067, Euro II 26E - project 21067, Euro II
fourth group - 1 letter - software version.
fifth group - 2 digits - calibration number
Example: B103EQ09 - Bosch, M7.9.7, project 03E, software version - "Q", calibration number 09 I203EK34 - Itelma, January 7, project 03E, software version - "K", calibration number 34 Classification of tuning firmware designations
As a rule, there are no general rules, but this classification scheme for tuning firmware is often used: Calibrations of front-wheel drive VAZs - “V”, replaced by:
"A"
— for firmware for non-standard “hardware”
“B”
— “Butan” — firmware for operation on liquefied gas.
“C”
- “Cam” - firmware for non-standard camshafts.
“D”
- “Dynamic” - for dynamic firmware;
“E”
- “Economy” - for economical firmware.
DIY chip tuning VAZ 2110
The procedure for flashing firmware or chip tuning for a VAZ
of the tenth family is not complicated and flashing the ECU yourself will not be difficult. It will be more difficult to select the appropriate firmware, not only in terms of dynamic characteristics, but also in terms of compatibility with the ECU. The firmware is not universal, but is suitable for specific controller models, or more precisely:
When choosing firmware you will need to know:
- Your car model
- Control unit type
- The name of the old firmware (it is indicated on the block!)
After you select the desired option, there remains one more unpleasant moment - when, in the event of incorrect controller firmware, a complete failure of the engine control system settings may occur, after which you will have to contact a service center.
You can flash the chip in two ways:
- Remove the chip from the controller and flash it separately
- Without removing the chip from the controller, flash it using a special connector
It will not be possible to cover all the subtleties of flashing a VAZ 2110 in just words, because...
There are many nuances and each case must be approached individually. Determine the type of control unit, its model, what firmware is used, etc. All the subtleties of programming the VAZ 2110 ECU
can be found on the chiptuner website. In the Chip Tuning section you can find a program for flashing the VAZ 2110, a list of VAZ 2110 firmware and much more.
Example of firmware for VAZ 2110 with ECU bosch M1.5.4 2111-1411020-70, firmware M1V13T64
This procedure was done by -xxx-
We have: ECU bosch M1.5.4 2111-1411020-70, firmware M1V13T64
Disadvantages of the firmware:
- Bad cold start! (at -25 you can’t start without “dancing with tambourines”)
- Fuel consumption is not low (highway - 6.6l, city ~10l)
- The dynamics are bad (compared to 21102 father).
I chose the firmware M1D13LAI6_3.
Equipment available:
- AutoProg programmer
- Soldering Station
- Set of wrenches and screwdrivers (including star screwdrivers)
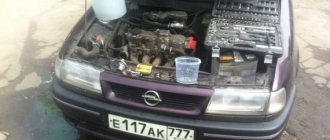
We remove the terminal from the battery.
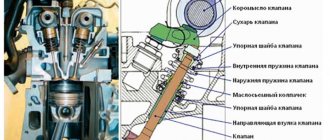
We remove the plastic covers on the tunnel on the left and right: On the passenger side we see the ECU! On the driver's side, by snapping off the metal holder, remove the connector from the ECU and remember the connector and the method of attaching it to the block (useful during assembly). We take out the block (see the figure for attachment points). Common people call it “Canned food”
Remove the block from the plastic base and bend the petals of the block cover. The ROM chip is soldered into the board and there are no cribs. 
We unsolder the microcircuit, indicated by the arrow, and put a crib in its place (the crib is needed at 28pin and preferably with collet clamps, but I installed a regular one, soldered from some kind of board). After soldering the crib:
I was unable to remove the microcircuit neatly; the board is quite thick; even suction on the soldering iron did not help. I had to bite out the microcircuit, and then, in turn, desolder each leg. To upload the firmware
A W27E512-70 microcircuit was purchased. AutoProg recognized it and flashed it without any problems. Now we install the microcircuit in the crib, and do not forget about the correct orientation of the “key”.
We assemble the block in reverse order and put it in the car:
- First we install the ECU in place.
- On the driver's side, we put on the connector, holding the metal bracket holder, while first immersing the connector with the side closest to the engine shield, and then pressing it down by pressing on the heel and snapping it with the plate.
- We put the terminal on the battery.
With new firmware:
The test on the city streets left a good impression.
- The car started to play!
- I was pleased with the response to the gas pedal.
The fact is that before changing the firmware, I deliberately drove around the city and tried to remember how the car behaves.
So my 10 is running on the new firmware! It’s too early to talk about gasoline consumption, but soon we’ll have a 400 km trip, so we’ll check it! The question of whether CO regulation is necessary remains open. They wrote on the forum that it is necessary to regulate the CO after reflashing, but at the service station they said that there is no need to regulate the injector, because it regulates itself. By the way, anti-theft protection for domestic cars until the end of the last century consisted of using a steering wheel lock. This was the end of all standard security measures. The VAZ-2110 with a carburetor eight-valve engine had from the factory the same security system as all VAZ classics. However, since the beginning of the 2000s, when the injection system was integrated into the eight engine, it became possible to install an immobilizer. Oddly enough, most owners of injection engines think about how to disable the standard anti-theft system. Why and how to do this, we will try to find out today.
Tuning "yellow iron"
The VAZ 21124 includes “yellow iron” tuning, in which stabilizers (for agility), reinforcements and braces (for road stability) are installed. However, be careful with counterfeits of these parts; at worst, they will damage the car, and at best, you will be throwing away a lot of money.
Feel like a real circuit racing driver with the VAZ 21124 hatchback . All you need is to install additional parts: a nameplate (symbols) on the handle of the car, neon lighting under the bottom of the car, an air intake on the hood and roof. The installation of front and rear bumpers with an aerodynamic body kit will add power to the car.
Immobilizer VAZ-2110: safety requires sacrifices
It doesn't work without sacrifices. VAZ standard immobilizers have been bringing their owners more hassle than benefit for almost 20 years.
Frequent groundless crashes
, failures to start, incompatibility with other security systems, unreliability of the elementary base and jambs during assembly force you to disable the standard immobilizer by any means. But first, let’s briefly look at the principle of operation of the device in order to understand how to deal with it.
Principle of operation
The principle of operation of the immobilizer.
The operating principle of any simple immobilizer is ridiculously simple - the device communicates with the engine control unit and gives a certain signal when unauthorized access is attempted. The ECU, in turn, gives or does not give permission to start the engine. It happens like this - to start the engine, it is necessary for the immobilizer to accept the key and only after successful initialization it sends an enabling signal to the ECU. Even in the case when the key fully fits the lock, but is not initialized by the immobilizer, the latter will send a prohibiting signal to the ECU, and the unit will turn off the fuel pump and ignition system. Consequently, starting the engine will be impossible.
How to disable
We will not delve into the intricacies of the device and circuitry, since to repair, configure and replace immobilizer elements you need to have a good knowledge of microelectronics and experience working with microcircuits.
However, we will briefly look at several options for disabling a full-time security guard. This can come in handy suddenly when the car suddenly stops responding to the working key, and this can happen at any time. History knows of cases when the immobilizer on a VAZ-2110 was completely disabled by a mobile phone call or third-party radio interference.
All ways
To the credit of the developers, it is worth mentioning that the latest version of the decimal immobilizer provides the ability to disable it one-time. This works when such a function is activated in advance. It all looks a little ridiculous
, but the engineers couldn’t offer anything better:
- When the immobilizer is activated, a six-digit secret code is written into its memory.
- The emergency function is activated. (This is described in detail in the instructions for each immobilizer).
- Activation occurs by pressing the gas pedal. You need to press the pedal as many times as written in the secret code. That is, if the code consists of the numbers 123456, for example, then you need to press the pedal once, wait a few seconds, then press it twice, wait exactly the same amount, then three times and so on until the last digit. If it doesn’t work out, we train again.
As for disabling the immobilizer, there are only two options - flashing the firmware and re-wiring. The most accessible method is the second one, so let’s start with it.
Cutting the wires on the immobilizer
Before starting work, let's figure out what we will do theoretically. Before operation, each immobilizer undergoes a training procedure. It consists of recording to a non-volatile storage medium EEPROM
key codes.
The car leaves the assembly line with a clean EEPROM
, and before use, the new owner writes key codes into memory.
As a result, we get a chain: set of keys - immobilizer - ECU.
This three will only work in this combination and if you try to replace at least one element, the engine will not start.
Our task is to convince the ECU memory (EEPROM) that the immobilizer does not physically exist. This is the only way we can start the engine with our key. In this case, it is advisable to leave the K-line diagnostic channel. We do it like this:
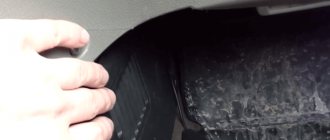
- We find the immobilizer housing. It is located directly above the electronic control unit. To get to it, remove the side panel of the console.
- Disconnect the connector from the immo housing.
We pull out the plug. - We find contacts 18 and 9.1 on the wiring harness block.
We need a yellow wire with a black stripe and an orange wire with a blue stripe. - We cut off these wires at a distance of about 40-50 mm from the connector.
- We clean and twist them. Be sure to isolate the twist.
- We install the block in place if we want to leave the immobilizer.
To remove the immobilizer completely, you need to completely clear the EEPROM of the control unit. In this version, as it turned out for us, only some functions will be available to the immobilizer and, most importantly, the connection between the diagnostic connector and the ECU will be maintained.
Programming the ECU for a VAZ-2110
To reprogram, you need a laptop with software.
The operation is not simple, but it will save you from buying a new clean control unit. The VAZ-2110 can be equipped with one of several modifications of the ECU, and our main task is to erase the EEPROM
. For the work to be successful, you must have a laptop with software, a programmer for microcircuits and a soldering station. And, of course, experience working with all this equipment.
Depending on the ECU model, the work is performed differently:
- Bosch M1.5.4
. We remove the block, open it and install the EEPROM memory, specially stitched with a cleaning algorithm, in place of the standard chip. Turn on the ignition for 5-10 seconds. After installing the chip, the engine should start. If the chip is soldered to the board, there are two options - either desolder it, or use the Combiset program to erase the memory using an adapter, and it is important that it and the ECU have a common minus.