- Where are they installed?
- Fault diagnosis
- Which ones are better to put
- Replacement process
- Recommendations from experienced
Initially, CV joints were positioned as elements with a very long service life. Manufacturers even assured that they could last as long as the car itself.
Photo of CV joint for VAZ 2114
But in reality, everything is not as colorful as it is described. A grenade has a life limit. What grenades, you ask. The grenade is the CV joint. People often use the concept of “grenade”. This can be explained very simply - the CV joint looks like a grenade. That's all. Therefore, do not be confused if you hear “grenade” when talking about CV joints. It is the same.
When replacement is required
If while driving your car you hear noise coming from the front of the car, be sure to check the condition of the boot. Quite often, replacing the outer CV joint boot of a VAZ 2114 becomes a daily task for service center employees.
To check, just turn the wheels in any direction and look under it. If cracks or complete damage are detected on the boot, the outer CV joint of the VAZ 2114 will definitely need to be replaced.
The presence of damage indicates that dirt has gotten inside the element. Much or little of it is no longer so important. Contamination leads to disruption of the functionality of the device.
In such situations, when the CV joint is damaged, it is strongly not recommended to continue driving under your own power. This is dangerous for you, your car and other road users. Ignoring this recommendation entails even more expensive repairs, since by the time you get to the garage or car service center, you will damage a number of other components and elements of the car.
How to remove a vaz shruz
Having determined that it is the external grenade that is broken, we begin to remove it.
How to unscrew the hub nut on a VAZ?
First of all, unscrew the hub nut. To do this, take a 30mm head and a lever, the larger the better. We put bricks under the wheels to prevent the car from rolling (simply putting it in gear is not an option, the wheel will spin) and begin to unscrew the hub nut.
In this matter, the more you weigh, the better, since I very often lacked my weight and leverage of about one and a half meters. I got out of the situation in the following way: I stood completely on the lever, as close to the edge as possible, thereby giving maximum tension to the nut, and hit the lever with a hammer. Usually this method helped me unscrew even the most soured wheel nuts.
One more nuance: if the outer walls of the head come into contact with the walls of the hub, it is better to lubricate the head with mining or lithol, or, in extreme cases, with silicone grease. Thanks to this trick, the head will not bite in the hub.
How to remove a grenade?
The hub nut is unscrewed, now we remove the wheel, unscrew the two bolts that hold the ball joint, disconnect the suspension arm and the hub, move it to the side of the car while lightly tapping the grenade, remove it from the hub. At this point, two options are possible:
- The grenade is already broken.
- Replacing the grenade due to its crunching sound.
In the first case, you simply remove the outer part of the CV joint from the shaft, then the retaining ring from the drive shaft and knock off the cage with a hammer.
In the second case, removing the CV joint becomes more difficult. You need to deflect the grenade relative to the shaft at the maximum angle so that the bearing balls and their cage are visible.
Now use a hammer to break the jumpers of the cage between the bearing balls and take out the balls one by one. When you take out the last ball, you can remove the body of the grenade, and then its inner part sitting on the shaft, after first removing the locking ring from the shaft.
Of course, you can simply try to knock the grenade off the shaft, but due to the locking ring this will be problematic.
That's it, the CV joint is completely removed. Now let's start installing the new part.
Replacing a grenade on a VAZ 2114 is very simple; no special skills are required. One hour of free time and a standard set of tools is enough. If you don’t want to or are afraid, send the car to a car service center.
CV joints are located at the bottom of the car
, on both sides of the front axle, in the form of oblong axles that fit into the hub of each wheel.
Tools:
car set with heads and covers, shoes, jack, rags, new spare parts, lithol or graphite lubricant, new boots.
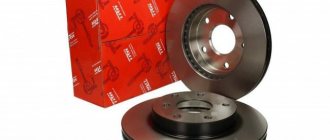
What to choose?
To replace the inner or outer CV joint on a VAZ 2114, a new element will be required. To be fair, we note that the most suitable and high-quality CV joints for the VAZ 2114 model are produced by the manufacturer, that is, AvtoVAZ.
But here comes the most important disappointment - they are not for sale. The only option is to go to a specialized VAZ official car service center. But from the point of view of financial costs, it is not the most reasonable decision.
In addition, there is now a fairly wide range of analogues on the market. Judging by the reviews of VAZ 2114 owners, special attention should be paid to CV joints produced by such companies as:
Photo of GKN CV joint for VAZ 2114
Replacement
Armed with new CV joints, also collect a set of necessary tools and materials. It will include:
- Set of heads;
- Spanners;
- Shoes;
- Dry rags;
- Grease for CV joints;
- Jack;
- Anthers.
CV joint arrangement diagram
Now let's get down to work on replacing the CV joints:
- Determine the location where the repairs will be carried out. This could be an overpass, a garage with an inspection hole, or a room with a car lift.
- Stop the engine and apply the handbrake. Use chocks to block the wheels.
- Using a wheel wrench, remove the wheel bolts.
- Raise the required part of the car with a jack.
- Loosen the nut in the center of the CV joint. Keep an eye on the puck so you don't lose it. It is not included with the new CV joint.
- Armed with 13mm wrenches, unscrew the fasteners of the upper part of the ball joint. It is not necessary to perform a similar procedure with the lower part, since it will not interfere with the repair process.
- Using a pry bar, slightly rip the grooves off the support and move them aside.
- Knock the hub off the CV joint splines. To do this you will need a hammer and some kind of wooden stand.
- Remove the old damaged CV joint.
- Check for damage to the stem.
- Remove any remaining lubricant from the rod using a dry rag.
- Place a new grenade in the new location. This assembly should include a CV joint, boot, clamps, nuts, and retaining rings.
- When assembling the unit, do not forget to use high-quality lubricants. There shouldn’t be too much of it, but you shouldn’t feel too sorry either.
- Reassemble the parts in reverse order.
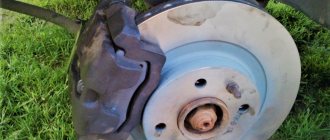
- By changing the CV joints, you can simultaneously check the condition of the brake pads. If they are in a sufficiently worn condition, it is advised to replace them at the same time. Anyway, you have already dismantled the knot.
- After completing the repair, check the car in action.
- It’s not uncommon for craftsmen without much experience to leave behind supposedly unnecessary parts after reassembly. Please note that everything that remains after assembly, and that is not the released elements that you replaced with new ones, has its place in the design of the car. Therefore, check where exactly these “extra” elements come from and install them in their rightful place.
Instructions for disassembling the unit
Before removing the wheel from the side of the faulty unit, it is necessary to loosen it using a 30 mm socket, having first pulled the metal boot out of the socket. Further steps according to the instructions:
- Use a wheel wrench to loosen the wheel bolts, jack up the car and remove the wheel. Unscrew the hub nut completely and remove the washer with a screwdriver. If your vehicle has engine oil pan protection installed, it will need to be removed. Some experts recommend draining some of the oil from the gearbox (1.5-2 liters) before removing the drive so that it does not start flowing through the spline hole when the unit is removed.
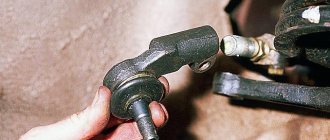
- Loosen and unscrew the tie rod ball pin nut and use a puller to press the pin out of the socket in the front suspension strut. Having turned the entire assembly by hand for convenience, unscrew the 2 bolts securing the ball joint. Holding the brake disc with both hands, carefully pull the CV joint shaft out of the mating splined part of the hub and move it to the side.
- The second end of the VAZ 14 CV joint must be removed from the splined part in the gearbox, being in the inspection ditch. To do this, you will need to place a mounting spade between the box body and the grenade, and then with a sharp jerk pull the assembly out of the socket, using the pry bar as a lever. If the part does not give in, it is allowed to tear it out of place with gentle blows of a hammer on the mounting blade. Before pulling it out, it is advisable to place a container under the gearbox, as some oil may leak out. Then the entire assembly is removed manually. A vice will be required for subsequent disassembly.
CV Joint Review
(grenades) for
VAZ
2108-2115.
Dismantling the CV joint VAZ 2114
The assembly shaft is securely clamped in a vice closer to the outer grenade if the outer CV joint is being replaced. Here you should check the condition of the boot. If there are no cracks or damage, and the rubber continues to remain elastic, then you only need to unlock one clamp that holds the boot on the grenade body.
Then it is turned outward or simply moved so that it does not interfere. Next, holding the slotted part of the grenade with one hand, apply gentle blows with a hammer along its edge from the inside. In the case when the grenade needs to be replaced, there is nothing special to worry about; you can safely hit it until it comes off the shaft splines. The boot on which defects are found is turned back out, the second clamp is loosened and the part is removed from the shaft. The inner CV joint is disassembled in exactly the same way as the outer one, you just need to clamp the shaft in a vice near the grenade itself.
Advice from experienced motorists
There are some useful tips on this matter that are worth listening to.
- If you hear a characteristic crunch while driving in a straight line, it means the CV joint has failed. If this crunching noise is heard only when turning, then the problem lies in a faulty joint.
- Before installing a new CV joint, treat the grenade landing site with lubricant. This significantly extends its service life.
- To adjust the CV joint and seat it properly, use wooden attachments. If this is not done, the risk of damaging the new element is very high.
- The boot should be installed as tightly and efficiently as possible. If you don't do this, dirt and dust will soon get there. These components will quickly render it unusable, and repair work will have to be carried out again.
- The lock nut on the hub is tightened with a special torque tool. Moreover, tightening is carried out strictly with the parameters specified in the instruction manual for your VAZ 2114 modification.
- During a routine inspection of the technical condition of your car, be sure to pay attention to the condition of the clamps and rubber elements to ensure their integrity. Such seemingly insignificant components can lead to serious consequences and significant financial costs.
- The purchase of spare parts, including CV joints, should be made only from trusted sellers, certified distributors. If you buy a bad, low-quality part, just trying to save money, you will have to pay even more to eliminate the consequences that the use of such elements led to.
The CV joint is an important component of any car, and replacing it even on your own is not particularly difficult.
Knocking in the chassis is a frequent companion in life for owners of the VAZ 2114. Many elements that can cause knocking, bad roads, and low-quality parts can cause extraneous noise in the suspension. A common source of the problem is the angular velocity distributor, or CV joint (grenade).
The process of replacing a part is simple, so you can change it yourself. The question is often asked which CV joint for the VAZ 2114 is better: regular or tripoid. Among the most common arguments: tripoid is more reliable, but it hums and vibrates at high speeds. The regular one is less reliable, but the car handles better at high speed. However, you can find opposing opinions and arguments on this matter.
There is no clear answer which type is better. Operation in harsh conditions showed that there is no fundamental difference in driving sensations and reliability. The main thing is to buy a high-quality grenade made of well-hardened metal, install it correctly and monitor the safety of the anthers.
Installation of new parts and assembly
First of all, the CV joint boot is replaced, if necessary. This is done in reverse order. How to properly bleed the brakes on a VAZ 2101 - the VAZ wheel farthest from the GTZ itself. The sequence is as follows: first, put a clamp on the shaft, tighten a new boot, and then move the clamp onto it and tighten it. You should not try to put the boot on the shaft together with the clamp, this is very inconvenient. It is also better to take new clamps for these purposes. Today you will learn about ignition coil malfunctions, how to check the coil, and also how to replace the ignition coil on a VAZ 2107 with your own hands. The next step is to put a new grenade on the shaft so that the splines match.
Then, through a wooden spacer, with gentle blows of a hammer, the part is pushed onto the shaft until it stops.
Attention! Before assembly, you must make sure that there is lubricant inside the CV joint; as a rule, there is not enough of it there. According to the documentation for the VAZ 2114 car, the cavity of the internal grenade must contain at least 80 cm³ of lubricant, and the external one - at least 40 cm³
Many car enthusiasts are wondering how to remove seats on a VAZ 2114 or how to replace them? How to replace a CV joint with your own procedure from the same process performed in the field. As a lubricant, you need to use a special thick lubricant “CV joint-4”.
After the grenade is mounted, the boot is pulled over its body and secured with a clamp. If necessary, the operation should be repeated with another grenade. Now the entire drive assembly can be put in place; to do this, one end of it is passed from the inspection hole into the opening above the lower lever and rested on the latter
It is important not to confuse the outer and inner ends. If you are performing the operation for the first time, then it will not be amiss to mark the outer CV joint when removing the unit
The other end of the drive is inserted into the splined part of the gearbox so that the splines coincide. Now you need to get out of the ditch, take a hammer and a wooden spacer and hammer the drive into the socket until it stops. How to open a VAZ 2114 without - vazremont.com. You need to strike carefully, and in no case forcefully. In this case, you need to periodically look under the car, monitoring the process of the internal grenade shaft entering the gearbox.
After one end of the drive is installed in place, you can further assemble the mechanism in the reverse order. Before doing this, it is worth checking the technical condition of the ball joint and steering rod pin. replacing the lock cylinder with how to replace the lock on a vase door. LLC “Lynx” for VAZ 2109. When the finger can be easily twisted in the body by hand or it just dangles, then the part needs to be replaced
, taking advantage of the opportunity. If some of the oil was initially drained from the gearbox, then it must be poured back through the appropriate neck.
Anthers need to be changed more often than CV joints themselves, since the unit can last 100-150 thousand km, and tires - at best, 30 thousand. To replace the outer grenade boot, remove the entire drive
not necessary, just pull the shaft out of the hub spline. But such a replacement is not only inconvenient, but also meaningless. The reason is that in the near future you will still have to disassemble the car and pull out the entire drive in order to replace the boot of the internal CV joint.
Therefore, it is always recommended to replace all 4 anthers at once, this will save you a lot of time and effort. After replacing the CV joints and anthers, there is no need to perform camber/toeing of the front wheels, unless you changed the worn steering rod in the process.
Fault diagnosis
The VAZ 2114 has 2 external and 2 internal CV joints. First you need to determine which one is knocking. The optimal test would be on a suspension diagnostic stand. If this is not possible, diagnosis by ear is possible.
Two signs indicate a grenade malfunction in a VAZ 2114:
- the sound resembles a crunch;
- It usually appears when turning.
The simplest and most accurate way to do a garage check is as follows:
- Place the car on a flat surface;
- Turn the wheels to one side (to the middle position or a little further);
- Drive off with medium speed. It is worth remembering that starting too smoothly may not reveal a crunch due to insufficient load on the CV joint, and starting too abruptly may lead to the drive flying out of the wheel.
- Repeat the operation by turning the steering wheel in the other direction. The appearance of a crunch indicates a malfunction of the outer CV joint on the side in which the steering wheel is turned.
Replacement
It is better to change a grenade yourself with an assistant.
- remove the wheel, remove the wheel bolts and the hub nut washer;
- unscrew the ball from the steering knuckle;
- pull out the splined end of the outer CV joint;
- pull out the drive with the internal CV joint from the gearbox;
- if you plan to remove both drives, remove the internal grenade from the drive and insert it into the gearbox so that the differential does not move after removing the second drive;
- remove or cut off the anthers, thoroughly clean all hinges with a special liquid or just gasoline;
- when filling the CV joint, use a special lubricant suitable for these purposes; ordinary lithol does not have the required temperature characteristics;
- the retaining rings of each CV joint and the hub nut must be replaced;
- The inner CV joints are inserted into the gearbox until they are completely fixed; when adjusting, you can use a hammer with a wooden spacer.
It is quite possible to diagnose and replace a CV joint with your own hands. This does not require sophisticated car mechanic skills and engineering knowledge, but it allows you to get in touch with the car, see and feel how it works. Whatever the reason for the crunching sound, you need to check the condition of the grenade as quickly as possible. Delaying this will almost certainly mean bringing the part to the point of complete wear, and timely repairs will allow you to get by with “little loss.”
In the design of modern front-wheel drive cars and all-wheel drive crossovers, CV joints (or “grenades”) are used to transmit rotational motion from the engine to the front wheels. The joints ensure a stable speed of rotation of the drive shafts, regardless of the angle of rotation of the wheels and movements of the suspension. This type of drive consists of two hinges, internal and external, which are attached to the axle shaft. The inner CV joint is inserted into the gearbox, and the outer one is fixed in the wheel hub.
The design of the internal and external CV joints is different: The internal CV joint compensates for vibrations of the engine and gearbox, as well as longitudinal movements of the axle shaft when cornering, but has a small bending angle. The external hinge device does not allow axial movements of the working parts, but provides continuous transmission of torque when the relative position of the shafts changes over a wide range (from 40 to 70 degrees).
There are two main modifications of this vehicle chassis unit: a six-ball CV joint and a tripoid constant velocity joint. To determine which CV joint is better, tripod or ball, you need to familiarize yourself with their operating properties.
A little theory
CV joints (constant velocity joints) perform one single, but very important task, namely the transmission of torque at rotation angles of up to 70 degrees relative to the axis.
CV joints are used only in all-wheel drive and front-wheel drive vehicles to ensure the front wheels turn and rotate under load.
CV joints are divided into:
- Internal
-
transmit torque from the gearbox to the drive shaft. - External
-
transmit torque directly to the wheels.
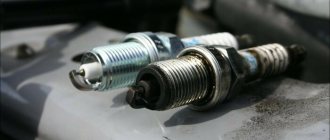
I will not analyze in detail the structure of CV joints, since the article will turn out to be too long and tedious, and you decided to read it only in order to find out how to carry out a quick and effective diagnosis. Therefore, I will simply advise you to check the CV boots more often, since some manufacturers themselves say that generally CV joints only have to be changed when the boot breaks.
Well, now let's get straight to the point.
CV joint with ball bearings
In general, the part is a housing with a driven shaft (trunnion), into which a holder (knuckle) is inserted. On the inner surface of the body and the outer side of the cage there are guide grooves along which six balls move, held by the separator. The splined part of the drive shaft is inserted into the central hole of the knuckle. To ensure stable operation, the installed hinge is filled with lubricant and sealed with a rubber or silicone boot. For ball CV joints, thick lubricants with molybdenum disulfide are used.
Tripod CV joint with needle bearings
A tripoid grenade design is often used as an internal hinge on modern cars:
In the body of such a hinge there is a three-beam fork, pressed onto the splines of the driven shaft. Three working rollers are attached to the ends of the fork, which can move along the guide grooves of the body when the unit is rotated or axially displaced.
To protect tripod joints from wear and metal scuffing, special synthetic compounds without solid additives are used.
Varieties
CV joints are classified according to their design features into four types:
- Ball bearings (the most common, present in all types of rear-wheel drive passenger cars).
- Paired (used extremely rarely, have a complex design).
- Crackers (they are mainly equipped with buses and trucks).
- Tripoid (used in internal structures, characterized by axial movement).
Based on their location, grenades can be divided into two types:
- External (connects wheel hubs and axle shafts).
- Internal (connect axle shafts and gearbox).
Depending on the design, grenades may have:
- 23 splines.
- 24 splines.
According to the manufacturer, all CV joints on Priora can be divided into two types:
- Original.
- Unoriginal.
The latter are cheaper. They are represented by the following brands:
- Pilenga.
- Metelli.
- SKF.
- Loebro.
- LGR Holding.
- G.K.N.
- Hofer.
- Febest.
Features of the tripoid joint
Due to the use of needle bearings, tripoids are more resistant to wear, and friction losses of elements in the assembly are also reduced.
Characteristics of tripoid CV joints:
- Possible bending angle up to 18 degrees,
- Maximum axial movement up to 55 mm,
- Engine and gearbox vibration compensation more than 60%.
Also, the tripoid cannot immediately fail, immobilizing the car, which is important for lovers of off-road driving. Despite the sharp crunch and vibrations that arise, the emergency tripoid CV joint will allow you to get to the repair site under your own power.