Fastening diagrams
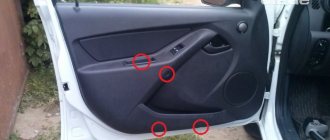
Lada Granta door cards are attached according to the standard pattern. The casing is plastic, fastenings are plastic latches and standard bolts. Place the fasteners around the perimeter of the insert. In this case, there will be 9 screws on the front door of the Grant, and the rear trim contains 10. To remove all bolted connections, use a screwdriver.
Proceed carefully, otherwise you risk breaking the bolted connections.
The door does not open in cold weather
Most often this happens after washing a car or driving in the rain, when dampness gives way to negative temperatures. Usually the larva freezes completely in the lock. Sometimes the lubricant in the drive or rod also hardens. Knowledgeable car owners advise warming up the constipation (for example, with a hairdryer) and then lubricating it with WD-40. Moreover, the procedure must be repeated after each significant wetness of the car.
In addition, it will also help:
- turning on autostart with constant heating of the interior;
- disassembling the door and adjusting the lock components;
- use any silicone-based lubricant.
Instructions
To tune Grants of standard or luxury modifications, you must first disconnect the negative terminal from the battery. If the stern doors are not equipped with electric drives, then this step is skipped. Purchase new clips in advance, since when removing the trim and the trim itself, the old ones are often damaged.
Then you need:
- Remove the decorative panel plug - to remove it without damage, it is recommended to use a flat profile screwdriver. You need to work until you hear a click, and act carefully to prevent the fastener from breaking off.
- Use a Phillips screwdriver to tighten the fixing screw, and do the same with the bolt that goes inside the plastic socket.
- Disassemble the plugs from the handle - remove them to gain access to a pair of screws, unscrew them, put them in a prepared box or other container.
- To complete the disassembly of the casing, unscrew the last pair of bolt clamps installed at the bottom of the Grant door.
Preparing the machine for work, necessary tools
The car must be driven into a garage or box (an inspection hole is optional - only when repairing other vehicle components) and secured in place, supporting the wheels to prevent shifting. It is allowed to carry out repairs outdoors in warm, windless weather on flat asphalt or a concrete surface. Be sure to find a fastening box with compartments so as not to confuse what was taken out and where it came from.
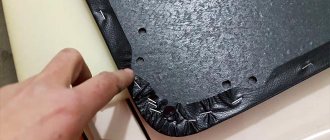
For the dismantled cladding, you will need free space to put it aside until the very end of all repair activities. This way it will be completely preserved – it can be further cleaned from the inside before re-installation. You should definitely stock up on clips, which may crack during the process of removing the trim (a kit for such work should be on hand).
You should also disconnect the battery (negative terminal) to prevent a short circuit due to elements under the casing. All components removed from under the trim can also be placed away from the car so that they do not accidentally get underfoot. The following instructions apply to all Lada Granta cars without changes by the owners.
Fastening elements are located along the lower perimeter (three bolts per ten), as well as along the entire door card - eight pistons. To complete all the work you will need:
- two screwdrivers (Phillips and flat head);
- set of tools for removing trim. If this is not the case, then you can use a flat-head screwdriver, an unnecessary credit card, or a similar flat tool;
- latex gloves;
Set of tools for removing trim and clips - rags;
- soldering iron (for fixing wires to the speakers in the absence of a detachable connection).
Additional tools may be required depending on the situation and the intended task.
Front doors
How to remove the front door trim on a Grant in stages:
- Disconnect the negative terminal, prepare a Phillips screwdriver and a set of spare clips.
- Unscrew the locking part of the lock.
- Pry off the screw muffler.
- Remove the screw and the lock release button.
- Remove the screw from inside the armrest niches.
- Remove the pair of screws at the bottom of the upholstery fastener using a similar tool.
- To dismantle the entire car trim - in Grant they do this, starting from the front corner of the door from the bottom, inserting a screwdriver between the metal and the trim material. To remove the upholstery without damage, you need to carefully overcome the resistance of the pistons.
- Remove the screws from the armrest niche and lower upholstery fastenings.
- Continue removing the trim, moving from the corner in different directions, and move the lock rod outward.
- Remove the block with wires from the electric window, remove the upholstery.
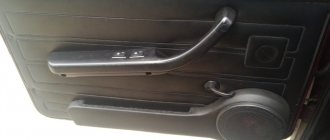
Remove the front door trim of the Lada Granta
Any car owner can dismantle the door panel trim on the Lada Granta model on his own, since this work does not involve any difficulties.
Removing the casing takes little time. The procedure itself can be carried out through several simple steps. For dismantling, you should only equip yourself with screwdrivers: flat-profile and figured. In this article we will describe how to remove the trim on a Grant from the front door and, accordingly, from the rear door.
How to dismantle the casing in Grant yourself?
How to remove the casing correctly and with your own hands? The first step is to disconnect the negative terminal from the power battery of the Lada Grant. This action is not necessary if the stern doors are not equipped with power windows. When dismantling the trim from the front door panel, disconnecting the terminal is a mandatory measure!
To securely fit the casing in its place, you will need to acquire new clips. It is possible that these fasteners may break during the removal procedure.
Next, on the decorative door panel of the Lada Granta, using a flat-profile screwdriver, pry up the plug and remove it. We act carefully to avoid breaking off its fasteners. Use a Phillips screwdriver to unscrew the fixing screw. We perform a similar procedure with a bolt located in a plastic socket.
After that, we switch to the plugs placed in the handle itself. If you carefully remove them, you will have access to two screws that also need to be unscrewed. We recommend placing all fastening elements in suitable containers. This will allow you to quickly and accurately assemble the unit to its previous state.
The only action left is to unscrew the remaining pair of trim fixing bolts, which are located at the bottom of the door card.
To remove the locking button, you will need to perform a simple manipulation - turn it to the left and slowly pull it up.
If the car is equipped with a manual drive of the mirror mechanism, then use a screwdriver to pry up the sealing gasket of the mirror hinge lever and remove it.
Based on the photo, it is recommended to first familiarize yourself with the locations of the clips in the Lada Granta. This will reduce the risk of damage and save time on work.
How to remove manual or power windows?
Removing manual mechanisms
In this case, armed with a flat screwdriver, we effortlessly press the mechanism handle lock away from the socket. Next, we move the latch to a position where its protrusion is freed from engagement with the socket. Now remove the socket with the handle.
If the window lift is electric?
The process of removing a panel with an electric mechanism on a LADA Granta is similar to that discussed earlier: the panel is pryed off and dismantled. To eliminate interference caused by the removed panel, it should be placed inside the door card by feeding it through the hole that is the panel seat.
- Speed sensor Lada Granta
- Grant headlight adjustment
- Rapids on Granta
Rear doors
Let's look at how to disassemble the rear door of a Lada Grant, since this work has its own characteristics. Actions:
- Disconnect the terminal with the minus sign and prepare replacement clips.
- Unscrew the lock button.
- Press out the socket on the window handle using a flat-head screwdriver.
- Remove the handle with the locking mechanism, having first pulled it out, remove the plug from the handle.
- Remove a pair of mounting screws with a Phillips screwdriver and remove the handle.
- Remove the door plugs of the Grants, begin to remove the trim one by one from the front from the bottom, inserting a screwdriver between it and the metal sheets. The upholstery must be moved away from the door panel towards the sides of the corners, overcoming the 10-piston resistance.
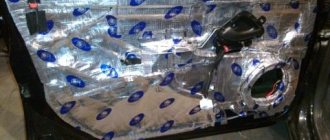
Pros of sound insulation
Today, every car needs sound insulation, and it doesn’t matter whether it’s a domestic car or an expensive foreign car, the sound insulation rating of foreign cars is gradually decreasing in order to make the car cheaper and thereby attract buyers, even world-famous concerns produce cars without sound insulation at all. It is important to know the positive aspects of sound insulation, in other words, what it gives:. It is important to know the positive aspects of sound insulation, in other words, what it gives:
It is important to know the positive aspects of sound insulation, in other words, what it gives:
- Serves to reduce the noise level inside the car interior and improve the sound quality of acoustics
- Noise reduction allows for quiet communication without raising your voice
- Excessive noise causes rapid driver fatigue, slows down reaction time and irritates the driver, which can lead to an accident.
- Many people do not know that increased noise causes the blood vessels in the body to narrow, this causes additional stress on the heart, over time angina develops and the risk of heart attack increases.
- Therefore, sound insulation is a concern for your own health and safety.
You can do sound insulation yourself, it’s not complicated, or you can pay and specialists will do everything for you.
How to remove Grant door trim
In this article we will tell you not only how to remove the grant door trim, but also how to do it correctly and as quickly as possible.
The rear door trim is secured with two screws and several hidden fasteners. The fasteners must be removed carefully without damaging the casing. Therefore, before you start removing the casing, just in case, stock up on clamps.
In a Lada Granta car, you can remove the rear door trim in the same way on both the right and left sides, because the trim is removed in the same way in both cases, unlike the front doors, in which both the procedure for removing the trim and the structure of the doors themselves are different.
Therefore, removal on such doors will have to be carried out differently, and incorrect execution of the instructions will lead to the fact that we will need to re-purchase the front door trim for the Lada Granta.
We will consider the procedure for removing the trim using the example of the rear left door. We will need two screwdrivers (flat and Phillips), as well as a damp cloth to wipe off the dust.
Work progress
- Lada Granta instructions on how to remove the rear door trim provide the following:
- 1) Disconnect the negative terminal of the battery to avoid a short circuit in the electrical wiring.
2) Remove the door handle designed to lower and raise the glass. To do this, you need to use a flat, thin screwdriver to press out the latch in the form of a half ring.
3) Remove the latch, but still do not remove the screwdriver.
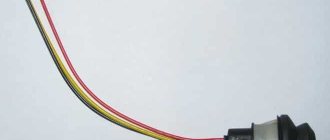
4) Calmly pull out the plastic washer after removing the handle. If the rear doors of the car are equipped with electric windows, then instead of the handle we remove the corresponding button, prying it off with the same flat-head screwdriver. Then disconnect the connector from the bundle of wires.
- 5) Unscrew the lock button.
- 6) Using a plastic mounting spatula, pry up the decorative plug of the door handle and remove it.
7) After removing the cover, you can find two screws that secure the handle. Take a Phillips screwdriver and unscrew them.
 Let's move on to the answer to the question of how to remove the door trim on a grant. To begin with, pry it up from below with a mounting spatula.
- 9) Carefully, so that the latches come out of the seats of the door panel, pull the trim towards you.
- 10) That's it, the door trim has been removed from the Lada Granta car.
- You can see more clearly how to remove the left rear door trim of a Lada Granta in the video, which is available on the Internet for everyone.
Installing the trim after removing it
Reinstallation of the casing is performed in the reverse order of the above steps. If the clamps are damaged, do not forget to replace them with new ones.
After installing the upholstery, check the ease of raising and lowering the rear door glass. Now we know how to remove the door trim on the grant, and then install it back if necessary.
Author of all articles on the site! Own service “New Line Auto” All types of work.
Specialization: Lada
Source: https://la-granta.ru/kak-snyat-obshivku-dveri-granta.html