01/19/2021 16,971 VAZ Chevrolet Niva
Author: Ivan Baranov
Not a single modern car today can do without a dashboard, which allows the driver to promptly learn about the status of the main components and systems. Thanks to this, the car owner will always be able to repair incorrectly functioning devices in a timely manner and prevent more serious malfunctions in the future. From this material you can find out what the dashboard of a Niva Chevrolet car is, what malfunctions are typical for it and how to diagnose and replace the dashboard.
[Hide]
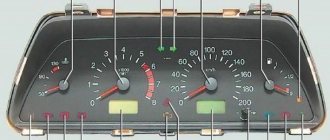
Symbol designations on the Chevrolet Niva instrument panel
The stock 2004 version has a number of mechanical gauges and analogue icons. In the photo above the panel elements are numbered. The symbols are described below.
| Number | Meaning |
| 3/4 | Standard turn signals also illuminate when the hazard lights are activated. |
| 7 | Indicator of the minimum amount of fuel in the tank. Refuel. |
| 8 | This indicator indicates that the side lights are on. |
| 9 | The brake system is in disrepair. The system needs to be diagnosed. |
| 10 | The high beam of the head optics is on. |
| 12 | Digital mileage indicator, general on top – daily on bottom. |
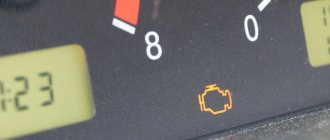
| 13 | This indication indicates that there is a problem with the engine. In this case, you need to immediately go to the service station. |
| 14 | Emergency light indicator. |
| 15 | Digital display – daily time indicator. Also, during self-diagnosis, an error code is displayed here. |
| 16 | The battery is low. Check the generator and its drive belt. |
| 17 | Handbrake activation lamp. |
| 18 | The oil pressure in the crankcase is too low. |
| 19 | Reserve indicator. |
There is also an additional row of light bulbs on the dashboard, located outside the dashboard.
Here the description of the indicators looks like this.
| Number | Purpose |
| 1 | Empty |
| 2 | The center differential lock is activated. |
| 3 | The immobilizer is activated. |
| 4 | There are problems with the operation of the ABS module; the entire device needs to be checked completely. |
| 5/7 | Backup lamps. |
Panel buttons
Push-button switches are located to the right of the instrument panel. The following description is given in order from left to right.
- Emergency stop button.
- Rear door glass defroster.
- Switch for front and rear (located next to each other) fog lights. If they are installed on the car.
- Variably may be responsible for turning on the windshield washer/cleaner.
- The last slot contains a standard plug for an additional device.
Exclamation mark on the Shnivy tidy: what does it mean
Indicates problems in the car's electronic systems. Check for additional indicators that light up at the same time. Often this is accompanied by the car not starting.
Drivers mainly look for reasons in nodes:
- starter;
- ignition system;
- braking module;
- car wiring.
SRS on the Chevrolet Niva dashboard
If the indicator on the Shnivy dashboard lights up, it only indicates that there are problems in the car’s security system. Check the airbags, belt sensors and wiring.
Tuning options
The choice of options for tuning is not particularly large:
- Install a device from another car. In this case, you will need the services of a qualified electrician, since the connectors will have to be redone. You can also install a digital version of the tidy - it will be more than original.
- As a tuning option, you can install LED bulbs instead of regular ones. Many car owners choose this option because it is less expensive and the easiest to implement.
- Another tuning method is to install original instrument scales on the speedometer, tachometer and other sensors. Moreover, you can buy such scales either ready-made or make them yourself in accordance with your preferences.
1. Tidy with LED lighting
2. Digital control panel
3. Tidying with the so-called. wells
Errors on the Shnivy panel
When performing self-diagnosis of the BC, the following faults may appear on the display.
| Number | Decoding |
| 0 | There are no problems in the system. |
| 1 | The ECU controller is faulty. |
| 2 | Fuel level indicator is broken. |
| 4/8 | High or low voltage inside the on-board network. Check that the generator set is operating correctly. |
| 12 | The warning lamp diagnostic circuit is faulty. |
| 13 | Open circuit DK1 |
| 14/15 | High/low signal level from DTOZH. |
| 16/17 | High/low voltage inside the on-board network. Here the distributor and battery are checked. |
| 19 | The DPKV is transmitting the wrong signal. |
| 21/22 | Likewise for TPS. |
| 23 | The intake air temperature sensor is reporting incorrect data. |
| 24 | Open circuit of the vehicle speed meter. |
| 25 | DD produces erroneous information. |
| 27/28 | Potentiometer CO – increased/lowered value. |
| 33/34 | The absolute pressure sensor is faulty. |
| 35 | The XX regulator is faulty or does not work correctly. |
| 41 | Phase sensor - incorrect signal. |
| 42 | The ignition control circuit is damaged. |
| 43 | DD – errors in the operation of the highway. |
| 44 | The fuel mixture is too lean. |
| 45 | Opposite meaning. |
| 49 | Loss of vacuum in the fuel line. Check the line for leaks. |
| 51 | The PROM is faulty. |
| 52 | RAM failure or circuit malfunction. |
| 53 | Increased voltage in the circuit. |
| 54 | The octane corrector is torn or out of order. |
| 55 | ECU circuit error. |
| 61 | Oxygen sensor degradation. |
Most errors can be caused by the overlap of several problems. For example, 8+2=10.
Possible faults
If you understand the designations of the light bulbs in the Niva Chevrolet instrument panel, let's look at the next point - possible malfunctions of the device:
- The instrument cluster does not work, but the engine starts normally. Most likely, the problem is caused by either a failure of the shield itself or a lack of power.
- The lights on the instrument cluster do not light up. If all the indicators stop working at once, this may indicate a break or fraying of the wire responsible for the lighting. If only some of the lamps do not work, then most likely they are simply burnt out.
- Devices not working - speedometer or tachometer. Most likely this is an electrical type problem; you need to disassemble the panel and look for the fault.
- Sensors do not work - fuel level, antifreeze temperature. As practice shows, this usually indicates poor contact in the electrical circuit. Usually this problem is solved by disconnecting and cleaning the plug contacts (the author of the video is the Ig K channel).
When the ignition is turned off, only the hazard warning lamp can work on the Chevrolet Niva instrument panel. When the ignition is turned on, the system performs a self-test. At this time, the check engine lights, oil pressure and battery charge lights are on. If there are any deviations in the operation of instruments and alarms, testing can be carried out.
To do this, turn off the ignition, hold down the odometer reset button and turn on the ignition. All lamps on the instrument panel should light up and the arrows should move three times from the minimum to the maximum value. Typical malfunctions include lamp burnout. If there are no signs of “life” in the entire panel, but the car starts, then you should check the block of connecting wires. Often, for the same reason, one of the devices fails, but here everything is not so simple, because the corresponding sensor may fail.
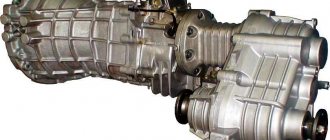
Also interesting: Niva Chevrolet transfer case: device, connection diagram and how to use?
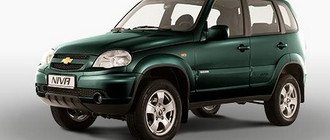
Chevrolet Niva began production 17 years ago, in 2002. The model has come all this long way without even changing the first generation. Restyling, however, did not bypass it in 2009, but you definitely won’t find any great differences in the two versions of the same compact SUV. By the way, the update was implemented by the well-known car studio Bertone.
Nevertheless, the car remains in demand among compatriots due to its affordability and good consumer performance. With a cost of less than 700 thousand rubles and a “ceiling” of 810,000 rubles at the moment, as well as a 4x4 wheel arrangement with very reasonable all-terrain properties, it is difficult to find a better budget compact SUV. And, unlike the same UAZ Patriot, the Cehvy-Niva is comfortable both in the city and on the highway on the way to the dacha.
Shnivy tidy does not work: reasons
Usually this is damage to the module's power circuit, moisture/condensation on the board, or mechanical damage caused by improper repair.
The problem is simple when studied in detail, and can be easily eliminated without the help of specialists.
The shield does not light up
If it just goes out (the backlight has failed), check the corresponding fuse inside the mounting block. Next you need to follow the wires towards the tidy. Here the condition of the contact groups and the presence of oxidation on the terminals are checked. If there are such problems, the problems should be eliminated.
If only some of the light bulbs stop lighting, dismantle the device and check the lighting elements directly for damage.
Shnivy's shield is blinking
A typical problem in cars that are driven on rough terrain or broken roads. A symptom of trouble is that the device periodically goes out while driving or blinks quickly.
Check the wiring and connecting terminals for possible damage or loose contacts.
Instrument needles Strings stuck
In such a situation, check the systems.
- Fuse and power circuits of the interior lighting line. The design of the network is such that the power is crossed, which causes problems.
- Mass disappears on the connected elements of the on-board circuits.
Instructions for reupholstery
It is important not only to choose high-quality material and decide on the most harmonious color scheme, but also to choose the appropriate threads for stitching. Ordinary ones will not work; you need special ones - strong and elastic. If seat covers are sewn by hand, it will be practically impossible to get an even stitch. This should be taken into account, because threads contrasting with the material will stand out too much, which will not have the best effect on aesthetics. It will be much better if the color of the threads matches the color of velor or corduroy.
To complete this task, you should be armed with the following:
- Glue.
- Threads for stitching.
- A set of keys.
- Degreaser.
- Sandpaper.
- Hair dryer.
Preparatory work involves dismantling the seats and dashboard. As such, there is no single sequence of work. Experienced drivers recommend starting reupholstery with complex elements. But, if there is no such work experience, it is best to do differently - start with simple elements.
It is advisable to start covering with the door card. It is washed and cleaned of dust and dirt, after which it is cleaned and degreased. Glue is applied to the surface of the card using a spatula, hard-to-reach places are coated with a brush. After which the material is glued, heated and smoothed with a hairdryer.
A torpedo is tightened using the same principle, however, there will be more difficult areas, and therefore folds will appear. But they can always be brought to invisible areas. Working with the ceiling is less difficult. It is enough to dismantle the factory coating and clean it. After that, glue is applied in strips of 20-25 cm and the material is glued, simultaneously with heating and smoothing.
Half the work is already done, all that remains is to give the seats a new look. New covers are sewn for them. The procedure may seem complicated at first glance, but in reality it won’t be difficult to do it yourself. The old covers need to be removed, ripped apart at the seams and used as a template for cutting out pieces from the new material. After which these pieces are sewn together, and the new covers are tried on the seats.
How to remove the tidy
Follow the simple procedure.
- Disconnect the car. Usually users remove the battery terminal, but you can remove the power fuse.
- Next you need to remove the steering casing. This is done by unscrewing the five mounting screws.
- Next, the steering wheel and its switches are removed.
- Now you need to unscrew all the fastening bolts that hold the tidy in place.
- After this, you need to carefully lift the panel from its seat and disconnect all contacts of the shield wires.
- Now you can completely remove the part from the machine.
Reassembling the unit is performed in reverse order.
Parsing
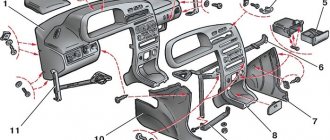
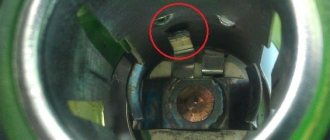
If you need to disassemble the Chevrolet Niva instrument panel, you need to do the following:
- Use a screwdriver to remove two plugs and unscrew the screws, which are located one on the right side of the emergency gang and the second in the right corner of the panel
- We remove the panel lining on the right side and dismantle all the connectors on the control buttons. It’s better to take a picture of which contact and where it fits before
- After this, we disconnect the lining on the left side and disconnect the pads from all the buttons, after which we completely remove the lining
- Unscrew the screws that secure the panel and remove it
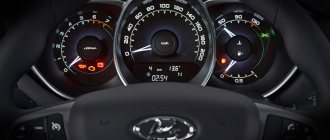
As for the changes and innovations of the software, a new design of the car was recently presented, where it was clear that a new dashboard of the Chevrolet Niva 2021 was installed.
REMOTE CONTROL SYSTEM Remote control system…
Chevrolet Niva is a Russian-assembled compact crossover. Produced in 2002, 2003, 2004, 2005, 2006, 2007, 2008. In 2009, the car received a restyling. The updated one was produced in 2010, 2011, 2012, 2013, 2014, 2015, 2021, 2021 and 2021. We will look at a block with Chevrolet Niva fuses and relays with a full description of the presented circuits. Let's show you where the cigarette lighter fuse is located.
Also interesting: Niva Chevrolet alarm connection points
Page 5
Page 7
Installation
Attach the purchased trim to the dashboard and trace all the components and symbols so that when you cut off the excess, the trim will lie flat. Then remove the old one and glue a new one in its place. This is probably the most difficult thing in the whole procedure.
Also, many people like to change the color of the instrument hands, most often to white, as it advantageously reflects the LED backlight of the dial. This is done using women's nail polish. The old paint is cleaned off with a utility knife and the hands are degreased with nail polish remover or acetone. Then they are coated with white varnish.
After the varnish has dried, they can be put in place. Glue the overlay onto the panel, place the arrows and assemble everything in reverse order. Enjoy the updated version of the instrument panel.
16. Open the hood.
26. Remove the instrument panel insert.
27. Remove the bolts located in the front of the instrument panel along the lower edge of the windshield.
28. Remove the front interior heating air duct.
29. Remove the instrument panel assembly with the heater and wiring harness.
30. Install the instrument panel and all removed parts in the reverse order of removal. Add fluid to the cooling system.
Read news about the new field
- What tire size is available for installation on Niva, available versions and recommendations
- Mud tires for Niva 4x4: radius 15 and 16 - which one is better to install "
- All about the Valet button and how to disable it yourself on alarm systems of different brands
- Niva Lynx buy in Samara - prices for the new Lada “Bronto” (Niva Pickup) | cost and equipment
- Air conditioning Niva Chevrolet - design and repair "
- Niva Chevrolet installation of air conditioning - Auto magazine MyDucato
- Instrument panel Niva Chevrolet designations. Improving the Chevrolet Niva dashboard
- Description of signs and symbols on the Niva instrument panel, panel repair, combination diagram
Read news about the new Niva
- The modernized Lada Niva Legend (4x4) 2021 was shown on the Internet
- Lada 4×4 Bronto - sales stopped, new details » Lada.Online - all the most interesting and useful about LADA cars
- Description of the instrument panel Lada 4×4 (VAZ 2121, 2131) » Lada.Online - all the most interesting and useful about LADA cars
- Chevrolet Niva gasoline consumption per 100 km
- Buy LADA (VAZ) 2131 (4×4) 2021 in Rostov-on-Don, low price for Lada 2131 (4×4) 2021 on the Avto.ru website
- Fuses Niva 21214 injector «
- The new large Lada 4×4 Niva “Bigster” 2021-2022 based on the Dacia Bigster was shown for the first time. The SUV has changed beyond recognition
- New Niva Chevrolet Lux 2021 - review of GLC equipment
Share link:
Similar articles
- Electrical diagram of a Chevrolet Niva car produced before 2009.
- External lighting switching diagram (until 2009) Chevrolet Niva.
- Connection diagram for seat heating wiring harness (since 2009) Chevrolet Niva.
- Electrical connection diagram for the engine management system of a Chevrolet Niva car produced before 2009.
- Connection diagram for wiring harnesses of the left and right rear doors (since 2009) Chevrolet Niva.
- Connection diagram for the additional wiring harness of the tailgate (from 2009) Chevrolet Niva.
- Rear wiring harness connection diagram (from 2009) Chevrolet Niva.
- Wiring diagram for the engine management system (from 2009) Chevrolet Niva.
- Connection diagram for wiring harnesses of the left and right front doors (since 2009) Chevrolet Niva.
- Headlight switching diagram (until 2009) Chevrolet Niva.
- Wiring diagram for electric headlight corrector (until 2009) Chevrolet Niva.
- Fuses and relays VAZ-2123 Chevrolet Niva.
- Ignition switch wiring diagram (up to 2009) Chevrolet Niva.
- Switching diagram for power windows of doors (before 2009) Chevrolet Niva.
- Wiring diagram for the tailgate glass cleaner and washer (before 2009) Chevrolet Niva.