The IAC needs to be cleaned, and if that doesn’t help, then change it. If it is necessary to replace the idle speed sensor of a VAZ 2107, then even a novice car enthusiast can cope with this procedure.
Tools and materials
For the procedure you will need the following tools:
- socket wrench set to “13”;
- Phillips and flathead screwdrivers;
- tape clamps for pipes;
- pad.
To check the functionality of the regulator, you will need a voltmeter. The IAC is located on the throttle valve. The voltage is measured at the contacts. If it is below 12 V, then there is a malfunction in the control unit or in the power circuit. If the voltage is 12 V, then the regulator is faulty.
Regulator position XX
Stages
The idle speed regulator on the VAZ 2107, located on the DZ, changes along with its body.
The procedure itself consists of the following steps:
- First of all, the car is de-energized by disconnecting the negative terminal on the battery.
- Next, you need to disconnect the cable with which the remote control is controlled.
- Next, you need to disconnect the wire block from the TPS and from the IAC.
- We loosen the clamps on the coolant inlet and outlet pipes, and disconnect them from the control valve.
- After loosening the clamp, disconnect the crankcase ventilation pipe.
- Next, you need to loosen the clamp on the hose that supplies fuel vapor to the remote control and disconnect the hose.
- After unscrewing the fastening nuts, remove the DZ housing from the studs and take out the gasket.
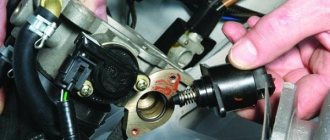
- Next, unscrew the fastening bolts and remove the IAC.
- On the removed regulator, check the O-ring; if it is worn out, replace it.
- Then we check the IAC voltage at the terminals of its windings. Between outputs AC and BD it should be infinite, between AB and CD - about 53 Ohms. If the readings are not the same, the device needs to be changed.
- Before installing a new IAC, you need to check that the needle does not protrude more than 23 mm, otherwise we replace the valve with a new one.
- Before replacing the device, lubricate the seal with engine oil.
- Installation of the DXX is carried out in the reverse order.
Thus, replacing the idle speed sensor on a VAZ 2107 is completed (video author - Ovsiuk).
Idle speed regulator VAZ 2107 injector
There may be several reasons for this unpleasant problem:
The IAC idle speed controller is malfunctioning
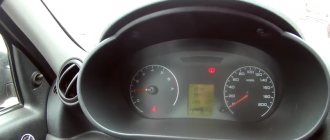
The idle speed of the engine changes by itself and it may even stop; often the engine does not want to start without pressing the gas pedal. And the “Check Engine” lamp may not light up. At medium and high speeds, the engine keeps its speed evenly, and no loss of power is noticeable.
Problems with the mass air flow sensor (mass air flow sensor)
If the mass air flow sensor is faulty, the speed may change not only at idle speed, but also at any other throttle opening, even when driving under load. A car can put its owner in a very dangerous situation by suddenly losing traction while overtaking. The check engine light is usually on. If you notice these signs, you will need to replace the faulty sensor. Read how to do this here
Air leaks through cracks in hoses and seals
Excess air that enters the engine intake tract bypassing the mass air flow sensor depletes the combustible mixture. The speed and power of the motor changes, the controller tries to correct this. As a result, the speed and “traction” change. But unlike the case with a faulty mass air flow sensor, this does not happen so abruptly. The Check Engine light does not come on.
Carefully inspect all tubes and hoses that extend from the throttle body, gaskets, the throttle body itself, and the intake manifold for cracks. Pay special attention to the hose going to the vacuum brake booster, as it often cracks. It also happens that the vacuum booster itself begins to “poison” the air and then when you press the brake pedal, the engine speed will change. Eliminate all these faults and the engine will start running smoothly again.
Other reasons
A car is a very complex system and it is simply impossible to describe the incredible variety of possible combinations of breakdowns. The engine may “jerk” when driving and change speed due to a malfunction of the ignition system, injectors, bad gasoline, water getting into the tank, dirty filters, etc. In each specific case, you need to carefully analyze all the signs and draw conclusions. If all else fails, you can always undergo verification diagnostics with a motor tester.
What is idle air control
When we release the gas pedal, the throttle valve closes completely, blocking the path of air into the intake manifold. In this case, engine operation is ensured by a small cross-section bypass channel, through which air flows for idle operation. A device is installed in the channel that has the ability to change its flow area and even completely block it. This mechanism is the idle speed regulator. With its help, the ECU controller can maintain and change engine speed at idle. For what? For example, when we start a cold engine and it runs unsteadily, when we turn on the heating or air conditioning, thereby adding to the load. Having received information from the crankshaft speed sensors, throttle position, speed sensor, and temperature, the controller processes it and sends a command to the idle speed controller - “add air” or “reduce air.” As a result, we have stable and smooth engine operation when the gas pedal is released.
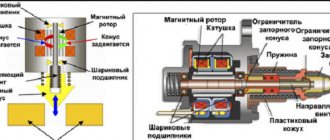
How he does it? A stepper motor is hidden inside the housing. Short pulses are applied alternately to its two stator windings and the rotor shaft rotates to a certain angle. A screw connected to the rotor acts on the throttling element (needle), pushing it out or pushing it into the hole. The flow area of the channel changes, and the idle speed changes accordingly.
Idle air control - device, connection, general view
The regulator may stop working for various reasons. Most often, the mechanical part fails - the needle drive parts break or jam. Idle air regulators bought in stores “on the cheap” are especially prone to this because of their low quality. Failures of the electrical part occur less frequently - burnout of windings, wire breaks, wear or corrosion of the contact block.
Before replacing the regulator, we need to make sure that the reason is in it, and not in the power supply wires and connectors. To do this, turn on the multimeter in the mode up to 20 volts, check the voltage at contacts “B” “D” with the ignition on. It should be about +12 volts. If the voltage = 0 or is much lower, then the cause of the malfunction is somewhere else. It is necessary to check all circuits from the controller to the regulator and the controller itself.
Signs of a VAZ IAC malfunction
Signs of a regulator malfunction vary, here are the main ones:
- the engine stalls when the gas pedal is released;
- poor engine starting;
- floating engine speed;
- increased speed.
It should be borne in mind that some symptoms of a broken IAC may coincide with a malfunction of other sensors: crankshaft position, throttle valve or mass air flow. Therefore, you can accurately determine its malfunction by taking some measurements yourself or using computer diagnostics.
How to replace idle air control
To replace the regulator, you can go in three ways:
- with complete disassembly of the throttle valve;
- partial;
- without removal.
I changed the regulator with complete disassembly, as I discovered clogged tubes, and a dropped plug rattled inside the receiver. When disassembling and cleaning I used carburetor cleaner. Although this is the same acetone and could have been saved.
Carburetor cleaner, if it is not needed under pressure, can be easily replaced with simple acetone
In the second option, the replacement is made without removing the tubes, but with removing the throttle. In this case, the air duct clamp is loosened, the throttle is unscrewed and, by moving it a little, removed from the studs. You need to turn it a little, this will give access to the sensor mounting bolt.
In the third option, you need a special screwdriver capable of unscrewing the sensor mounting screw. Typically, this is a flexible screwdriver for hard-to-reach places or an angled attachment for a screwdriver.
Necessary tool
To replace the sensor you will need:
- Flathead screwdriver.
- Crosshead screwdriver.
- Socket or open-end wrench size 13.
Replacing the idle speed sensor
To avoid getting burned, carry out the replacement on a cool or warm engine.
- disconnect the damper control cable;
- remove the block from the throttle position sensor;
- remove the block from the XX regulator;
- disconnect the coolant supply pipes from the throttle body;
- remove the crankcase ventilation pipe.
- disconnect the air supply pipe;
- pull the fuel supply hose to the throttle valve;
- unscrew the screws and remove the IAC.
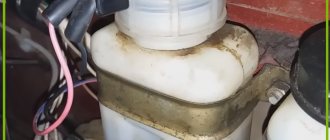
Removed VAZ regulator
Removing the faulty regulator
Remove and replace the plug
Cleaned throttle body
Assembly is carried out in reverse order.
After replacing the regulator, do not start the engine immediately. Simply turn on the ignition, wait 10 - 30 seconds and turn off the ignition. After that you can start it. This time is necessary to calibrate the new idle air control ECU.
Ideally, when starting on a cold car, the speed should rise to 1500 rpm and drop to 800 as it warms up.
The preparation operations are not complicated and standard for any repair, but your personal safety, the time spent on maintenance and repair, as well as the quality of the work largely depend on their implementation. We prepare our VAZ2107 car for replacement as follows:
- We do car washing
- If possible, it is advisable to wash the outside of the car before work (you will get less dirty while working), including the bottom if necessary
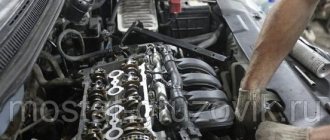
- If the work (as in our case) is to be done in the engine department, then it should be washed there too
- The operation associated with washing the engine compartment is best performed in a non-automated car wash.
- Here, the engine compartment of your car will be washed by hand, having previously treated the outside of the body and the engine compartment with specific cleaning compounds.
- They will also remove dirt stuck in the wheel arches, as well as from the bottom of the body, using a directed jet of water under pressure, with drying completed.
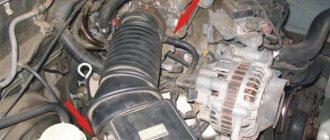
Warning: When washing the engine compartment, you should protect the pads, sensors and other actuators of the fuel injection system from getting water. You should also avoid getting water on the starter and alternator. The sensors and contacts are wrapped with insulating tape or tape, the generator and starter are covered with plastic bags and the bags are secured so that they do not fly off. In any case, washing the engine compartment involves disconnecting the terminals from the battery. After washing, the above components and parts must be thoroughly dried; to do this, blow them with a stream of compressed air.
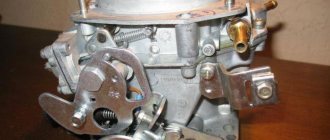
How to set up a Solex carburetor
This can be done without removing the device from the car. However, in some cases you have to do this to configure some parameters. Both options are considered further. How to adjust the carburetor directly on a car?
Setting levels in float chambers
Before making adjustments, start the engine and warm it up for 10 minutes, then turn off the ignition. The following actions:
- disconnect the fuel hose from the device;
- unscrew the 5 screws securing the carburetor cover;
- disconnect the choke control cable;
- lift the lid evenly and slowly so as not to deform the floats;
- Using a caliper, measure the distance from the plane of the cover to the surface of the fuel - it should be 23-25 mm;
- if the value is incorrect, bend the float tongue in each of the chambers in the desired direction;
- At the same time, clean the cameras from dirt;
- put the cover in place, then you need to install the dismantled elements.
We recommend: Symptoms of a VAZ 2114 mass air flow sensor malfunction and checking the sensor
Adjusting the needle
Place the Solex lid on a horizontal, flat surface. Now, by bending the metal “petals”, adjust the stroke of the valve needle, which should be equal to 2 mm. At the same time, check the tightness of the fuel valve. To do this, take a rubber bulb, insert it into the tip of the inlet fitting and squeeze so that it is deformed. At the same time, close the return fitting channel very tightly with your finger. When you turn the lid over, the bulb will become normal in shape, which indicates that the valve is opening, i.e., working.
Idle speed setting
Start the car and warm up the engine to operating temperature of 85-90 degrees, and then turn it off. Further:
- at the bottom of the Solex, find the mixture quality adjusting screw and screw it in completely (but not with excessive force, so as not to strip the thread);
- “back up” by unscrewing the screw 4-5 full turns;
- start the engine, press the choke handle all the way;
- by rotating the quantity screw, achieve stable operation of the internal combustion engine at minimum speed (according to the tachometer this is 700-1100 rpm);
- screw the quality screw back in until the engine begins to try to stall, and unscrew the hardware 1-1.5 turns;
- tighten the quantity screw until it reaches 900 rpm - if the motor starts to work unstably, slightly unscrew the quality screw again.
What to do if the motor does not respond to the rotation of the propellers
It’s quite a common situation: you turn the quality or quantity screw, but the engine does not change speed. The reason for this phenomenon is poor flow of gasoline into one of the idle channels (ICH). At the same time, the hardware responsible for the quality of the mixture simply does not have time to shut off the gasoline supply. This is due to:
- incorrectly sized jets: check their diameter and install standard products;
- the seat for these parts is loose;
- The XX solenoid valve (the “barrel” or cylinder to which the electrical wire fits) or the plug in its place is not screwed tightly enough.
How to set the transition mode
It is he who is “responsible” for the failure of the accelerator pedal when it is pressed sharply. Here the main role is played by the hole located above the throttle valve (spout). After sharp pressure on the gas, an additional portion of gasoline begins to be sucked in. In order to avoid failures, it is necessary to carefully select the XX jet and the spout that sprays fuel. Work algorithm:
- start the car and press the choke handle all the way;
- gently press the gas pedal: if there are dips, the nozzle located in the first chamber is to blame; with a normal set of revolutions, proceed to the next point;
- sharply press the accelerator: if there is a failure, you need to select the spout (optimal dimensions 40*40) and the jet (39-40).
Checking the idle air control circuit
Before moving on to diagnosing the regulator itself, it is necessary to check its circuit, because the reason that it stopped working could be a simple break in the wires or a malfunction of the electronic control unit. To diagnose the circuit, you only need a multimeter with the ability to measure voltage. The procedure is as follows:
- Raise the hood and find the sensor wiring harness on the throttle assembly.
- Disconnect the wiring harness block.
The voltage between ground and each of the terminals must correspond to the voltage of the on-board network, i.e. approximately 12 V. If it is less than this indicator, or is absent at all, you need to diagnose the wiring and electronic control unit.
Replacement
Diagnostics, cleaning and replacement of the throttle body is carried out after removing the throttle unit from the car.
The sensor is carefully removed from the dismantled unit and inspected. To check the performance of the dhx, use a tester switched to ohmmeter mode. Step by step diagnostic procedure:
- Set the measuring range on the tester to 0-200 Ohm.
- Attach the probes to the terminals, first on “A” and “B”, then “C” and “D”. The working element will show a value within the range of 50-53 Ohms.
- Take measurements between opposite pairs: “A” and “C”, then “B” and “D”. On a working unit, the instrument readings should tend to infinity.
If the electrical parameters are normal, the rod is measured - the overhang length should not exceed 22 mm.
If the rod is jammed, its size is increased, there are no optimal indicators of the multimeter, the part is changed. It is not advisable to repair the sensor.
Operating principle of IAC
This fuel system device operates according to the following algorithm. As soon as the VAZ 2110 has a high idle speed, the controller gives a command to open valve XX, directing the air flow bypassing the throttle valve.
To reduce the frequency value of the crankshaft rotation, he programs the unit to close, while the degree of saturation of the air flow transmitted past the throttle valve decreases.
Checking the idle speed regulator of a VAZ 2110 car for functionality is carried out as follows:
- Disconnect all battery terminals to completely de-energize the vehicle.
- We interrupt the contact between the harness block and the idle speed regulator coming to it.
- Using a professional multimeter, we measure the resistance of the external and internal windings of the IAC, while the resistance parameters of contacts A and B, and C and D should be 40-80 Ohms.
- If the instrument scale is zero, it is necessary to replace the IAC with a working gadget, and if the required parameters are obtained, we check the resistance values in pairs B and C, A and D.
- The device must detect an “open circuit”.
- With such indicators, the IAC is serviceable, and if they are absent, the regulator must be replaced.
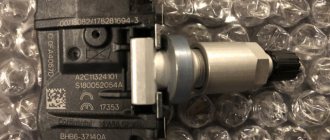
When purchasing an IAC, you should carefully study the contents of the box, since counterfeits are very common on the market. Their use can lead to serious engine damage, which will require a large amount of money to fix. How to distinguish an original from a fake is shown in the photo above.
Self-replacement of DZH
Before changing the device, you should first check that the light bulbs may have burned out, bad contacts, a blown fuse, or damaged wiring. If the reason is a malfunction of the device, then it needs to be replaced. Checking the bulbs and wiring is done with a multimeter.
Tools and materials
To replace the idle speed sensor on a VAZ, you should prepare the tools and necessary materials:
- key on “22” and a key on “24” may be required;
- multimeter;
- screwdriver;
- pliers;
- container for oil;
- electrical tape;
- chisel;
- hammer.
Signs of breakdown
Problems with engine operation during idling are not always associated with a malfunction of the fuel system. For carburetor engines that use a classic ignition circuit, a jumping stroke in 70% of cases is associated with a broken group of contacts and incorrect carburetor settings.
The carburetor magnetic valve operates only when the ignition is on. Therefore, before repairing a part, the quality of the power supply to the central wire of the carburetor and the integrity of the circuit are checked. Causes of unstable engine idle speed:
The first signs that the IAC has burned out on an engine with a distributed injection system:
If the regulator is burnt out, the engine computer signal system does not display the CHECK error on the instrument panel, so the part is diagnosed based on the symptoms when checking the system.