When to change the air filter on Grant
The manufacturer in the manual indicates a replacement interval of 30,000 km. In relation to domestic transport, including the Lada Granta, the indicated resource is slightly increased. Experienced car service workers recommend replacing the Grant air filter at around 12,000 km.
If the machine is often (systematically) used in conditions of increased gas pollution, reduce the replacement interval by a third. Regardless of the quality of the material or the originality of the workmanship, dust particles still penetrate inside, interfering with normal functioning. Part numbers and overview of manufacturer prices
| Brand / article / OEM | Price, rub.) |
| GB-9597 E4 Big Filter | from 150 |
| MANN-FILTER C 22 117 | —/— |
| LYNXauto LA-1505 | —/— |
| CHAMPION CAF100505P | From 200 |
| PURFLUX A515 | —/— |
| KNECHT LX 220 | —/— |
| FILTRON AP006 | From 250 |
| CLEAN FILTERS MA 435 | —/— |
Removing the air filter and air intake
Removing the air filter and air intake of Lada Granta (VAZ 11183, 21116)
We remove the air filter to clean the cavity of the filter housing from dirt, replace it, and also to gain access to parts and components located in the front left part of the engine compartment.
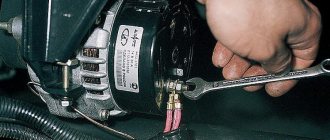
By pressing the lock of the engine control system wiring harness block, disconnect the block from the mass air flow sensor connector. Use a Phillips screwdriver to loosen the clamp securing the corrugated hose to the air filter cover pipe...
...and remove the hose from the pipe.
Using a Phillips screwdriver, unscrew the four screws securing the air filter cover...
...and remove the cover.
We remove the canister purge valve from the filter housing holder without disconnecting the tube and the wiring harness block from the valve (see “Removing the canister purge valve”).
Remove the replacement element from the filter housing. The air filter housing is mounted in the engine compartment on three rubber supports. The two front supports are located on the upper cross member of the radiator frame, and the rear one is located on the battery platform bracket.
We remove the front right support from the slot in the filter housing bracket. Similarly, we remove it from the slots of the other two brackets of the air filter housing...
We remove the filter housing pipe from the rubber coupling of the air intake...
...and remove the air filter housing. Install the air filter in reverse order.
We remove the air intake for replacement, as well as when dismantling the fan or radiator of the engine cooling system.
Using a 10mm socket, unscrew the air intake nut. Remove the air intake from the radiator bracket stud and disconnect the rubber coupling of the air intake from the air filter housing pipe.
Remove the air intake from the engine compartment.
Remove the rubber coupling from the air intake pipe. Install the air intake in the reverse order.
Video on the topic “Lada Granta. Removing the air filter and air intake"
Quick release for VAZ air filter, injector. Advice from an auto electrician Removing the air filter with housing Lada Kalina How to remove the filter housing on a VAZ 2110.
The mechanism of action of the VAZ 2114 air filter
The principle of operation of the filter element on the “fourteenth” can be described using the following algorithm:
- The outside air enters the air filter through the cooling system fan;
- At the outlet of the air filter, a mass air flow sensor is installed that monitors the amount of air intake by the engine. The engine operating mode depends on the sensor readings. If everything is OK, then the engine runs evenly, does not stall, and the declared fuel consumption regime is observed;
- Then the filtered atmospheric air enters the injector receiver; the air then participates in maintaining the operating pressure of the fuel system.
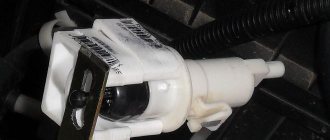
Where is the cabin filter of the Lada Granta liftback
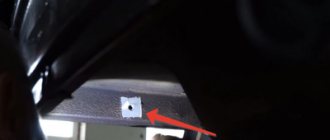
Regardless of the modification of the car brand, the location of the cabin filter in the Lada Granta liftback is identical for all - under the frill in the right front part.
Of course, the choice is not entirely successful, since in case of heavy rain or puddles, water still penetrates inside onto the paper fiber. This leads to the creation of an obstacle to the air flow, a decrease in cleaning efficiency, and the penetration of pathogenic bacteria.
Replacing the Grant air filter
Good day, colleagues. The day before yesterday I pulled out the spark plugs and filter, despite being on vacation I don’t have much time, excavation work takes a lot of time.
As I wrote earlier, during the holidays there was a series of “rescue operations”, in one of them I broke off: a set of spark plugs - NGK BKR6 Genuine part for Nissan and a Toyota oil filter (hmm, we looked at the tables - the diameter, fit and dimensions of the seal are ours, TAZIKOVSKIES, for whom interesting code 90915-YZZE1 - analogue of MANN 914/2):
filter and candles The filter is still waiting in the wings. Also, while taking my wife to work, I stopped at BBC on the way back and bought a GB-9597 E4 air filter with impregnation and a 16-inch tubular key for spark plugs:
filter and
key to 16 Under the hood it’s a little dirty, I haven’t washed it yet, but overall it’s tolerable:
It’s not exactly clean, but it’s not exactly dirty. We do the work of replacing spark plugs carefully - since there is a lot of dirt under the spark plugs and its getting into the cylinders does not bode well for the engine:
carefully, dirt. Therefore, carefully clean it with a brush made of fluffed rope and blow through the sockets for installing the spark plugs until they are unscrewed. In general, we recommend NGK V-Line 13 for 8 valves, but we don’t look a gift horse in the mouth, and this series of spark plugs fits Nissans of almost all makes:
new spark plug For comparison, old and new:
spark plugs: new and old I looked at the old spark plugs: the insulator is good, no burnouts or breakdowns are visible, there is no fur, the color is brownish, without obvious reddishness, I think my engine 11186 is stitched under the 92nd. Having replaced the spark plugs, I moved on to replacing the filter - the procedure is simple, but the same requires care: - disconnect the sensor connector - loosen the clamp - unscrew the 4 bolts securing the filter unit cover and carefully remove it, it is advisable to do this not in the wind - so that dust does not accumulate in the sensor and the air duct. Do you need it so that there are glitches with the engine? - remove the air duct from the cover so that it does not interfere, if possible - carefully plug the pipe with a clean flannel from dust and dirt
— we take out the old filter, mileage 11,000 km, it looks like it would still serve:
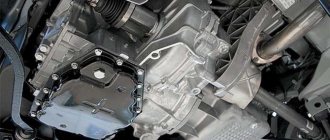
old filter But to be honest, I don’t believe that the filter lasts 30,000 km, the maximum on old cars lasted 15,000 km, then changed, it just became dull at speeds above 3000. So we changed it and didn’t bother, I just vacuumed and wiped the insides, it was dirty:
filter box, before cleaning Naturally, dust and dirt will still accumulate there, this is inevitable, but putting a clean filter in a dirty box is somehow not comme il faut. Yes, and the costs are minute. — put the new filter in place, orienting it with its folds along the air duct:
Place it along the air duct and tighten the 4 screws in place
With a clear conscience we go to try, the engine starts the first time. Everything is successful. The whole procedure took about 40 minutes, I did it slowly. Costs - filter and key, with a discount - 155-00
PS: I still want to install the Federal Tax Service instead of our box: the mileage already allows it, it lasts 15-20 washing cycles. You need to wash it approximately every 5-7 pumps. We need to come up with a cold air supply. Somewhat more expensive to maintain - the flushing fluid is more expensive than a standard replacement filter, but in my opinion this is compensated for by: - better engine traction - more space under the hood for access
- less fuel consumption
Good luck on the roads, colleagues.
How to remove the air filter housing on a Lada Priora?
This element serves, as the name implies, to purify air coming from the external environment and direct it directly to the car engine. Air filters of many new domestic (and not only) car brands are very similar to each other; finding them under the hood is not difficult. The air purification filter is a black plastic box with a streamlined shape - while it shows a corrugation or a rather thick tube that leads from the filter to the motor. In Lada Priora, this filter is located in the center of the hood right at the front of it and is mounted on rubber supports.
Usually the filter is removed for replacement if it has become deformed or simply due to external influences (the appearance of severe cracks, for example), as well as to change the filter element located inside.
To remove the air filter housing, prepare a 10mm wrench and also some pliers just in case.
Using a 10mm wrench, loosen the nut of the “–” terminal of the battery.
Remove the “–” terminal from the battery.
A mass air flow sensor is connected to the air filter, which serves in the car to determine the exact amount of air, and based on the data of which the car’s electronic control unit will calculate the proportions to form the fuel mixture. This sensor is attached to the air filter by a wiring harness. To remove this harness, push up the latch (it is yellow).
Use a screwdriver to loosen the metal clamp on the air outlet pipe of the air purification filter.
Next, carefully disconnect the pipe from the air filter housing.
Thanks for subscribing!
Please note that the rubber housing supports described above (there are three of them in total) are installed in the metal body of the machine and when you try to remove the filter housing, they will try to pull out along with it. To prevent this from happening, lubricate all three supports with a silicone-based lubricant.
If, nevertheless, the rubber supports came out at the moment when you pulled out the filter, simply install them back in their place. This can be done by clamping the ends of the supports with pliers.
The filter takes in air from below, for which another pipe connects to it. Therefore, when removing the filter housing, carefully begin to pull it up until the inlet pipe appears from below - pull it and disconnect it from the filter housing; You don't need to remove any clamps for this.
The air filter housing is installed in its place in the reverse order of removal.
Video - Replacing the engine air filter on a VAZ - Lada Granta
The operation of the car’s fuel system depends on the cleanliness and quality of the air filter, as it cleans the air entering it from impurities, dust and dirt. This air is used to form the air-fuel mixture. In order for it to perform its functions efficiently, it must be changed in a timely manner. Replacing the Priora and Grant air filter is described in the article. Using the replacement recommendations and watching the demonstration video, any car enthusiast can change the filter on their car.
How to replace an element in the Grant model?
How to replace the air filter correctly and step by step?
- At the beginning of the “operation”, we open the hood of the Lada Grant and find a housing located directly next to the battery and coolant reservoir.
- Disconnect the connector from the MAF socket.
- Using a screwdriver, unscrew the screws securing the housing cover of the LADA Granta element. Before the procedure, it is recommended to clean the “box” of dust and dirt. A vacuum cleaner or compressor for blowing a stream of compressed air is perfect. Here we cover the MAF socket with a suitable rag.
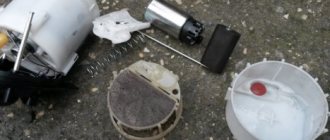
- We take out the used element.
- We correctly install the new element on the Lada Granta. To do this, look at the arrow marked on the surface of its frame. Its pointer should coincide with the direction of the air flow. This is a very important point, since an incorrectly installed element will not ensure the effective functioning of the air supply system.
- We reassemble all the dismantled elements in reverse order and connect the removed connectors.
This completes this simple procedure, the air filter is installed on the Lada Granta car. Please note that reusing an old filter is unacceptable. It must be disposed of without alternative. And when the air filter is replaced, an exclusively new one is always installed.
The importance of the Grant liftback air filter is somewhat exaggerated - this is an opinion expressed by inexperienced motorists. And this is the main mistake of “young” drivers. The functionality of the air system cannot be underestimated.
The dynamics of vehicle acceleration, fuel consumption, and stability at idle speed depend on the percentage ratio of air and fuel. Timely replacement of the cleaning element, purchase of original components, professional installation is the key to a long service life of the technical product.