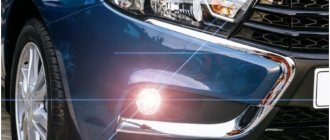
Fog lights are installed on a car to improve visibility in bad weather conditions.
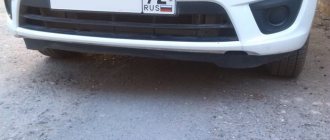
Lada Vesta is equipped with PTF only in luxury configuration. All others have plastic plugs at the bottom of the buffer.
Installing PTF on Lada Vesta is not a cheap service. Self-installation will save some money, but requires care and experience on the part of the repairman. Incorrect installation of wiring and electrical circuits can lead to negative consequences and a short circuit.
The main steps when installing fog lights on a Lada Vesta
- Placing the machine on an inspection pit, roadside overpass, hydraulic lifting mechanism.
- Removing the terminal from the battery, since the work involves voltage, contacts, and relays.
- Unscrewing the top, middle, bottom row of fasteners and screws.
- Removing the sidewalls of the buffer from the grooves, removing the front part.
- Removal of plastic inserts, installation of fasteners for PTF.
- Laying the wiring from the left PTF to the fuse block.
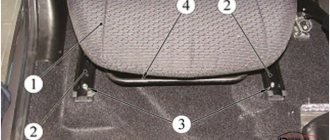
- Installation of a mechanical button in the cabin, to the left of the steering column.
- Laying the cable from the button to the fuse box.
- Connection of limit switches according to the provided diagram.
- Install the buffer in the reverse order.
Preparing seats and attaching headlights
With the exception of the luxury version, plastic plugs are installed in place of the PTF. Using a special 76 mm bit, we drill holes.
This stage can be avoided if you purchase ready-made factory-made plastic inserts with cutouts in advance. The brackets are installed using three self-tapping screws.
Buy a mechanical button for the car interior in any shape you like. The standard installation location is to the left of the steering column, closer to the trunk lid opening button.
Installation of PTF on Lada Vesta
This process includes the following steps;
- removing the bumper;
- preparation of the seat;
- installation of headlights;
- PTF connection.
It seems to be simple, but let’s look at all this in more detail.
Removing the bumper
The front bumper of the Lada Vesta is quite massive and can easily be damaged, so when dismantling, do not forget to be careful.
First, disconnect and remove the battery. Also, be sure to prepare the place where you will put the bumper - just lay a rag so that its surface is not damaged.
The lower part is attached with four bolts to the body and four self-tapping screws to the fender liners. All this needs to be turned out.
On each side, unscrew the two screws securing it to the lockers.
Under the hood, remove the six bolts that secure the top to the body.
Removing the bumper
It remains to remove two bolts under the license plates. Here you already need to hold the bumper by the beam. Gently pull it towards you to disengage it from the side brackets.
Now you have access to the right place, and it's time to move on to the next step.
Preparing seats and attaching headlights
In place of the foglights there are factory plugs. Using a 76 mm crown, you need to cut holes in them. A stationery knife is also suitable for these purposes. If you purchased the trim for the fog lights on the Lada Vesta, then this step is skipped.
Cut holes in the bumper
It won’t take much time to figure out how to install the PTF brackets. They should simply be secured to the bumper using self-tapping screws.
It is also necessary to take care of the hole for the PTF button in the dashboard of the car. To do this, you can choose a place on the center console or next to the trunk release button.
Connecting fog lights
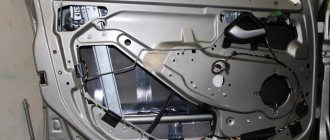
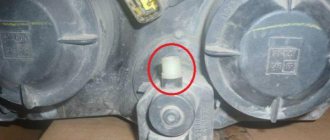
From the right PTF, the wiring is laid inside a metal box. The wiring enters the interior from the engine compartment through a special hole in the area of the pedal assembly.
The easiest way to connect fog lights is using a universal scheme, as when connecting equipment on previous cars in the Lada line. Load power is taken from the battery (M6 bolt) and supplied to the contact relay through a fuse.
Plus comes from the mounting block from the size fuse. Alternatively, you can use the plus of the cigarette lighter.
The relay itself is installed under the hood or directly in the cabin.
This method of connecting the PTF to the Lada Vesta is the most optimal in terms of savings and minimal intervention in the electronic part of the car.
About the standard set of fog lights
If you decide to convert the Lada Vesta with your own hands without visiting a service station, then additionally buy:
| Name / catalog article | Price, rub.) |
| PTF 261500097 | From 3000 (kt) |
| —/— FCR220029 | —/— |
| Blocks with wires for PTF 8450006983 | From 13000 |
| Left bracket 8450006277 | From 260 |
| Bracket right 8450006276 | —/— |
| Steering column switches 8450006924 | From 6500 |
| Electronics unit 231A08052R | From 3300 |
| Wiring 8450030715 | From 20000 |
*price indicated as of 02/02/2019.
The total cost, excluding payment for services at a service station, is 45–50 thousand rubles. Installation of fog lights in a workshop - from 60,000 rubles.
One of the problems that the master faces during the installation of the basic version of the Lada Vesta is the new electrical equipment circuit. It is different from Lada Granta, Kalina, Priora.
Standard control of fog lights is implemented via the steering wheel paddle. The activation signal does not go directly to the fog lights, but to the EMM control module. After which the unit redirects the signal via the CAN bus. Installing headlights according to the described scheme is complex, costly, and not always understandable for an inexperienced driver. An alternative and simpler option is to install fog lights using a separate circuit using a relay.
Punishment for xenon in foglights
There is a common myth that the fine for xenon does not apply to fog lights (sidelights, PTF). Indeed, in some situations, when inspecting a car, a traffic police officer may not notice xenon lamps in the foglights and thus not react in any way to their installation.
However, if during a detailed inspection of the car the unauthorized installation of xenon lamps in the fog lamps of a car whose design does not imply the use of this type of headlights is revealed, the penalty from the traffic police will be the same 3000 rubles. for installation and deprivation of rights for up to a year for driving with xenon in the PTF.
The fact is that the law regulating the installation of lamps in a car does not separate the concepts of “headlights” and “fog lamps”; Articles of the Code of Administrative Offenses 12.4 and 12.5 talk about installation “on the front of the car,” and as you know, “fog lamps” are located in the front.
Wiring diagram
Preparatory stage:
- set of automotive tools, screwdrivers;
- rags, plastic spatula;
- fog lights, wiring kit, limit switches, 4-pin relay, insulation;
- elastic clamps – ties for electrical wiring;
- 16 A fuse for replacement in the fuse box;
- plastic corrugation of at least 5.0 meters.
Sequence of actions for connecting Lada Vesta fog lights:
- We install the car within the perimeter of the repair area, provide safety measures, and secure the rear row of wheels with wheel chocks.
- We gradually unscrew the top, middle, bottom row of screws.
- We remove the side clamps from the grooves.
- We remove the front bumper assembly and fix it on a workbench for ease of work.
- Using a crown (diameter 76 mm), we drill the left and right holes for the PTF. If you purchased ready-made brackets, then install them and secure them with three self-tapping screws.
- We lay the wiring under the plastic buffer amplifier and clamp it with clamps. Screw the buffer into place.
- We lay the cable to the fuse block.
- We install a mechanical button in the interior. The location is determined at personal discretion. We bring the limit switches to the fuse and relay block.
- We take the load power from a 12 V battery. We connect the control “plus” from the side lights or the cigarette lighter. We install the relay in the cabin under the dashboard above the pedal complex.
- As an alternative option, a steering column switch from Renault Duster with a fixed engagement is installed (article 8201167981).
With this scheme, the fog lights are activated when the headlights and low beam are turned on.
There is a third activation method: using a pulse relay, using the steering column switch, which are equipped with the Standard and Comfort versions. Installation work is carried out exclusively in the cabin, outside the engine compartment.
Review of Manufacturer Prices
| Name / catalog article | Price, rub.) |
| FranceCarFCR220029 | From 1500 |
| Autostol63261500097R | From 2300 |
| Valeo 47401 | From 4300 |
| Valeo 02539 | From 3300 |
| Bracket for fog lamp 657845163 | From 250 |
| Facings - frames | From 1000 |
| DLAA | From 1300 |
| Tune-auto (body) | From 890 |
| Wesem | From 2000 |
| LED bulbs in fog lights | —/— |
| Valeo | From 4000 |
| Lens | From 5000 |
| Rear fog lamp Lada Vesta 2191-3757010-20, size 223 * 12 mm | From 650 |
*prices are as of 02/02/2019.
Recommendations for selection
When purchasing, check the catalog numbers with the actual data specified in the instruction manual. Get advice from service center specialists regarding the compatibility of the PTF with your car model.
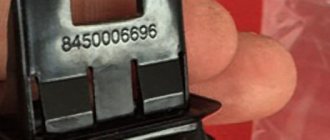
Check the presence of the barcode, date, batch number, and integrity of the packaging. Ask managers to provide you with quality certificates for products.
Conclusion
Installing fog lights on a Lada Vesta with your own hands is not difficult. Difficulties most often arise when connecting the electrical component rather than installation.
Before connecting the limit switches, be sure to disconnect the terminals from the battery to prevent a short circuit in case of incorrect connection.
Instructions - installing PTF on Lada Vesta
Installing fog lights on the Lada Vesta is difficult. This is due to the design of the electronic equipment of the Lada model. The fog lights on the Lada Vesta are controlled from the steering column switches, and they do not have a fixed position with the fog lights on. In addition to this, problems are created by the absence of a special electronic fuse box of the EMM type in all but the top-end trim levels of the Lada 2180. The signal about the start of PTF operation in the original design comes here. Owners of cheap modifications of the Lada Vesta have to look for other connection schemes. Despite the difficulties, installing PTF yourself is possible. To do this, you will need to purchase the headlights themselves, brackets for mounting them, a power button, a contact snout, a set of wires with corrugation, connectors and adapters, and a 16 Am fuse.
First remove the bumper
Connecting the PTF Vesta begins with disconnecting the battery and removing the bumper, which is simultaneously attached to the body, fender liners and lockers with a large number of bolts and screws. Unscrew one by one:
— 4 bolts in the lower part of the body;
— 4 self-tapping screws from the fender liner;
— 2 screws from each locker;
— 6 bolts on top of the body and 2 more under the license plates.
At this time, it is necessary to hold the bumper by the beam to avoid damage if it falls. The Lada Vesta has a massive bumper, so the help of a second person will not hurt. The detached part needs to be pulled slightly towards you and removed from the side brackets.
Preparing the seats and mounting the headlights
We have already said earlier that instead of fog lights, the fret manufacturer installs plastic plugs in which holes must be cut. This can be done with a bimetallic crown, or an ordinary stationery knife. The second method will take a little longer and require additional care. If it seems that it won’t be possible to cut smoothly, you can buy a new lining for the PTF.
Next, you should install and secure the pre-purchased brackets with self-tapping screws, and then place the fog lights themselves inside them.
At the same stage, the power button is installed. It can be placed wherever it is convenient for the driver, but usually a place is selected on the center console, next to the button used to open the luggage compartment. The hole for the button can be drilled or cut.
The most important point is connecting the fog lights
We lay the output to the button through the corrugated box between the side members, starting from the right headlight. It is more convenient to run the wires inside the cabin itself next to the passage into the pedal assembly.
The light bulb is connected in the same way as in the Lada Priora, Viburnum or Grant. Electricity is taken from the battery and connected to the contact relay through a fuse. The relay can be installed in the engine compartment or inside the cabin of the 2180. We extend the plus contact from the size fuse or from the cigarette lighter.
Reviews are positive and negative
| № | Positive |
| 1. | Gennady , 32 years old, St. Petersburg: I bought the basic version of Vesta, I installed the PTF myself with a friend. There is nothing difficult about it, we did it in half an hour in total. |
| 2. | Kirill , 29 years old, Moscow: I traveled for two years without fog lights, it was very difficult in bad weather. I installed it at a service station, it was expensive, but the cost is worth it. |
| 3. | Vasily , 41 years old, Volgograd: bought the car second-hand, the previous owner installed a PTF. They illuminate well, cover the roadside, and visibility is good. |
| 4. | Dmitry , 45 years old, Samara: after a year of using Vesta, I realized that it wouldn’t work without additional lighting. I installed it myself and finished it in 20 minutes. |
| 5. | Alexander , 42 years old, Saratov: I bought Vesta in its basic configuration a year and a half ago. The car is good, but installing additional accessories is expensive. In particular, the fog lights cost me more than 45,000 rubles. |
| 6. | Ivan , 39 years old, Uralsk: my positive review of the PTF Autostol63261500097R, which I bought at a local store. Good price-quality ratio, warranty from the manufacturer. |
| 7. | Vyacheslav , 50 years old, Krasnodar: I don’t use the car very often, but I realized that I can’t do without additional headlights. Autumn time, often foggy, visibility is limited. I bought FranceCarFCR220029, my recommendations. |
| 8. | Alexey , 32 years old, Sevastopol: I bought a Lada Vesta in the basic version and decided to install fog lights. As it turned out, there was nothing complicated, there was more uncertainty. |
| Negative | |
| 9. | Vladimir , 32 years old, Moscow: I bought a car in a luxury configuration with PTF. I am dissatisfied with the quality of lighting, I plan to install Valeo 47401. In thick fog, visibility is still limited, despite the low landing. |
| 10. | Sergey , 33 years old, Samara: I drove for six months on factory fog lights, the quality is not very good. If possible, I will replace it with foreign analogues. |
| 11. | Kirill , 38 years old, St. Petersburg: garage mates recommended installing Autostol63261500097R instead of factory headlights. The cost of Autostol is one and a half thousand more expensive than the factory analogue, but the quality is obvious. |
| 12. | Valentin , 42 years old, Rostov-on-Don: I drove Vesta for six months, the car is good. There are not enough fog lights, weather conditions have worsened, visibility has decreased. I have selected several options: Valeo 47401, Autostol63 261500097R, I will choose and consult with specialists. |
| Video - Installing fog lights | Video - Installation without intervention in the ECU |
Why is replacement needed?
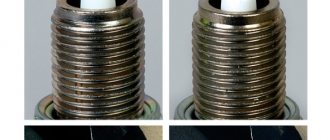
Before moving on to the question of the need to replace a xenon lamp with a halogen one, it is necessary to find out the differences between these lighting devices.
The xenon lamp is based on a special gas, which begins to glow thanks to the operation of the ignition unit.
The resulting light is brighter and helps improve visibility not only at night, but also in bad weather conditions.
Xenon headlights have a higher level of illumination, which is the main factor when choosing these lighting devices. You can compare the lighting level with xenon and halogen in the following picture.
However, the use of xenon headlights may subject the driver to administrative liability.
The fact is that, in accordance with the appendix to Government Decree No. 1090, the operation of a motor vehicle is prohibited if:
- the type, color, operating mode or location of the headlights installed on the vehicle does not correspond to the vehicle design provided by the vehicle manufacturer;
- There are no lenses on the lenses or these devices do not match the type of headlight installed;
- Light fixtures are dirty or not working correctly.
This means that installation of xenon lamps is possible only in headlights of a certain type and marked DR, DC or DCR.
In other cases, xenon lamps are considered to be installed illegally and such lighting devices do not meet the manufacturer's technical requirements.
Illegal installation of xenon can lead to:
- to the impossibility of passing the technical inspection required to purchase a compulsory motor insurance policy (MTPL);
- to the imposition of sanctions under Article 12.5 of the Administrative Code. This article provides for the possibility of depriving a driver of a driver’s license to drive a vehicle for a period of 6 months to 1 year;
- to the seizure of lighting devices that do not meet the requirements.
It is the possible consequences of the illegal installation of xenon headlights on a vehicle that primarily lead to the need to replace the equipment with halogen headlights.
Replacing xenon with halogen may also be necessary:
- at the request of the vehicle owner. Some drivers prefer halogen headlights, since the main characteristics of lighting devices fully comply with established standards;
- when receiving insufficient light from xenon, for example, as a result of prolonged use. Over time, not only the light bulb installed in the headlight can be damaged, but also other elements of the equipment (for example, the ignition unit, lens, and so on).