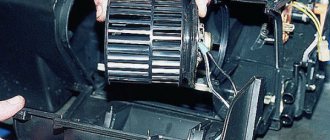
Sometimes vehicle parts require replacement, most often due to breakdown or wear. The question of how to remove the center console on a Priora worries those motorists who want to replace a part hidden by the console. For example, without removing the panel it is impossible to get to the clock block, heating control device or deflector.
I am glad that the process of dismantling the console panel is quite simple and you will need a minimum of tools, which can be found in the trunk of every motorist. If you need to replace one of the above parts, learn how to remove and reinstall the console.
How to remove the center console on a Priora? But you never know why you need it
Download PDF
For motorists, knowing how to remove the center console on a Priora will be useful for carrying out repair work or replacing the part in question with a more modern version. This manipulation should sometimes be carried out when installing the DVR. To do the work yourself, you will need a basic set of tools: a screwdriver and wrenches. We'll look at how to remove the center console on a Priora below. The dismantling procedure consists of the following operations:
- The first step is to deactivate the rear window heating button;
Removing and installing the panel (dashboard) Priora
If you decide to install sound insulation for the engine shield, or paint or reupholster the panel, then carefully study the instructions on how to remove and install the Lada Priora dashboard yourself.
Necessary tool . Phillips and flathead screwdrivers, 10mm head, pliers with narrow jaws.
Before starting work, you should disconnect the negative terminal from the battery. Then remove the steering column switches.
Remove the fuse box cover:
- Turn the three locks of the mounting block cover 90°.
- Unclip the fuse box cover.
Disconnect the wires from the ignition switch. Then remove the instrument cluster. and remove the central floor tunnel. Disconnect the wires from the electric power steering:
Then in order:
- Unclip the plastic clips and remove the left A-pillar trim. Remove the right A-pillar trim in the same way.
- Pry off the left door glass blower nozzle using a flat-head screwdriver with soft material underneath to avoid scratching. Similarly, remove the blower nozzle on the right side.
- Unscrew the nut of the upper fastening of the Priora panel, it is located in the cavity under the door glass blower nozzle, using a “10” socket. Unscrew the nut on the right side in the same way.
- Unscrew the bolt securing the ends of the ground wires of the dashboard using the same key.
- Disconnect the connectors with the instrument panel wires from the connectors located on the bracket above the fuse block.
- Disconnect the wire block located on the right end of the bracket.
- Disconnect the engine control wiring connector from the instrument panel connector.
- Unscrew the nut securing the ground wire terminal using a 10mm socket.
Main process
Using a screwdriver, remove the windshield blower nozzles. Then the upper fastener, consisting of three clamps and bolts holding the instrument panel, is removed. The next step will be dismantling the amplifier. After a visual inspection of the bottom of the console, remove the corresponding screws that are located at the bottom of the panel. Next, the wiring of the instrument assembly is dismantled by unscrewing the pads and clamps.
The wiring system associated with the ignition switch is also inspected and removed. Together with it, the ground fastening, the power supply structure of airbags and other components with an electrical connection are disassembled. The final step is to dismantle the Priora dashboard itself with the center console. The part in question is a rather weighty part; it is advisable to have an assistant to remove it from the cabin. At this stage, the operation to remove the center console can be considered completed and further planned work can begin.
Characteristics
Although removing this item is a fairly simple process, there are a few things you should be aware of. You need to disassemble it by dismantling the radio. This procedure uses special pullers that are inserted into the sides of the radio until it clicks into place. Then you just need to pull the item towards you and then disconnect all the connectors that appear. The metal alcove where the radio was located has been removed. Then unscrew the two latches facing the console.
To make sure you don't miss all the fasteners, keep in mind that the console is secured with two hidden screws under the open cover and four similar screws under the ashtray and radio. At the top of the cladding it is secured with additional metal brackets. It will take some work to remove it.
If the center console is dismantled, in order to eliminate an unpleasant squeak, after dismantling the cladding, it is necessary to glue the edges of the panel with a special insulator that protects against extraneous noise. In addition, it is necessary to similarly treat all areas with which the console interacts, and ensure that the element is securely fixed and does not shake after assembly.
Delivery by transport company (cash on delivery, no prepayment)
Advantages:
- the cost of delivery of heavy and large-sized orders is much cheaper than that of Russian Post;
- There are practically no restrictions on the weight and dimensions of cargo;
- There is a wooden crate service - this is an additional guarantee of the integrity of the order.
Disadvantages: unfortunately, there are branches only in cities.
The estimated cost of delivery for an order up to 30 kg is 450 rubles.
List of transport companies with which we cooperate:
- TC "PEK" (cash on delivery service available);
- TC "Business Lines";
- TC "Energia";
- TC "KASHALOT" (KIT) (cash on delivery service available);
- TC "SDEK" (cash on delivery service available);
- TC "DPD";
- TC "ZhelDorExpedition";
- TC "VOZOVOZ";
- TC "Baikal-Service".
To send your order by transport company:
The cost of delivery is calculated based on the volume, weight of the selected product and the distance from the city of Tolyatti.
To send an order you must:
- indicate full name recipient;
- Your locality and region;
- series, number of passport or driver's license;
- Your phone number (contact).
TC "Business Lines" - Urgent delivery of goods from 1 kg throughout Russia. The exact cost can be found on the official website of the delivery service - https://www.dellin.ruTK "PEK" - Guaranteed safety of cargo for the entire duration of cargo transportation, clear information support, delivery of goods throughout almost the entire territory of Russia, Belarus and Kazakhstan in optimal time and accurately calculated cost of services. The exact cost can be found on the official website of the delivery service https://pecom.ru/ru/calcTK "SDEK" - Low tariffs compared to foreign courier companies, while the quality of the services provided meets modern international logistics requirements. Developed network of own representative offices. The exact cost can be found on the official website of the delivery service https://www.cdek.ru/calculator.htmlTK "ZhelDorExpedition" - Serves only large cities and towns. The exact cost can be found on the official website of the delivery service - https://www.jde.ru/branchTK "Energia" - Cargo transportation in Russia, the CIS and China. The exact cost can be found on the official website of the delivery service https://nrg-tk.ruTK "KASHALOT" (KIT) - Delivery of cargo from 1 kg to 20 tons throughout Russia and Kazakhstan. The exact cost can be found on the official website of the delivery service https://tk-kit.ru/calculateTK "Baikal-Service" - Transportation and delivery of groupage cargo by road in Russia. The exact cost can be found on the official website of the delivery service https://www.baikalsr.ruTK "DPD" - Transportation and delivery of groupage cargo by road in Russia. The exact cost can be found on the official website of the delivery service https://www.dpd.ru TK "VOZOVOZ" - Transportation of groupage cargo by regular delivery routes between Russian cities. The exact cost can be found on the official website of the delivery service https://vozovoz.ru
How to replace the cooling radiator on a VAZ 2170-VAZ 2172?
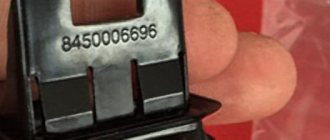
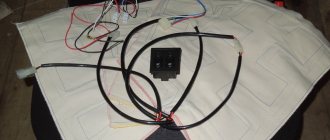
1) Before you start work, drain all the coolant from the radiator (read “here” for how to drain the liquid) and proceed to removing the electric fan (If you don’t remove it, you simply won’t remove the radiator), to do this, first reset the negative terminal with the battery by loosening the bolt that secures it, then remove the air filter housing since it will get in the way very much (Read “here” how to do this), and you can start removing the electric fan, first disconnect the wiring from each other, wiring the electric fan has a connector and block on the side (see photo 1), then unscrew (it’s most convenient to use a wrench) two bolts that secure the electric fan to the casing on the left and four nuts, two of which are located on the top and two bottom (see photos 2 and 3 below) and later remove the electric fan by pulling it to the top and putting it aside.
Read:
2) Next, remove the sound signal, since it will not allow you to remove the radiator (For information on how to do this, read the article: “Replacing the signal on a Lada Priora”) and then loosen all the clamps that secure all the supply pipes to the radiator (see. photos 1 and 2, pay your attention to photo 1, there is another pipe indicated by an arrow, so don’t miss it) and disconnect them, immediately after that unscrew the two nuts that secure the radiator to the body (see photo 3) and then pull out the holder , which holds the hose so that it does not dangle from the hole in the cross member of the engine compartment (see photo 4), and that’s it, you can then safely tilt the radiator towards the car engine and then pull it out of the engine compartment.
radios Use for phone calls
The instructions from the Priora radio also contain information that the device supports the Bluetooth function and can be used for a wireless headset or playback tracks from Bluetooth devices.
To do this, you need to press one or another key from the phone with the icon, and the display will display the name of the device (inscription or Disconnect). You first need to turn on Bluetooth on your mobile phone and perform a search. If everything is in order, then the message “hands is possible” will appear on the phone and the connection is free (the PIN code in this case is “0000”). Then a sound signal and a Bluetooth icon will appear. As it says: if the manual needs to accept a call, you need to press the left button with the phone icon, and to interrupt the connection, press the right button. You can dial a number after switching to Bluetooth mode. After using the numeric keypad, the name of the mobile phone is typed, after which you need to call the subscriber with the left button on the phone icon. Ending and disconnecting a conversation is also done by pressing the right icon on the phone button (short or long, Pin). Accordingly, the code for the phone (instead of four zeros) can be set if in Bluetooth “mode” you press the Scan button, enter a new code and press confirmation (button “8”).
In the “for” Bluetooth mode of some phone models, you can transfer address book data from the phone to For. radio receiver, you need to press AF/PS, view the address book via PTY, select the desired one via the number by rotating the encoder knob. In addition, you can delete one number via AF or all numbers via TA. Therefore, you need to be careful when using Bluetooth.
Removing the Console
The upper part of the console contains several mounting screws that need to be unscrewed. Two of them are at the top of the console. These screws are used to install the audio system. If the car was purchased factory equipped, then these screws are located under the cover itself.
As soon as the screws are unscrewed, you can slowly remove the console. To do this, you need to carefully move it to the side and thread all the wires that went to the buttons and were previously disconnected.
After which you need to disconnect several more connectors, one of which is the heater control unit connector, and the second is the connector for the standard quartz clock.
And finally, the outermost detachable connector belongs to the button for activating the additional alarm in case of an accident. It is better to disconnect it when the button is already removed from the console.
Preparing to remove the console
Before removing the console on the Priora, you need to remove the radio. This is where differences may arise between trim levels. Namely: the difference in luxury and standard cars is in the size of the connector for the radio. As for everything else, there is no difference in fastenings. To remove the radio, special tools (keys) that come with it are suitable.
Having freed the niche, you need to press on the connectors for the buttons, then take them out and disconnect the block with wires from them. It is better not to damage these wires, as they go to the console. Then the ashtray is removed. To do this, you need to pull it towards yourself with a certain amount of force. As soon as the ashtray is removed, the fastening screws will be visible: there are two of them and both need to be unscrewed. Only now we begin to answer the question: “How to remove the center console on a Priora?”
What you will need
To remove the Priora radio, you will need narrow metal plates that can fit through the grooves on the front of the head unit. Additionally, you will need a utility knife or wire cutters to remove the plastic clamps.
How to remove the dashboard on a Lada Priora?
During the operation of the car, Lada Priora owners may be faced with the need to remove the instrument cluster.
For example, to eliminate damage caused by mechanical shocks, scratches or abrasions, to replace light bulbs, arrows and the instrument itself, to “overexpose” the backlight, to install tuning visors, etc.
It is not difficult to do this yourself and the step-by-step instructions provided will help you with this.
For dismantling you will need a Phillips and flathead screwdriver.
Remove the cover of the mounting block by turning the 3 locks at the bottom of the cover by 90 degrees.
We press the lock and release the steering column to its lowest position.
Unscrew the 2 screws of the facing frame from above.
Then unscrew 1 screw on the left and right of the steering column.
Remove the frame and unscrew the 2 screws holding the tidy. Pull the device towards you to get to the connector. The connecting wires are short, so she comes out reluctantly.
We put our hand into the opening between the panel and the instrument cluster and, using a thin screwdriver, carefully move the connector lock up and to the right.
We remove the instrument panel. We see that the glass is fixed using latches, which must be released to gain access to the arrows.
To replace light bulbs, the instrument cluster itself does not need to be disassembled. The bulbs can be unscrewed by turning them 90 degrees.
Installation of the instrument cluster is carried out in reverse order.
Why do you need a voltmeter in the Priora cabin?
Headlight block Lada Priora: replacement and type of lamps
Most modern car models do not have a voltmeter on the instrument panel. Manufacturers decided that information about the on-board network voltage is not needed by the driver. This indicator is monitored by the on-board computer, which signals problems in the event of an obvious malfunction of the charging system or the vehicle’s on-board network. At the same time, a voltmeter is one of the most popular additional devices installed by car owners. This is caused by the following circumstances:
- the device allows, if necessary, continuous voltage monitoring;
- analysis of voltmeter data allows you to determine the load on the generator and its operating efficiency.
How to remove the speedometer on a Priora. How to remove the instrument panel on a Lada Priora yourself
So, for this we need the following tools:
- short Phillips screwdriver;
- flat screwdriver.
If you have all the tools, you can start disassembling. To do this you will need to do the following:
- Set the steering wheel to its lowest position. After this, remove the trim from the dashboard. Note that it is secured with four screws, which can be unscrewed with a regular Phillips screwdriver.
- Unscrew the two screws that are located on top. And in order to gain access to the lower screws, you need to remove the plastic at the bottom of the steering wheel. To do this, turn the 3 clamps counterclockwise by 90°. Next, pry the plastic with your hand or something else and remove it.
- Unscrew the last 2 screws that were under the plastic.
- Next, remove the cover with both hands. Note that you need to start from the top. You must be extremely careful not to break the latches.
- Remove the two screws that will hold the dashboard in place. This is done with a Phillips screwdriver.
- After this, to disassemble it, you need to pull it towards you a little. Next you need to remove the connector in the shield that goes to the dashboard. Note that it is secured with a tricky latch that needs to be pryed off with a flat screwdriver.
- Next, use the same screwdriver to pull the lock back.
- And perform the last operation - remove the instrument panel.
After this, you can perform any operations, for example, make beautiful lighting for a new sample. To do this, you need to carefully remove the hands and the backing of the numbers.
Note that the backing is made of thick polyethylene tape, so it is recommended to perform all operations with a stationery knife, prying up the corner of the backing and pulling the knife along the edge of the shield. Let us remind you that the backing is glued with glue, but with the right approach it can be easily removed.
Next, connect the LEDs directly and enjoy the result. But that's not all, some car enthusiasts make the dashboard arrows change color. It looks really amazing, but the main thing is that it is easy to implement.
Reassembling the dashboard must be done in the reverse order.
Note that in the “luxury” configuration the car has two airbags and air conditioning, which can also be disassembled and modified.
Voltmeter instead of a Priora watch
The current time is displayed on the Priora dashboard, so there is no particular need for a separate clock.
To install a voltmeter instead of a clock you will need:
- digital voltmeter with LED scale of suitable size;
- hot glue;
- file;
- knife or jigsaw;
- a piece of plexiglass or CD case;
- a piece of tint film.
To install a voltmeter in the body of a standard clock, you need to dismantle it and remove the mechanism. After this, you need to install the voltmeter panel into the case, slightly filing its corners. It is better to secure the panel to the housing with hot glue.
There is a hole in the middle of the glass for the time adjustment knob, so you need to find a replacement for it. You can cut new glass from a CD case or from a piece of plexiglass. To hide the “filling” of the voltmeter, the glass should be tinted before installation, for example, with a piece of tinting film. In this case, only the luminous LED display of the voltmeter will be visible from the outside.
Next, all that remains is to solder the wires to the voltmeter terminals and insert the voltmeter instead of the Priora clock. Connecting the wires will be discussed below.
Lada Priora Sedan › Logbook › Removing the center console of the Priora
I’ll just tell you this for those who don’t know.
To remove the center console you need a Phillips screwdriver.
1. Remove the cover "*** Open ***" and the ashtray below. 2. Take out the buttons (they come out from the front, just pry them off with a flat-head screwdriver)
3. Take out the “emergency lights” button (the same as those buttons)
4. We take out the radio along with its box.
5. 2 bolts in place of the radio (they will be at an angle towards you)
6. 2 bolts in the pocket where the cover was *** Open *** 7. 2 bolts in the ashtray 8. Now pull the console towards you, smoothly without jerking (resistance is possible)
9. The console will not come out completely, because... the clock and control unit for the stove are connected there. The clock connector is located between the air ducts
Now turn off the control unit of the stove.
Well, that's all, we have the console in our hands, congratulations!
By the way, I want to “hoard up” a little. To remove the watch, unfasten the latches on the console
, and to remove the used stove, unscrew 4 screws from the console.