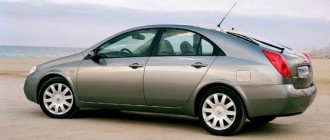
1. Complete sound insulation of Priora in Moscow - cost 2. Task: installation of sound insulation of a Lada Priora car in the “Gold” configuration 3. Vibration insulation of the floor, trunk and rear arches of a Lada Priora photo 4. Solution: sound insulation of the hood, engine shield and fender liner of a Lada Priora car in the “Gold” package
5.Results: sound insulation of doors in the interior of a Lada Priora car in the “Gold” configuration at a price of 29 thousand rubles
The car was brought in with complaints about extraneous noises in the VAZ hatchback, which greatly irritated him, as well as an unpleasant clanging sound when the doors slammed. The car owner was satisfied with the complete sound insulation of the Priora at the “Gold” tariff. Additionally, he asked for a dashboard wrap and asked how much it cost. Answer - the service is not included in the price and is paid separately.
Do-it-yourself noise insulation of Lada Priora sedan
Introduction
The problem of annoying squeaks and rattles when driving is familiar to almost any owner of a domestic car.
To preserve their nerve cells and eardrums, drivers often have to become familiar with the concept of sound insulation. The Priora sedan was no exception to the rule in this regard. The vibrations, squeaks and noise of gravel under the wheels when driving on the highway become especially unpleasant. An equally sore subject is the sounds from the engine compartment and the creaking of cheap plastic dashboard. Unfortunately, noise reduction cannot be called a panacea, because there are a lot of delicate nuances in this issue that the service center specialists are unlikely to tell you about.
Self-soundproofing Lada Priora. Basics.
Independent work to reduce the noise of the Priora in particular, like any other car, is carried out using two main materials:
- vibroplast. Usually sold in sheets measuring 75*53 cm. For a car, the optimal thickness is 2.2 mm. Used as a material to dampen housing vibrations;
Noise-absorbing material (vibroplast)
- splen. It is glued on top of the vibroplast and is used as a sound insulator. Sheet thickness is 8 mm. will be optimal.
Usually, do-it-yourself soundproofing of a Priora sedan follows the standard scheme.
The scope of work is assessed from the point of view of what noises irritate you most: under the hood, from the engine compartment, rain, etc. If you take a comprehensive approach to the issue of noise reduction of the Priora, you need to tape the following places:
- hood cover with the exception of the supporting frame;
- arches;
- lockers;
- doors;
- salon floor;
- roof;
- space for a spare tire in the trunk;
- trunk with the exception of the side members and the top of the glasses;
- wings;
- the trunk lid is similar to the hood lid;
- installation of additional door seals.
- soundproofing of the dashboard;
- soundproofing of the engine compartment.
The process of removing noise from the Priora dashboard and removing it is very labor-intensive. Without removing it, you can simply glue all the joints of the plastic with modelin, and especially large cracks with bitoplast. However, if you are also puzzled by the issue of sound insulation of the engine compartment, then there is still no escape from removing the dashboard.
What does soundproofing a Priora sedan do with your own hands?
Firstly, this, of course, saves a very decent amount of money. After all, we are talking about tens of thousands of rubles, when everyone can understand the technology of work, with a strong desire. To be fair, we note that the process is extremely labor-intensive if you approach it comprehensively.
The doors will become noticeably heavier, but they will be much more pleasant to close!
Sealing of interior doors
Secondly, sound insulation produces a muffled sound; the metal of a car, not covered with sound-proofing material, sounds loud and ringing. External noise disappears, but internal noise becomes more expressive. Sound insulation of the floor eliminates the rumble of asphalt and impacts when driving over uneven surfaces. At high speeds, when you drive along the highway without looking at the speedometer, it may seem that the Priora is moving at a speed less than 30 kilometers from the real one.
Soundproofing the roof will make the sounds of raindrops more muffled. It often happened that during good precipitation one could not even hear the music in the cabin. Alas, noise reduction is not a panacea for all ills, and there are pitfalls here. And it’s not even Priora herself who is to blame, but the technical nuances of the work.
- the weight of the car increases. Just 1 sheet of vibroplast weighs 1.5 kg. If you approach the matter with sufficient enthusiasm, Priora can gain up to 50 kg in weight. This will certainly affect acceleration and braking;
- extremely labor-intensive, preferably done with an assistant;
- it’s costly even just in terms of materials, when all the work is done by hand;
- Gradually you get used to the new sound insulation and again you get the feeling that it is not there.
Soundproofing Priora doors: work order
The driver should feel comfortable and comfortable during the trip. This makes the trip safer. The domestic auto industry does not yet have a level of quality at which there is no need to make any modifications to the manufactured products. For example, the sound insulation of the Lada's interior needs to be improved. It makes sense to improve the acoustics in your car immediately after purchasing it.
Improving comfort in the car
Interior noise insulation is usually done by specialists who work at service stations. However, due to the fact that such work is not particularly difficult, it is often carried out by the car owner himself in his own garage. Lada Priora is significantly different in terms of comfort from its predecessors. For example, the VAZ 2110 and VAZ 21099 models, which have significant noise in the cabin while driving. The Lada Priora has much less noise, but is still sufficient to get on the nerves of the passengers in the cabin. The main source of noise is metal vibration. This sound comes into the car interior from the doors.
Vibration material is installed in the Priora as sound insulation. It is not expensive and absorbs sound well. Sound insulation of the doors relieves the driver of additional sound pollution. This allows him to be more attentive and control the vehicle better. Good quality sound insulation allows the driver to get less tired during the journey, as a result of which he can cover long distances.
Soundproofing doors in Priora
Priora. What happy owner of a car, especially a domestic one, doesn’t want it to be better than a foreign car. Patriotism is a great feeling that makes us buy our domestic cars at such a price (purely the opinion of the author of the article).
Video about soundproofing doors on Priora
First of all, we will look at an example of installing speakers in the door not of the 13th, standard radius for this model, but of the 16th. In combination with sound insulation, the sound should turn out - oh, yum. It's not complicated at all. We cut out an insert from wood, pressed cardboard, MDF, chipboard - there are a lot of materials. On the body, on the door itself, we outline the future location of the holes for the screws and the insert itself. Next we need to slightly expand the standard cell, otherwise the magnet from the column will not fit. This is done with ordinary metal scissors.
We also recommend that you read the following materials:
Next, we soundproof the door itself. We tighten everything that is inside the door, we tighten everything that rings, well, everything in this regard. Next, you need to remove the standard anti-corrosion treatment inside the Priora doors. This can be done with a regular solvent. We cut out pieces of sound insulation so that they fit into the door slots and glue them.
It is advisable to glue in warm weather, the material will bend better and have a higher quality property, taking the shapes we need. The average consumption is one and a half sheets per door.
It was worth it! About car safety in the material: Crash test of Lada Priora.
Correct sound insulation of Lada car doors
What are Lada cars famous for? First of all, they are practical, economical and inexpensive to maintain. They are also known for their poor sound insulation. Noise, hum, howl, rattling and squeaks are familiar, integral additions. However, you can make the car a little more comfortable if you install additional sound insulation on the doors.
Lada cars (Granta, Priora, Kalina, Largus, Niva 4x4, Vesta or XRAY) have similar instructions for installing noise vibration insulation (SHVI). Features may only occur when removing/installing door trims:
Why soundproof doors? This modification will allow:
- Eliminate rattles and squeaks
- Reduce road noise
- Improve the sound of acoustics
- Change the sound of doors closing for the better
General action plan:
- Install a vibration isolator (visomat, vibroplast, BiMast) on the outside of the door (we will ensure good vibration damping of the surface)
- Close the technical openings of the door using a vibration isolator.
- Place noise insulation (bitoplast, isotone, accent)/thermal insulation (splen) directly on the plastic door trim.
It is not recommended to install sound insulation and thermal insulation inside the door, because these materials only work with 100% surface coverage. The doors have slots for glass and drain holes, so sound insulators/heat insulators will be inside the door in an aggressive environment and may lose their properties.
Recommendations from manufacturers
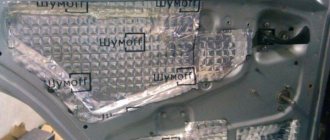
Installation diagram for additional sound insulation in doors from Shumoff:
Here are instructions on how to properly soundproof doors from STP:
Vibration isolation
You can independently select the appropriate vibration-proofing material, for example, using this table:
Degrease the surface. Stick vibration dampers 2-3 mm thick (thicker only with a powerful audio system) onto a flat surface inside the door. To achieve maximum effectiveness, it is enough to cover 70-80% of a flat surface. We do not cover the drain holes, stiffening ribs and the end of the door. Heat the material with a hairdryer and roll it with a hard roller (roll in one direction), expelling the air.
It is recommended to cover the technological holes in the door with a single sheet, cutting out holes for rods, fasteners, etc.
Soundproofing and thermal insulation
STP recommends gluing a sound-absorbing material, for example, an accent, on top of the vibration insulation material on the “street” panel (joint to joint, it should cover the maximum area of this surface).
We cover the entire surface area of the door trim, cutting out holes for fasteners and other necessary elements. The recommended material from the Shumoff company is sound-heat-insulating material P4, from STP - Biplast.
Preparation
1. Remove the upholstery and all adjacent plastic;
- First of all, we remove the lampshade and the entire adjacent plastic block with the rear-view mirror;
- Unscrew the sun visors;
- Remove the front plastic covers on the struts;
- Carefully remove the side pillar panels;
- Remove the rear plastic panels from the racks;
- We unscrew the handles for passengers;
- We take out the rear 3 clips.
Tip: the headliner can be easily removed through the fifth door (trunk door)
2. Clean the ceiling from dirt, degrease the prepared surface with a regular solvent and let it dry.
3. Purchase in advance the materials necessary for sound insulation:
- Vibration insulation - 3 sheets, I used Bimast Bomb (there are many alternatives);
- BitoPlast – 2 sheets;
- SPLEN – 1.5 sheets;
- scissors;
- construction hair dryer;
- hard roller.
Communities › VAZ: Repair and Improvement › Blog › Soundproofing doors (Priora)
I bought noise and vibration insulation, I took 2mm vibration insulation
based on two sheets per door, maybe this is too thin a material, but I was afraid that the doors would sag. Sound insulation - insulating tape 3004B with foil, two rolls and 3004B without foil, also two rolls.
In general, it all started with removing the casing; I won’t describe the process. Next, I wrapped foam rubber around the pull rod that goes to the “pivot” for opening and closing the door, because it rattled unrealistically.
By the way, the whole idea of gluing the doors came to me when I first got behind the wheel of my Priorik, everything just rattled terribly, my previous car (nine 2003) rattled much less. But is this a reason to refuse to buy a good car? After all, AVTOVAZ is a designer, and you don’t have to approach it without a hammer and file.
Now let’s return to the topic of this entry) after wrapping the rod, I began to clean and degrease the inside of the door. For this I used 92 gasoline, I wanted to use 646 solvent, but I was afraid that it would burn the paint. It turned out like this
After that, I began to cut the vibrating material into pieces so that they would fit into the technological holes and glue them to the inside of the door, I smoothed the air with my fingers through a rag, I did not use rollers or a hair dryer either, everything was glued well.
When I finished with the inside, I sprayed the door along the edge with some kind of black non-drying Movil (I dug it up from my father in the garage) using a syringe. About 3 syringes per door. Then, using the same syringe, I filled all the mechanisms inside with synthetic oil, coated the window lift cables and locks, tightened the nuts and proceeded to sealing the technological holes.
Next, I unscrewed the top part from the removed casing, glued everything there with anti-squeak material “Madeline”, I also placed it under each clip for fastening the casing and tightened all the screws.
I cut out soundproofing insulation tape 3004B foil along the contour of the skin, and began gluing it onto the door (also in pieces), and along the edge, where the skin had contact with the iron of the door, I glued a strip of insulation tape 3004B without foil. I cut out the places where the clips go into the door iron and mounted the trim in place.
I forgot to take a photo with the soundproofing glued on, but I think it’s not scary, everything is as simple as two fingers on the asphalt.
Actually, why I took two rolls of foil and non-foil insulation tape, because I wanted to stick it with foil on the outer part of the door, and without foil put it under the casing as a second layer, but it all fit, so I had to make do with one layer. But I didn’t dare to glue sound insulation inside the door, since it is essentially like foam rubber and will absorb all the moisture that gets into the door, which will lead to corrosion.
In many articles on pasting noise and vibration insulation they write that the vibration material must be heated with a hairdryer and rolled well onto the iron, but it is not written why! I barely got information about this. And everything is done to ensure that the vibrating material adheres well and there is as little air under it as possible. If the air remains, condensation will accumulate in the air bubbles, which will lead to what? Right! To corrosion!
That's all! I was very pleased with the result, extraneous sounds in the doors, such as rattling, whistling inside the door, disappeared, and most importantly it became quieter, and this is really noticeable! Oh yes, the doors close much quieter and better, and after anointing all the mechanisms the handles became very soft and quiet. If you decide to do the same, don’t hesitate to do it, it’s worth it!
Soundproofing the floor of Lada Priora.
The floor of the Priora is almost completely covered with standard sound insulation, but it does not adhere to the body at all and, accordingly, does not work, so it only faces complete dismantling.
We clean and degrease the body before installing the materials.
Let's start soundproofing the interior Degrease the surface and begin installing the first layer of vibration insulation Shumoff M3
.
Sealing the front arches and the engine bulkhead as high as possible. To vibration insulate the surface under the rear seat we also use M3
. We take all the sheets already preheated from a special oven and carefully roll them after installation.
This layer will allow us to significantly reduce vibration from the road, increase the integrity and knock-down of the car, and also reduce sensitivity from the road structure itself.
We degrease the floor surface again and begin applying the second layer. We cover the entire floor from the engine bulkhead and under the rear seat with noise and heat insulator Shumoff P4
; This will allow you to achieve higher efficiency and eliminate difficulties when assembling the interior.
The second layer will allow us to reduce noise from the wheels and road surface, as well as significantly increase the thermal insulation of the interior.
Sound insulation of LADA Priora doors
Soundproofing or soundproofing of the VAZ 2170 is often done for one simple reason: since the car is Russian-assembled, it is not famous for its quiet interior and silent ride.
In addition, one of the main sources of noise is the noise from the wheels when driving, so the issue of sound insulation of Priora doors is currently the most pressing. The technological process of sound insulation is almost the same regardless of the make and type of car. But each individual case has its own subtleties and nuances. ATTENTION! Now you can buy a completely new Pioneer MVH X580BT processor radio for only 2990 rubles! Don't believe me? Then follow the link and see for yourself! Read more"
Soundproofing Priora doors begins, first of all, with removing the upholstery material from the doors. Under the upholstery there is standard sound insulation, which must be carefully removed. After this, you should thoroughly wipe the metal door frame, for example, with White Spirit, degreasing and cleaning the surface. It is worth noting that the anticorrosive agent located at the bottom of the doors must under no circumstances be removed!
The most optimal and simplest option for installing sound insulation is considered to be the option in which sound insulation is made using layers. Soundproofing Priora doors with your own hands of this type will take you no more than 10 hours of work. You will also need about 7 sheets of vibration-absorbing material, 4 sheets of Splen, 3 sheets of bitoplast and the same amount of modelin.
The first layer of sound insulation of Priora front doors is the installation of vibration-proofing material inside them:
- First, you need to cut out several sheets of suitable shape and size from the vibrating material (the larger the sheets, the better).
- Next, using a technical hair dryer, you need to heat the bitumen side of the resulting sheets.
- Then heated pieces of vibration insulation should be glued to the inside of each door and rolled out with a hard iron or plastic roller over its entire area.
- Then the next sheet is taken and overlapped over the first one according to the algorithm described above.
The coverage of vibration-proofing material on the inside of the doors depends on the material itself, so its percentage (percentage of coverage) can vary from 55 to 100%.
The next layer of sound insulation for Priora doors means sticking sound-absorbing and heat-insulating materials onto the vibration-proofing layer. Experts recommend using materials such as Splen or Accent at this stage. They have a self-adhesive base, so their installation does not require any specific skills or a lot of time. In this case, the entire surface (100%) of the inside of the doors is covered.
A third layer of sound insulation can be installed upon request. The essence of this layer is to cover all technological holes in the doors with vibration-isolating material or the like. If you make a third soundproofing layer, then in case of repair of the window regulators it will need to be dismantled. As practice shows, sound insulation of doors made in three layers is considered the most effective.
Discomfort inside the car when driving also occurs due to squeaks. Therefore, an equally important step in soundproofing doors is soundproofing the door skins. To do this, the upholstery material is first made heavier with vibration material, so it will vibrate less and make fewer squeaks. And then bitoplast (sound-absorbing material) or modelin is glued on top of the vibration material in the places of their contact.
The rear doors of the Priora are soundproofed in the same way . Then the door is assembled in the opposite sequence. It is recommended to use new clips for door trim.
It is worth paying attention to the fact that high-quality sound insulation implies a set of measures that are aimed not only at eliminating external noise from the wind, wheels and road, but also at minimizing crickets and squeaks inside the car dealership. Only in this case will the driver be able to achieve absolute silence and comfort when moving in the car.
One of the best radios in its segment. It is a diskless receiver that rationally uses the manufacturer’s developments in the field of digital audio processing. This is a full-fledged processor device, designed taking into account the needs of modern car enthusiasts. More details at the link.
- Matrix LCD display with wide viewing angle;
- Working with a USB drive;
- Built-in microphone, Bluetooth and wireless voice communication system (can connect up to 2 phones);
- Compatible with Android, iPod/iPhone;
- Maximum output power: MOSFET 50W x 4.
Rules for applying sound insulation
The instructions for applying sound insulation are the same, no matter what kind of car you treat:
- Preparing the surface for processing begins with removing the casing, factory sound insulation and anything that will interfere with your work.
- Then, the surface must be washed, if there is rust, clean it and prime it
- After this, you need to degrease the surface
- Now you can cut out the vibration material, it is always placed first, remove the protective film, heat it with a hairdryer, apply it and roll it with a roller to expel air bubbles
- Vibromaterial is placed overlapping, so the protection will be more effective
- A noise absorber or a noise reflector is glued on top of the vibration insulation, it all depends on the place of treatment
- It is self-adhesive, sticks in sheets on all 100 percent of the surface, it does not require heating (vibrating material is enough to stick on 80-90 percent of the entire area)
- Anti-squeak materials are glued in places where the skin comes into contact with the metal, and in places where the skin elements come into contact, around the handles
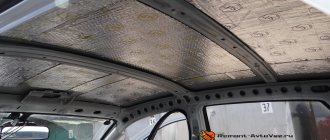
Roof treatment
It is recommended, especially for beginners, to start from the ceiling or hood, where gluing is much easier:
- Soundproofing a Priora roof begins with removing the sheathing
- Then wash and degrease the surface, after which vibration insulation is applied
The nuances here will be as follows:
- It’s more convenient to glue with an assistant so that he warms up and feeds the pieces, then holds while you roll the material to the roof
- The thickness of the vibration absorber on the roof should be 2-3 millimeters, and the thickness of the sound absorber - 5 millimeters, otherwise it may bend from the weight
Priora roof vibration isolation
- After soundproofing, return the roof sheathing to its place
Hood
Hood processing nuances:
- Vibration insulation is placed only in the recesses (photo below), covering the whole thing is just a waste of material and time, you won’t notice the effect
- But the sound-reflecting material is glued in one piece to the entire surface, it will also serve as insulation
- A material with a foil layer is recommended for the hood, as this will protect it from the effects of temperature
This is how the vibration insulation is glued to the hood, there is no need to glue it anymore
- Under the hood there is a partition between the engine and the passenger compartment (engine shield), it is treated with vibration isolation, then with a sound deflector, through it the hum and vibrations from the engine are transmitted to the passenger compartment, so its treatment cannot be skipped
Salon
Sound insulation of the trunk of a Priora hatchback is carried out in conjunction with interior treatment, for this:
- All rugs and chairs are removed, as well as all floor coverings.
- If there is any semblance of sound insulation, remove it and throw it away.
Tip: when disassembling the interior, it is recommended to remember or write down the sequence of actions, and it is better to collect the fasteners in a box so as not to lose them.
The interior is treated at the same time as the trunk
- Then, wash the surfaces, the floor of the cabin is the most contaminated place
- Don't forget to degrease the surface
- Here, a minimum 5mm vibration absorber is used, and a 10mm sound absorber is placed
Attention: Do not seal the mounting holes, brackets and studs, otherwise problems will arise when assembling the interior.
- Priora hatchback trunk soundproofing has one nuance; the niche for the spare wheel should be glued with thinner materials, otherwise the wheel may not fit back in
- Wheel arches, front and rear, are glued with a double layer of vibration insulation
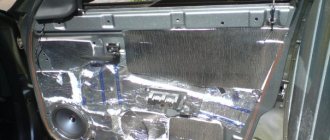
Doors
Doors are treated in three layers:
- The first layer of vibration insulation is placed on the door panel, inserted in small pieces through the technological holes, and glued overlapping
Vibration insulation treatment of door panels
- With the second layer, the outer surface is treated with vibration insulation, while all technological holes are sealed to create a closed box for the speakers
Advice: before closing the technological holes, make sure that the window regulators and rods are working properly.
We close the technological holes to create a closed box
- Glue the sound absorber as the third layer
- You can additionally glue the door trim with a sound absorber from the inside
- Places where the trim comes into contact with the metal of the door are glued with Madeleine, and also Madeleine is glued around the door handles so that squeaks disappear