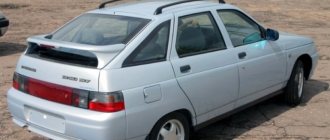
"Ten" is a fairly quiet and comfortable car. The reason lies in the fact that the VAZ-2110 is equipped with a body with good aerodynamics, and modern materials and designs are used in the interior. The standard sound-absorbing panel is also hidden under the hood - it isolates the shield from the engine compartment. And this is not all the standard sound insulation of the VAZ-2110.
But if the car has already managed to “run” several thousand kilometers, then the situation will be completely different. The dashboard squeaks begin to be heard, and it is worth noting that these sounds directly depend on the temperature. If at 20 degrees above zero squeaks are almost inaudible, then at -20 they can be heard from everywhere. In addition to the “moans” of plastic linings, covers, doors and roofs, high-frequency noises from the operation of the gearbox and engine are added.
In such a situation, the best solution is to soundproof the car. It is not difficult to complete - you only need special materials, tools and skillful hands.
Selection of materials
In order for the sound insulation of a VAZ to be effective, it is necessary to select suitable high-quality materials. They are different: some are characterized by rigidity, others by increased ductility. The material should be selected depending on the location of application.
Vibroplast is a single-layer bitumen material trimmed with foil. This material will require approximately five sheets. The hood, roof, trunk and interior floors, doors, wheel arches, front panel are finished with vibroplast.
Bitoplast is similar to impregnated foam rubber. To completely soundproof a car, a couple of 10mm sheets will be enough. Bitoplast is also used as a cushioning material during interior assembly.
Splen has not only noise- but also heat-insulating properties. To soundproof a car you will need about six sheets of this material. Its cost is low, and any place can be treated with splen without thinking about saving.
Modelen is a fabric with a 2 mm layer of mounting adhesive. About 0.5 m2 of such material needs to be prepared. Modelen is suitable as a gasket if it is impossible to use bitoplast.
Disassembling the interior
First of all, you need to remove the front and rear seats. After this, you can begin dismantling the console. You'll have to tinker here, although there shouldn't be any particular difficulties. There are few fasteners on the panel, so it can be easily removed.
However, it is recommended to remember the order in which the wires are connected - this will save time during assembly. It is best to mark the pads by drawing up a wiring diagram. To remove the dashboard, you will have to remove the steering wheel along with the steering column cover. The rugs also need to be removed.
The standard sound insulation of the VAZ-2110 under the seats is fiber-bitumen, of different structure, thickness and appearance. At the back, the insulation is thinner, more elastic and covered with a film. Under the driver's seat the insulation is thicker, stiffer and without film.
This circuit effectively absorbs the noise of a running engine. But when replacing, the standard insulation must be dismantled, and the work here is complicated due to the many plastic fasteners. Most likely, the thick layer of new insulation will prevent the fasteners from being reinstalled, so they will no longer be needed.
After the dismantling of the old insulation has been completed, the interior has been stripped down to bare metal, and wires are hanging everywhere, you can immediately begin soundproofing the VAZ-2110.
Roof insulation
The primary layer performs the functions of vibration isolation; for this purpose, “Vizomat” with a thickness of 2 mm is used, it covers all planes between the stiffeners.
The secondary layer absorbs noise; a 10 mm thick coating – “Accent” – is used for the coating. “Bitoplast” with a thickness of 5 to 10 mm is laid on the stiffeners at your discretion. It is better to install a 5 mm thick coating under the lighting fixtures and handles to prevent warping of the skin.
To carry out high-quality insulation of the engine panel, it will be necessary to dismantle the dashboard, therefore, accordingly, the instrument panel should be soundproofed together.
The first coating is made from vibration dampers with a significant sound absorption coefficient, for example: “Vizomat”, “Bimast Bomb”, etc. To cover technological holes, the same products are used, but thinner. The sides are also covered with a thin coating of the brands - “Bimast Standard” or “Bibroplast GOLD”.
The secondary layer serves for sound insulation; “Accent” with a thickness of 10 or 15 mm is used for processing. In those places where the torpedo is adjacent to the body and for the side panels, 10 mm Bitoplast is used to eliminate squeaks.
The third layer - sound insulation, is made on the front wheel arches from a soundproofing coating of the Splen brand, having a thickness of 4.8 mm, applied on top of the secondary coating.
as the fourth layer ; if it becomes unusable, it should be replaced with a new one; installation of a standard coating is required to achieve the full effect.
Finishing with insulating material
The front panel and the floor are covered with vibrating material - vibroplast. It is cut and packed tightly. To make installation convenient, heavy and inflexible material can be heated - ideally it should exactly follow the shape of the floor. Laying is carried out gradually with careful gluing into uneven areas. The entire surface is covered with vibroplast. The front panel can be insulated in several layers.
The splen is fixed on top of the vibroplast. Here you need to work carefully: the thickness of the splen sheet is 8 millimeters, and given that it does not want to deform, some elements will not be easy to install. A small amount of material is placed in the places where the sled is attached, and there is no need to attach splen under the central plastic tunnel at all. The front panel is pasted over quite simply; there is enough free space.
The rest of the car's sound insulation is carried out during assembly. The instrument panel is glued from the inside with 10- or 5-mm bitoplast. The joint of the air duct that leads to the legs is processed with modelling. Biplast is glued on top.
Other air ducts do not need insulation, but it is recommended to finish the joints with vibroplast. The joints of the central tunnel are covered with the same model, and biplast is also installed at the joints of the air ducts with the panel, but only after removing the factory seal.
After this, factory insulated carpets and floor upholstery are installed. The panel is installed in its place. When fixing the panel at the joints, it makes sense to fix the bitoplast to seal and provide insulation from extraneous sounds. Then you can install the remaining interior elements in place and connect the wires. When installing the panels, you can cover them from the inside with modelin or biplast.
Soundproofing a VAZ also involves gluing the trunk floor and rear wheel arches. Particular attention should be paid to arches; they use more insulation. Niches in the body - the bottom of the doors, pockets for storing tools, luggage spare tires - do not need to be taped: moisture often accumulates in such places, and the insulation can harm the body.
Soundproofing of the interior of VAZ 2110, 2111, 2112
Sound insulation of VAZ 2110 dashboard
The creaking and rattling of the torpedo got me to the edge! And it was necessary to somehow solve this problem, and how - to make noise, of course! For noise and vibration insulation, the following were purchased at Loska: 3 large sheets of vibrating material from ShumoFF 3mm 2 large sheets of splen from ShumoFF 8 mm 1 large sheet of bitoplast STP 1.5 x 1m anti-creaking from ShumoFF - (bought black carpet with adhesive backing) For convenience, I removed the seats and the tunnel , and then everything is like in Murzilka. Dismantling the whole thing took about an hour, since I spent a long time studying the topic of torpedo noise and knew where the screws were.
Almost removed panel.
tin
Now it's time to tackle the dashboard itself
The noise of the torpedo itself took a lot of time, almost half a day. I taped all the joints, all the ribs so that there would be no friction between the plastic anywhere. I covered the top of the panel a little with vibrator, but just a little. I glued the back of the tidy with bitoplast. I taped all the joints of the stove's fir-tree with reinforced tape to prevent air loss.
Air duct in tape
I came to the garage the next day and immediately began to remove the engine shield. I laid the first layer with a 3mm noise vibrator. It took about 2.5 sheets to cover the entire shield to the floor. Then I glued 8mm splen on the top of the vibrosha.
I also updated the foam on the heater damper, because... There were gaps in the finger, I had to tinker with it a little.
After all the manipulations, I decided to install the panel (try it on). After I installed it, I decided to shake it a little and the creaking started again - where did it come from? I took it off again... I immediately noticed the central studs that hold the panel in place. There were ordinary pieces of hose on the studs... I removed them and covered them with anti-squeak.
After the torpedo was installed in place, it no longer made a single sound.
First stage of installation
I also covered everything with anti-squeak
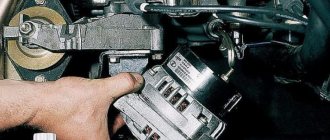
I covered the inside of the fuse box cover with bitoplast
Pasting with anti-squeak
Almost everything... about vacuuming and getting ready to install the tunnel and seats))
Hooray ! Finish!
On the second day, a lot of time was spent on laying the wiring, about 3 hours. And so there is nothing complicated, the main thing is to take more food, water and patience to the garage. It took a day and a half to complete the entire work front. I’m very happy with the result, really! Nothing cracks, nothing creaks...in a word, silence! And I’m also very pleased with the modifications to the heater air ducts. After I renewed the foam on the damper and sealed all the cracks with reinforced tape... the stove blows what it needs... and there was an excellent flow of air into the legs.
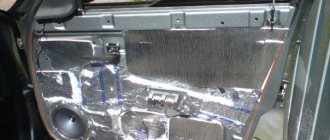
Sound insulation of front doors of VAZ 2110
In this post I will tell you about the soundproofing of the 2 front doors. There is nothing difficult about disassembling a door. If you don't know how to do this? can be viewed on the Internet.
So, the door is dismantled. There is a pitiful semblance of soundproofing on the doors from the factory, we need to remove it. It is better to do this in the 2nd: one heats it from the outside with a hairdryer, while the other removes it from the inside with a spatula. I will say that this is complete crap... It can be removed easily, but it breaks and therefore there is a lot of garbage from it. Next, using gasoline, white spirit or another solvent, degrease the inside of the door.
The first will be the vibration layer. It will be better if you glue it in large pieces. First, we make a template, cut out a piece of vibra, try it on, and only then separate the backing and heat the material with a hairdryer. Carefully push the material through the door and straighten it with your hands. Then you need to roll out the material well. Firstly, if you do not do this, you may not achieve the desired result. Secondly, moisture can accumulate in the bubbles, which will subsequently cause corrosion. I rolled it using a roller like this:
Stitch roller
The first layer is done. Then we make the 2nd - noise-insulating layer. An accent was chosen as such material. It is advisable to glue it in as large a piece as possible.
In the future, acoustics will be installed in the door.
We take the door card, apply a decorative ring from the speaker, outline and cut out the hole.
We make spacer rings. I didn't have plywood and made the rings from chipboard. We take the same decorative ring from the speaker and cut a ring around it. Unfortunately, they are a little crooked, but this actually helped during installation.
For convenience, we fasten the rings together on the reverse side using 3-4 self-tapping screws.
Now we attach the door card and mark the seat for the speaker on the door with a pencil. I cut a hole in the door with a jigsaw. We attach the rings and secure them with 4 metal screws.
We solder the connectors for the column and insulate them using heat shrink.
We close the technological holes in the door using vibration.
The podiums themselves were also rolled up.
During the work, all rods, locks and handles were adjusted and lubricated. The doors were also sealed. The driver's door is done in the same way.
Sound insulation of rear doors of VAZ 2110
Now it's the turn of the rear doors. We remove the trim and tear off the factory curtains. Now you need to remove the factory sound insulation. We heat the outside of the door with a hairdryer, and carefully remove it from the inside with a spatula. Next, using white spirit, we remove excess factory anticorrosive.
I tried to cut the vibration into large pieces, but the openings in the rear doors are very small and not even my hand could fit through all of them. The main thing is to roll it well afterwards so that there are no bubbles or voids, otherwise condensation may accumulate in them.
While there is access to the door, I adjusted the locks and lubricated them.
Because I removed part of the factory anti-corrosion agent, then made a new one around the entire perimeter of the door (I applied it wherever possible):
I also sealed the door openings with vibrato:
I glued bitoplast to the door cards. One piece is enough for 2 doors.
I glued pieces of madeline onto the landing pads under the pistons on the door trim, and then inserted the pistons. As a result, they sit firmly and do not wobble:
Also, I covered the eyelet in which the door latch goes with madeleine:
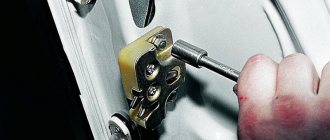
Also, to soften the sound when opening the door lock, you need to stick a piece of madeleine on this part of the lock (marked in red):
Reassemble in reverse order.
Results: the doors have become a little heavier, and, consequently, they close better and quieter; I won’t say that the cabin has become much quieter, but the sounds have become more muffled.
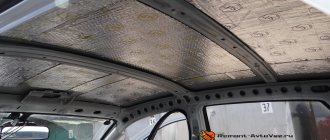
Soundproofing the ceiling of VAZ 2110
To remove the headliner, it is necessary to dismantle the interior mirror, visors, handles, side trims, “cyclops”, interior lamp and air temperature sensor, three rear pistons (they consist of 2 parts - one is similar to a “stud”, and the other is a piston. There is no need to completely remove the rear triangles. We also remove the door pillar trims: remove the lower part by unscrewing 3 screws and the belt fastening (key 17), move it down. Unscrew the upper eyelet of the belt (key 17), unscrew another 1 screw at the bottom of the trim and move it down. Next, we carefully remove the upholstery from under the seal, and it falls down. It would be advisable to pull it out, but I didn’t succeed. I folded out the front seats, removed the rear ones, but I still couldn’t pull it out through the door. Even with the rest in the cabin It won’t be difficult to make a Shumka on the ceiling.
We detach the wires from the roof; don’t forget to throw away the tape; it will come in handy again later. We take the dimensions of the ceiling, cut it out, apply it, roll it. It is advisable to carry out the work with an assistant. One holds, the other rolls.
We glue SPLEN on top of the vibration. We take measurements, cut it off, peel off the backing, apply it and smooth it out. Mainly plays the role of thermal insulation.
This is where the work ends. We put everything back together in reverse order.
Soundproofing the trunk of a VAZ 2110
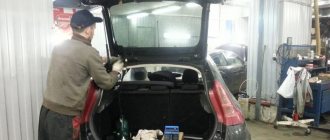
The process turned out to be very long and difficult (took 2 days). It was very hot outside, so even with short breaks it was difficult...
We begin to disassemble the trunk and rear part of the cabin. We remove the “sofa”, seat backs, armrest. We take everything out of the trunk. We remove the decorative trim of the floor covering: we pick out 2 pistons from the lower fastenings of the seat backs and take them through the trunk. We remove the trim from the arches: We pull it out from under the seal, and in the trunk we unscrew the screws holding the trim and remove it. We remove the spare tire and the plastic containers in the wings. A third of the arch and the back of the trunk were rolled out from the passenger compartment. The rest of the arch is already from the trunk (this was the first day)
2nd day
I didn’t remove the factory Shumka from the spare wheel well, I rolled the STP on top of it.
Then he rolled up the wing niches and the wings themselves.
I did the remaining part last.
The niches in the wings and various “alarming” areas were treated with Movil just in case.
I didn’t start assembling the interior right away. I decided to tidy up the amplifier wiring and improve the trunk lighting, but more on that later.
Soundproofing the floor of VAZ 2110
I started by looking under the skin and insulation sometime in the spring, which are located under the driver’s feet, i.e. mine. And what I saw there was severe rust. Accordingly, it was decided that as soon as summer comes, we’ll open up the entire floor and climb in there, and put in the Shumka at the same time. In principle, I’ll say right away that there’s nothing scary about dismantling the entire floor covering and everything is very easy to figure out. I started by disassembling everything.
Start
there's nothing
I threw out the factory Shumka because it was all rotten. Next, I started sanding the entire floor and peeling off the factory noise that had been scribbled on the bottom itself. Looks like a vibration noise. I tore it off with a screwdriver and a hairdryer, whatever I had on hand.
There were, of course, small holes, which is sad, but they were fixed immediately by the welder. After sanding, everything was cleaned with a ROCKET vacuum cleaner!
Next, we treat the entire bottom with anti-rust. At first I used this drug.
It acts very slowly, but effectively.
After that, I first sanded all the nasty stuff a little with this sponge, and then washed it
I took one more product to try and was not disappointed - the effect was great.
Result
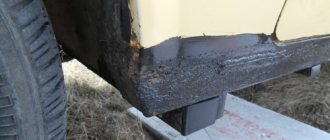
Next I painted everything with rubber-bitumen mastic.
I say right away that it needs to be painted in several THIN layers, otherwise it will turn out like mine: I painted it with a very thick layer (you yourself understand that it’s a pity, the thicker the better). As a result, the whole thing dried for me within 2 days. The most interesting thing is that in the sun it does not dry at all, on the contrary, the current spreads.
On day 3 I began the soundproofing process. First, the STP vibration layer, of course, took about 8 sheets, I think. Duration of work is 2 days because there was no time.
Next, the 2nd layer of splen took about 5 sheets, and there wasn’t enough for the part where the rear passengers sit, but that’s not a big deal.
And it seemed like what else was needed, but the factory Shumka had rotted and needed replacement. Accordingly, a 3rd layer is needed. I bought another thick layer of STP from the market and they said that it also serves as a heat insulator, we’ll see in winter. I used 4 sheets.
That, it seems, is all. One of the advantages I noticed: the music with noise from the floor was a completely different matter - the bass was excellent. Another plus is that there is less shaking on small bumps and all kinds of joints, and on bridges it is almost unnoticeable. I am very pleased with my work!
https://www.drive2.ru/l/7048942/, https://www.drive2.ru/l/7048945/, https://www.drive2.ru/l/1229144/, https://www .drive2.ru/l/1685526/, https://www.drive2.ru/l/1725491/, https://www.drive2.ru/l/1795336/, https://www.drive2.ru/ l/1558482/, https://www.drive2.ru/l/1558615/
next article:
Interior lighting VAZ 2110, 2111, 2112
Contents of the article: Illumination of the VDO panel for VAZ 2110 Illumination of the SAUO unit for VAZ 2110 Illumination of the glove compartment for VAZ 2…
Rating 0.00 [0 Vote(s)]
Let's sum it up
If the sound insulation of the VAZ is carried out correctly, the noise level should decrease by 40-55%. The sound of the running engine will not be heard as much, and you can completely forget about the noise of the wheels - especially when driving at speed. In addition, drivers who are not too lazy to do additional sound insulation claim that the car’s dynamics then improve.
Soundproofing of the VAZ-2107 can be done in a similar way. It is worth noting that the work is really worth spending time and energy on. This is especially useful if the machine is used constantly. Many car enthusiasts also soundproof the Priora. But we will talk about this in a separate article.
By the way, if you need windshield wipers for your car, go to the online store pro-wipers.ru