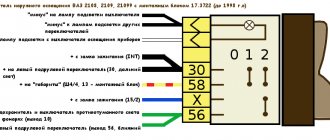
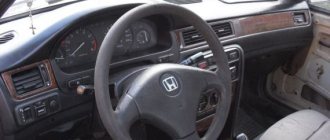
Description of the VAZ 2109 instrument panel (High panel): 1. Ignition switch, 2. Hazard warning switch, 3. Windshield wiper and washer switch lever, 4. Radio socket, 5. Central nozzles of the interior ventilation and heating system, 6. On-board computer ( installed as part of the package), 7. Instrument panel, 8. Glove box lid, 9. Side nozzles of the interior ventilation and heating system, 10. Loudspeaker trim, 11. Shelf, 12. Power window switches (installed as part of the package), 13. Cigarette lighter, 14 . Control panel for the interior ventilation and heating system, 15. Gear shift lever, 16. Parking brake lever, 17. Ashtray, 18. Carburetor choke handle, 19. Accelerator pedal, 20. Brake pedal, 21. Clutch pedal, 22. Horn switch, 23. Instrument lighting switch, 24. Hydraulic headlight leveler, 25. Front seat heating switch (installed as standard), 26. Rear fog lamp switch, 27. Fog lamp switch (installed as standard), 28. Heated glass switch tailgate, 29. Hood lock drive lever, 30. Turn signal and headlight switch lever, 31. External lighting switch, 32. Instrument cluster.
More information about the instrument cluster for the high panel (torpedo) VAZ 2109
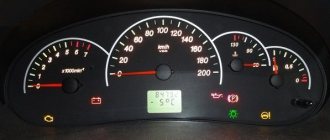
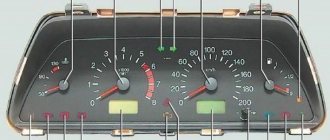
1. Speedometer, 2. Trip counter reset handle, 3. Trip counter, 4. Total mileage counter, 5. Fuel level indicator, 6. On-board control system light panel, 7. “TEST” display, 8. “Test” display STOP”, 9. Indicator lamp for failure of brake lamps and side lights, 10. Indicator lamp for low brake fluid level, 11. Indicator lamp for low coolant level, 12. Indicator lamp for front brake pad wear, 13. Indicator lamp for low level level in the washer reservoir, 14. Indicator lamp for low oil level in the engine crankcase, 15. Coolant temperature indicator, 16. Tachometer, 17. Indicator lamp for engaging the parking brake, 18. Indicator lamp “CHECK ENGINE” system injection, 19. Indicator lamp for closing the carburetor air damper, 20. Indicator lamp for reserve fuel remaining, 21. Indicator lamp for emergency oil pressure in the engine lubrication system, 22. Indicator lamp for turning on the right turn indicators, 23. Indicator lamp for battery charge, 24. Left turn indicator warning light, 25. Seat belt warning light, 26. Doors not closed warning light, 27. Side lights warning light, 28. High beam headlight warning light, 29. “CHECK ENGINE” warning light. engine”) toxicity reduction systems.
Step-by-step tuning steps
Before dismantling the VAZ 21099 panel, you will need to remove the terminals from the power supply by hand. Then the decorative steering wheel trim is removed. The nut should be unscrewed so that its end is flush with the similar element of the steering column shaft. You can’t turn it away right away. Then tuning the VAZ 21099 panel involves removing the steering wheel.
After unscrewing the 6 screws that secure the lower casing, you will need to remove it. The ignition switch trim is removed. The next step involves loosening the bolt that secures the base of the switches. The last element is removed from the shaft, and 2 blocks with the corresponding wires are disconnected.
In this case, you will need to label the washer and wiper switches. The block with wires is disconnected from the corresponding levers and direction indicators. The choke should be pulled out so that a draft occurs. At the same time, the handle of the first unit is pulled towards itself. Then the bolts securing the console trim are removed from the panel and the trim itself is removed.
The cigarette lighter cartridge and ashtray are pulled out of the socket. The VAZ torpedo is equipped with a heater fan that will need to be removed. To do this, it is recommended to use a screwdriver. The block and two wires are disconnected from the fan switch. They illuminate the europanel.
Tuning instrument panel
How to remove a high instrument panel VAZ - 2108, 09, 099 - Yakovlev Dmitry
Complete removal of the VAZ 2109 panel. Preparation for gluing. Part 1
You also need to disconnect the handles for the hydraulic headlight adjustment and the light switch. After unscrewing the nuts, the corresponding switch is pushed inside the panel. The side nozzles are removed with a screwdriver. The high panel provides for turning away the bolts for fixing the linings. The last elements are located on both sides of the torpedo.
Subsequent tuning is carried out taking into account the removal of the radio socket. Existing audio equipment is pre-dismantled. Then, using a screwdriver, the latches are removed and the cover is raised. The block and wires are disconnected from the cigarette lighter. A similar step is carried out in relation to the backlight and alarm switch.
How to remove the instrument panel from a VAZ-2114
Before you finally remove the dashboard on the VAZ-2114, you need to understand the specific components that will have to be dismantled:
- a key component on which the BC is attached, a block of various devices, as well as all kinds of keys, switches and other components;
- a trim that is installed on the VAZ-2114 mainly for beauty, but also has air duct outlets;
- plugs;
- brackets;
- ashtray body;
- crossbars;
- shield;
- central bracket;
- console screens.
If you are going to remove the instrument panel from a VAZ-2114, you will have to remove all these elements separately. Moreover, each of them has its own fastening features and you will need to use different tools, since you will need to remove the shield and, for example, the brackets in different ways.
Tools and materials
To remove all the necessary elements, it is not at all necessary to have any expensive tools or special equipment. It is enough that the garage has a standard set of screwdrivers, as well as instructions for working with the VAZ-2114.
Sequence of operations when removing a torpedo from a VAZ-2114
In order to remove the instrument panel from a VAZ-2114, it is enough to do everything in accordance with the simple instructions given below:
- Using a Phillips screwdriver, remove the 3 screws securing the left console screen to the dashboard. It is recommended to get a short tool, as it is much more convenient.
- Carefully remove the lower part of the trim from the body bracket, removing the screen.
- Remove all screws securing the console screen to the panel. At the same time, do not forget to constantly belay the pad with your hand.
- Remove the screen. At the same time, be sure to ensure that it does not cling to any kind of cords.
- Disconnect the connectors to disconnect ground from the battery. If a radio is used in transport, then in this case it should also be separated from the main wires by removing the connecting block. If it is not in the car, it will be enough to remove the wires from the dashboard, making sure that they have a plug. Be sure to turn off the cigarette lighter and also remove the socket with the light bulb that illuminates the ashtray.
- Remove the handles from all levers that control the heating dampers. It is recommended to pry them off with a flathead screwdriver to make the procedure easier. There is a special protrusion on the lever, and when the handle is installed, it is combined with the lever through a special hole. That is why, when removing it, you should use a thin screwdriver to pick it up and lift it, freeing it from this protrusion.
- Remove the electric fan toggle switch (you just need to pull it out of the connector).
- Unscrew all the screws securing the VAZ-2114 dashboard to the brackets on both sides.
- Release the shield and trim by removing two self-tapping screws located in the window near the instrument unit;
- Take out the plug and remove the screw located behind it.
- Remove the two screws that hold the trim in place at the bottom, then pull it out.
- Label the wires to identify which switches they go to, then unplug them.
- Remove all bolts from the steering bracket.
- Unscrew the screws holding the lower bracket mount.
- Remove the light guide.
- Remove the element securing the heating control unit, and then remove the cartridges that are located behind it.
- Remove the decorative insert, removing any external components.
- Remove the hydraulic corrector lighting.
- Loosen all the fasteners of the panel, then remove the bolt with which it is secured to the crossbar, located on the left side.
- It remains to remove the VAZ-2114 torpedo.
see also
Comments 55
Hello, please tell me how the part of the torpedo that is marked in the photo is attached, yesterday I glued it, started assembling it and something is moving around, but it is attached to the right with a self-tapping screw. The photo is not mine.
Do you need one sheet of material?
Did it squeak or was it normal? I want to fly away
it still started to creak six months later, but it’s still much quieter than before sizing
I also poured Moment glue into the holes for the screws so that vibration would prevent the screws from unscrewing.
What if I have to unscrew it again? what are you going to do?
Why should I unscrew them? I remove the entire dashboard and there is no point in disassembling it into its components. Everything there is glued and secured with glue.
What if I have to unscrew it again? what are you going to do?
On the other hand, you need to make a little effort to remove the screw from the gluing point, but it certainly won’t come loose.
I agree, sometimes it’s annoying on the paving stones, the screws fall out everywhere)
On the other hand, you need to make a little effort to remove the screw from the gluing point, but it certainly won’t come loose.
excellent post, although I took mine apart myself and tried to glue it, but I feel like I’ll have to do it again
a year and a half or 20 thousand kilometers on dirt roads and broken roads - and it will be as before. checked a hundred times)
Yes, at least every year I’m ready to dismantle the floor of the car like this for the sake of such silence